
Eureka Forbes GFCDFWDULTMVE0
Eureka Forbes Wet & Dry Armor Vacuum Cleaner User Manual
Model: GFCDFWDULTMVE0
1. Important Safety Instructions
Please read all instructions carefully before using your Eureka Forbes Wet & Dry Armor Vacuum Cleaner. Retain this manual for future reference.
- Always ensure the power supply matches the voltage specified on the rating label.
- Do not leave the vacuum cleaner unattended when plugged in. Unplug from outlet when not in use and before servicing.
- Do not use on wet surfaces if not specifically designed for wet pickup. This model is designed for both wet and dry use.
- Do not pick up flammable or combustible liquids, such as gasoline, or use in areas where they may be present.
- Do not pick up anything that is burning or smoking, such as cigarettes, matches, or hot ashes.
- Do not use without filters in place. Ensure the HEPA filter is correctly installed for dry vacuuming.
- Keep hair, loose clothing, fingers, and all parts of body away from openings and moving parts.
- Use extra care when cleaning on stairs.
- If the supply cord is damaged, it must be replaced by the manufacturer, its service agent, or similarly qualified persons to avoid a hazard.
- This appliance is equipped with an auto shut-off technology to protect against overheating. If the unit shuts off, unplug it and allow it to cool before resuming use.
2. Product Overview
The Eureka Forbes Wet & Dry Armor Vacuum Cleaner is a versatile cleaning solution designed for both wet and dry applications. It features a powerful 22 kPa suction, a blower function, and a durable stainless steel tank.

Figure 2.1: Eureka Forbes Wet & Dry Armor Vacuum Cleaner with its main components.
Key Features:
- 22 kPa High Power Suction: For effective removal of stubborn dust and debris.
- Blower Function: Useful for blowing away dust from hard-to-reach areas.
- 20 Litre Tank Capacity: Large capacity for extended cleaning sessions.
- High Strength Stainless Steel Body: Durable construction for longevity.
- HEPA Filter: For efficient filtration during dry vacuuming.
- 7 Multipurpose Accessories: Versatile tools for various cleaning tasks.
- Auto Shut-off Technology: Protects the motor from overheating.
Included Components:
- Main Unit (Vacuum Cleaner)
- Flexible Hose
- Metal Telescopic Tube
- Floor Brush
- Upholstery Brush
- Crevice Nozzle
- Reusable Dust Bag
- HEPA Filter
- User Manual
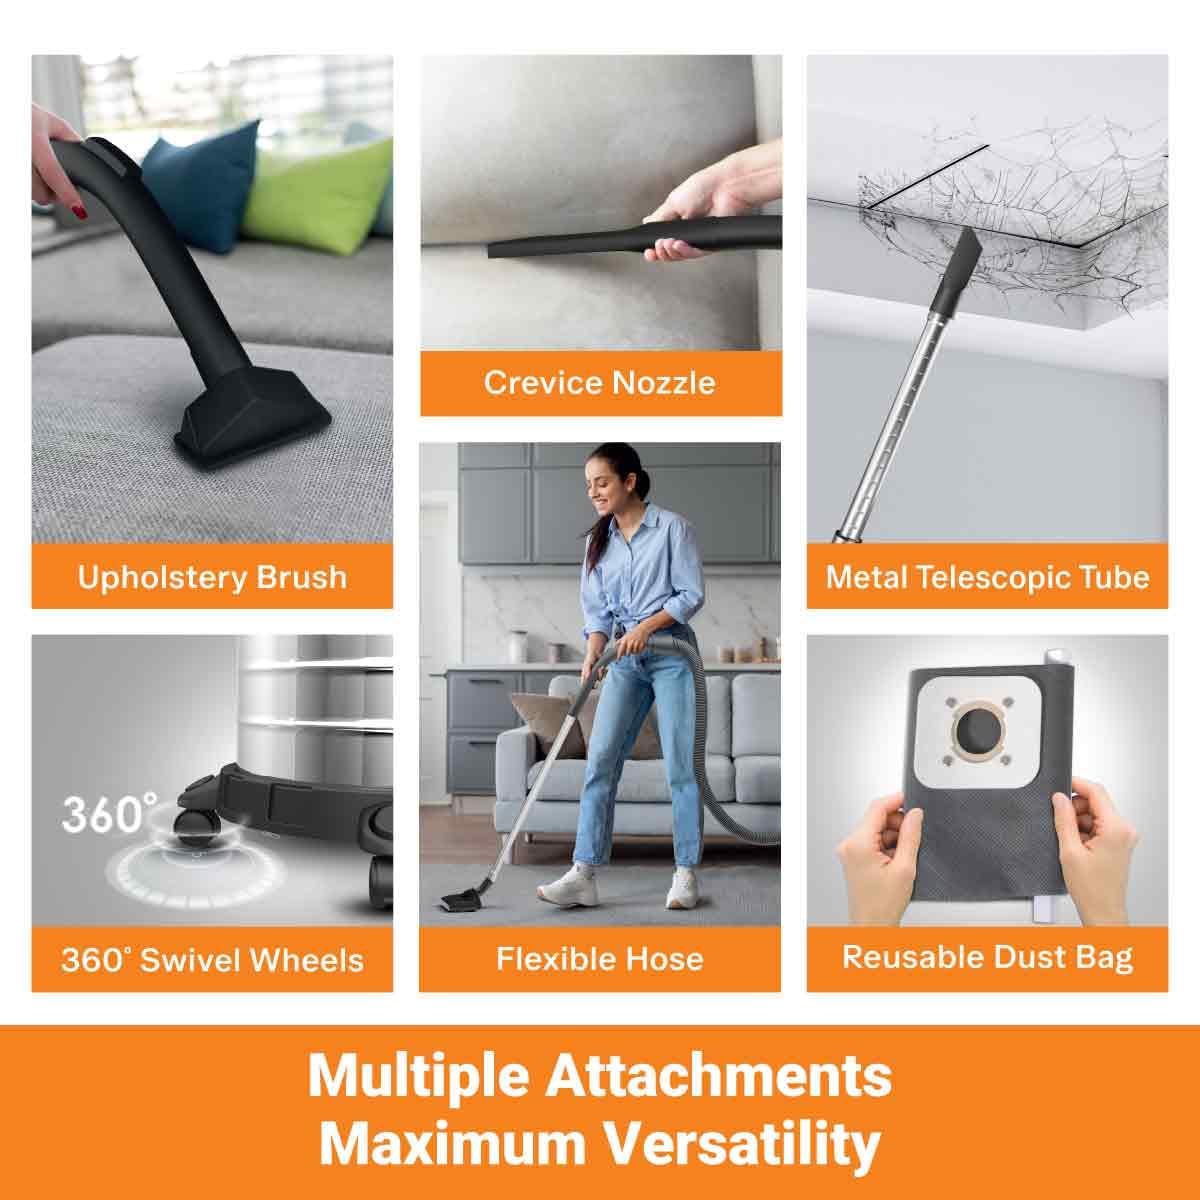
Figure 2.2: Multiple attachments for maximum versatility.
3. Setup and Assembly
Follow these steps to assemble your vacuum cleaner before first use.
- Unpack Components: Carefully remove all parts from the packaging. Check against the 'Included Components' list to ensure everything is present.
- Attach Wheels: Insert the swivel wheels into the designated slots on the base of the vacuum cleaner until they click into place.
- Connect Flexible Hose: Insert the larger end of the flexible hose into the suction inlet on the main unit. Ensure it is securely fastened. For blower function, connect to the blower outlet.
- Assemble Extension Tubes: Connect the metal telescopic tube to the handle end of the flexible hose. Adjust the length as needed.
- Attach Cleaning Tool: Select the appropriate cleaning tool (e.g., floor brush, crevice nozzle, upholstery brush) and attach it to the end of the telescopic tube.
- Install Filters: For dry vacuuming, ensure the HEPA filter and reusable dust bag are correctly installed inside the tank. For wet vacuuming, remove the dust bag and ensure the foam filter (if provided, or follow specific wet use instructions) is in place.
4. Operating Instructions
4.1 Dry Vacuuming
- Ensure the reusable dust bag and HEPA filter are correctly installed.
- Connect the flexible hose to the suction inlet.
- Attach the desired dry cleaning accessory (e.g., floor brush for carpets/hard floors, upholstery brush for furniture).
- Plug the power cord into a suitable electrical outlet.
- Press the power switch to turn on the vacuum cleaner.
- Move the cleaning tool over the surface to be cleaned.
- After use, turn off the power switch and unplug the appliance.

Figure 4.1: Demonstrating the powerful 22 kPa suction for dry cleaning.
4.2 Wet Cleaning
- Important: Remove the reusable dust bag and HEPA filter before wet cleaning. Ensure only the foam filter (if applicable) is in place to protect the motor.
- Connect the flexible hose to the suction inlet.
- Attach a suitable wet cleaning accessory (e.g., a squeegee tool if provided, or the floor brush for liquid pickup).
- Plug the power cord into a suitable electrical outlet.
- Press the power switch to turn on the vacuum cleaner.
- Move the cleaning tool over the wet surface to pick up liquids.
- Monitor the tank capacity. The vacuum cleaner has a 20-liter tank. Do not overfill.
- After use, turn off the power switch and unplug the appliance. Empty and clean the tank immediately.

Figure 4.2: The 20-liter tank capacity allows for extensive cleaning.
4.3 Blower Function
- Connect the flexible hose to the blower outlet on the main unit.
- Plug the power cord into a suitable electrical outlet.
- Press the power switch to turn on the vacuum cleaner.
- Direct the hose towards the area where you want to blow away dust or debris.
- After use, turn off the power switch and unplug the appliance.

Figure 4.3: The 3-in-1 functionality for dry vacuuming, wet cleaning, and blowing.
5. Maintenance
Regular maintenance ensures optimal performance and extends the life of your vacuum cleaner.
5.1 Emptying and Cleaning the Tank
- Always unplug the vacuum cleaner before emptying or cleaning.
- Unlatch the clips securing the motor head to the tank.
- Carefully lift off the motor head.
- For dry debris, remove the reusable dust bag and empty its contents into a waste bin. Shake out any remaining dust.
- For wet debris, carefully pour out the liquid from the tank.
- Rinse the inside of the tank with water and wipe it dry with a cloth.
- Reassemble the motor head and secure the clips.
5.2 Cleaning Filters
- Reusable Dust Bag: Empty regularly. If heavily soiled, it can be hand-washed with mild detergent and air-dried completely before reuse.
- HEPA Filter: For dry use, tap gently to dislodge dust. Do not wash the HEPA filter unless specified by the manufacturer, as it can damage the filter media. Replace if heavily soiled or damaged.
- Foam Filter (for wet use): Rinse with water and mild soap. Squeeze out excess water and allow to air dry completely before reinstallation.
Ensure all filters are completely dry before reassembling the vacuum cleaner to prevent mold growth and motor damage.
6. Troubleshooting
Refer to this section for common issues and their solutions.
| Problem | Possible Cause | Solution |
|---|---|---|
| Vacuum cleaner does not turn on. | No power supply; Power cord not plugged in; Overheating protection activated. | Check power outlet and plug connection; Unplug and allow unit to cool for 30 minutes before restarting. |
| Low suction power. | Dust bag full; Filters clogged; Hose or attachments blocked; Tank full (wet use). | Empty dust bag; Clean/replace filters; Check hose and attachments for blockages; Empty tank. |
| Water leaking from unit (wet use). | Tank overfilled; Seals not properly seated; Tank damaged. | Do not overfill tank; Check and reseat tank seals; Contact service for tank damage. |
| Unusual noise during operation. | Blockage in hose/attachments; Motor issue. | Check for and remove blockages; If noise persists, contact customer support. |
If the problem persists after attempting these solutions, please contact Eureka Forbes customer support.
7. Specifications
| Feature | Specification |
|---|---|
| Brand | Eureka Forbes |
| Model Name | GFCDFWDULTMVE0 |
| Special Feature | 22 kPa High Power Suction, Blower Function, HEPA Filter, Wet/Dry |
| Filter Type | HEPA Filter |
| Surface Recommendation | All floors |
| Power Source | Corded Electric |
| Voltage | 220 Volts |
| Item Weight | 8.15 Kilograms |
| Capacity | 20 Liters |
| Recommended Uses | Carpeted floors, Hardwood floors, Upholstery, Pet hair removal, Stairs, Wet surfaces |
| Colour | Red & Black |
| Wattage | 1350 Watts |
| Item Dimensions (L x W x H) | 40L x 40W x 53H Centimeters |
| Country of Origin | China |
8. Warranty and Support
Eureka Forbes is committed to providing excellent customer service.
- Virtual Demo: A free virtual demonstration is available post-purchase. A dedicated customer service executive will provide a live demo over a video call.
- Service Network: Eureka Forbes offers India's largest and widest service network, covering over 19,000 Pincodes.
- Customer Support: 12-hour support is available via a toll-free call.
- Manufacturer: Eureka Forbes Limited, Registered Office Address: B1/B2, 701, 7th Floor, Marathon Innova, Off. Ganpatrao Kadam Marg, Lower Parel (West), Mumbai, Maharashtra – 400013.
For any service requests, queries, or to schedule your virtual demo, please refer to the contact information provided with your purchase documentation or visit the official Eureka Forbes website.

Figure 8.1: Eureka Forbes' extensive service network and support options.
Ask a question about this manual
Ask about setup, troubleshooting, compatibility, parts, safety, or missing instructions. Manuals+ will review the question and use this page’s manual context to help answer it.