Introduction
Welcome to your new Gardner Pet Extra Tall Adjustable Cat Gate. This manual provides essential information for safe and proper installation, operation, and maintenance of your pet gate.
Important Safety Information
- Read all instructions before assembly and use.
- Keep small parts away from children and pets during assembly.
- Ensure the gate is securely installed and tightened before use.
- Regularly check all parts for wear and tear. Replace damaged parts immediately.
- This gate is designed to contain pets and small children. Do not use for purposes other than intended.
- Never leave children or pets unattended with the gate.
Package Contents
| Item | Quantity | Description |
|---|---|---|
| Main Gate Frame | 1 | The primary gate structure with integrated door. |
| Auxiliary Part (2-pole extender) | 2 | Long extension bars for wider openings. |
| Auxiliary Part (1-pole extender) | 2 | Short extension bars for narrower openings. |
| Thumb Screws | 2 (2 spare) | Used for initial height adjustment. |
| Flat Top Bolts (Pressure Mount Screws) | 4 | Main tension bolts for pressure mounting. |
| Fixed Sleeves | 4 | Wall cups for hardware mounting. |
| Expansion Tubes | 4 | For drywall/plasterboard installation with fixed sleeves. |
| Tapping Screws | 4 | For securing fixed sleeves. |
| Fixing Parts (Clips) | 2 (4 spare) | To secure extension bars together. |
| Open-End Wrench | 1 | Tool for tightening flat top bolts. |
| Phillips Screwdriver | 1 | Tool for tapping screws. |
| Instruction Manual | 1 | This document. |
Setup and Installation
Step 1: Determine Gate Height and Width
The Gardner Pet gate is adjustable in height from 51 to 87 inches and in width from 27.56 to 37 inches. Select the appropriate extension bars (2-pole or 1-pole) to match your doorway or opening width. The main gate frame is 27.56 inches wide without extensions.
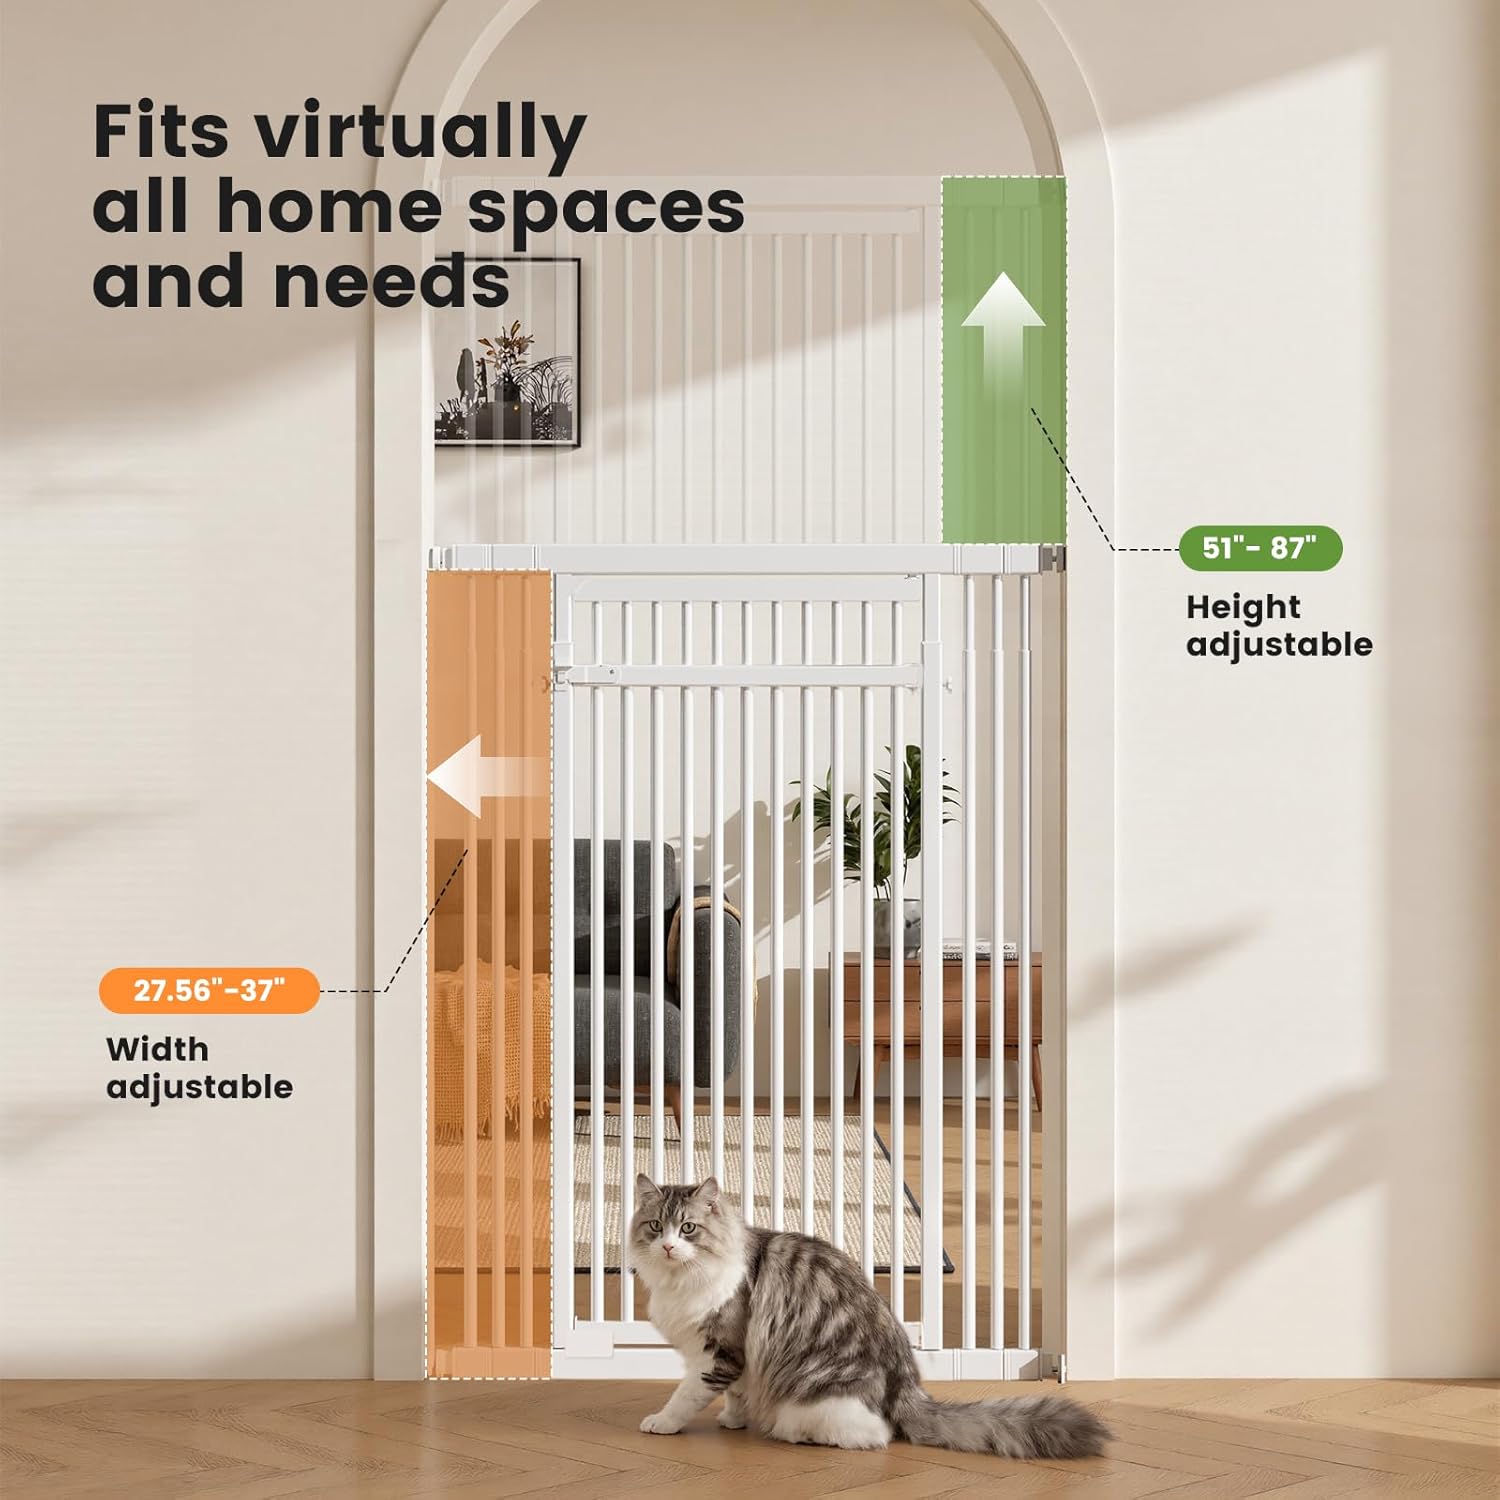
Image: Diagram illustrating the adjustable height (51-87 inches) and width (27.56-37 inches) of the gate.
Step 2: Initial Height Adjustment
Insert the two thumb screws into the designated holes on the main gate frame. Loosely screw them in. Place the gate in your desired opening and extend the top section upwards until it reaches the desired height. Once the height is set, tighten the thumb screws to lock the height setting. Remove the gate from the opening for further assembly.
Video: Official Gardner Pet assembly instruction showing how to extend the gate to the desired height and secure it with thumb screws.
Step 3: Attach Extension Bars (if needed)
If your opening requires additional width, slide the appropriate 1-pole or 2-pole extension bars onto the main gate frame, both at the top and bottom. Ensure the silver-colored long screw on the extension faces the product when inserting.

Image: Illustration demonstrating the attachment of extension pieces to the main gate frame for wider doorways.
Step 4: Pressure Mounting the Gate
Insert the four flat top bolts into the corner holes of the gate. Place the gate back into your doorway or opening. Turn the flat top bolts clockwise to extend them and apply pressure against the walls. Use the included open-end wrench to further tighten the bolts until the gate is securely held in place. Ensure the gate is stable and does not move when pushed.

Image: Close-up view of the pressure-fit installation, showing the flat top bolt against a wall.
Step 5: Hardware Mounting (Optional, for extra stability)
For permanent installation or extra stability, especially on drywall or plasterboard, use the fixed sleeves, expansion tubes, and tapping screws. Mark the position for the fixed sleeves, drill holes, insert expansion tubes, and then screw the fixed sleeves into place. Finally, adjust the flat top bolts to fit into the fixed sleeves and tighten with the wrench.

Image: Step-by-step diagram illustrating the hardware mounting process using drilling and fixed sleeves.
Step 6: Secure Extension Bars with Clips
If using extension bars, use the provided fixing parts (clips) to secure the bars together. These clips snap onto the vertical bars, providing additional stability and preventing movement between the main gate and the extensions.
Operating Instructions
Opening and Closing the Gate
The gate features a dual-action swing door that opens smoothly from either side. To open, lift the latch mechanism with one hand and swing the door open. To close, simply push the door shut; it will automatically latch securely. This design allows for convenient one-handed operation.

Image: Visual guide on lifting the latch to open and lowering to close the gate.
Maintenance
- Cleaning: Wipe the gate with a damp cloth and mild soap. Do not use abrasive cleaners or harsh chemicals.
- Regular Checks: Periodically inspect all components, especially the pressure-mounted bolts and extension clips, to ensure they remain tight and secure.
- Damage: If any part of the gate becomes damaged, discontinue use immediately and replace the affected components or the entire gate.
Troubleshooting
Gate is not stable:
Ensure all four flat top bolts are tightened sufficiently to create firm pressure against the walls. If using extension bars, verify that the fixing clips are properly installed. Consider using the optional hardware mounting for increased stability.
Gate does not fit the opening:
Re-evaluate the combination of extension bars used. The gate supports widths from 27.56 to 37 inches. Adjust the height by loosening the thumb screws, extending or retracting the top section, and re-tightening.
Door latch is stiff or not closing properly:
Check for any obstructions around the latch mechanism. Ensure the gate frame is installed squarely and not twisted, which could affect latch alignment. A small amount of lubricant can be applied to moving parts if necessary.
Specifications
- Model Number: GP01L0225BK
- Mounting Type: Pressure Mount (Optional Hardware Mount)
- Adjustable Height: 51" - 87"
- Adjustable Width: 27.56" - 37" (with included extension kits)
- Bar Spacing: 1.37" (Ultra-Narrow)
- Material: Heavy-Duty Steel
- Color: Black
- Product Dimensions: 2 x 2 x 87 inches
- Item Weight: 30.6 pounds
Warranty and Support
For warranty information or product support, please refer to the contact details provided on the product packaging or visit the official Gardner Pet website. Keep your purchase receipt for warranty claims.


