
1. Introduction
This manual provides essential information for the assembly, operation, and maintenance of your TRENT Galvanized Steel Outdoor Shed, Model TRE-CE3X5. This durable and practical shed is designed for outdoor storage, offering protection for tools, equipment, and other items. Please read these instructions carefully before beginning assembly or use to ensure safe and efficient operation.

Image 1.1: Overview of the TRENT Galvanized Steel Outdoor Shed.
2. Safety Information
- Always wear appropriate safety gear, including gloves and eye protection, during assembly.
- Assembly requires at least two people for safety and ease of installation.
- Ensure the shed is assembled on a level and stable surface. Anchoring the shed to the ground is recommended for stability, especially in windy conditions.
- Keep children and pets away from the assembly area.
- Be cautious of sharp edges on metal panels during handling.
- Do not store flammable liquids or hazardous materials inside the shed unless properly secured and ventilated.
- Regularly inspect the shed for any damage or loose components and address them promptly.
3. Package Contents
Verify that all components listed below are present before beginning assembly. If any parts are missing or damaged, contact TRENT customer service.
- Shed Panels (various sizes for walls, roof, door)
- Frame Components (beams, supports)
- 1 x Hinged Door
- 2 x U-Hooks
- 4 x Corner Pieces
- 4 x Fastening Hooks (supports up to 4 kg each)
- 4 x Expansion Screws
- 1 x Pair of Gloves
- Floating Floor Foundations
- Assembly Hardware (screws, nuts, washers)
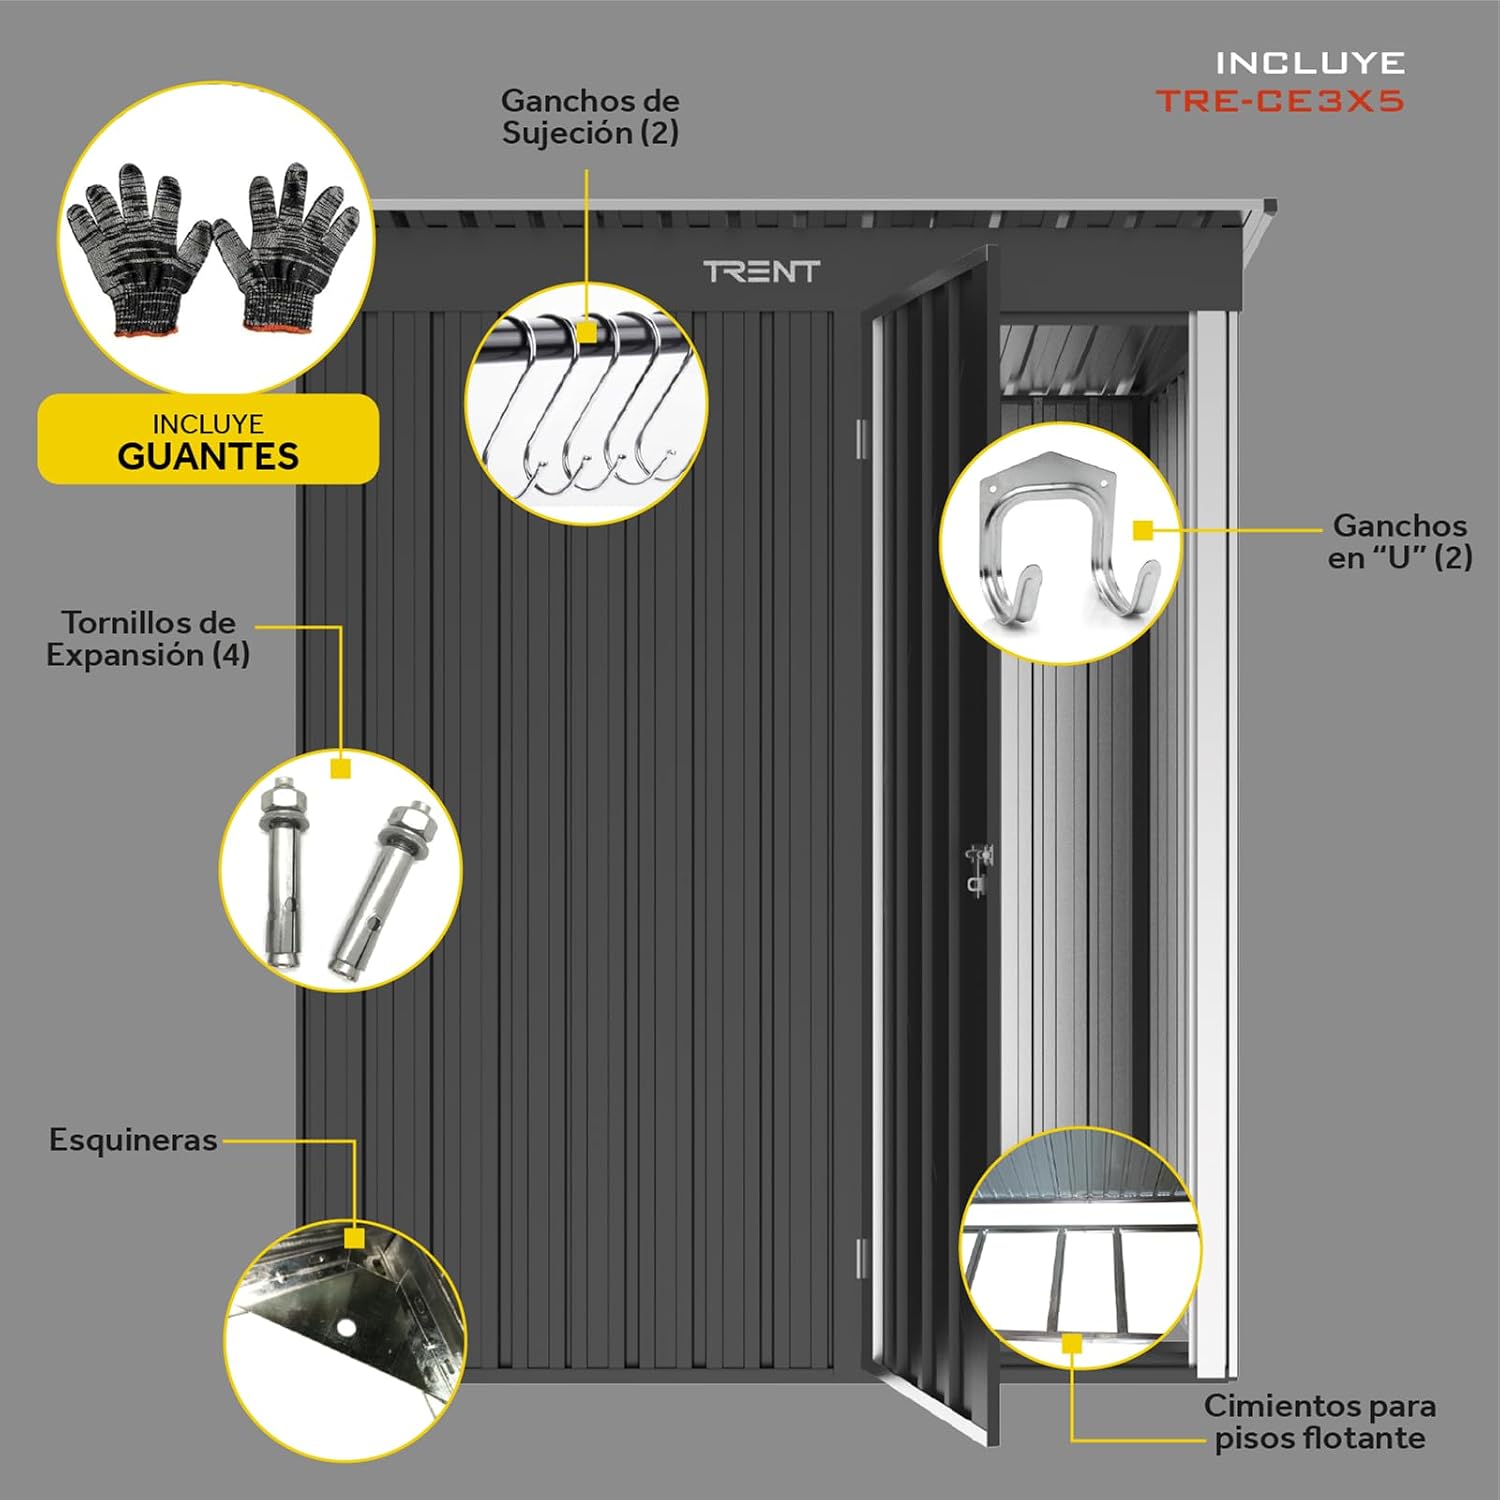
Image 3.1: Included accessories for the TRENT Shed.
4. Setup and Assembly
Follow these general steps for assembling your TRENT shed. Refer to the detailed assembly diagram for specific part identification and connection points.
- Site Preparation: Choose a level, stable area for the shed. Clear any debris and ensure proper drainage.
- Foundation Assembly: Assemble the floating floor foundations according to the diagram. These provide a base for an optional floor (wood or tongue and groove recommended, 75 cm x 149 cm, not included).
- Base Frame Construction: Assemble the base frame components, ensuring they are square and secure.
- Wall Panel Installation: Attach the wall panels to the base frame, working systematically around the perimeter. Secure panels using the provided hardware.
- Door Frame and Door Installation: Install the door frame and then attach the hinged door. Ensure the door opens and closes smoothly and the security latch functions correctly.
- Roof Assembly: Assemble the roof frame and attach the pent roof panels. The pent roof design is engineered to prevent water accumulation.
- Ventilation Grilles: Ensure the upper ventilation grilles are clear and unobstructed to allow for proper air circulation.
- Anchoring: Use the provided expansion screws to anchor the shed to the ground for enhanced stability.
- Accessory Installation: Install the fastening hooks and U-hooks as desired for internal organization.

Image 4.1: Floating floor installation guide.

Image 4.2: Door latch and internal hook installation.
5. Operating Instructions
- Door Operation: The shed features a hinged door. To open, unlatch the security lock and pull the door outwards. To close, push the door shut and engage the latch. A padlock (not included) can be used for additional security.
- Ventilation: The shed includes upper ventilation grilles. Ensure these remain unobstructed to allow for constant air circulation, which helps prevent humidity and odors inside the shed.
- Storage: Utilize the ample internal space for storing tools, garden equipment, bicycles, or other outdoor items. The included hooks can be used for hanging smaller items.

Image 5.1: Examples of items stored within the TRENT Shed.
6. Maintenance
- Cleaning: Clean the shed periodically with a mild detergent and water. Rinse thoroughly and allow to air dry. Avoid abrasive cleaners or harsh chemicals that could damage the galvanized finish.
- Inspection: Regularly inspect all panels, frame components, and hardware for any signs of damage, corrosion, or looseness. Tighten any loose screws or bolts.
- Rust Prevention: Although made of galvanized steel, minor scratches or prolonged exposure to harsh conditions can lead to surface rust. Touch up any deep scratches with rust-inhibiting paint.
- Roof Maintenance: Ensure the pent roof remains clear of debris (leaves, snow) to maintain proper water runoff.
- Door Hinges and Latch: Lubricate door hinges and the latch mechanism annually to ensure smooth operation.

Image 6.1: Shed features emphasizing durability and ease of maintenance.
7. Troubleshooting
- Water Accumulation Inside:
- Check that the shed is assembled on a level surface.
- Ensure all screws and panel connections are tight.
- Verify the pent roof is correctly installed and free of debris.
- Inspect for any gaps or damaged seals.
- Door Sticking or Not Closing Properly:
- Check if the shed is level. Uneven ground can cause door misalignment.
- Inspect hinges for damage or rust; lubricate if necessary.
- Ensure no obstructions are blocking the door's path.
- Shed Instability:
- Confirm all frame components and panels are securely fastened.
- Ensure the shed is properly anchored to the ground using the expansion screws.
8. Specifications
| Brand | TRENT |
| Model Number | TRE-CE3X5 |
| Color | Dark Gray |
| Material | Galvanized Steel |
| External Dimensions (D x W x H) | 91 cm x 151 cm x 187 cm |
| Internal Dimensions (D x W x H) | 87.5 cm x 147 cm x 170-184 cm (approx.) |
| Total Surface Area | 1.45 m² |
| Internal Usable Surface Area | 1.125 m² |
| Material Thickness | 0.25 mm |
| Product Weight | 37 kg |
| Door Style | Hinged |
| Door Dimensions (W x H) | 52 cm x 168 cm |
| Roof Design | Pent (sloped) |
| Water Resistance Level | Water Resistant |
| Assembly Required | Yes |

Image 8.1: Dimensional specifications of the TRENT Shed.
9. Warranty Information
For specific warranty terms and conditions, please refer to the retailer where the product was purchased or contact TRENT customer service directly. Keep your proof of purchase for any warranty claims.
10. Customer Support
If you have any questions, require assistance with assembly, or need to report missing/damaged parts, please contact TRENT customer service. Provide your model number (TRE-CE3X5) and purchase details for faster service.
You can often find contact information on the TRENT brand website or through your product retailer.