
1. Important Safety Information
Please read and understand all instructions before assembly and use. Keep this manual for future reference.
- Always secure the cabinet to the wall using the provided anti-tip kit to prevent tipping. This is crucial for safety, especially in households with children or pets.
- Do not overload the trash can drawers; each is designed to hold up to 33 lbs (15 kg). Exceeding this weight limit can damage the mechanism and pose a safety risk.
- Exercise caution when operating the pull-out trash can holders and drawers to prevent pinch injuries. Keep hands clear of moving parts.
- Follow the assembly instructions carefully to ensure safe and stable operation of the cabinet. Incorrect assembly can lead to instability and potential hazards.
- Ensure the cabinet is placed on a level surface to prevent wobbling and ensure proper door and drawer alignment.
2. Product Overview
The HOSTACK Kitchen Hutch Cabinet is a versatile storage solution designed to enhance kitchen organization and aesthetics. It features a combination of upper and lower storage compartments, including hidden trash bin storage.

Image 2.1: Front view of the assembled HOSTACK Kitchen Hutch Cabinet.
Key Features:
- Hidden Trash Storage: Two pull-out holders accommodate double 13-gallon trash bins, concealing waste and preventing access by pets. This design also helps contain odors.
- Integrated Storage: Combines a buffet and an upper hutch cabinet, offering 7 spacious compartments, a 47-inch wide tabletop, and 2 deep drawers for comprehensive storage.
- Multi-Purpose Design: Suitable for various uses including kitchen trash storage, a hutch with countertop, a pantry for food and supplies, or a laundry hamper.
- Durable Construction: Manufactured from engineered wood with smooth-gliding rails. Reinforced with dual iron pipes for the trash can drawers, each supporting up to 33 lbs.
- Adjustable Shelves: The side cabinet features adjustable shelves to customize storage space.

Image 2.2: Benefits of the hidden trash cabinet design, addressing odor and pet access.

Image 2.3: Detail of the pull-out trash cabinet mechanism, highlighting reinforced pipes and smooth slides.
3. Specifications
| Feature | Detail |
|---|---|
| Brand | HOSTACK |
| Model Name | Kitchen Hutch with Trash Can Cabinet |
| Color | Black |
| Overall Dimensions | 47.2" W x 14.9" D x 70.86" H (120cm W x 38cm D x 180cm H) |
| Material | Engineered Wood, Metal Handles |
| Weight Limit (Overall) | 350 Pounds (158.7 kg) |
| Weight Limit (Each Trash Drawer) | 33 lbs (15 kg) |
| Recommended Trash Bin Size | Max: 15.5" W × 12.4" D × 21.8" H (Bottom width: 13.78" W) |
| Number of Drawers | 2 |
| Number of Shelves | Multiple (Adjustable) |
| Assembly Required | Yes |
Note: Trash bins are not included with the cabinet. Please confirm your trash bin size before purchase to ensure compatibility.

Image 3.1: Detailed dimensions of the cabinet and the maximum trash can size it can accommodate.

Image 3.2: Visual guide for compatible trash bin dimensions.
4. Assembly Instructions
This cabinet requires assembly. It is recommended to have two people for assembly, though it can be completed by one person. Clear instructions and labeled pieces are provided with the product. Please follow them carefully.
Before You Begin:
- Unpack and Organize: Lay out all components and hardware. Verify that all parts listed in the instruction manual are present. Organize parts by their labels to streamline the process.
- Tools Required: A screwdriver (Phillips head) is typically needed. A power drill with appropriate bits can expedite the process but use with caution to avoid overtightening.
- Clear Workspace: Ensure you have a spacious, clean, and level area for assembly to prevent damage to components and for ease of movement.
General Assembly Steps:
- Begin by assembling the base frame of the cabinet.
- Attach the side panels and internal dividers as indicated in the manual.
- Install drawer slides and assemble the drawers.
- Assemble the upper hutch section, including shelves and door hinges.
- Carefully place the upper hutch onto the base cabinet. This step may require two people.
- Attach all doors and adjust hinges for proper alignment (refer to Troubleshooting section for door adjustment).
- Install the pull-out trash bin mechanisms.
- Secure the anti-tip kit to the wall and the cabinet.
Refer to the detailed step-by-step diagrams and instructions included in your product packaging for precise assembly guidance.
5. Operating Instructions
5.1 Using the Pull-Out Trash Bins
- To access the trash bins, gently pull the front panel of the trash cabinet outwards. The smooth-gliding rails will allow the bin holder to extend.
- Place your 13-gallon trash bins (not included) into the designated holders. Ensure they fit within the maximum dimensions specified in Section 3.
- To close, push the front panel back until it is flush with the cabinet.
- Avoid forcing the drawers if they encounter resistance. Check for obstructions.
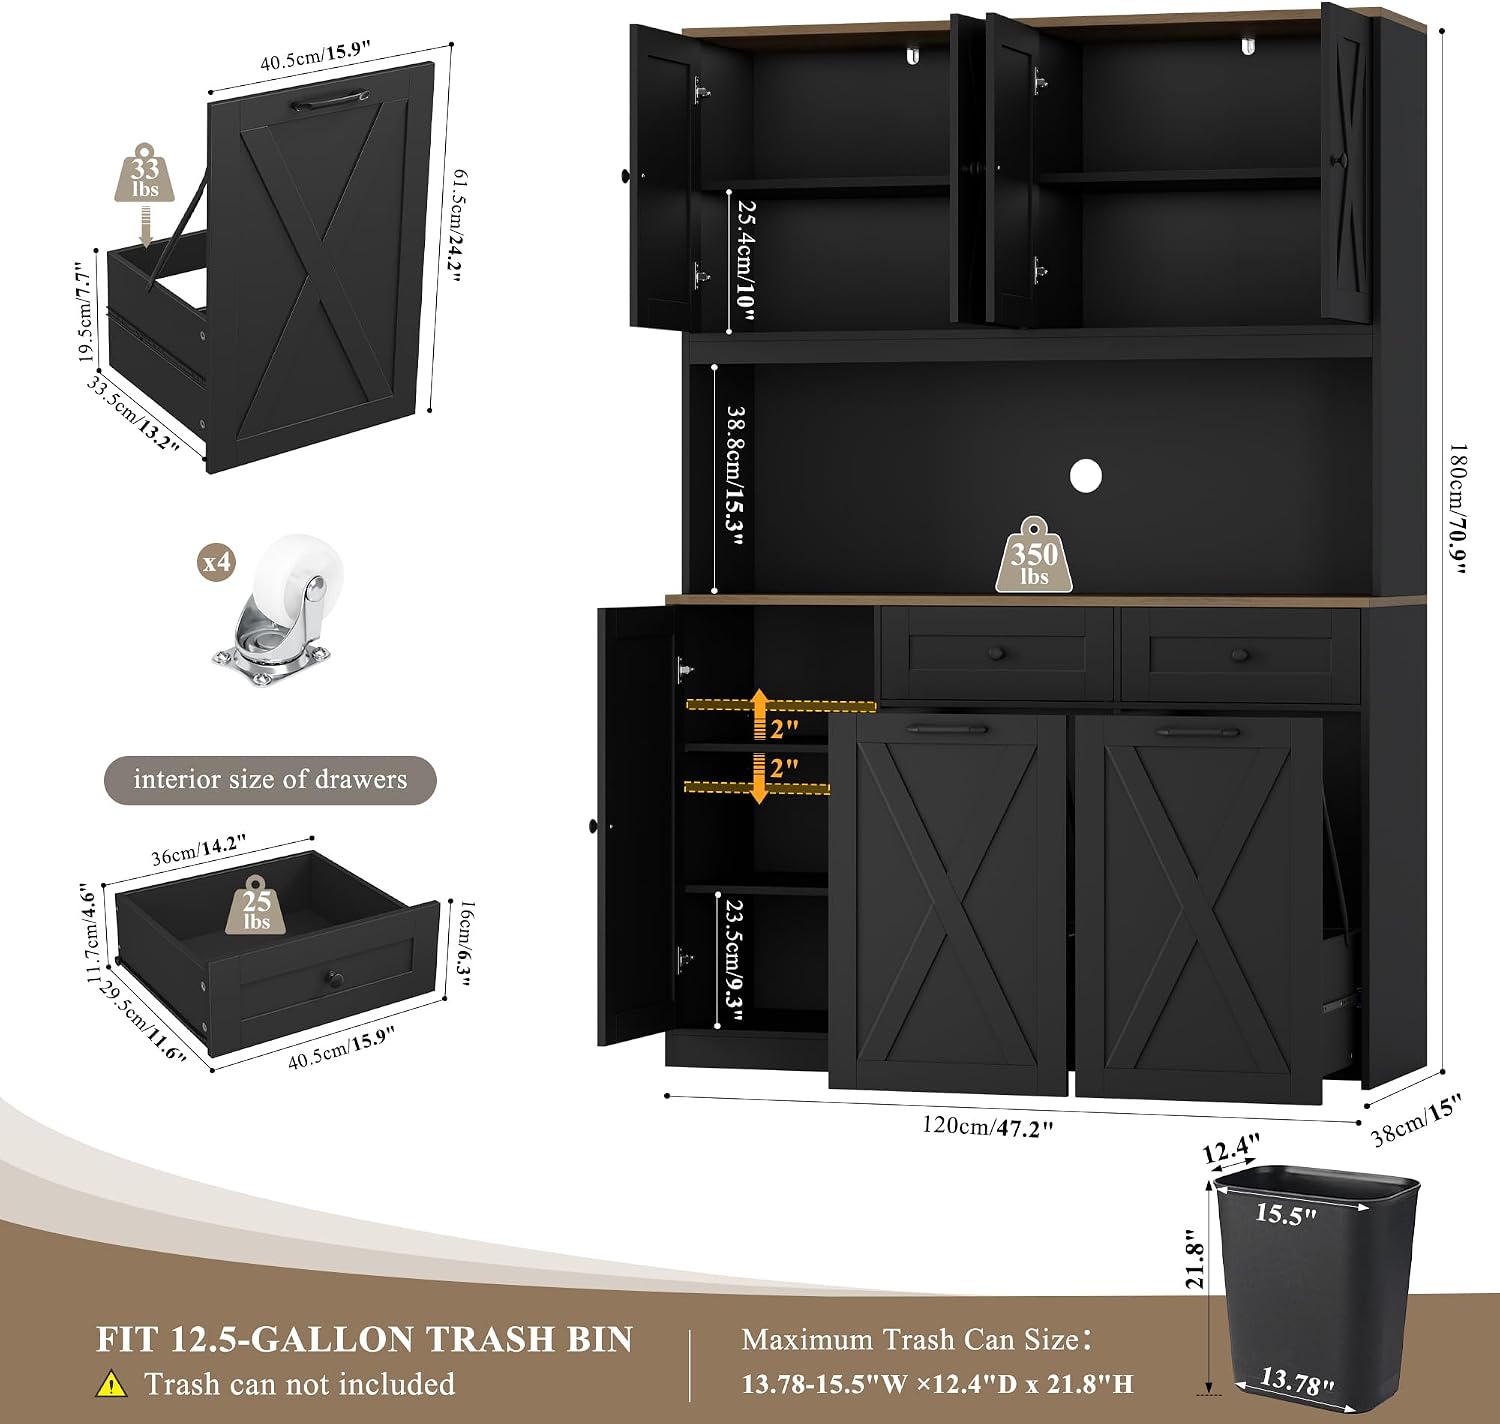
Image 5.1: Interior layout demonstrating the pull-out trash bins and adjustable shelving.
5.2 Using the Drawers
- The two deep drawers are designed for storing various kitchen items such as paper towels, trash bags, cleaning supplies, or small appliances.
- Pull the metal handles to open the drawers. Push them back to close.
- Do not overload drawers beyond their capacity to ensure smooth operation and prevent damage to the slides.

Image 5.2: Example of drawer storage for kitchen essentials.
5.3 Adjusting Shelves
- The side cabinet features adjustable shelves. To change shelf height, remove all items from the shelf.
- Carefully lift the shelf and reposition the shelf pins to the desired height.
- Ensure all four shelf pins are securely inserted into the corresponding holes before placing items back on the shelf.
6. Maintenance
- Cleaning: Wipe surfaces with a soft, damp cloth. Avoid harsh chemicals or abrasive cleaners, which can damage the finish.
- Spills: Clean up spills immediately to prevent staining or damage to the wood.
- Hardware Check: Periodically check all screws and fasteners to ensure they are tight. Retighten if necessary to maintain stability.
- Drawer Slides: If drawer or trash bin slides become stiff, a small amount of silicone lubricant can be applied to the tracks.
7. Troubleshooting
Common Issues and Solutions:
| Problem | Possible Cause | Solution |
|---|---|---|
| Cabinet is wobbly or unstable. | Uneven floor; loose fasteners; anti-tip kit not installed. | Ensure cabinet is on a level surface. Tighten all assembly screws. Install the anti-tip kit securely to the wall. |
| Drawers or trash bins do not slide smoothly. | Overloaded; debris in tracks; misaligned slides. | Reduce weight in drawers/bins. Clean tracks. Check assembly for proper slide alignment. Apply silicone lubricant if needed. |
| Cabinet doors are misaligned or have gaps. | Hinges require adjustment. | Adjust the door hinges using the screws provided on the hinge mechanism. Refer to the detailed adjustment steps below. |
| Trash bin drawer feels weak or damaged. | Exceeded weight limit; impact damage. | Ensure trash bins do not exceed 33 lbs. Avoid pushing down on trash forcefully. Contact customer support for replacement parts if damaged. |
Door Adjustment Guide:
If your cabinet doors are not aligning correctly, follow these steps to adjust the hinges:

Image 7.1: Examples of common door alignment problems.

Image 7.2: Step-by-step guide for hinge adjustments.
- Adjusting Side-to-Side (Gap Adjustment): Turn screw C clockwise to reduce the gap between doors or counter-clockwise to increase it.
- Adjusting Up-and-Down (Height Adjustment): Loosen screws A and B, then raise or lower the door to the desired height. Re-tighten screws A and B to secure.
- Adjusting In-and-Out (Depth Adjustment): Loosen screw D, push the door in to ensure it is flush with the cabinet frame, then re-tighten screw D.
8. Warranty and Support
For warranty information, missing parts, or technical support, please contact HOSTACK customer service directly. Refer to the contact information provided in your product packaging or visit the official HOSTACK website.
When contacting support, please have your product model name ("Kitchen Hutch with Trash Can Cabinet") and ASIN (B0FLQBK66K) available for faster service.