1. Introduction
This manual provides detailed instructions for the installation, operation, and maintenance of your ASUS ROG Strix Helios II GX601S Hatsune Miku Edition gaming PC case. Please read this manual thoroughly before beginning assembly to ensure proper setup and optimal performance.
The ROG Strix Helios II Hatsune Miku Edition is designed for high-performance gaming systems, featuring dual tempered glass panels, an aluminum diamond-grille front panel, and extensive cooling and cable management solutions.
2. Safety Information
- Always disconnect the power supply from the wall outlet before installing or removing any components.
- Handle tempered glass panels with care. They are fragile and can break if dropped or struck.
- Wear anti-static gloves or use an anti-static wrist strap to prevent electrostatic discharge (ESD) damage to components.
- Keep small parts and screws away from children.
- Ensure proper ventilation around the PC case to prevent overheating.
3. Package Contents
Verify that all items are present in your package:
- ASUS ROG Strix Helios II GX601S Hatsune Miku Edition PC Case
- Accessory Box (containing screws, cable ties, and other small parts)
- User Manual (this document)
- Four (4) 140mm performance fans (pre-installed)
- Graphics card slot clamp
- Rear detachable PSU bracket
- Multifunction cover with graphics card holders
- PSU shroud
- Cable cover
- Rear cable clips
- Ergonomic case straps
4. Setup and Installation
4.1 Preparing the Case
Before installing components, remove the side tempered glass panels. Locate the quick-release latches or screws on the rear of the case to detach the panels carefully. Place them on a soft, flat surface to prevent scratches.

Image: Angled view of the ASUS ROG Strix Helios II GX601S, showcasing the tempered glass side panels and front design.
4.2 Motherboard Installation
- Install the I/O shield (if not pre-attached to your motherboard) into the rear opening of the case.
- Align your E-ATX, ATX, Micro-ATX, or Mini-ITX motherboard with the standoffs inside the case.
- Secure the motherboard with the provided screws.
4.3 Power Supply Unit (PSU) Installation
- Attach the detachable PSU bracket to your power supply.
- Slide the PSU with the attached bracket into the designated compartment at the rear bottom of the case.
- Secure the PSU bracket to the case with screws.
4.4 Graphics Card (GPU) Installation
The case supports graphics cards up to 450mm in length.
- Remove the necessary PCIe slot covers from the rear of the case.
- Insert your graphics card into the appropriate PCIe slot on the motherboard.
- Secure the graphics card to the case with screws.
- Utilize the adjustable graphics card slot clamp (multifunction cover) to provide additional support and prevent GPU sag.
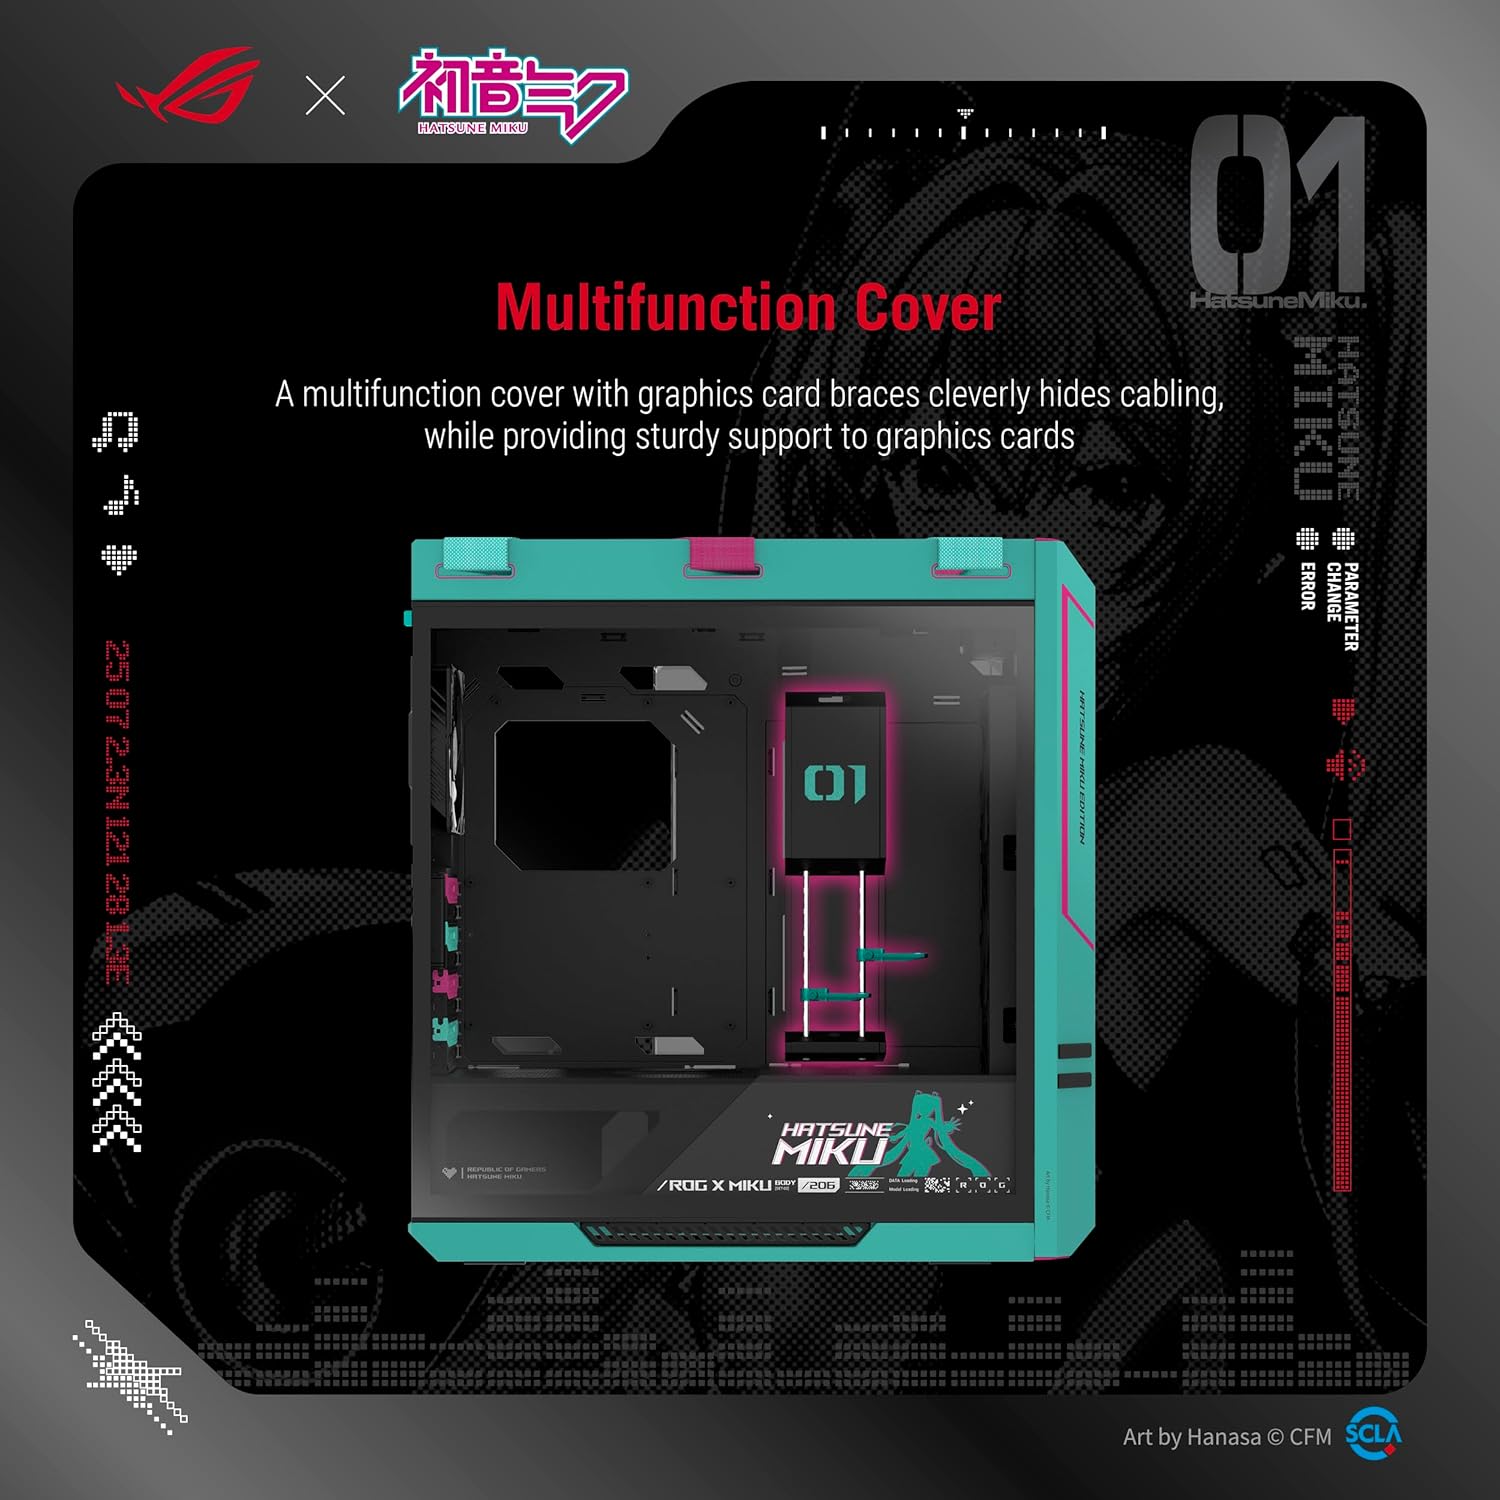
Image: Interior view highlighting the multifunction cover with integrated graphics card holders, aiding in cable management and GPU support.
4.5 Cooling System Setup
The case comes with four pre-installed 140mm performance fans for optimal airflow. It supports various fan and radiator configurations:
- Front: Up to 3 x 140mm fans or 3 x 120mm fans; Radiator up to 420mm
- Top: Up to 3 x 140mm fans or 3 x 120mm fans; Radiator up to 420mm
- Rear: 1 x 140mm fan or 1 x 120mm fan; Radiator up to 140mm
Ensure fans are oriented correctly for intake and exhaust to create efficient airflow.

Image: Diagram illustrating the various fan and radiator mounting options and capacities within the PC case.
4.6 Cable Management
Utilize the integrated cable management features:
- The multifunction cover helps route and hide cables from the main compartment.
- The PSU shroud conceals the power supply and excess cables.
- Cable covers and rear cable clips are provided to organize cables behind the motherboard tray.
4.7 Front I/O Panel Connections
Connect the front I/O panel cables to your motherboard:
- Two (2) USB 20Gbps Type-C ports
- Four (4) USB-A 3.0 ports
- ARGB-lighting control button header
- Fan-speed PWM control button header
- Audio jacks (if applicable)
- Power and Reset buttons, HDD LED, Power LED headers
Refer to your motherboard manual for specific header locations.
5. Operating Instructions
5.1 Powering On/Off
Press the power button on the front I/O panel to turn your system on or off. A short press typically initiates power on, while a longer press (usually 4-5 seconds) will force a shutdown.
5.2 I/O Panel Functions
- USB Ports: Connect USB devices such as keyboards, mice, external drives, and other peripherals.
- ARGB-lighting Control Button: Cycles through various pre-set RGB lighting effects for the case's integrated lighting.
- Fan-speed PWM Control Button: Adjusts the speed of connected PWM fans, typically cycling between silent, balanced, and performance modes.
5.3 Transporting the Case
The ROG Strix Helios II features ergonomic X-shaped woven straps at the top, designed to facilitate easier transport of your PC build. Ensure all components are securely fastened before lifting the case.

Image: Top view of the PC case, highlighting the ergonomic X-shaped woven straps designed for comfortable and secure transport.
6. Maintenance
6.1 Cleaning Dust Filters
The case is equipped with removable dust filters on the front, top, and bottom to prevent dust buildup. Regularly clean these filters by gently removing them and washing them with water or brushing off accumulated dust. Ensure filters are completely dry before re-installing.
6.2 Cleaning Tempered Glass Panels
Use a soft, lint-free cloth and a non-abrasive glass cleaner to clean the tempered glass panels. Avoid harsh chemicals or abrasive materials that could scratch the glass.
6.3 General Cleaning
For other surfaces, use a soft, dry cloth. If necessary, a slightly damp cloth can be used, followed by a dry cloth. Avoid spraying cleaning solutions directly onto the case, especially near electronic components or vents.
7. Troubleshooting
7.1 System Not Powering On
- Check if the power supply is properly connected to the wall outlet and switched on.
- Ensure all power cables from the PSU are securely connected to the motherboard and components.
- Verify that the front panel power button header is correctly connected to the motherboard.
7.2 Fans Not Spinning or RGB Not Working
- Confirm that fan power cables are securely connected to the motherboard or fan controller.
- Check that ARGB headers are correctly connected to the motherboard or a dedicated RGB controller.
- Ensure relevant software (e.g., ASUS Aura Sync) is installed and configured correctly if controlling RGB via software.
7.3 Front USB Ports Not Functioning
- Verify that the front panel USB headers are correctly connected to the corresponding USB ports on your motherboard.
- Check your motherboard manual for correct header pin assignments.
8. Specifications
| Feature | Specification |
|---|---|
| Model Name | MIKU & ROG STRIX HELIOS II GX601S |
| Case Type | Mid Tower |
| Motherboard Compatibility | E-ATX (up to 12" x 10.9"), ATX, Micro-ATX, Mini-ITX |
| Material | Tempered Glass, Aluminum |
| Dimensions (LxWxH) | 22.2 x 23.3 x 9.8 inches |
| Item Weight | 40.2 pounds |
| Maximum GPU Length | 450mm |
| Maximum CPU Cooler Height | 190mm |
| Maximum PSU Length | 220mm |
| Front I/O Ports | 2 x USB 20Gbps Type-C, 4 x USB-A 3.0, ARGB-lighting control, Fan-speed PWM control |
| Cooling Method | Air (supports liquid cooling radiators) |
| Pre-installed Fans | 4 x 140mm performance fans |
9. Warranty and Support
For warranty information and technical support, please refer to the official ASUS website or contact your local ASUS representative. Keep your proof of purchase for warranty claims.
You can find additional resources and contact information at the ASUS Official Website.


