
1. Introduction
This manual provides essential information for the proper setup, operation, and maintenance of your Xiangtat Radiomaster Nexus-XR 2.4GHz Helicopter Flight Controller. The Nexus-XR is an advanced flight controller designed in collaboration with Rotorflight, featuring an integrated 2.4GHz ExpressLRS receiver for enhanced performance and reliability in RC helicopters. Please read this manual thoroughly before using the product to ensure safe and optimal performance.
2. Product Overview
2.1 Key Features
- Integrated ExpressLRS Receiver: Dual Semtech SX1281 2.4GHz transceivers for seamless RF performance, eliminating the need for an external receiver.
- Dual Antenna Design: Two 65mm wire antennae for superior signal strength and range.
- Versatile Connectivity: Multiple UART ports support CRSF, ELRS, S.BUS, and more.
- Optimized for Rotorflight 2.2: Engineered for peak performance and compatibility.
- Flight Logging: 256MB onboard flash memory for detailed logging and tuning.
2.2 What's in the Box
The product package includes the following items:
- Radiomaster Nexus-XR Helicopter Flight Controller
- Type C extension cable
- JST-ZH1.5 "DSM" Telemetry cable (Note: Telemetry only does not support DSM Receivers)
- Voltage telemetry wire
- JST-GH to Servo Plug (dupont 3 pin connector)
- 4 Wire pigtail cables
- Ultra light-weight and flexible USB-C extender
- 3M double-sided mounting tape (3 pieces)
- Inventory Card
- Heat shrink tubing (2 pieces)

Figure 2.2.1: Included components in the Nexus-XR package.
2.3 Product Visuals
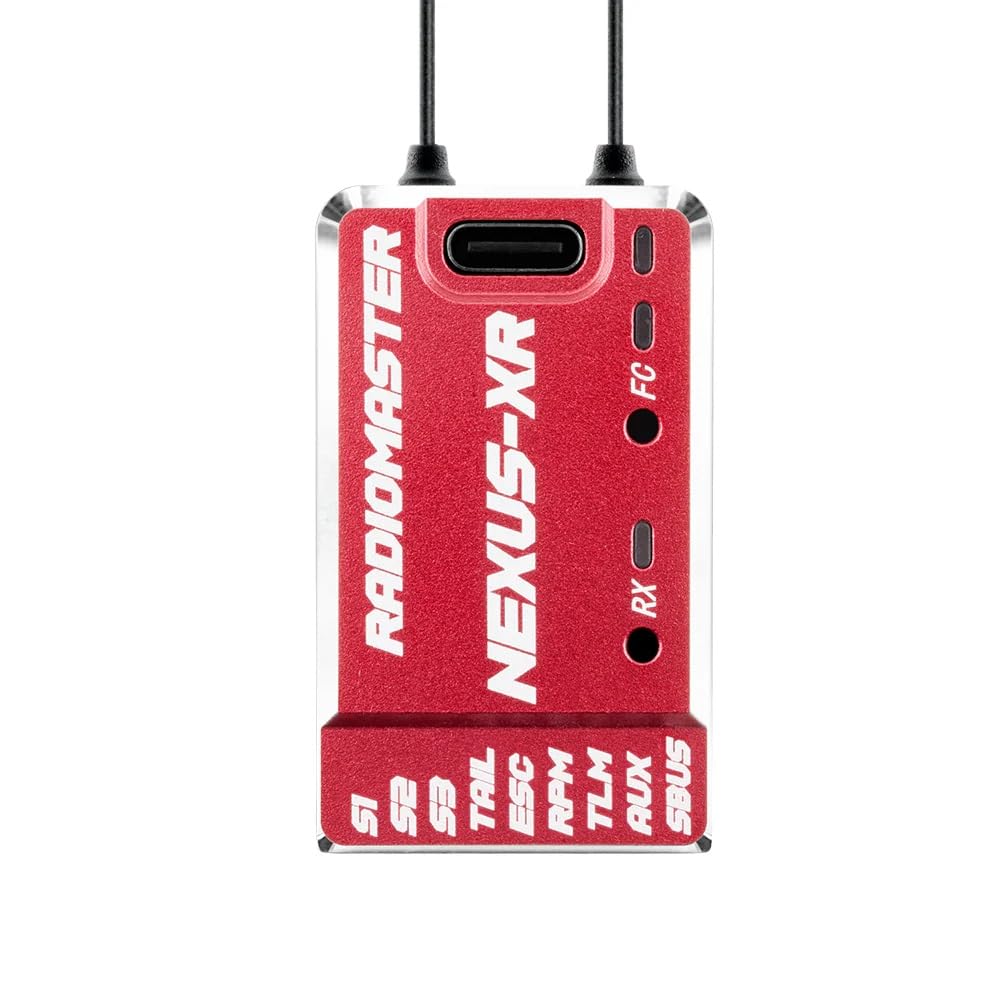
Figure 2.3.1: Front view of the Nexus-XR Flight Controller.

Figure 2.3.2: Side view showing UART and EXT-V ports.

Figure 2.3.3: Connection diagram for tail servos and motor.
Video 2.3.1: Official product video showcasing the Radiomaster Nexus-XR 2.4GHz Helicopter Flight Controller and its integrated ExpressLRS Receiver.
3. Setup
Proper setup is crucial for the safe and stable operation of your helicopter. Follow these general steps for initial configuration. Refer to the official Rotorflight documentation for detailed software configuration.
- Mounting: Securely mount the Nexus-XR flight controller to your helicopter frame using the provided double-sided mounting tape. Ensure it is oriented correctly as per Rotorflight guidelines.
- Power Connection: Connect the flight controller to your helicopter's power distribution board (PDB) or ESC. Ensure correct polarity and voltage. The Nexus-XR supports up to 12V for tail servos.
- Servo Connections: Connect your servos (cyclic, collective, tail) to the appropriate ports (S1, S2, S3, TAIL) on the flight controller. The Nexus-XR supports both 760µs and 1520µs tail servos.
- Telemetry & Other Connections: Connect any additional components such as ESC, RPM sensor, or external telemetry modules to the designated UART or TLM ports.
- Antenna Placement: Position the two 65mm wire antennae at a 90-degree angle to each other for optimal signal reception. Avoid placing them near carbon fiber or metal parts that could obstruct the signal.
- Software Configuration: Connect the flight controller to your computer using the USB-C extender. Launch the Rotorflight configurator software.
- Firmware Update: Ensure the flight controller has the latest Rotorflight 2.2 (or newer) firmware installed. Follow the software's instructions for firmware updates.
- Receiver Binding: Since the Nexus-XR has an integrated ExpressLRS receiver, follow the ExpressLRS binding procedure using your compatible Radiomaster transmitter.
- Calibration: Perform all necessary calibrations within the Rotorflight software, including accelerometer, gyroscope, and ESC calibration.
- Flight Mode Setup: Configure your desired flight modes and switch assignments in the Rotorflight software.
4. Operating Instructions
Once the setup is complete and verified, you can proceed with operating your helicopter. Always perform pre-flight checks.
- Pre-Flight Check: Before each flight, ensure all connections are secure, batteries are charged, and the flight controller LEDs indicate normal operation (e.g., solid green for armed, solid blue for receiver linked).
- Arming: Arm the helicopter using the configured switch on your transmitter. The motor will typically spool up to a low RPM.
- Take-off: Slowly increase collective pitch to lift off. Maintain smooth control inputs.
- Flight: Operate the helicopter within your skill level and in a safe environment. The Nexus-XR's precise control and integrated receiver provide stable flight characteristics.
- Landing: Reduce collective pitch gradually to land. Disarm the helicopter immediately after landing.
- Post-Flight: Disconnect the battery. Review flight logs (if enabled) using the Rotorflight software to analyze performance and make adjustments.
5. Maintenance
Regular maintenance ensures the longevity and reliable performance of your Nexus-XR flight controller.
- Inspection: Periodically inspect the flight controller for any physical damage, loose connections, or signs of wear.
- Cleaning: Keep the flight controller clean and free from dust, dirt, and moisture. Use a soft, dry brush or compressed air for cleaning. Avoid using liquids.
- Firmware Updates: Regularly check for and install the latest firmware updates for Rotorflight to benefit from performance improvements and bug fixes.
- Antenna Check: Ensure the antennae are not damaged or kinked. Replace if necessary to maintain signal integrity.
- Storage: Store the flight controller in a dry, cool environment away from direct sunlight and extreme temperatures when not in use.
6. Troubleshooting
If you encounter issues with your Nexus-XR flight controller, refer to the following common troubleshooting steps.
| Problem | Possible Cause | Solution |
|---|---|---|
| No power/LEDs off | Incorrect power connection, faulty cable, power supply issue. | Check power cable polarity and connection. Verify power supply voltage. |
| Receiver not binding | Incorrect binding procedure, incompatible firmware, transmitter issue. | Ensure correct ExpressLRS binding steps are followed. Update firmware on both FC and transmitter. |
| Unstable flight | Improper calibration, incorrect PID settings, mechanical issues with helicopter. | Recalibrate sensors. Adjust PID settings in Rotorflight. Check helicopter for loose parts or damage. |
| No servo response | Incorrect servo connection, faulty servo, software configuration error. | Verify servo connections and power. Check servo mapping in Rotorflight. Test servos individually. |
| USB connection issues | Faulty USB cable/extender, driver issues, incorrect port. | Try a different USB cable/port. Install necessary drivers. Ensure the USB-C extender is properly connected. |
For more detailed troubleshooting or advanced issues, please consult the official Rotorflight documentation or the Radiomaster support resources.
7. Specifications
| Feature | Detail |
|---|---|
| Product Dimensions | 1.85 x 1.3 x 0.58 inches |
| Integrated Receiver | Dual Semtech SX1281 2.4GHz ExpressLRS |
| Antennae | Two 65mm wire antennae |
| MCU | STM32F722 |
| Gyro/Accelerometer | ICM42688P 6-axis MEMS |
| Onboard Flash Memory | 256MB for flight logging |
| UART Ports | Multiple, supporting CRSF, ELRS, S.BUS |
| Servo Compatibility | 760µs and 1520µs Tail Servos (up to 12V) |
| Recommended Age | 15 years and up |
| Manufacturer | Xiangtat |
8. Safety Information
This product is an RC Receiver. Always operate remote-controlled vehicles responsibly and adhere to local regulations and safety guidelines.
- Always ensure your transmitter and receiver are properly bound and calibrated before flight.
- Never operate your RC helicopter near people, animals, or property.
- Maintain a safe distance from obstacles, power lines, and other potential hazards.
- Do not fly in adverse weather conditions (e.g., strong winds, rain).
- Regularly inspect all components for damage before and after each flight.
- Keep fingers and loose clothing away from rotating propellers and motors.
- The manufacturer recommends this product for users 15 years and up.
9. Warranty and Support
For warranty information, technical support, or service inquiries, please contact Xiangtat customer service or refer to the official Radiomaster website. Keep your proof of purchase for warranty claims.