
1. Product Overview
The Meatender P9Pro-W is a WiFi-enabled PID (Proportional-Integral-Derivative) pellet grill controller designed as a replacement for various Pit Boss models. It offers precise temperature control, remote monitoring via a smartphone application, and real-time diagnostic alerts to enhance your grilling experience.

Image 1.1: Meatender P9Pro-W Controller, hot rod, and fuse.
Key Features:
- Wireless App Control via WiFi: Connect to your grill and manage settings remotely.
- Precision PID Temperature Controller: Maintains stable temperatures and optimizes pellet usage.
- Real-Time Diagnostic Alerts: Monitors components and provides alerts for issues.
- 1°F Increments Adjustment: Allows precise temperature control from 180°F to 500°F.
- Broad Compatibility: Designed for various Pit Boss rectangular circuit board models.
2. Compatibility
This controller is compatible with rectangular circuit boards found in many Pit Boss pellet grill models. Ensure your grill's existing controller has a rectangular form factor for proper fitment.
Compatible Pit Boss Models (440-1600 capacity):
- Navigator Series: PB550G, PB850G, PB1150G
- Sportsman Series: PB500SP, PB0820SP, PB1100SP, PB0820SPW, PB1100SPW
- Pro Series: PB600PS1, PB820PS1, PB1100PS1
- NASCAR Series: PB700NC1, PB1000NC1
- Mahogany Series: PB440D2, PB440D3/PB456D, PB440TGN1
- Onyx Edition: LEXINGTON PB500NX, CLASSIC PB700NX, AUSTIN XL PB1000NX, SAVANNAH PB1500NX
- Other Wood Pellet Grills: PB700FB1, PB820FB1, PB820XL, PB440D3/PB456D, PB440TGN1, PB700FB1, PB820D2/PB820D3/PB1000D3, PB820XL/PB820ME, PB1000XL, PB1000SC2/PB1000SC3, PB1000T3/PB1000T4

Image 2.1: Visual guide to compatible Pit Boss models and controller slot type.
3. Setup and Installation
The Meatender P9Pro-W controller is designed for simple, snap-in replacement. No specialized tools or technical skills are typically required.
Installation Steps:
- Power Off: Ensure your pellet grill is completely powered off and unplugged from the electrical outlet before beginning installation.
- Access Controller: Locate and open the access panel for your existing grill controller. This usually involves removing a few screws.
- Disconnect Old Controller: Carefully disconnect all wiring harnesses from the old controller. Note the color-coded wiring for easier re-connection.
- Remove Old Controller: Unmount the old controller from its housing.
- Install New Controller: Position the Meatender P9Pro-W controller into the housing.
- Connect Wiring: Reconnect the wiring harnesses to the new controller, matching the color codes. Ensure all connections are secure.
- Secure Controller: Fasten the new controller in place and close the access panel.
- Connect Hot Rod: If replacing the hot rod, connect the new hot rod as per your grill's specific instructions. The included hot rod has a fuse for protection.
- Power On: Plug in your grill and power it on. The new controller should initialize.
Note: If you are unsure about any step, consult your grill's original manual or seek professional assistance. Online video tutorials for similar models can also be helpful.
4. Operating Instructions
The Meatender P9Pro-W controller offers both manual control via the panel and remote control via a smartphone application.
4.1 Initial Power-Up and PID Program Selection
- After installation, power on the grill. The controller will display initial settings.
- Select the appropriate PID program based on your grill's cooking surface size. This optimizes temperature control for your specific model. Refer to the app for guidance on program selection.

Image 4.1: Selecting PID temperature programs via the app.
4.2 WiFi App Control
The controller features wireless app control, allowing you to manage your grill from your smartphone.
- Download App: Download the 'GrillirG' app from your smartphone's app store.
- Pair Device: Follow the in-app instructions to pair your controller with your smartphone via WiFi. This typically involves creating an account and connecting to the controller's local WiFi network before linking it to your home WiFi.
- Remote Control: Once connected, you can control various functions remotely:
- Temperature Setting: Adjust the grill temperature from 180°F to 500°F in 1°F increments.
- PID Settings: Fine-tune PID parameters for optimal performance.
- Meat Probes: Monitor up to two meat probe temperatures and set target alarms.
- Smoke Levels: Adjust smoke intensity.
- Timers: Set timers to track cooking duration.
- Real-Time Status: View the current grill temperature and status of components.

Image 4.2: Wireless app control interface.

Image 4.3: Overview of app functions.
4.3 Manual Control
The controller panel allows direct adjustment of settings:
- Power Button: Turns the grill on/off.
- Select Button: Cycles through display modes or confirms selections.
- F/C Button: Toggles between Fahrenheit and Celsius temperature display.
- Prime Button: Initiates the auger to prime the fire pot with pellets.
- Control Knob: Adjusts temperature settings and navigates menus.

Image 4.4: Fine-tuning temperature with the control knob or app.
5. Maintenance
Proper maintenance ensures the longevity and optimal performance of your Meatender P9Pro-W controller and grill.
- Cleaning: Wipe the controller panel with a clean, damp cloth. Avoid abrasive cleaners or excessive moisture.
- Wiring Inspection: Periodically check all wiring connections for tightness and signs of wear or damage.
- Probe Care: Clean meat probes after each use. Store them properly to prevent damage.
- Firmware Updates: Check the app regularly for any available firmware updates for your controller to ensure you have the latest features and improvements.
6. Troubleshooting
The controller provides real-time diagnostic alerts to help identify and resolve common issues.
Diagnostic Alerts:
The controller continuously monitors key components such as the hot rod, auger motor, fan, and RTD grill probe. If an issue is detected, an alert will be displayed on the controller screen and/or in the smartphone app.
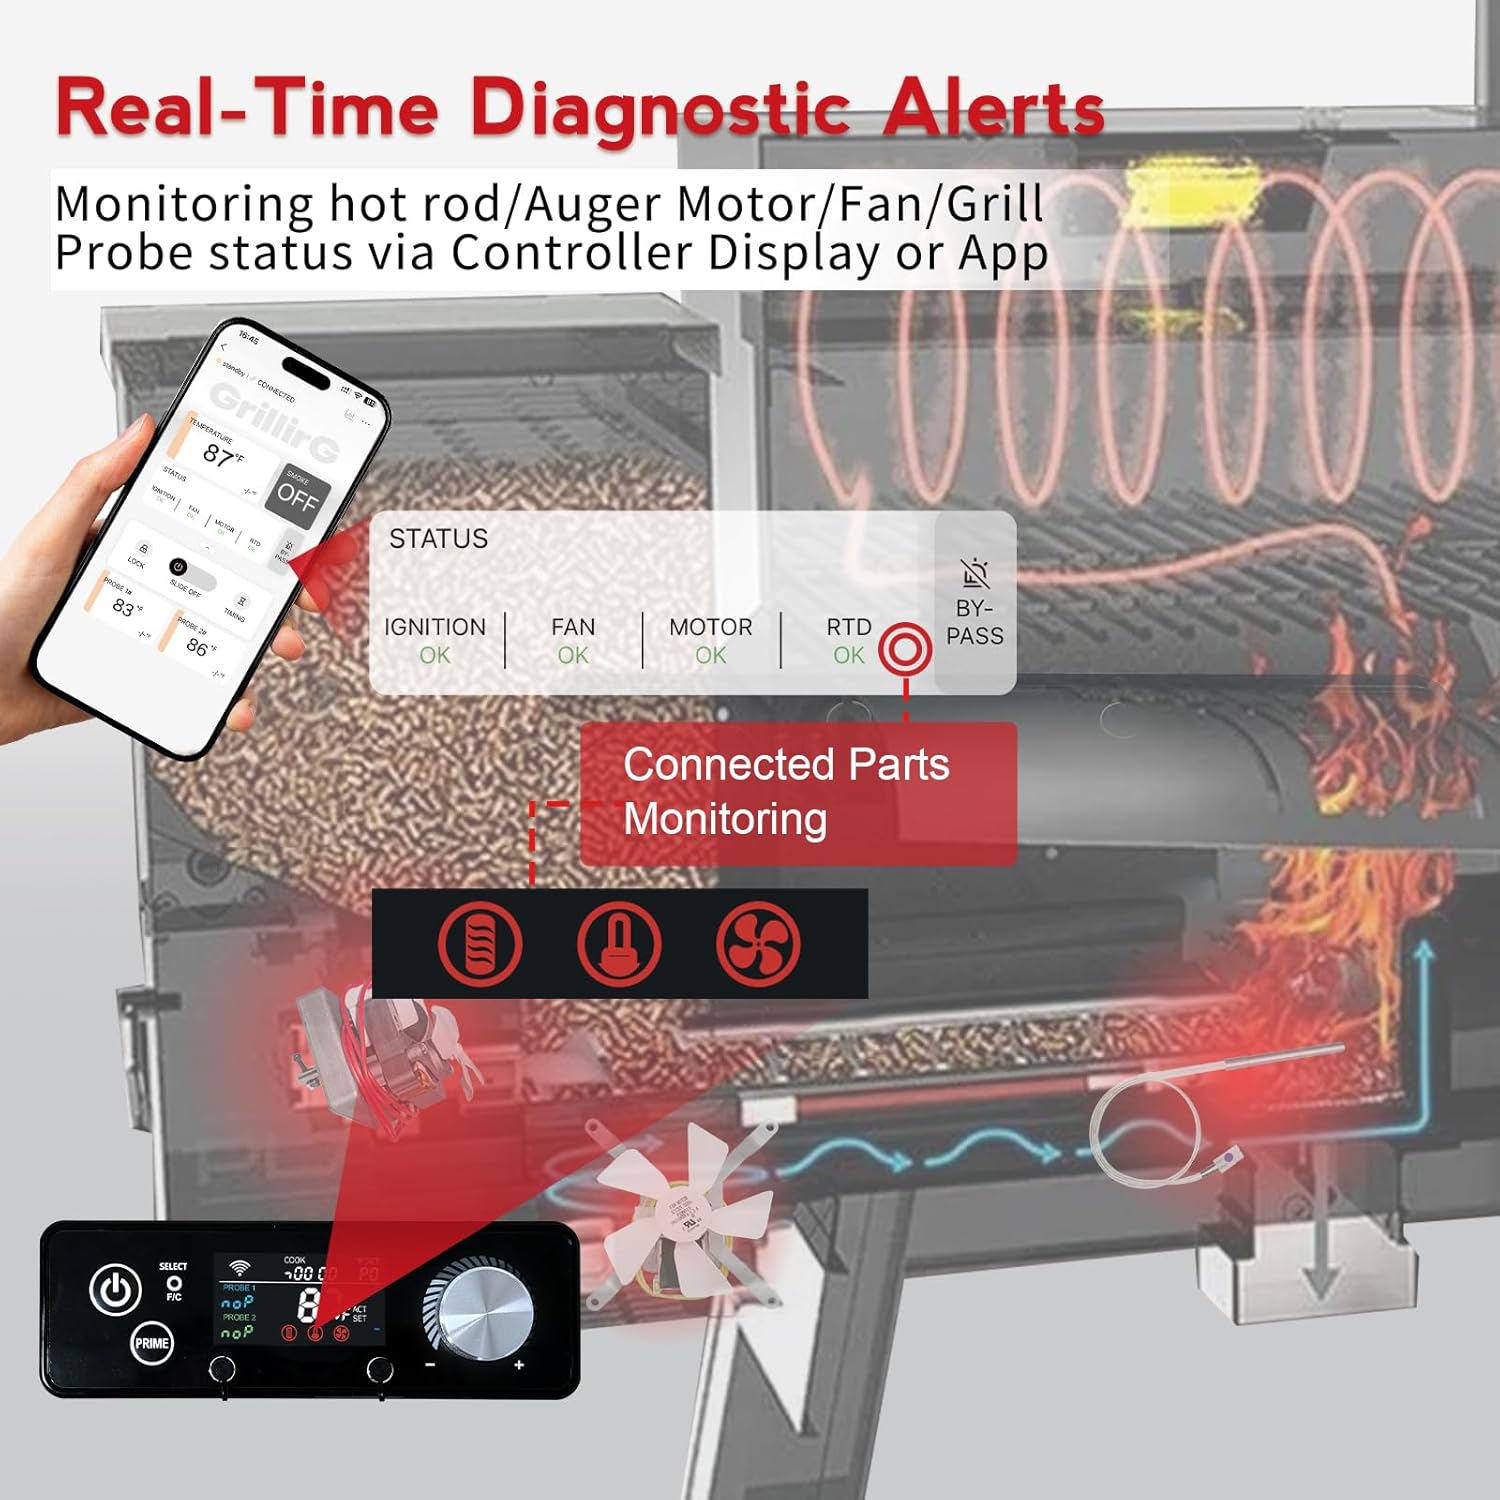
Image 6.1: Real-time diagnostic alerts on the controller and app.
Common Issues and Solutions:
- No Power:
- Check if the grill is properly plugged into a working outlet.
- Inspect the power cord for damage.
- Verify the internal fuse (if applicable) is intact.
- Temperature Fluctuations:
- Ensure the correct PID program is selected for your grill size.
- Check for sufficient pellets in the hopper.
- Verify the RTD grill probe is clean and properly installed.
- The normal "puffing" sound during operation is the PID system cycling the auger and fan to maintain steady temperature. This is not a malfunction.
- WiFi Connectivity Issues:
- Ensure your grill is within range of your WiFi router.
- Restart your router and the grill controller.
- Re-attempt the app pairing process.
- Component Failure Alerts (Hot Rod, Auger, Fan, RTD):
- An alert indicates a potential issue with the specified component (e.g., poor contact, short circuit, overload).
- Power off and unplug the grill. Inspect the wiring connections for the indicated component.
- If the issue persists after checking connections, the component may need replacement.
7. Specifications
| Feature | Detail |
|---|---|
| Model Number | P9Pro-W |
| Brand | Meatender |
| Compatibility | Rectangular circuit boards for Pit Boss 440-1600 series |
| Temperature Range | 180°F to 500°F |
| Temperature Adjustment | 1°F increments |
| Connectivity | WiFi (App-Enabled) |
| Included Components | 1 RTD Probe, 1 Screw & Nut (Hot Rod included with this product) |
| Display Type | Digital |
| Item Weight | 14 ounces (0.4 Kilograms) |
| Package Dimensions | 10 x 4.25 x 2.95 inches |
8. Warranty and Support
For warranty information and technical support, please refer to the official Meatender website or contact their customer service directly. Keep your purchase receipt for warranty claims.
Manufacturer: Meatender