
1. Product Overview
The RGBlink Mini V3 is a compact 4K video switcher designed for live streaming and multi-camera productions. It features 4 HDMI inputs, 2 1080P HDMI outputs, a 2.1" touch screen, and professional T-bar control. The device supports flexible TAO Cloud activation to unlock premium functions like PTZ control, recording, and logo overlay.
Key features include dual HDMI output, UVC webcam mode for direct connection to streaming platforms, HD recording to USB drives, and creative effects such as PIP layouts, chroma key, and 15 transition effects.

Image: The RGBlink Mini V3 Video Switcher, a compact black device with multiple HDMI ports, a T-bar, and a small touch screen display, shown with various cables connected.
2. Setup and Activation
2.1 Initial Setup
- Unpack the Mini V3 hardware and included accessories.
- Upgrade your Mini V3 to the latest firmware before use.
- Connect the device to the internet using an Ethernet network cable.
- Power on the device.
2.2 TAO Cloud Activation
The Mini V3 offers flexible activation options for premium functions via TAO Cloud (www.tao1live.com). You can choose monthly, yearly, or lifetime plans for features like PTZ control, recording, and logo overlay.
- On the Mini V3 menu, navigate to Settings → IP Setting.
- Enable DHCP and wait for the device to receive an IP address.
- Go to Settings → TAO Cloud.
- Follow the on-screen instructions to obtain a verification code.
- Log in to your TAO Cloud account on a computer or smart device.
- Navigate to My Collection → Devices → Binding Devices.
- Enter your chosen device name and the verification code, then click Bind to register your Mini V3.
- After successful binding, select your premium plan (monthly, yearly, or lifetime) and complete payment via PayPal.
- Once activated, the device supports full functionality according to your plan.

Image: A diagram illustrating the steps for TAO Cloud activation, including firmware upgrade, network connection, obtaining a verification code, and binding the device to a TAO Cloud account.
3. Operating Instructions
3.1 Connecting Devices
The Mini V3 supports multiple input and output options:
- HDMI Inputs: 4x HDMI inputs for cameras, laptops, game consoles, etc.
- HDMI Outputs: 2x 1080P HDMI outputs for program and preview monitoring.
- USB Output: UVC webcam mode for direct connection to computers for streaming.
- Audio: Line In and Audio Out ports for external audio sources and monitoring.
- USB Recording: USB 3.0 port for recording directly to USB drives.
- Network: Ethernet port for TAO Cloud features and software control.
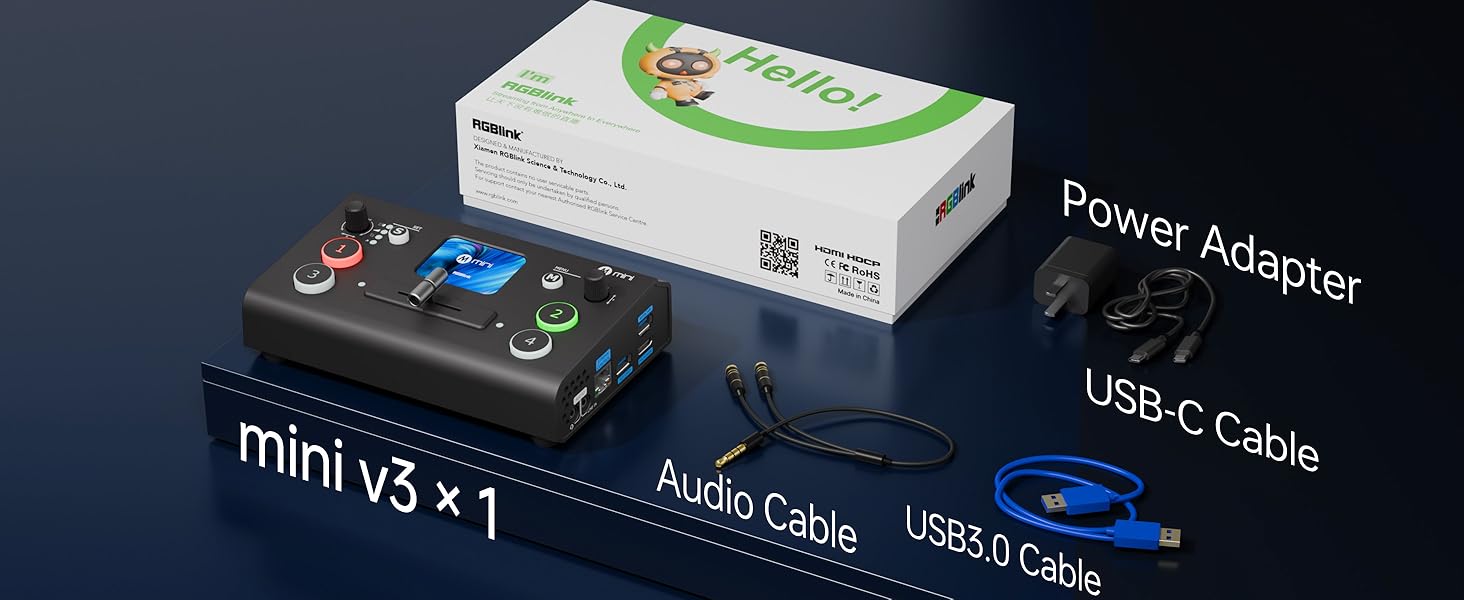
Image: A diagram showing the various input and output connections of the RGBlink Mini V3, including HDMI inputs, USB, audio, and network ports.
3.2 Switching Between Video Inputs
Use the numbered buttons (1-4) to select your desired input. The red button indicates the live program output, while the flashing button indicates the preview input. Use the T-bar for smooth transitions between inputs.
Video: An official RGBlink video demonstrating how to switch between 4 HDMI video inputs using the T-bar and numbered buttons on the Mini V3, showing the preview and program outputs on an external monitor.
3.3 Picture-in-Picture (PIP) and Chroma Key
Access the menu via the touch screen to enable and configure Picture-in-Picture (PIP) layouts or Chroma Key effects. The touch screen allows for intuitive control over these features.

Image: A visual representation of the Picture-in-Picture (PIP) function on the RGBlink Mini V3, showing a smaller video feed overlaid on a larger one.

Image: A demonstration of the Chroma Key function on the RGBlink Mini V3, showing how to remove a green screen background and replace it with another image.
3.4 Transition Effects
The Mini V3 includes 15 built-in transition effects to enhance your video production. Select your desired effect from the menu before transitioning between inputs.

Image: A display of the 15 built-in transition effects available on the RGBlink Mini V3, offering various visual transitions between video sources.
3.5 PTZ Camera Control
If you have a compatible PTZ camera and the feature is activated via TAO Cloud, you can control its pan, tilt, and zoom functions directly from the Mini V3's joystick and touch screen interface. You can also save and recall PTZ presets for quick camera movements.

Image: The Mini V3's touch screen showing "Views Saving" and "Fast Call" options, indicating built-in storage for PTZ presets for instant recall.
4. Recording
The Mini V3 supports HD recording directly to USB drives up to 2TB. Ensure your USB drive is formatted in exFAT or Fat32 for compatibility.
- Insert a compatible USB drive into the USB 3.0 port.
- Navigate to the recording settings on the touch screen.
- Select your desired recording quality (Low, Medium, High). Note: High quality records at 1920x1080 @ 60Hz.
- Press the record button to start and stop recording.
5. Maintenance
- Keep the device clean and free from dust. Use a soft, dry cloth for cleaning.
- Ensure proper ventilation to prevent overheating. Avoid blocking air vents.
- Regularly check for firmware updates on the RGBlink website to ensure optimal performance and access to new features.
6. Troubleshooting
6.1 No Video Output
- Check all HDMI cable connections.
- Ensure input sources are powered on and outputting a signal.
- Verify the correct input is selected on the Mini V3.
- Confirm the output resolution is supported by your display.
6.2 No Audio
- Check audio cable connections (Line In/Out).
- Verify audio levels on the Mini V3's audio menu.
- Ensure audio is enabled for the selected HDMI input if using embedded audio.
6.3 Fan Noise
The device has an internal fan for cooling. While generally not obtrusive, it may be audible. You can adjust fan speed settings in the device menu, but be mindful of potential overheating if set too low.
7. Specifications
| Feature | Detail |
|---|---|
| Model Number | 230-0010-01-0 |
| Color | mini V3 |
| Connector Type | HDMI, USB Type-A |
| Compatible Devices | Camcorder, Camera, Laptop, Monitor, Smartphone |
| Number of Ports | 12 |
| Item Weight | 0.49 Kilograms |
| Max Video Output | 1920x1080 @ 60Hz (Full HD) |
| HDMI Input Resolution | Up to 4K @ 60Hz |
8. Warranty and Support
The RGBlink Mini V3 comes with a 1-year manufacturer's warranty.
For further support, product information, or to explore other RGBlink products, please visit the official RGBlink store or website:


