
Product Overview
The Fanbulous 62-inch Oil Bronze ceiling fan combines modern design with advanced functionality, suitable for both indoor and outdoor spaces (avoiding direct rain exposure). It features a quiet DC motor, 8 dual-finish blades, and an integrated LED light with adjustable color temperatures, all controlled by a convenient remote.
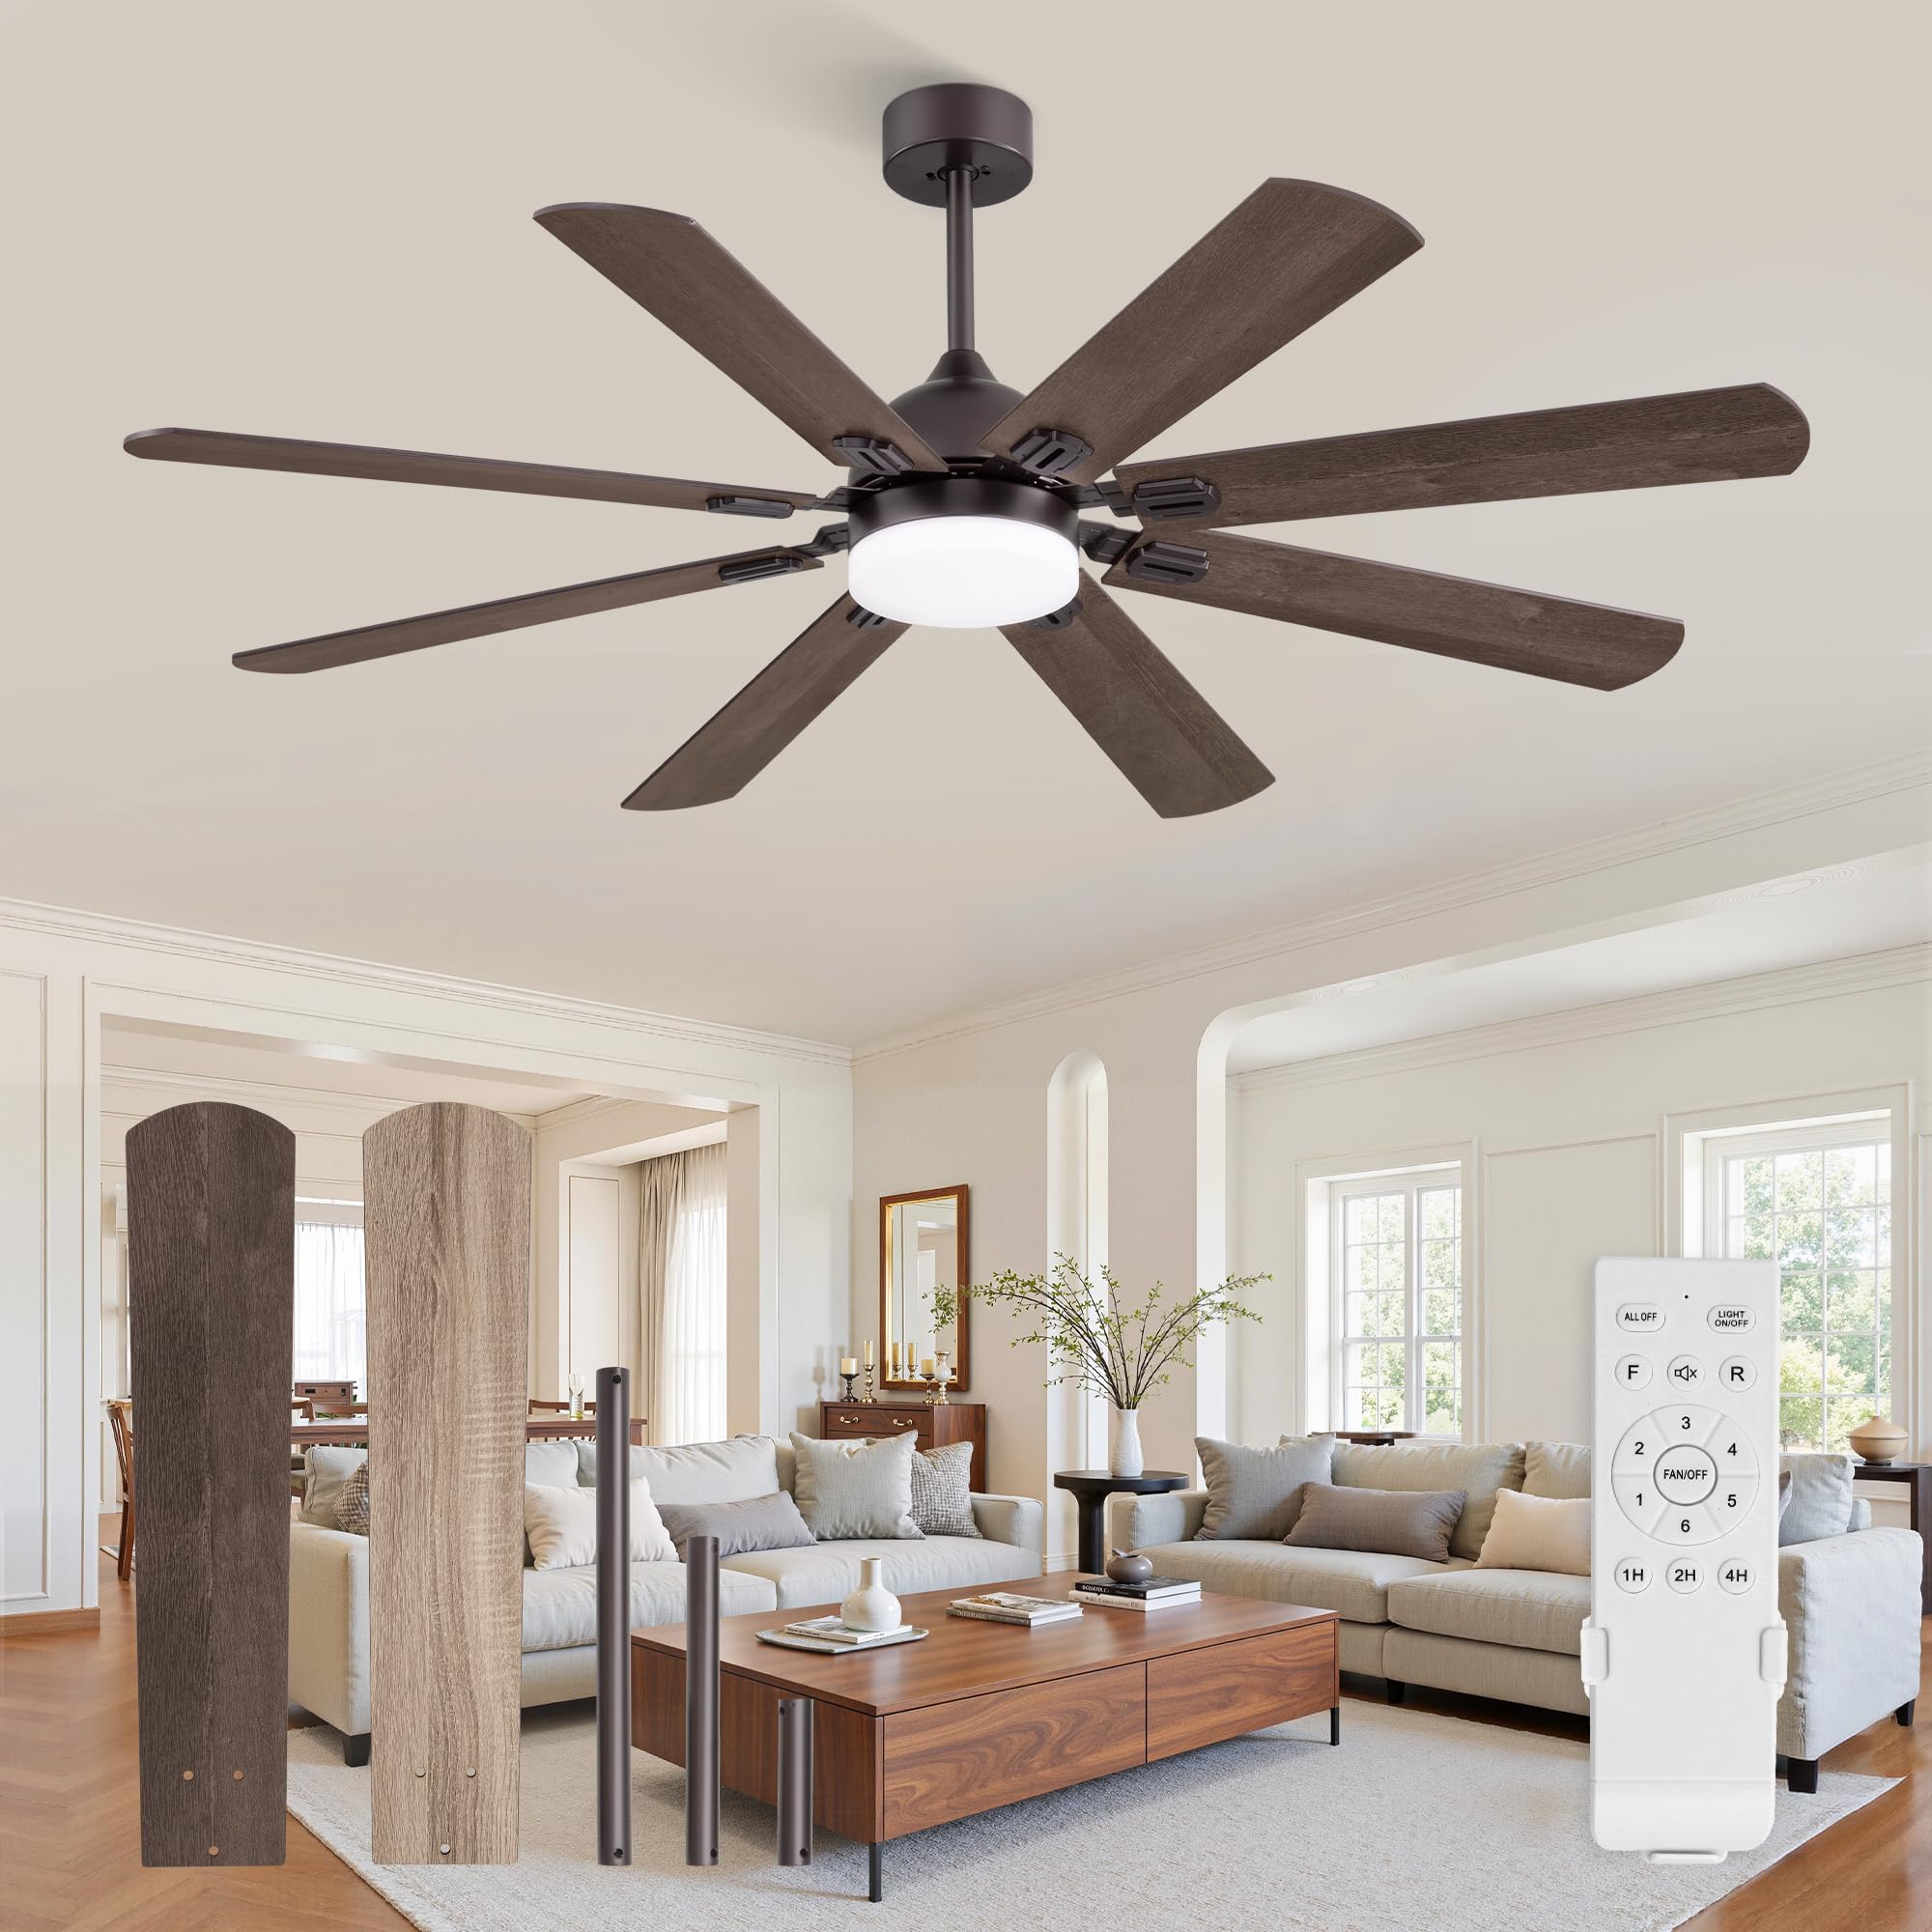
Image: Fanbulous 62-inch Oil Bronze Ceiling Fan. This image shows the complete Fanbulous 62-inch ceiling fan with its oil bronze finish and integrated LED light.
1. Safety Information
Please read and understand this entire manual before attempting to assemble, operate, or install the product. Failure to follow these instructions could result in electric shock, fire, or serious personal injury.
- Ensure the power is turned off at the circuit breaker before installation or maintenance.
- All wiring must be in accordance with national and local electrical codes.
- The fan must be mounted to a ceiling joist or support structure capable of supporting a minimum of 35 lbs (15.9 kg).
- Do not bend the blade holders during installation or cleaning.
- Keep children away from the fan when it is operating.
- Do not use the fan with a solid-state speed control device.
2. Package Contents
Carefully unpack your fan and check the contents. You should have the following items:
- Ceiling Fan Motor Assembly with Integrated LED Light
- 8 Fan Blades (Dual Finish: Oil Bronze and Light Walnut)
- Remote Control (2 AAA batteries included)
- Receiver/Module for Remote Control
- Downrods (5", 10", 15" options)
- Mounting Bracket
- Hardware Pack (screws, wire nuts, anchors)
- User Manual
Video: Fanbulous 62-inch Ceiling Fan with Lights controlled by Remote. This video demonstrates the fan's features, including the quiet DC motor, LED light, and remote control operation.
3. Specifications
| Feature | Detail |
|---|---|
| Brand | Fanbulous |
| Model Name | YW62 |
| Size | 62 Inch |
| Color | Oil Bronze |
| Number of Blades | 8 (Dual Finish: Oil Bronze / Light Walnut) |
| Motor Type | DC Brushless Motor |
| Noise Level | ≤ 35 Decibels |
| Air Flow Capacity | 4956 Cubic Centimeters Per Minute |
| Light Wattage | 24W LED (1800LM) |
| Color Temperatures | 3000K (Warm), 4000K (Neutral), 6000K (White) |
| Control Method | Remote Control |
| Downrod Lengths | 5", 10", 15" (Included) |
| Sloped Ceiling Compatibility | Up to 15° |
| Indoor/Outdoor Usage | Indoor, Outdoor (Avoid direct rain exposure) |
| Power Source | AC, 120 Volts |
| Item Weight | 13 Pounds |
4. Setup & Installation
Professional installation is recommended. Ensure all power is disconnected at the circuit breaker before beginning installation.
4.1 Mounting the Fan
- Secure the Mounting Bracket: Attach the mounting bracket to a ceiling joist or a suitable support structure. Ensure it can safely support the fan's weight.
- Choose Downrod Length: Select the appropriate downrod (5", 10", or 15") based on your ceiling height. The fan can be installed on sloped ceilings up to 15 degrees.
- Assemble Downrod and Motor: Feed the fan wires through the chosen downrod and attach the downrod to the fan motor assembly.
- Hang the Fan: Carefully lift the fan assembly and hang it from the mounting bracket.
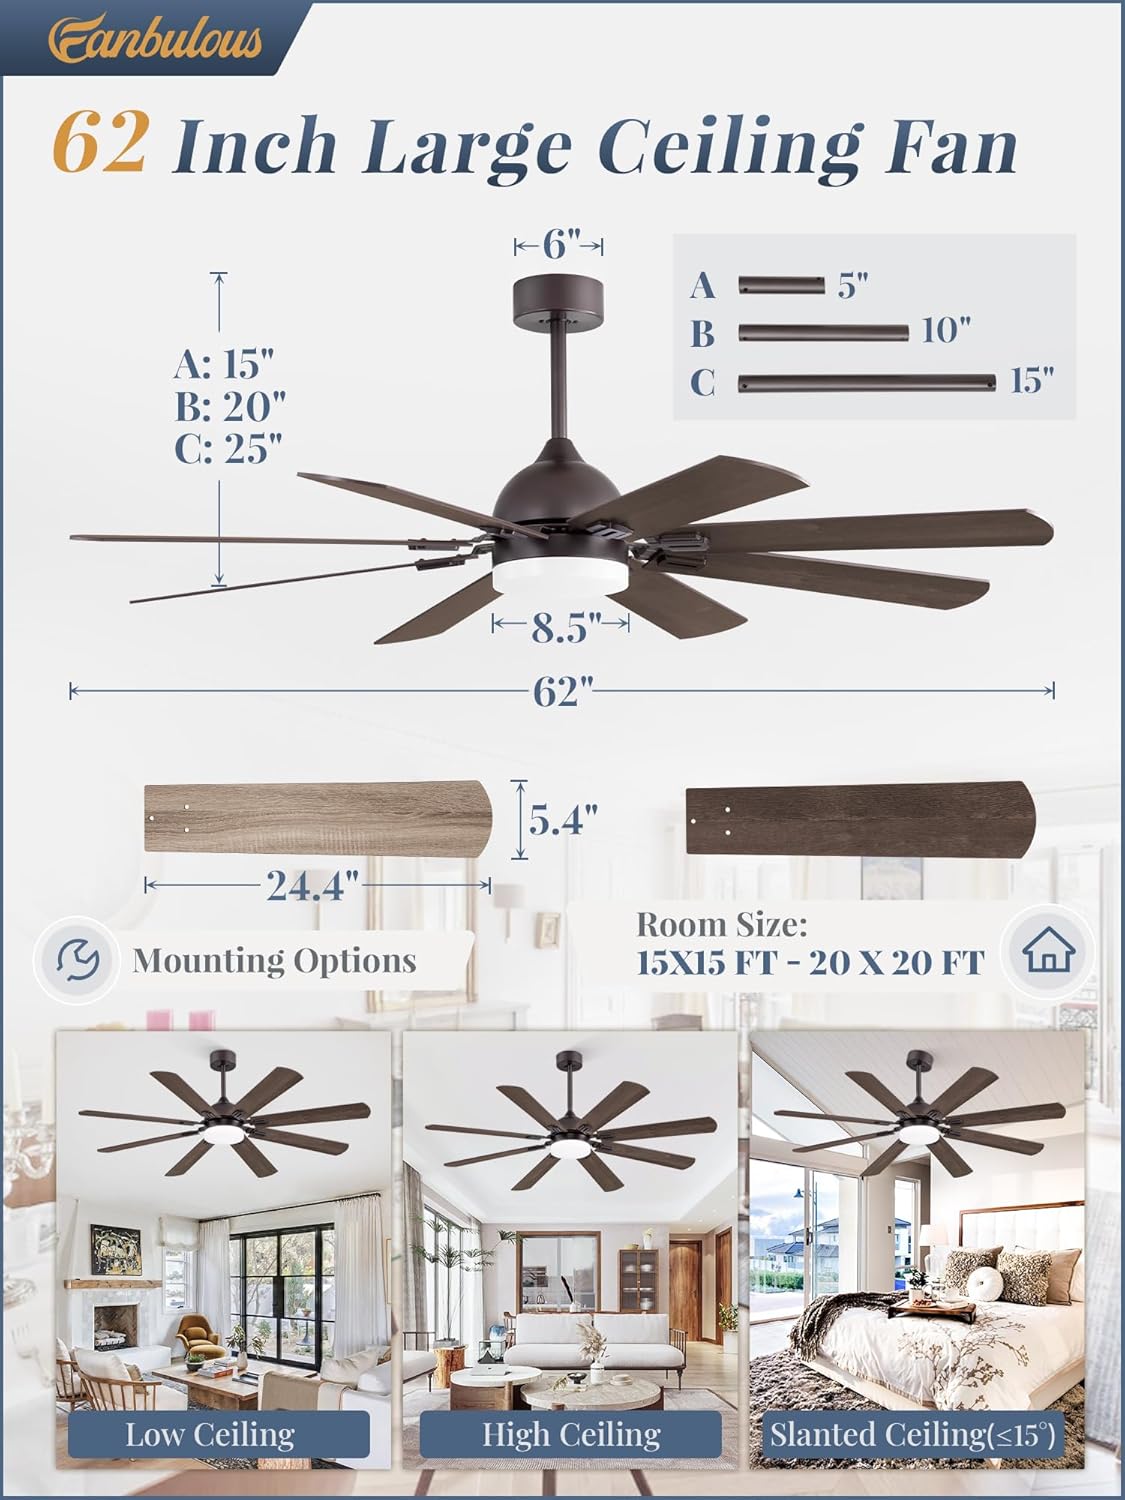
Image: Fanbulous Ceiling Fan Dimensions and Mounting Options. This image illustrates the fan's dimensions and shows examples of low ceiling, high ceiling, and slanted ceiling installations.
4.2 Wiring
- Connect Electrical Wires: Connect the fan's electrical wires to the household wiring according to local electrical codes. Ensure proper grounding.
- Install Remote Receiver: Place the remote control receiver inside the canopy. Connect the receiver wires to the fan and household wiring as per the wiring diagram in the full manual.
- Secure Canopy: Attach the canopy to the mounting bracket, covering the wiring connections.
4.3 Attaching Fan Blades
- Select Blade Finish: The blades are dual-sided. Choose either the Oil Bronze or Light Walnut finish to face downwards.
- Attach Blades: Securely attach each of the 8 fan blades to the motor housing using the provided screws. Ensure all screws are tightened to prevent wobbling.

Image: Fanbulous Ceiling Fan Dual-Sided Blades. This image highlights the two available finishes for the fan blades: Oil Bronze and Light Walnut.
4.4 Installing the LED Light
- Connect LED Wires: Connect the LED light module wires to the corresponding wires from the fan motor.
- Secure Light Kit: Attach the LED light kit to the bottom of the fan motor assembly.
5. Operating Instructions
Your Fanbulous ceiling fan is operated using the included remote control. Ensure the 2 AAA batteries are correctly installed in the remote.

Image: Fanbulous Ceiling Fan Remote Control Features. This image displays the remote control and its various buttons for fan speed, light control, and timer settings.
5.1 Fan Speed Control
- Press buttons 1 through 6 to select desired fan speed. 1 is the lowest speed, and 6 is the highest.
- Press FAN/OFF to turn the fan off.

Image: Fanbulous Ceiling Fan Quiet Operation. This image highlights the fan's quiet operation, with a noise level below 35 dB, suitable for peaceful environments.
5.2 LED Light Control
- Press LIGHT ON/OFF to turn the LED light on or off.
- Color Temperature Adjustment: The LED light offers three color temperatures (3000K Warm, 4000K Neutral, 6000K White).
- To change the color temperature, quickly toggle the light switch (wall switch or remote button).
- The light features a memory function: if the switch is toggled again after more than 10 seconds, the light color will not change from its last setting.

Image: Fanbulous Ceiling Fan 3-Color Temperature LED Light. This image demonstrates the three adjustable color temperatures of the integrated LED light: 3000K Warm Light, 4000K Natural Light, and 6000K Cold White Light.
5.3 Reversible DC Motor (Summer/Winter Modes)
- Press the R button on the remote to reverse the fan blade direction.
- Summer Mode (Downward Airflow): Blades rotate counter-clockwise, pushing cool air down to create a cooling effect.
- Winter Mode (Upward Airflow): Blades rotate clockwise, drawing cool air up and pushing warm air down from the ceiling, optimizing heat distribution.

Image: Fanbulous Ceiling Fan Reversible DC Motor. This image visually explains the summer mode (downward airflow) and winter mode (upward airflow) functions of the fan.
5.4 Timer Function
- Press the 1H, 2H, or 4H buttons on the remote to set the fan to automatically turn off after 1, 2, or 4 hours, respectively.
6. Maintenance
Regular maintenance ensures optimal performance and longevity of your ceiling fan.
- Cleaning: Periodically clean the fan blades and motor housing with a soft, damp cloth. Do not use abrasive cleaners or solvents.
- Tighten Screws: Check all screws and connections annually to ensure they are secure. Loose connections can cause noise or wobbling.
- Blade Balance: If the fan wobbles, ensure all blades are securely attached and consider using a blade balancing kit (not included) if necessary.
- Light Source: The integrated LED light is designed for long life. If replacement is needed, contact Fanbulous customer service.
7. Troubleshooting
Before attempting any repairs, ensure the power is turned off at the circuit breaker.
| Problem | Possible Cause | Solution |
|---|---|---|
| Fan does not start | No power to the fan; Loose wire connections; Remote control issues. | Check circuit breaker and wall switch. Ensure all wiring connections are secure. Replace remote batteries. Re-pair remote if necessary (refer to full manual). |
| Light does not work | Loose wire connection to light kit; Faulty LED module. | Check light kit wiring connections. If problem persists, contact customer service for LED module replacement. |
| Fan wobbles | Loose blade screws; Unbalanced blades; Loose mounting bracket. | Tighten all blade screws. Ensure blades are installed correctly. Use a blade balancing kit. Verify mounting bracket is securely fastened to the ceiling. |
| Noisy operation | Loose screws; Motor hum; Blades hitting an obstruction. | Check and tighten all screws. Ensure no blades are hitting anything. A slight motor hum is normal for DC motors, but excessive noise may indicate an issue. |
| Remote not working | Dead batteries; Remote not paired; Obstruction between remote and receiver. | Replace batteries. Ensure remote is within range and not obstructed. Re-pair remote with receiver (refer to full manual for specific steps). |
8. Warranty & Support
Fanbulous stands behind the quality of its products.
- Motor Warranty: 5-year warranty on the fan motor.
- Other Parts Warranty: 2-year warranty on all other parts.
- Customer Support: The dedicated Fanbulous team is available 24 hours online to assist you with any questions or issues, ensuring your satisfaction for a long time after purchase.
- For warranty claims or technical support, please contact Fanbulous customer service through their official channels.