
1. Introduction and Overview
The RECOIL CRX-PRO is an advanced electronic car audio crossover designed to precisely manage audio signals within your vehicle's sound system. It professionally splits audio signals into 5 optimized frequency bands: Low, Low Mid, High Mid, High, and a Through-Pass channel. This precise distribution, coupled with adjustable crossovers ranging from 30Hz to 20kHz, effectively eliminates frequency overlap, ensuring crystal clear sound staging and optimal performance from your speakers.
This manual provides detailed instructions for the proper installation, operation, and maintenance of your CRX-PRO unit, helping you achieve a superior audio experience.
2. Key Features
- 5-Way Precision Frequency Distribution: Divides audio signals into Low, Low Mid, High Mid, High, and Through-Pass bands with adjustable crossovers (30Hz to 20kHz) for clear staging.
- Studio Quality Sound Purity: Achieves very low 0.01% THD floor noise and 85dB crosstalk rejection, preserving signal integrity for reference-quality sound.
- Deep Bass Optimization System: Features a Triple Bass Control including a Subsonic filter (Bypass/40/60/80Hz) for subwoofer protection, Bass Boost (+10dB @ 40Hz) for enhanced kick drums, and a Phase Inverter (0°/180°) to eliminate cancellation.
- Plug-and-Play Pro Installation: Integrated input selector (SUB/LOW or FRONT/REAR), remote ignition cable, and color-coded RCA jacks simplify setup. No DSP programming is required, allowing for approximately 15-minute installation.
- Industry-Grade Reliability: Built with military circuit protection (reverse polarity/overload) within a durable aluminum chassis (224 x 116 x 30 mm).
3. Setup and Installation
Proper installation is crucial for optimal performance and longevity of your RECOIL CRX-PRO. Follow these steps carefully.
3.1 Power and Remote Connections
Connect the power wires to the designated terminals on the unit:
- +12V (BAT): Connect to a constant +12V power source from your vehicle's battery. Ensure an inline fuse (not included) is used for protection.
- GND: Connect to a solid chassis ground point on your vehicle.
- REM (Remote In): Connect to the remote turn-on output of your head unit or ignition switch. This signal turns the CRX-PRO on and off with your vehicle's audio system.
- REM OUT (Remote Out): Provides remote turn-on signals for up to three external amplifiers (AMP1, AMP2, AMP3). These outputs are sequenced to prevent turn-on/off pops.
3.2 Audio Input and Output Connections
Use high-quality RCA cables for all audio connections.
- SUB/LOW Input: Connect to the subwoofer or low-frequency RCA output from your head unit.
- FRONT/REAR Input: Connect to the front or rear full-range RCA output from your head unit.
- Pass Thru Output: Provides a full-range signal pass-through, useful for connecting additional processors or amplifiers.
- LOW Output: Connects to the amplifier powering your subwoofers or low-frequency speakers.
- LOW MID Output: Connects to the amplifier powering your low-mid range speakers.
- HIGH MID Output: Connects to the amplifier powering your high-mid range speakers.
- HIGH Output: Connects to the amplifier powering your tweeters or high-frequency speakers.

Figure 1: Detailed diagram showing the various input and output connections on the RECOIL CRX-PRO unit, including power, remote, and RCA audio connections.
3.3 Initial Power-Up
Once all connections are secure, turn on your head unit. The CRX-PRO should power on, followed by your connected amplifiers in sequence, preventing any audible pops or thumps.
4. Operating the CRX-PRO
The CRX-PRO offers extensive control over your audio system's frequency response and signal distribution.
4.1 Frequency Band Adjustment
Each output channel (LOW, LOW MID, HIGH MID, HIGH) features dedicated controls for precise tuning:
- Adjustable Crossovers: Use the rotary knobs to set the high-pass (HPF) and low-pass (LPF) filter frequencies for each band. This ensures that each speaker receives only the frequencies it is designed to reproduce.
- Level Controls: Adjust the output level for each channel to balance the sound across your system.
- Phase Inverter (0°/180°): Available on select channels (e.g., LOW output) to correct phase alignment issues between speakers, especially subwoofers, and prevent cancellation.
4.2 Deep Bass Optimization
The LOW output channel includes specialized controls for bass management:
- Subsonic Filter: Selectable at Bypass, 40Hz, 60Hz, or 80Hz. This filter removes ultra-low frequencies that subwoofers cannot reproduce efficiently, protecting them from damage and improving overall bass clarity.
- Bass Boost: Provides up to +10dB of boost at 40Hz to enhance the impact of kick drums and deep bass notes.

Figure 2: Diagram illustrating the Deep Bass Optimization System controls, including Subsonic Filter, Bass Boost, and Phase Inverter.
4.3 Input Selection
Use the input selector switch to choose between SUB/LOW or FRONT/REAR inputs, depending on your head unit's configuration and desired signal routing.
5. Maintenance
To ensure the longevity and optimal performance of your RECOIL CRX-PRO, follow these simple maintenance guidelines:
- Cleaning: Use a soft, dry cloth to wipe down the unit. Avoid using harsh chemicals, solvents, or abrasive cleaners, as these can damage the finish or internal components.
- Ventilation: Ensure the unit is installed in a location with adequate airflow to prevent overheating. Do not block the ventilation fins.
- Connections: Periodically check all power and audio connections to ensure they are secure and free from corrosion. Loose connections can lead to signal loss or intermittent performance.
- Environment: Protect the unit from extreme temperatures, direct sunlight, and moisture.
6. Troubleshooting
If you experience issues with your CRX-PRO, consult the following troubleshooting tips before contacting support:
- No Power:
- Check the +12V (BAT) connection and ensure the inline fuse is intact.
- Verify the GND connection for a solid chassis ground.
- Confirm the REM (Remote In) wire is receiving a +12V signal from your head unit.
- No Audio Output:
- Ensure all RCA input and output cables are securely connected.
- Check the input selector switch to ensure the correct input source is selected.
- Verify that the level controls for each output channel are not set to minimum.
- Confirm that connected amplifiers are powered on and functioning correctly.
- Distorted Sound:
- Reduce the input level from your head unit or the output levels on the CRX-PRO.
- Check the gain settings on your connected amplifiers.
- Ensure crossover frequencies are set appropriately for your speakers to avoid over-excursion or strain.
- Audible Pops/Thumps:
- Verify the remote turn-on sequence. The CRX-PRO should turn on before amplifiers and turn off after amplifiers. The built-in sequencer helps manage this.
7. Specifications
| Manufacturer | RECOIL |
| Part Number | CRX-PRO |
| Item Model Number | CRX-PRO |
| Item Weight | 898 g |
| Parcel Dimensions | 27.51 x 20.8 x 5.89 cm |
| Mounting Type | Freestanding |
| Included Components | 5-way electronic crossover |
| Batteries Required? | No |
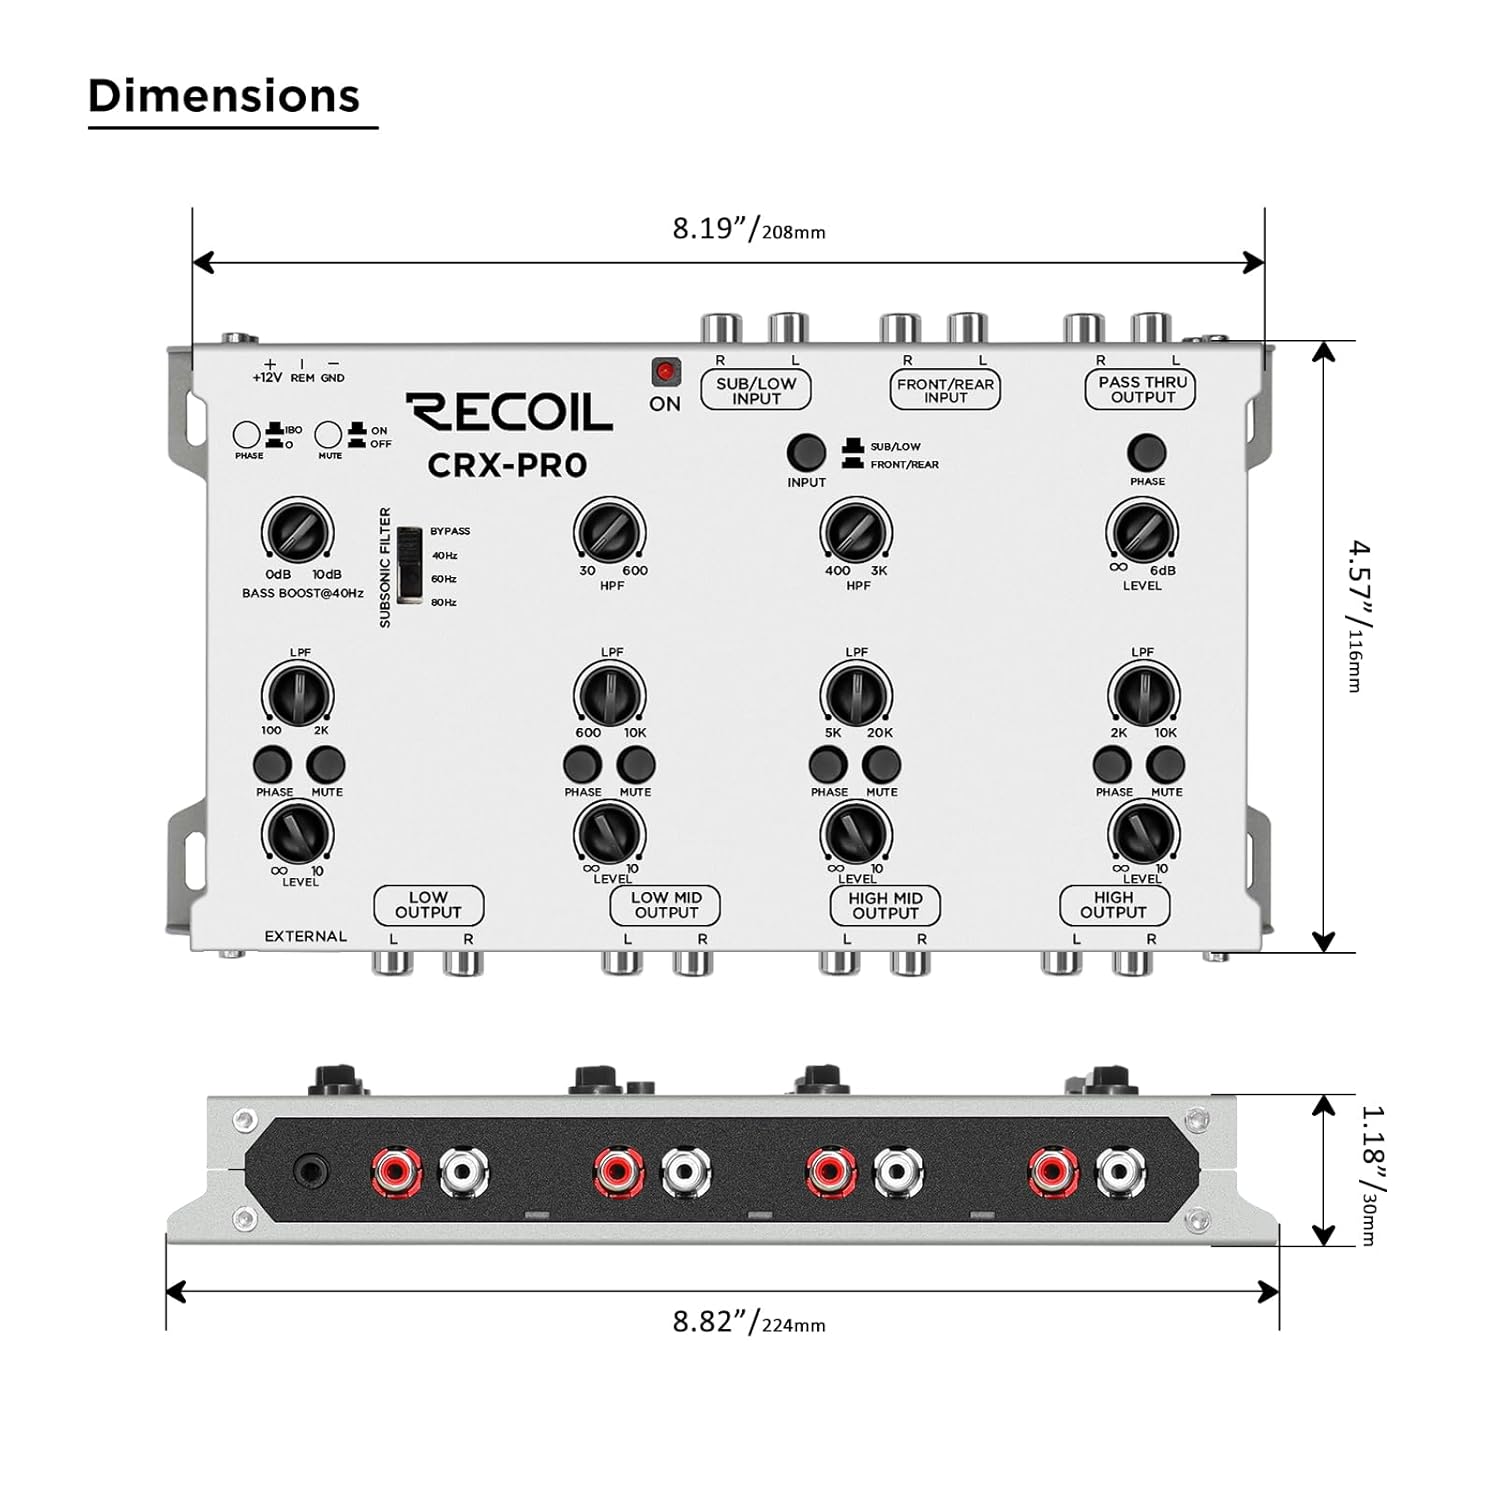
Figure 3: Diagram showing the physical dimensions of the RECOIL CRX-PRO unit.
8. Warranty
The RECOIL CRX-PRO is backed by a 12-month warranty against defects. This warranty covers manufacturing defects and ensures your product performs as expected under normal use. For specific terms and conditions, please refer to the warranty card included with your product or contact RECOIL customer support.
9. Support
For technical assistance, troubleshooting beyond this manual, or warranty claims, please contact RECOIL customer support. You can typically find contact information on the product packaging, the official RECOIL website, or through your authorized dealer. Please have your product model number (CRX-PRO) and purchase information ready when contacting support.