1. Product Overview
The GAMDIAS ATHENA M4M WOOD is a compact micro-ATX gaming case designed for high-performance builds. It features a real walnut-finish mesh front panel and a tempered glass side panel, offering both aesthetic appeal and component visibility. This case supports micro-ATX and mini-ITX motherboards and is optimized for efficient cooling and smart cable management.
Key Features:
- Premium Design: Real walnut-finish mesh front panel and tempered glass side panel.
- High-Airflow Cooling: Includes three pre-installed 120mm NOTUS M1 fans (two front intake, one rear exhaust). Supports up to nine fans and dual 360mm radiators (top and bottom).
- Compact Compatibility: Accommodates micro-ATX and mini-ITX motherboards, graphics cards up to 395mm, and CPU coolers up to 175mm.
- Smart Layout: Front-mounted PSU with downward-facing connectors for improved cable management. Supports connector-hidden (BTF) motherboards.
- Modern Connectivity: Front I/O includes one USB 3.2 Gen2 Type-C port, two USB 3.0 ports, and audio connectivity.
- Dust Resistance: Equipped with dust filters on the top, front, bottom, and side.
- Flexible Storage: Supports one 3.5" drive and multiple 2.5" bays.

Figure 1: GAMDIAS ATHENA M4M WOOD Micro-Tower Gaming Case, front-side view.
2. Setup and Installation
This section provides general guidelines for installing components into your ATHENA M4M WOOD case. For detailed, step-by-step visual instructions, please refer to the official online manual by scanning the QR code provided with your product packaging.
2.1 Preparing the Case
- Remove Side Panels: Locate the thumb screws on the tempered glass side panel and the solid side panel. Unscrew them and carefully remove both panels.
- Accessory Kit: Locate the accessory box inside the case, which contains screws, cable ties, and other mounting hardware.
2.2 Motherboard Installation
- Ensure the correct standoffs are installed for your micro-ATX or mini-ITX motherboard.
- Carefully place the motherboard into the case, aligning it with the standoffs and the I/O shield opening.
- Secure the motherboard with the provided screws.
2.3 Power Supply Unit (PSU) Installation
The ATHENA M4M WOOD features a front-mounted PSU design. The PSU is installed vertically at the front of the case, with its connectors oriented downwards for easier cable management.
- Mount the PSU to the designated bracket at the front of the case.
- Secure the PSU with screws. Ensure all cables are routed through the cable management cutouts.
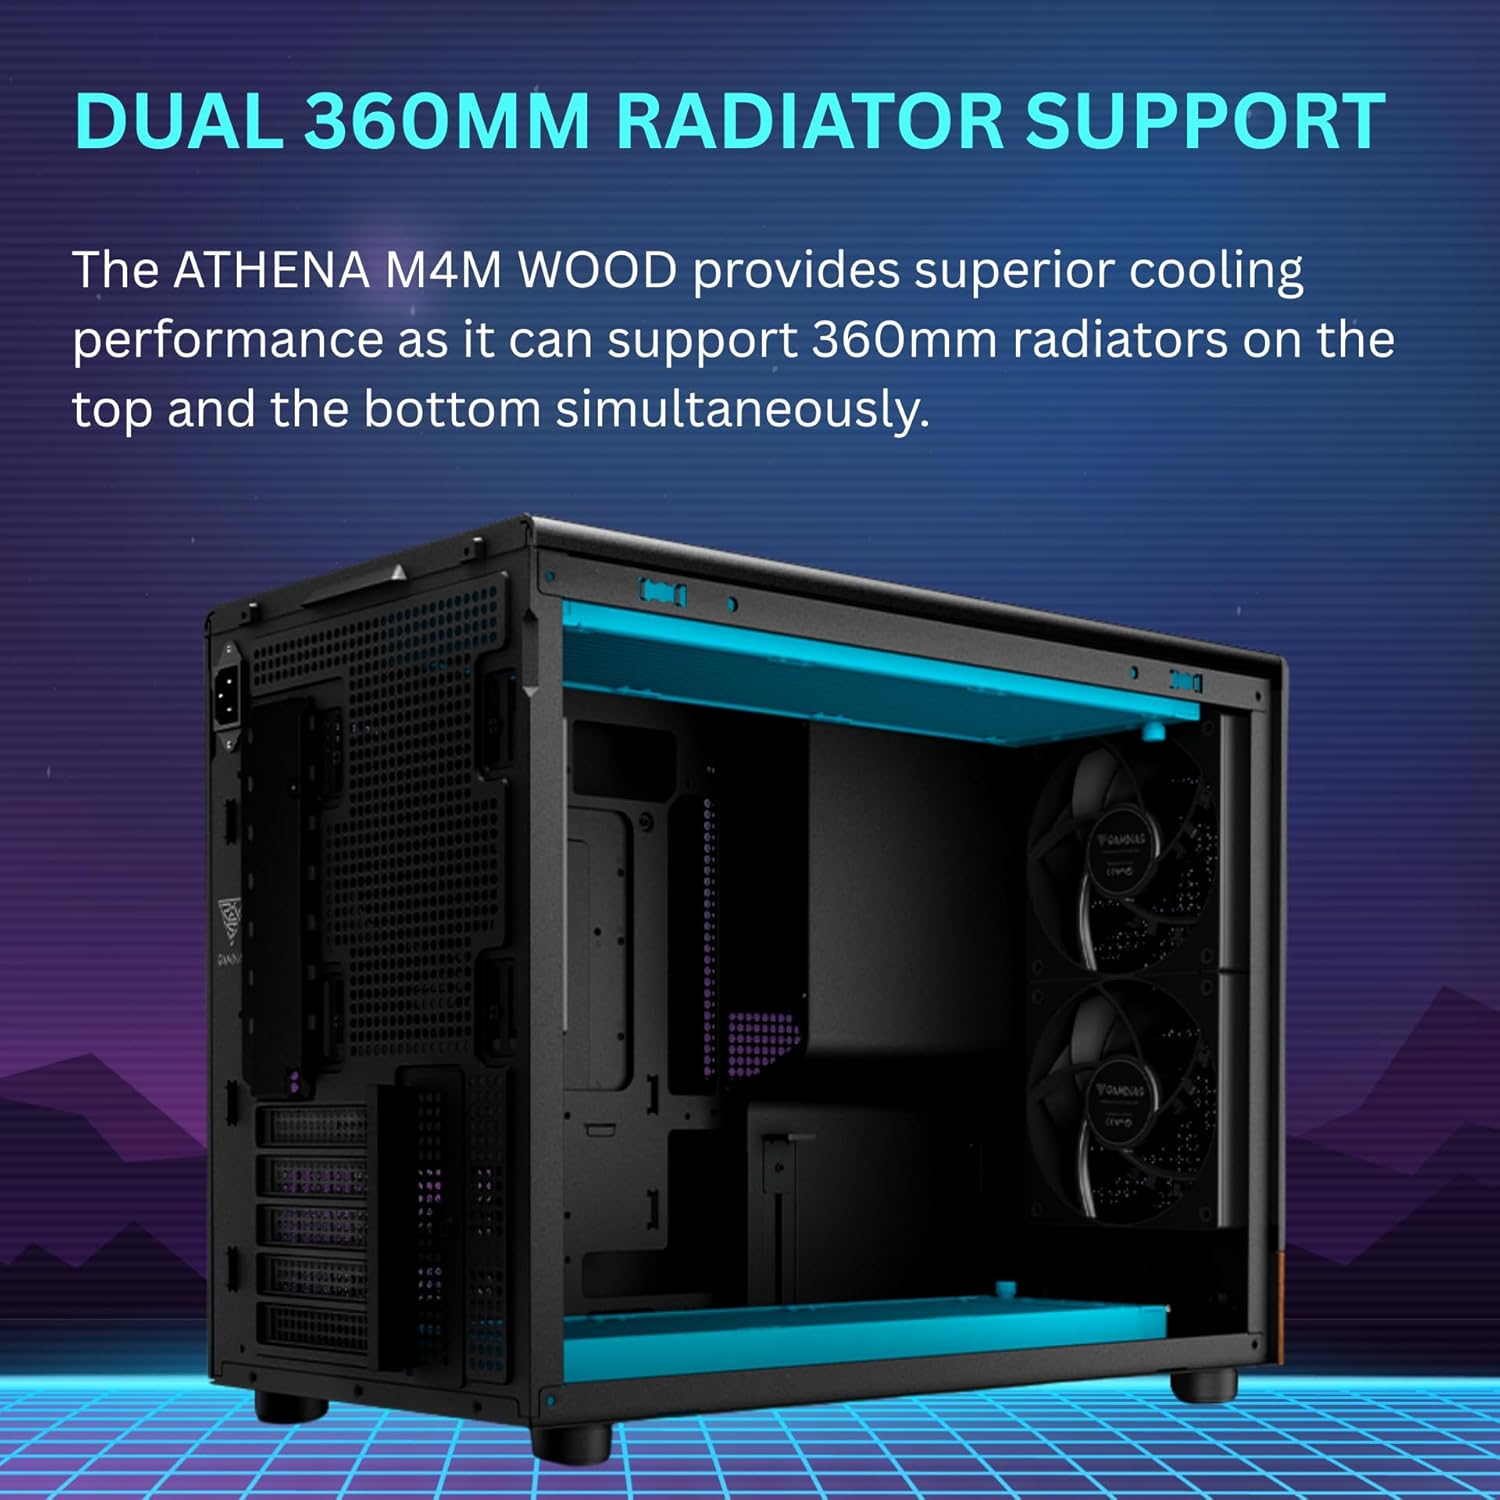
Figure 2: Illustration of the front-mounted PSU design with downward-facing connectors.
2.4 Graphics Card (VGA) Installation
- Remove the necessary PCIe slot covers from the rear of the case.
- Insert the graphics card into the appropriate PCIe slot on the motherboard.
- Secure the graphics card with screws. The case includes a built-in support bracket for longer GPUs.
2.5 Cooling System Installation (Fans & Radiators)
The case comes with three pre-installed 120mm NOTUS M1 fans. Additional fans and radiators can be installed as follows:
- Front: Supports up to two 120mm fans (two pre-installed).
- Rear: Supports one 120mm fan (one pre-installed).
- Top: Supports up to three 120mm fans or one 360mm radiator.
- Bottom: Supports up to three 120mm fans or one 360mm radiator.
- Side: Supports up to two 120mm fans.

Figure 3: Extensive airflow configuration with three built-in PWM fans.
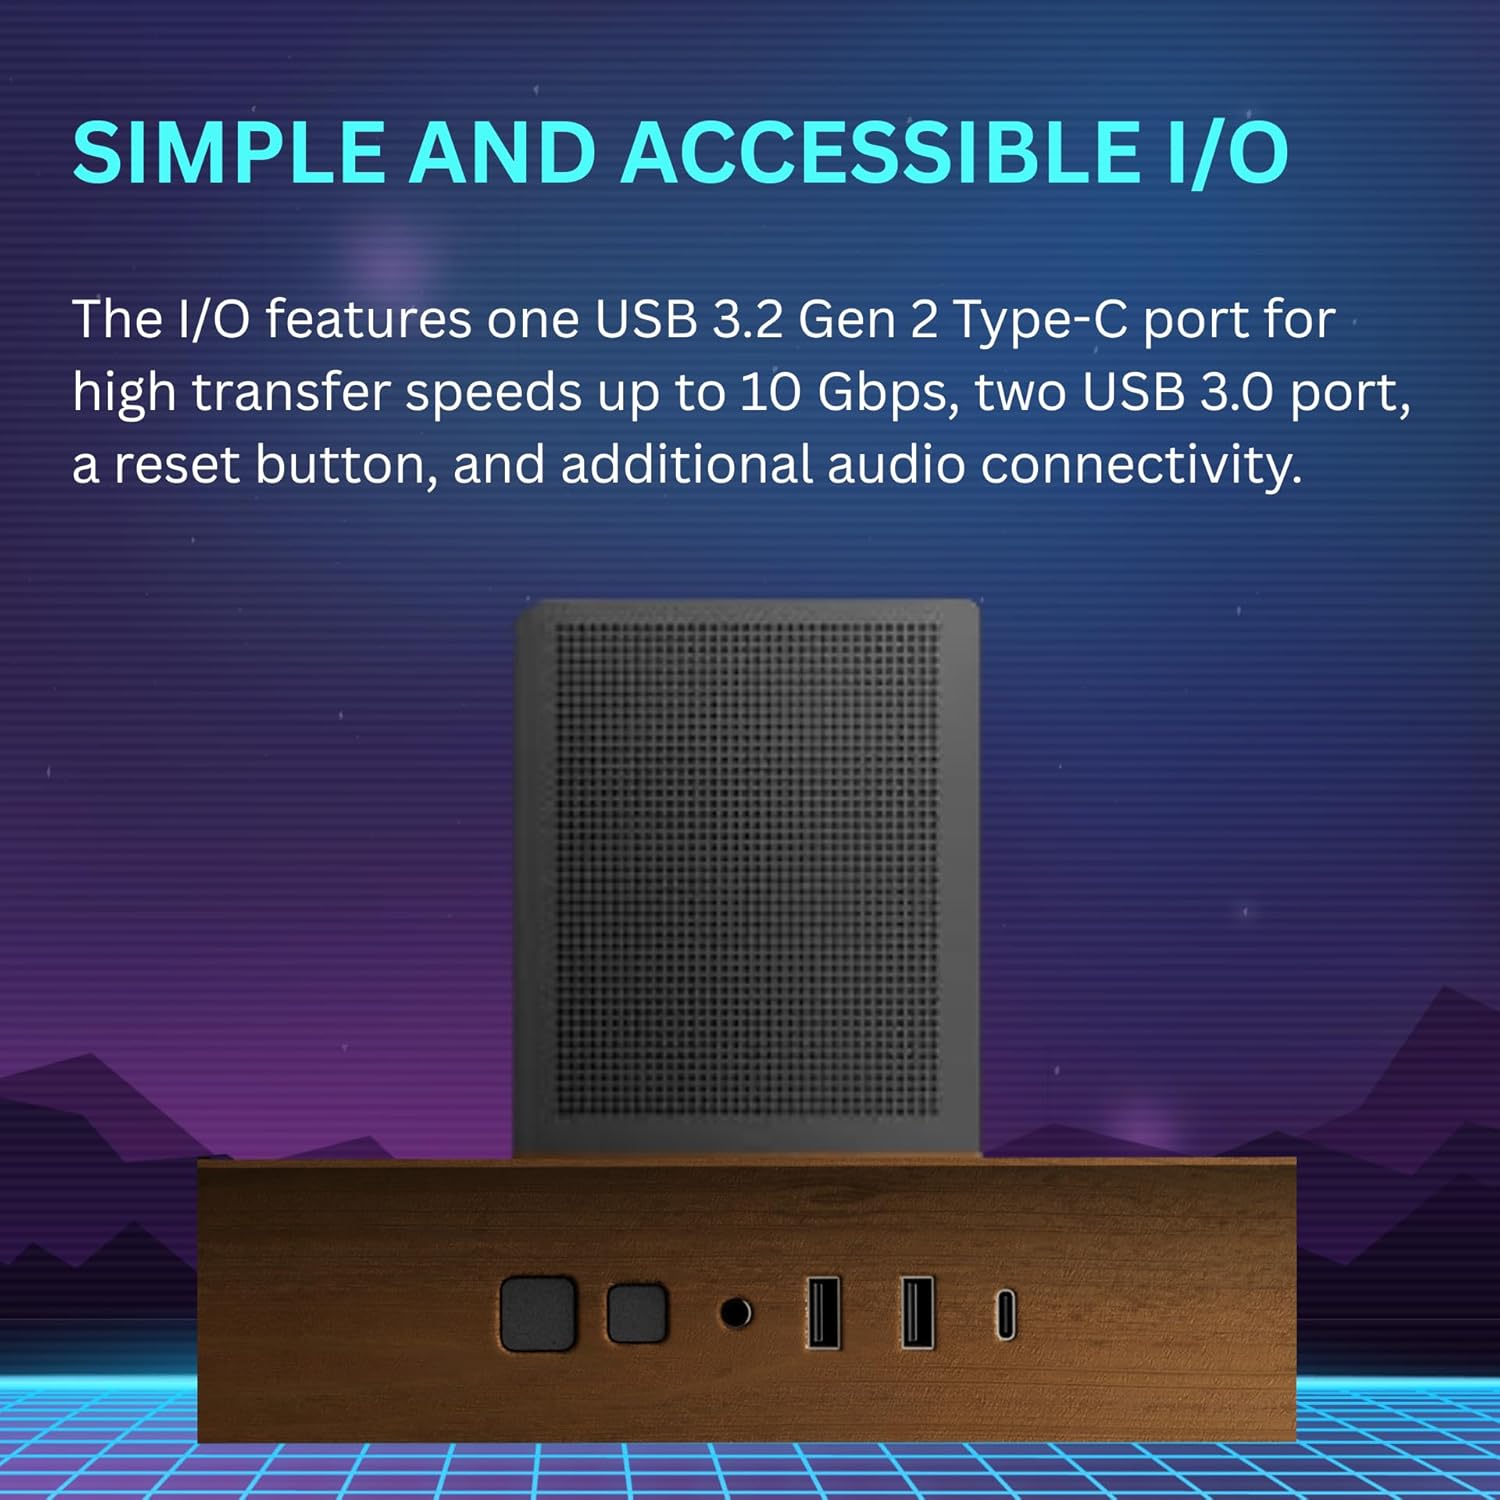
Figure 4: Dual 360mm radiator support for top and bottom mounting.

Figure 5: Cooling compatibility diagram showing fan and radiator placements.
2.6 Storage Drive Installation
The case provides flexible storage options:
- One 3.5" HDD bay.
- Multiple 2.5" SSD bays.
Mount your drives to the designated brackets using the provided screws.

Figure 6: Flexible storage options for HDDs and SSDs, also showing dust filters.
2.7 Cable Management
Utilize the cable routing cutouts and tie-down points behind the motherboard tray to organize cables. The front-mounted PSU with downward-facing connectors simplifies cable routing. For BTF (Back-To-the-Future) motherboards, the case is designed to accommodate hidden connectors for an ultra-clean build.
3. Operating Instructions
3.1 Front I/O Panel
The front I/O panel provides convenient access to essential ports and controls:
- Power Button: To turn the system on or off.
- Reset Button: To restart the system.
- USB 3.2 Gen2 Type-C Port: For high-speed data transfer (up to 10 Gbps).
- USB 3.0 Ports (x2): For standard USB connectivity.
- Audio Jacks: For headphone and microphone connections.

Figure 7: Front I/O panel with USB-C, USB 3.0, and audio ports.
3.2 Fan Control
The case includes a fan/connection hub at the back, allowing you to connect more fans than your motherboard might natively support. Note that this hub may not include individual fan sensors, meaning manual speed control for each fan might be limited. Fan speeds are typically controlled via your motherboard's BIOS/UEFI settings or dedicated software.
4. Maintenance
4.1 Dust Filter Cleaning
The ATHENA M4M WOOD is equipped with dust filters on the top, front, bottom, and side panels to prevent dust accumulation. Regular cleaning of these filters is crucial for maintaining optimal airflow and cooling performance.
- Carefully remove the dust filters from their respective locations.
- Clean the filters using compressed air, a soft brush, or by rinsing them with water (ensure they are completely dry before reinstallation).
- Reinstall the dust filters securely.
Figure 8: Exploded view showing dust filters on top and side panels.
4.2 General Cleaning
Use a soft, dry cloth to wipe down the exterior surfaces of the case. Avoid abrasive cleaners or solvents that could damage the finish, especially the walnut front panel and tempered glass.
5. Troubleshooting
- Difficulty connecting front USB 3.0/3.2 cables: The front USB 3.0/3.2 Gen2 Type-C connectors can be challenging to connect due to cable length and angle. Consider using a 90-degree adapter if you encounter difficulty.
- PSU Fitment Issues: Some larger PSUs (e.g., over 150mm in length) or specific models might have tight fitment due to the front-mounted design. Verify PSU dimensions before installation. If issues persist, ensure the PSU shroud is not obstructing.
- Top Plate Not Sitting Flush: If the top plate does not sit flush, gently check for any obstructions or misalignments. Avoid forcing it, as this may damage the metal.
- Fan Control Limitations: The included fan hub may not allow individual fan speed control via software. Fan speeds might be regulated by the motherboard's BIOS/UEFI settings based on temperature curves.
- SSD Placement and SATA Power Cables: Ensure that standard SATA power cables can reach and connect properly to SSDs, especially if using daisy-chained cables, as placement might be tight.
For further assistance, please consult the GAMDIAS support website or contact customer service.
6. Specifications
| Feature | Detail |
|---|---|
| Model Name | ATHENA M4M WOOD |
| Case Type | Micro-Tower |
| Motherboard Compatibility | Micro ATX, Mini ITX |
| Material | Metal, Stainless Steel, Tempered Glass, Walnut Wood |
| Color | Black (with Walnut front panel) |
| Dimensions (L x W x H) | 17.56 x 9.25 x 13.66 inches (446 x 235 x 347 mm) |
| Item Weight | 12.36 pounds (5.62 kg) |
| PSU Mounting Type | Front Mount |
| CPU Cooler Height Limit | Up to 175mm |
| VGA Card Length Limit | Up to 395mm |
| Fan Support |
|
| Radiator Support |
|
| Drive Bays | 1 x 3.5", Multiple 2.5" |
| Front I/O Ports | 1 x USB 3.2 Gen2 Type-C, 2 x USB 3.0, Audio (Headphone/Mic), Power, Reset |

Figure 9: Interior accommodation showing CPU cooler and VGA card clearance.
7. Warranty Information
GAMDIAS products are covered by a limited warranty. The specific terms and duration of the warranty may vary by region and product. Please retain your proof of purchase for warranty claims.
For detailed warranty information, including coverage, limitations, and the claims process, please visit the official GAMDIAS website or contact your local retailer.
8. Customer Support
If you encounter any issues or have questions regarding your GAMDIAS ATHENA M4M WOOD gaming case, please refer to the following resources:
- Online Manual: Scan the QR code provided in your product packaging for the most up-to-date and detailed installation guide.
- GAMDIAS Official Website: Visit www.gamdias.com for product information, FAQs, and support contact options.
- Technical Support: Contact GAMDIAS technical support directly through their website for personalized assistance.


