
1. Product Overview
The Ralcam 3.9mm Two-Way Articulating Borescope is an advanced industrial inspection camera designed for detailed visual examination in confined and hard-to-reach areas. It features an ultra-slim probe, a high-definition display, and precise articulation capabilities, making it suitable for various professional and technical applications.

Figure 1: Ralcam 3.9mm Two-Way Articulating Borescope
Key Features:
- Ultra-Slim 3.9mm Probe: Designed for accessing narrow pipes, small engine ports, and confined mechanical areas.
- 5-inch HD IPS Screen: Provides sharp, real-time, and vivid images for clear visual inspection.
- 210° Two-Way Articulation: Allows precise control to navigate twists and turns, ensuring comprehensive views without blind spots.
- 180° Image Rotation: For comfortable viewing from multiple angles without repositioning the device.
- Adjustable LED Illumination: Equipped with 6 LED lights and 3 adjustable brightness levels for optimal visibility in various environments.
- 5.0FT Stainless Steel Flexible Cable: Durable, kink-resistant, and maintains its shape for precise control.
- IP67 Waterproof Probe: Suitable for use in wet or oily conditions.
- 4x Digital Zoom: Magnify images for detailed close-up views.
- Photo and Video Recording: Capture still images and record video footage of inspections.
- High-Temperature Alert: Provides a warning and automatic shutdown for protection when temperatures exceed 90°C/194°F.
2. Package Contents
Verify that all items are present in the package:
- 1 × Ralcam Borescope (5” Display Unit)
- 1 × 3.9mm Camera Probe (5.0FT Stainless Steel Tube)
- 1 × USB-C Charging Cable
- 1 × 32GB TF Card (Pre-installed)
- 1 × Protective Carrying Case
- 1 × User Manual (This document)
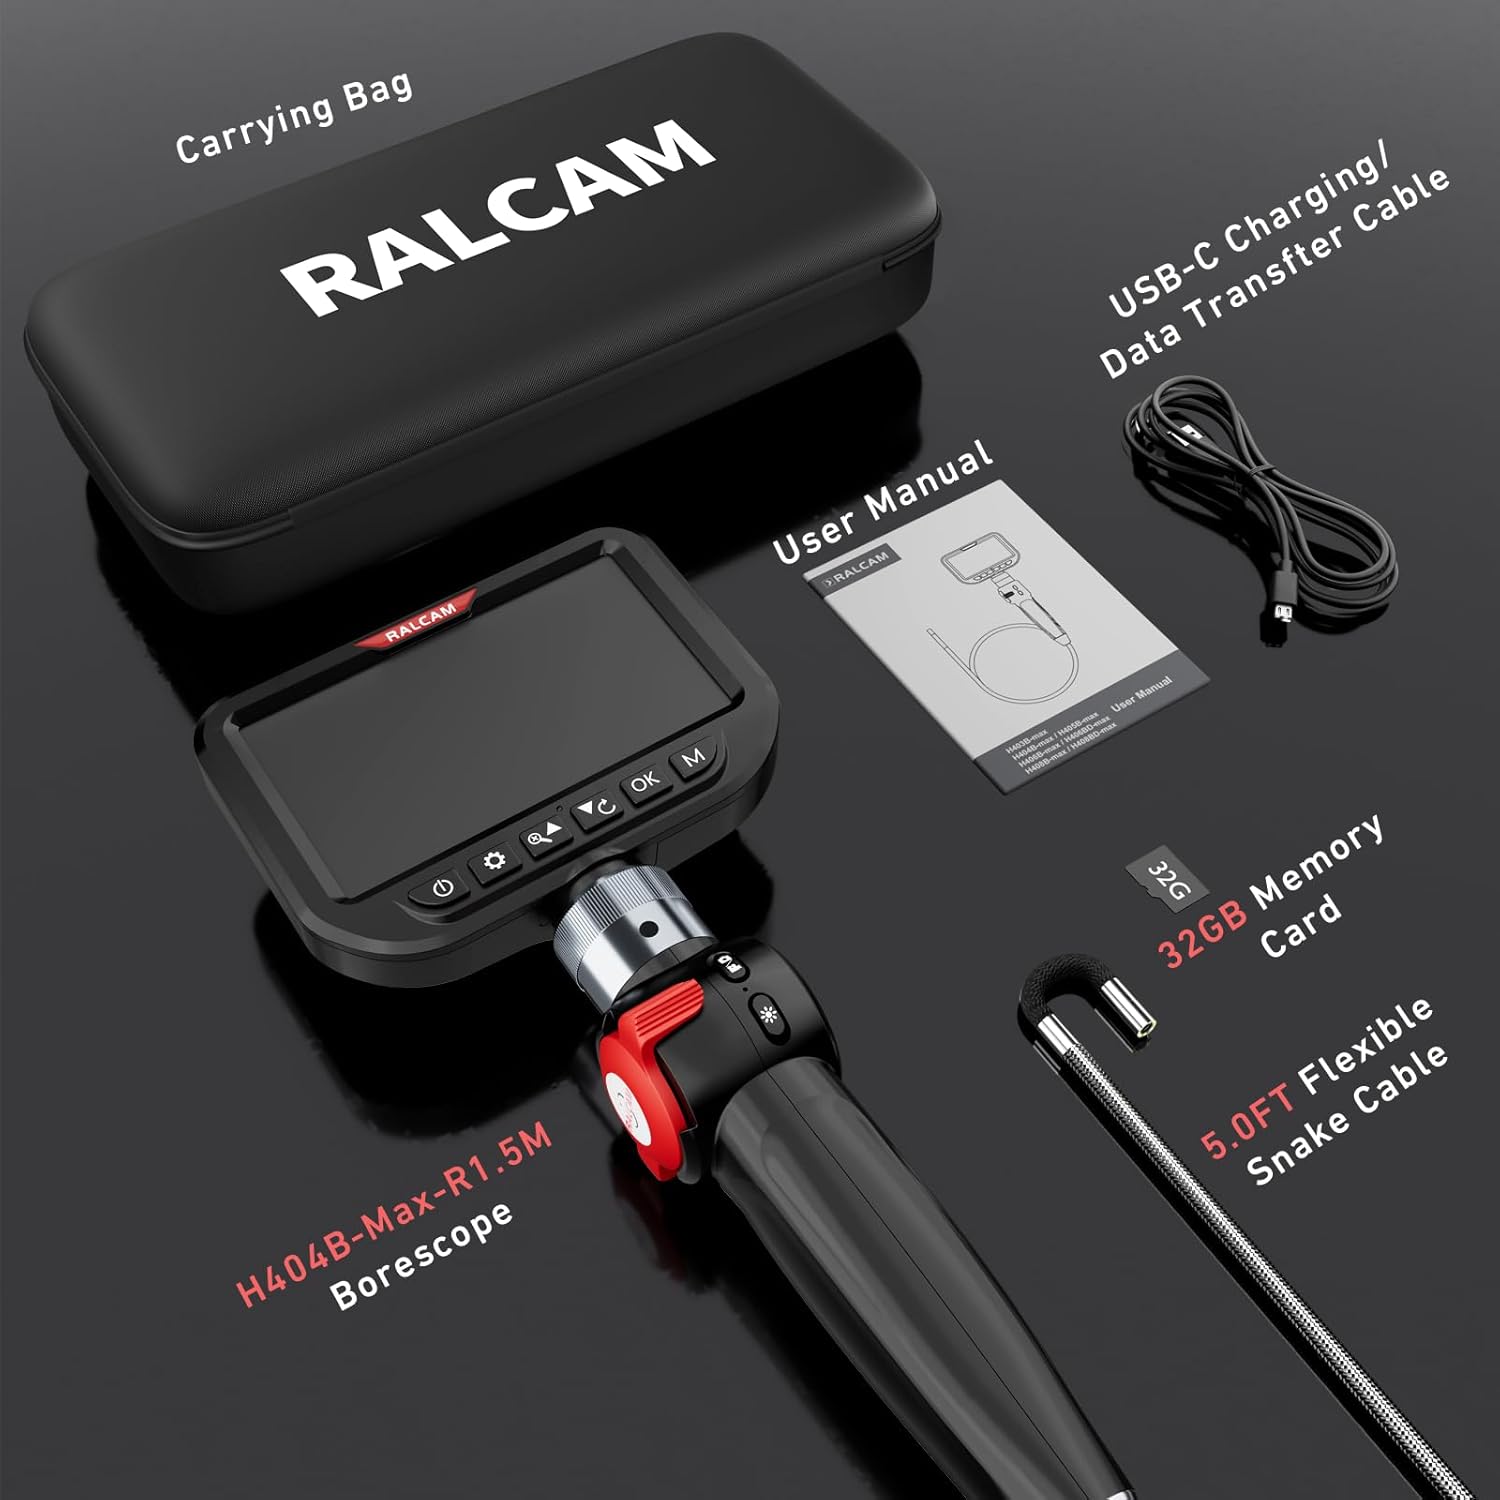
Figure 2: Included Accessories
3. Setup Guide
3.1 Charging the Device
The borescope is powered by a rechargeable battery. Before first use, fully charge the device using the provided USB-C charging cable. Connect the USB-C end to the borescope and the USB-A end to a compatible power adapter (not included) or a computer USB port.

Figure 3: Charging the Borescope
3.2 Attaching the Camera Probe
- Carefully align the connector of the 3.9mm camera probe with the port on the main display unit.
- Gently push the probe connector into the port until it is securely seated. Do not force the connection.
- Ensure the connection is firm to prevent signal loss during operation.
Video 1: Demonstration of Ralcam Borescope features including probe articulation and light adjustment. This video shows the device being used for inspection and highlights its key functionalities.
4. Operating Instructions
4.1 Power On/Off
- To power on, press and hold the power button (⏻) located on the display unit until the screen illuminates.
- To power off, press and hold the power button again until the screen turns off.
4.2 Articulation Control
The borescope features a 210° two-way articulating probe. Use the red wheel control on the handle to precisely adjust the angle of the camera tip. Rotate the wheel left or right to bend the probe in the desired direction.
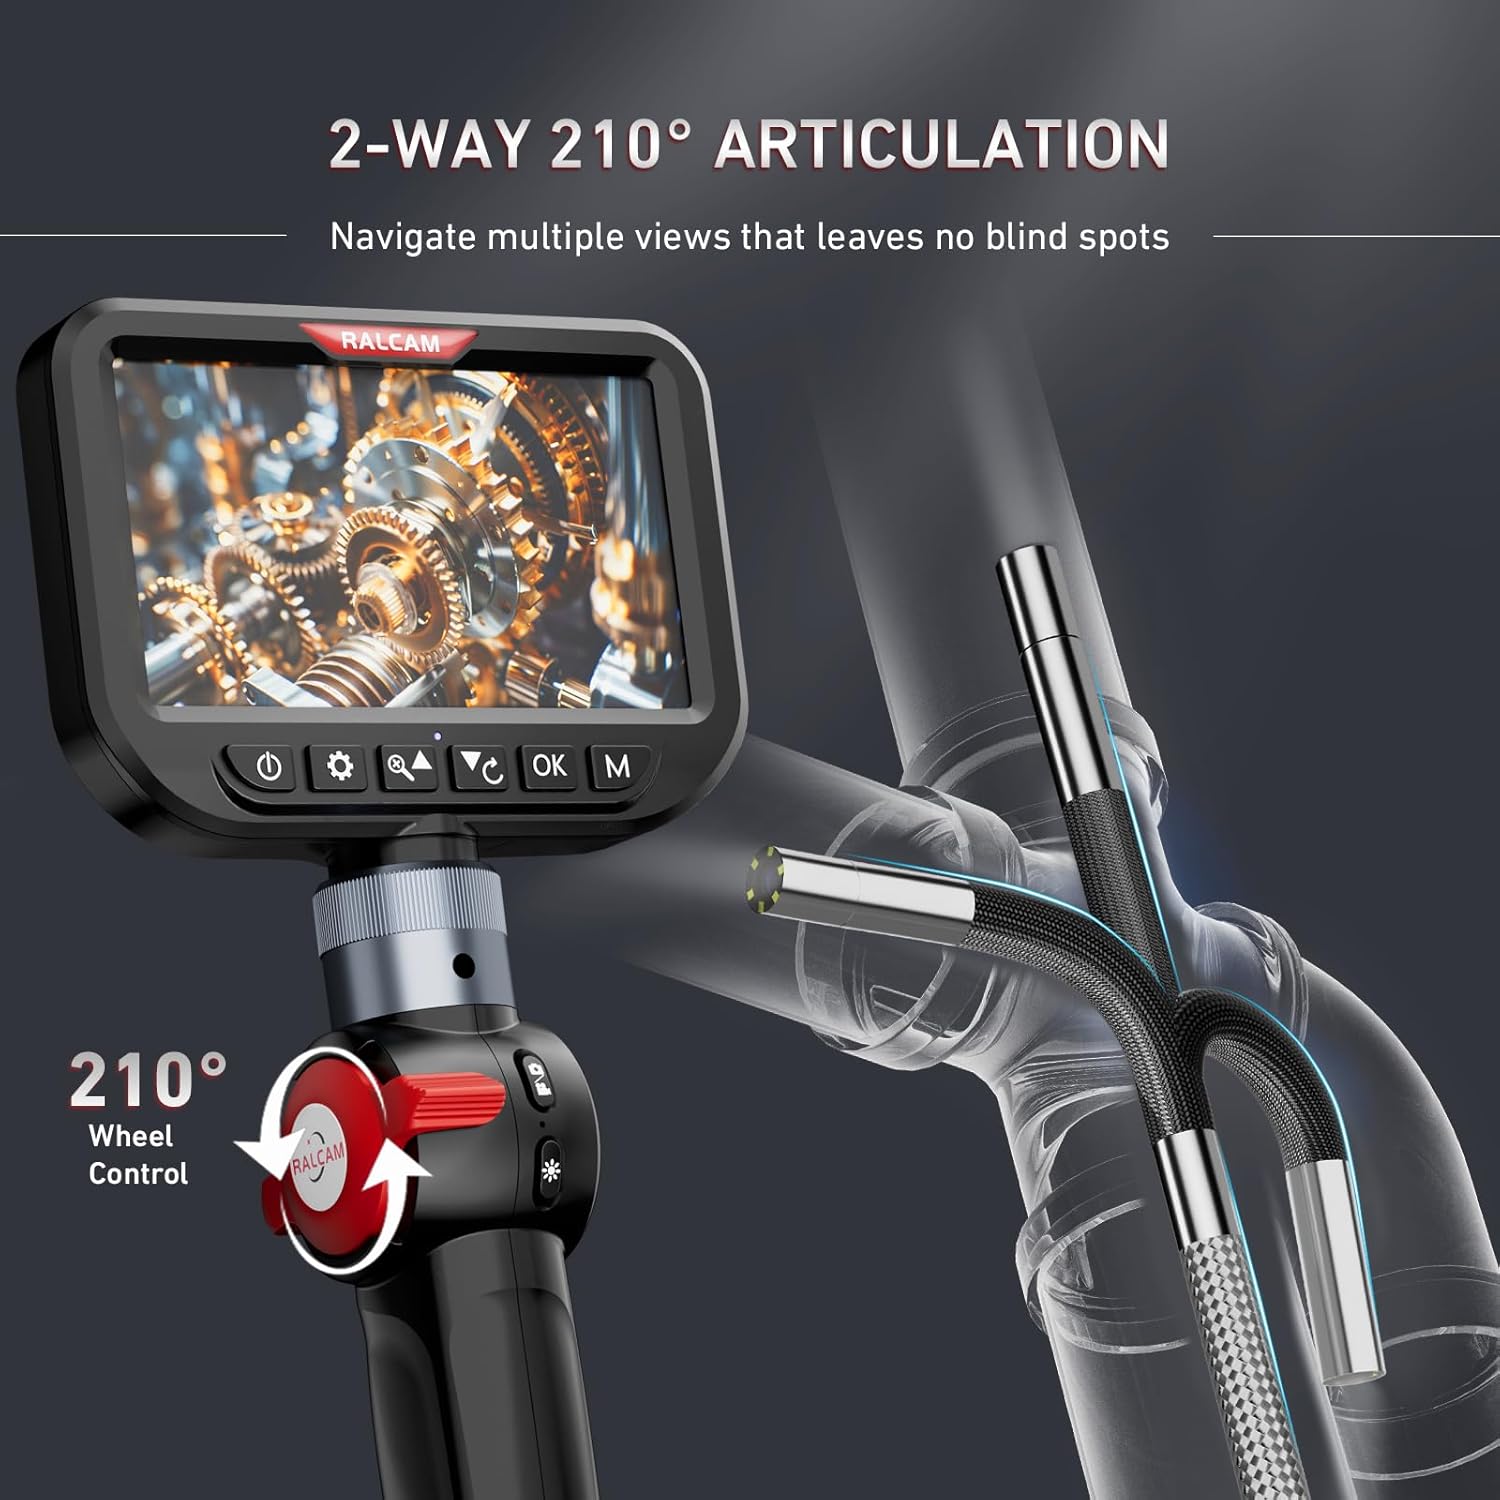
Figure 4: Two-Way Articulation Control

Figure 5: Probe Articulation Range
4.3 Adjusting LED Illumination
The camera probe is equipped with 6 adjustable LED lights. Press the light button (💡) on the handle to cycle through 3 brightness levels or turn the lights off. Adjust the brightness according to the inspection environment.

Figure 6: LED Brightness Adjustment

Figure 7: LED Light Modes
4.4 Image Rotation and Digital Zoom
- Image Rotation: Press the C button on the display unit to rotate the image 180 degrees for optimal viewing orientation.
- Digital Zoom: Use the zoom buttons (🔍+ / 🔍-) to magnify the live image up to 4x for closer examination of details.

Figure 8: Image Rotation and Digital Zoom

Figure 9: Digital Zoom Levels
4.5 Photo Capture and Video Recording
The borescope allows you to capture still images and record video footage directly to the included 32GB TF card.
- Photo Capture: Press the OK button once to take a still photograph.
- Video Recording: Press and hold the OK button to start recording video. Press and hold again to stop recording.
- Captured photos and videos are saved to the 32GB TF card.

Figure 10: Photo and Video Functions
4.6 Data Transfer
To transfer photos and videos to a computer:
- Connect the borescope to your computer using the provided USB-C cable.
- The device should appear as a removable storage device on your computer.
- Alternatively, remove the TF card from the borescope and insert it into a compatible card reader connected to your computer.

Figure 11: USB-C Data Transfer
4.7 High-Temperature Protection
The borescope is equipped with a high-temperature warning system. If the probe's temperature exceeds 90°C (194°F), the device will display a warning and automatically shut down to prevent damage. Allow the probe to cool down before resuming operation.

Figure 12: High-Temperature Alert Mechanism
5. Maintenance
5.1 Cleaning
- After each use, especially in dirty or oily environments, gently wipe the camera probe with a soft, damp cloth.
- For stubborn grime, use a small amount of mild detergent on the cloth, then wipe with a clean, damp cloth. Ensure no liquid enters the main display unit.
- The probe is IP67 waterproof, but the main unit is not. Avoid submerging the main unit in liquids.
- Clean the display screen with a microfiber cloth to avoid scratches.
5.2 Storage
- Store the borescope and its accessories in the provided protective carrying case when not in use.
- Keep the device in a cool, dry place, away from direct sunlight and extreme temperatures.
- Ensure the probe is not sharply bent or kinked during storage to maintain its integrity.

Figure 13: Storing the Borescope in its Carrying Case
6. Troubleshooting
| Problem | Possible Cause | Solution |
|---|---|---|
| Device does not power on. | Low battery. | Charge the device fully using the USB-C cable. |
| No image on screen. | Probe not connected securely. | Ensure the camera probe is firmly connected to the main unit. |
| Image is blurry or dark. | Insufficient lighting; dirty camera lens. | Adjust LED brightness. Clean the camera lens with a soft cloth. |
| Probe articulation is stiff. | Cable kinked or obstructed. | Carefully straighten the cable. Avoid forcing articulation if resistance is felt. |
| Device shuts down unexpectedly. | High-temperature protection activated. | Allow the probe to cool down. Avoid using in environments exceeding 90°C. |
| Cannot save photos/videos. | TF card full or not inserted correctly. | Check TF card insertion. Delete unnecessary files or replace the card. |
7. Specifications
| Feature | Detail |
|---|---|
| Model Number | H404B-Max-A1.5M |
| Probe Diameter | 3.9mm (0.15in) |
| Probe Length | 5.0FT (approx. 1.5m) |
| Articulation | 2-Way, 210° |
| Display Screen | 5-inch HD IPS |
| Video Capture Resolution | 1080p |
| Digital Zoom | 4x |
| Image Rotation | 180° |
| Illumination | 6 Adjustable LED Lights |
| Waterproof Rating | IP67 (Probe only) |
| Storage | 32GB Micro SDXC Card (included) |
| Battery | Rechargeable (1 9V battery required, included) |
| High-Temperature Protection | Automatic shutdown at ≥90°C/194°F |
| Item Weight | 2.57 pounds |
| Package Dimensions | 16.7 x 8.7 x 3.46 inches |
8. Warranty and Support
Ralcam products are designed for reliability and performance. For warranty information, technical support, or service inquiries, please refer to the contact details provided with your purchase documentation or visit the official Ralcam website.
Please retain your proof of purchase for warranty claims.

