
ViaBecs CAN021-R
ViaBecs 10.2" Wireless Apple CarPlay Radio User Manual
Model: CAN021-R for Honda CRV 2.4L (2015-2016)
1. Introduction
This manual provides comprehensive instructions for the installation, operation, and maintenance of your ViaBecs 10.2" Wireless Apple CarPlay Radio, model CAN021-R, designed specifically for Honda CRV 2.4L models from 2015 to 2016. Please read this manual thoroughly before installation and use to ensure proper functionality and to maximize your experience.
2. Safety Information
Always prioritize safety. Improper installation or operation can lead to vehicle damage or personal injury. Consult a professional if you are unsure about any installation steps.
- Do not attempt to operate the device in a way that distracts you from driving.
- Ensure all wiring is correctly connected to prevent short circuits or electrical hazards.
- Keep the device away from water and excessive heat.
- Only use accessories approved by ViaBecs.
3. Package Contents
Verify that all items are present in your package:
- 10.2" Car Stereo Unit (CAN021-R)
- CAN021-R Wiring Harness (Specific for Honda CRV 2015-2016)
- GPS Antenna
- 4G Antenna
- USB Cables
- External Microphone
- User Manual (This document)
- Additional accessories as specified on packaging.

This image displays the ViaBecs 10.2-inch car stereo unit along with its dedicated wiring harness, which includes various connectors for power, audio, and data. The harness is designed for plug-and-play installation in compatible Honda CRV models.
4. Setup and Installation
Note: Professional installation is recommended. Disconnect the vehicle's battery before beginning installation.
4.1 Vehicle Compatibility
This unit is designed for Honda CRV 2.4L models manufactured between 2015 and 2016. Ensure your vehicle matches this specification for proper fit and function.

This image illustrates the compatibility of the car stereo with Honda CRV 2.4L models from 2015-2016, highlighting the correct wiring harness (CAN021-R) for these specific vehicles. It also shows the original dashboard and the new unit installed.
4.2 Wiring Diagram
Refer to the detailed wiring diagram for connecting the main unit to your vehicle's electrical system. Each port is labeled for clarity.

This image provides a comprehensive wiring diagram for the car stereo, detailing connections for GPS antenna, 4G antenna, USB inputs, SUB output, CVBS inputs, AUX inputs, audio outputs, 12V+ AMP control, external microphone, 4G SIM slot, 16PIN power port, WiFi antenna, and FM/AM antenna. Each connection point is numbered for easy identification.
4.3 Antenna Installation
- GPS Antenna: Connect the GPS antenna to the designated port on the rear of the unit. Position the antenna in a location with a clear view of the sky, typically on the dashboard or under the windshield.
- 4G Antenna: Connect the 4G antenna for cellular data connectivity. Ensure it is placed in an area with good signal reception.
- WiFi Antenna: Connect the WiFi antenna for wireless network access.
4.4 External Microphone
Connect the external microphone to the 3.5mm MIC jack on the unit. Position the microphone near the driver for optimal voice pickup during calls and voice commands.

This image illustrates the connection of the external microphone to the car stereo unit, emphasizing its role in providing clear audio for calls and voice commands by reducing ambient noise. It shows the microphone connected via a 3.5mm jack.
5. Operating Instructions
5.1 Power On/Off
The unit will power on automatically when the vehicle's ignition is turned on. To power off, turn off the vehicle's ignition. A long press on the power button (if available) may put the unit into standby mode.
5.2 Touch Screen Interface
Navigate the system using the 10.2-inch QLED touchscreen. The interface is based on Android 13, offering intuitive controls similar to a smartphone or tablet.

This image displays the main screen of the car stereo, showcasing the Apple CarPlay interface with various application icons such as Phone, Music, Maps, Messages, Now Playing, Car, Calendar, and Settings. The screen also shows connectivity indicators like 5G and Wi-Fi.
5.3 Wireless Apple CarPlay & Android Auto
The unit supports wireless Apple CarPlay and Android Auto for seamless smartphone integration.
- Connecting: Enable Bluetooth and Wi-Fi on your smartphone. Pair your phone with the car stereo via Bluetooth. Follow the on-screen prompts to activate CarPlay or Android Auto.
- Features: Access navigation, make calls, send messages, and stream music directly from your phone's interface on the car stereo screen.

This image demonstrates the various smartphone integration options: Wireless Apple CarPlay, Wireless/Wired Android Auto, and iOS/Android Mirror Link. Each mode displays a different interface on the car stereo screen, showing navigation, music playback, and phone mirroring capabilities.
5.4 GPS Navigation
Utilize the built-in GPS module for navigation. Pre-installed maps or online navigation apps (via 4G/WiFi) can be used. Ensure the GPS antenna is properly installed for accurate positioning.
5.5 Bluetooth Connectivity
Bluetooth 5.0 allows for hands-free calling and audio streaming. Pair your device through the Bluetooth settings menu on the stereo.
5.6 Wi-Fi and 4G Connectivity
Connect to Wi-Fi networks or insert a 4G SIM card (if supported by your region and carrier) to access online features, stream content, and download apps from the Google Play Store.

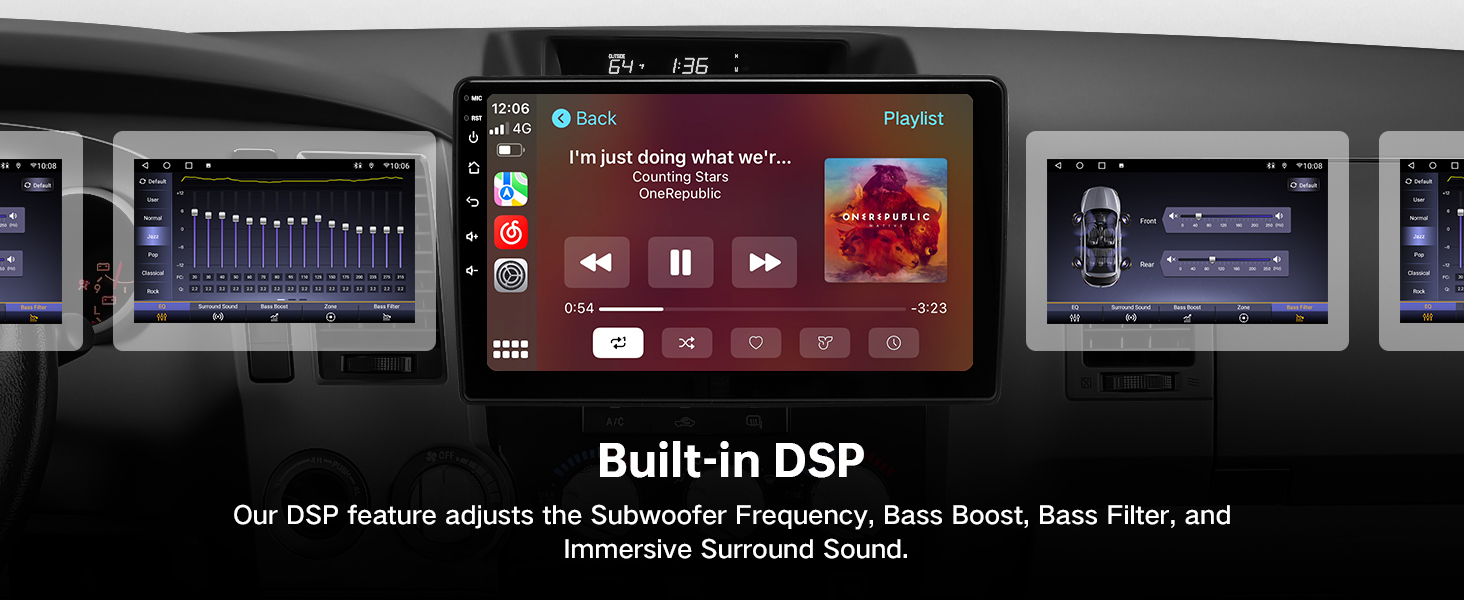
This image illustrates two key features: the built-in DSP (Digital Sound Processor) with 48-band EQ for audio customization, and the support for Wi-Fi and 4G internet connectivity, enabling online entertainment and communication directly from the car stereo.
5.7 DSP and Equalizer Settings
The built-in DSP (Digital Sound Processor) with a 48-band EQ allows for extensive audio customization. Access the sound settings to adjust frequency response, bass, and other audio parameters to your preference.
5.8 Steering Wheel Controls (SWC)
The unit retains factory steering wheel control functionality. After installation, verify that all buttons (volume, track skip, mode) operate correctly. No additional configuration is typically required.
5.9 Split-Screen Multitasking
Utilize the split-screen feature to run two applications simultaneously, such as navigation and music playback, for enhanced convenience.

This image illustrates the split-screen multitasking capability of the car stereo, showing multiple applications running concurrently. For example, a music player and a web browser are displayed side-by-side, allowing users to interact with both simultaneously.
6. Maintenance
- Cleaning: Use a soft, dry cloth to clean the screen and unit. Avoid abrasive cleaners or solvents.
- Software Updates: Periodically check for system updates via the "Settings" menu to ensure optimal performance and access to new features.
- Temperature: Avoid exposing the unit to extreme temperatures for extended periods.
7. Troubleshooting
| Problem | Possible Cause | Solution |
|---|---|---|
| Unit does not power on. | Incorrect power wiring; Blown fuse; Vehicle battery disconnected. | Check power connections; Inspect vehicle fuses; Ensure battery is connected. |
| No sound output. | Incorrect speaker wiring; Volume too low; Mute function active. | Verify speaker connections; Adjust volume; Disable mute. |
| GPS signal is weak or inaccurate. | GPS antenna improperly placed or disconnected. | Ensure GPS antenna has a clear view of the sky and is securely connected. |
| Apple CarPlay/Android Auto not connecting. | Bluetooth/Wi-Fi off on phone; Incorrect pairing; Software glitch. | Enable Bluetooth/Wi-Fi; Re-pair device; Restart phone and stereo. |
| Steering wheel controls not working. | Harness connection issue; Vehicle compatibility. | Check CAN021-R harness connections; Confirm vehicle model. |
8. Specifications
- Model: CAN021-R
- Screen Size: 10.2 inches
- Operating System: Android 13
- Processor: Octa-core (UIS7862, 1.8GHz)
- RAM: 6GB
- Internal Storage: 128GB
- Display Type: QLED, 1280x720px resolution
- Connectivity: Bluetooth 5.0, Wi-Fi, 4G (SIM support), USB
- Audio: Built-in DSP, 48-band EQ, TDA7851 4*50W Amplifier output
- Special Features: Wireless Apple CarPlay, Android Auto, GPS Navigation, Steering Wheel Control (SWC), Split-screen multitasking, External Microphone support.
- Compatible Vehicles: Honda CRV 2.4L (2015-2016)
- Item Weight: 4.18 pounds (1.9 Kilograms)
- Output Power: 200 Watts
9. Warranty and Support
For warranty information and technical support, please refer to the documentation included with your purchase or contact ViaBecs customer service directly. You can typically find contact information on the manufacturer's website or through your point of purchase.
If you have questions regarding installation or operation, please contact the seller for assistance.
This image provides guidance on how to contact the seller, "Kasa Offical Store," for support or inquiries. It shows the steps to navigate to the seller's page and use the "Ask a question" feature.
Related documentsCAN021-R


Ask a question about this manual
Ask about setup, troubleshooting, compatibility, parts, safety, or missing instructions. Manuals+ will review the question and use this page’s manual context to help answer it.