Introduction
This manual provides detailed instructions for the installation, operation, and maintenance of your Baseus VD1 Pro Solar Dash Cam. Please read this manual thoroughly before using the product to ensure proper functionality and safety.
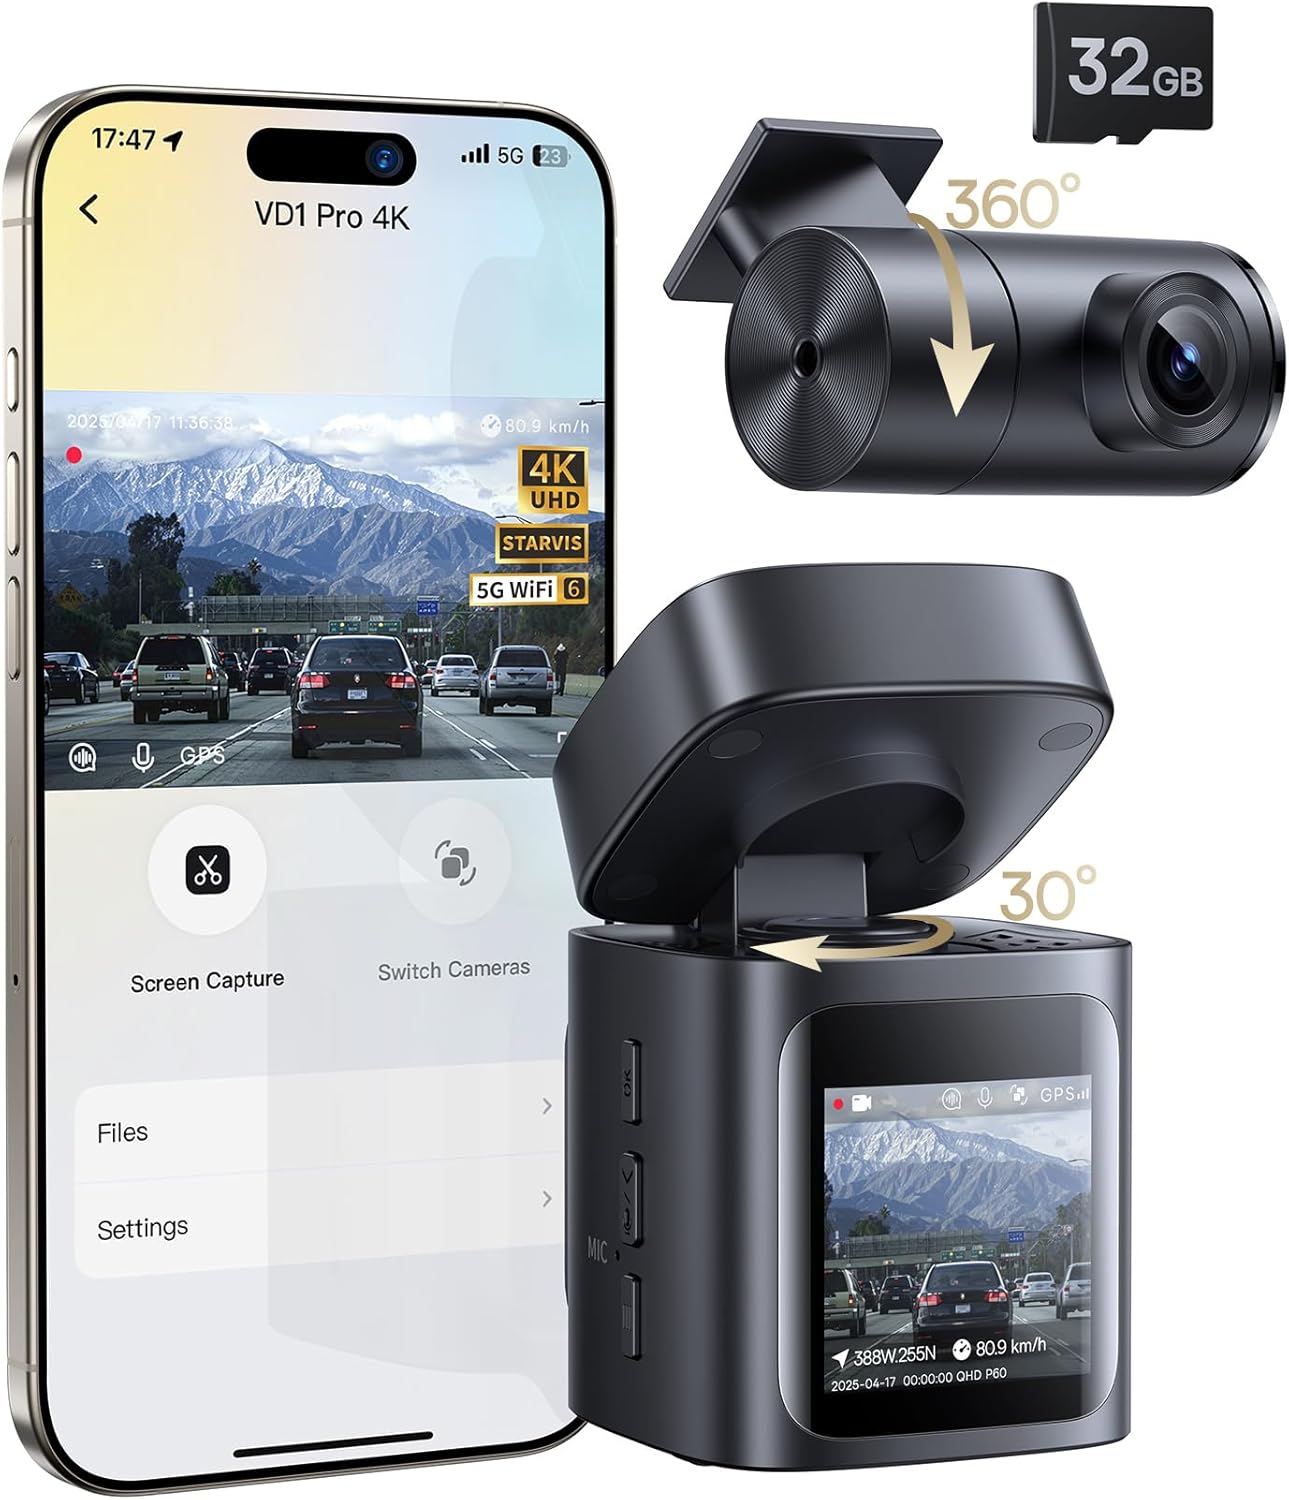
Image: The Baseus VD1 Pro Solar Dash Cam, showing the main unit, rear camera, and a smartphone displaying the companion app interface. A 32GB microSD card is also depicted.
Product Features
- Solar Sync System: Integrated solar panel and built-in battery for hardwire-free parking surveillance, offering up to 14 days of standby power.
- Dual Recording: Captures 4K UHD HDR footage from the front camera and 1080P footage from the rear camera.
- Wide Angle Lenses: 170° front lens and 120° rear lens provide extensive coverage.
- STARVIS Night Vision: Equipped with an IMX335 sensor, f/1.6 aperture, and 6-layer lens for enhanced low-light performance.
- 5GHz WiFi 6: Enables faster video downloads and seamless app connectivity.
- GPS Positioning: Provides real-time tracking and location data.
- Voice Control: Hands-free operation for common commands.
- G-Sensor: Automatically detects collisions and saves footage.
- Loop Recording: Overwrites oldest footage to ensure continuous recording.
- Included Accessories: Comes with a 32GB microSD card, car mount, rear camera, cables, car charger, and installation tools.

Image: A visual summary of the Baseus VD1 Pro Dash Cam's key features, including 4K+1080P recording, Solar Sync System, STARVIS Night Vision, 5GHz WiFi, GPS, Voice Control, and compact design.
Setup Instructions
Follow these steps for quick and easy installation of your dash cam.
1. Unboxing and Components Check
Before installation, verify that all components are present in the box:
- Dash Cam 4K x 1
- Rear Camera x 1
- User Manual x 1
- 3m Rear Camera Cable x 1
- Car Charger (DC 5V/2.4A) x 1
- USB-A to USB-C Cable (5V/2.4A, 3.6m) x 1
- Trim Tool x 1
- microSD Card (32GB) x 1 (pre-inserted)
- 3M Adhesive Pad x 1
- Static Cling Film x 1

Image: All items included in the product package, laid out for inspection. This includes the main dash cam, rear camera, various cables, car charger, trim tool, 32GB microSD card, and the user manual.
2. Physical Installation
- Install Static Cling Film: Apply the static cling film to your windshield where you intend to mount the front dash cam. This helps with adhesion and makes removal easier.
- Install Front Dash Cam: Attach the front dash cam to the static cling film using the 3M adhesive pad. Ensure the camera has a clear view of the road.
- Install Rear Camera: Mount the rear camera on your rear window. The rear camera offers 360° rotation for optimal positioning.
- Connect Rear to Front: Use the provided USB-C cable to connect the rear camera to the front dash cam. Route the cable neatly using the included trim tool to hide it along the vehicle's interior trim.
- Power the Dash Cam: Connect the car charger to your vehicle's cigarette lighter socket and then connect the USB-A to USB-C cable from the charger to the front dash cam's power input.
- Verify Memory Card: Ensure the 32GB microSD card is properly inserted into the dash cam's slot. The dash cam will typically indicate its presence.
- Check Indicator Light: Once powered, the indicator light on the dash cam should illuminate, confirming it is receiving power and operating.
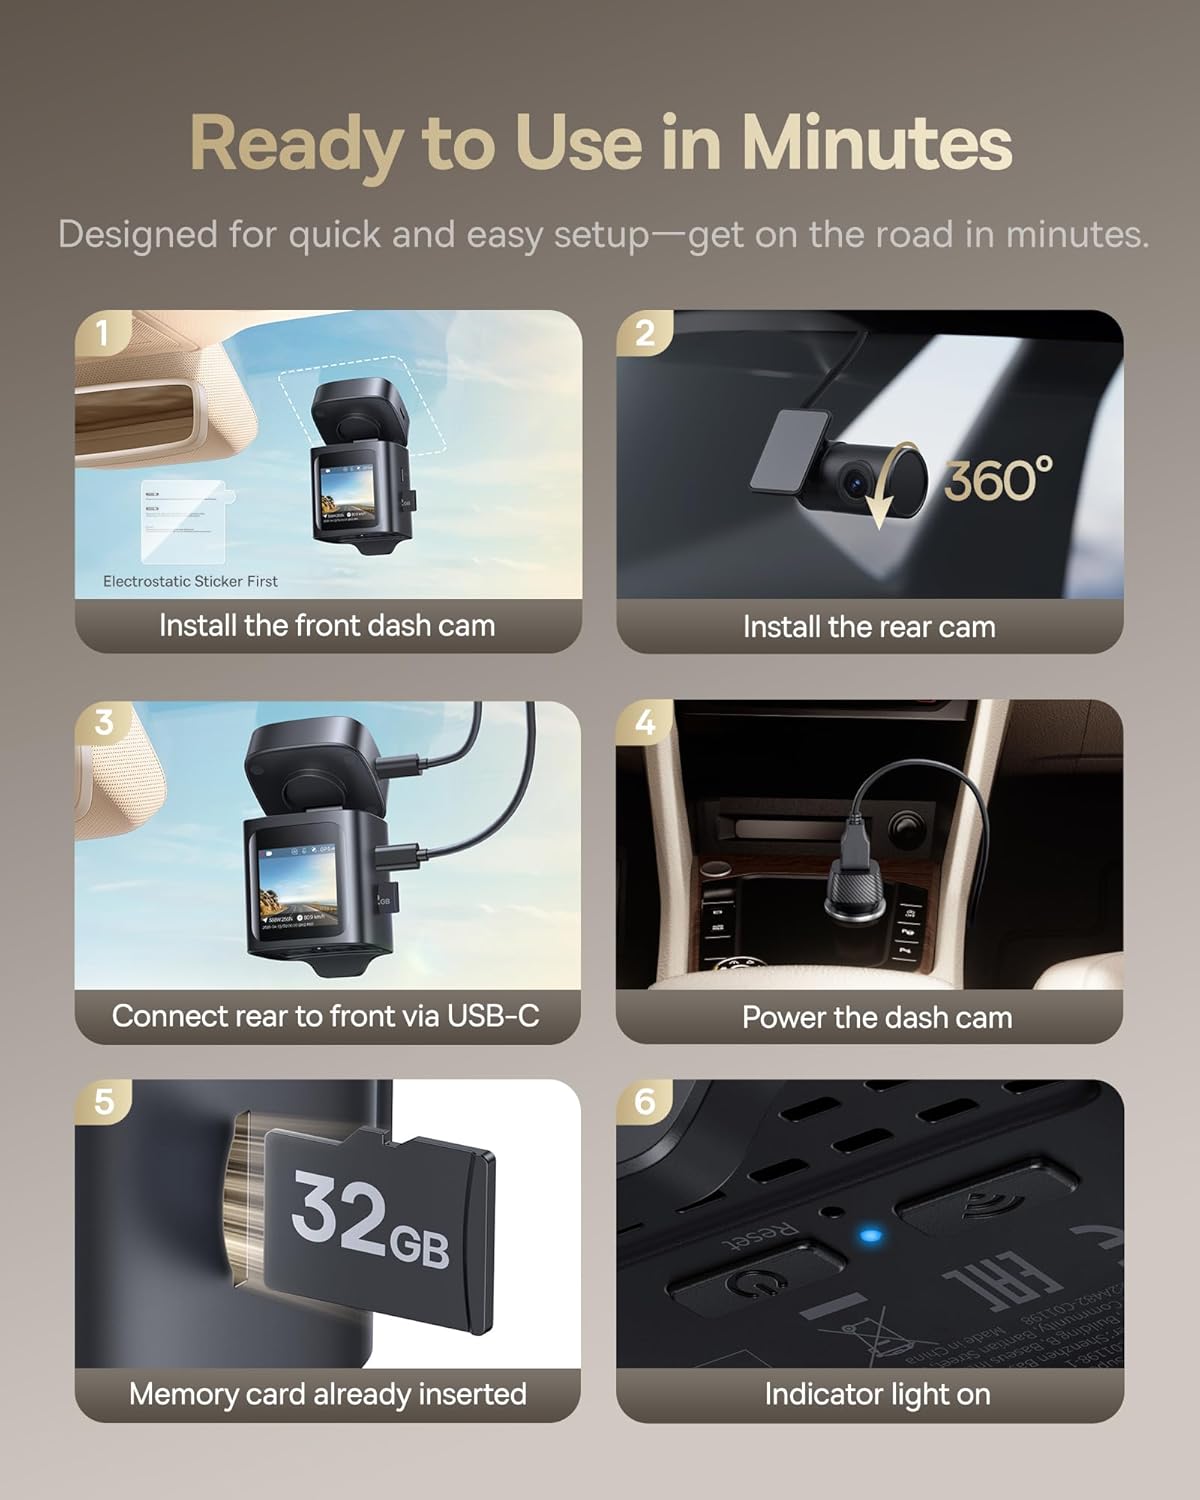
Image: A step-by-step visual guide illustrating the installation process, from attaching the front dash cam and rear camera to connecting cables and powering the device.
3. Initial Setup and MicroSD Card Formatting
Before first use, it is crucial to format the microSD card directly within the dash cam. Formatting on a computer may cause compatibility issues.
- Power on the dash cam.
- Navigate to the settings menu on the dash cam's screen.
- Locate the 'Format SD Card' or similar option.
- Confirm the formatting process. This will erase all data on the card and prepare it for recording.
4. App Installation and Connection
Download the free Baseus App from your smartphone's app store (iOS or Android).
- Enable Wi-Fi on your smartphone.
- On the dash cam, press the Wi-Fi button to activate its Wi-Fi hotspot.
- On your smartphone, connect to the dash cam's Wi-Fi network (SSID and password usually displayed on the dash cam screen or in the manual).
- Open the Baseus App. The app should automatically detect and connect to the dash cam.
Note: The app-to-dash cam connection works only when you are in the car, not remotely.
Operating Instructions
1. Basic Recording
Once powered on, the dash cam will automatically begin continuous loop recording. The front camera records in 4K UHD and the rear camera in 1080P.
2. Parking Surveillance Mode
The Solar Sync System enables hardwire-free parking mode. When your vehicle is parked and the ignition is off, the dash cam enters standby mode. It will automatically record 30-second clips upon detecting collisions, vibrations, or approaching objects. Up to 20 such incidents can be stored.

Image: A visual representation of the dash cam's parking surveillance capabilities, highlighting its 14-day maximum standby time, 20 collision detections, 4K+1080P recordings, and 30-second event clips.
3. G-Sensor and Emergency Recording
The built-in G-sensor detects sudden impacts or collisions. When triggered, it automatically locks the current video segment to prevent it from being overwritten by loop recording, ensuring critical footage is preserved.

Image: An illustration demonstrating the G-sensor's adjustable sensitivity settings (High, Medium, Low) and examples of incidents it can detect, from light bumps to major collisions.
4. Voice Control
The dash cam supports English voice commands for hands-free operation. Common commands include:
- "Turn off display"
- "Take picture"
- "Lock the video"

Image: A driver interacting with the dash cam using voice commands, illustrating the hands-free convenience for actions such as turning off the display, taking a picture, or locking a video.
5. Using the Baseus App
The Baseus App provides comprehensive control and access to your dash cam's features:
- Live View & Playback: Stream real-time footage or review recorded videos.
- Instant Video Downloads: Download recorded clips to your smartphone quickly via 5GHz WiFi 6.
- Customizable Settings: Adjust recording resolution, G-sensor sensitivity, and other preferences.
- GPS Info Display: View recorded GPS data, including route and speed.
- OTA Updates: Receive firmware updates for improved performance and new features.

Image: A smartphone displaying the Baseus app, illustrating features like live view, video download progress, and settings. The image emphasizes the 5GHz WiFi 6 for faster data transfer.
6. GPS Real-Time Tracking
The integrated GPS module records your driving route and speed, which can be viewed through the Baseus App. This provides accurate location data for incident analysis.

Image: The dash cam and a smartphone screen displaying real-time GPS tracking on a map, indicating the vehicle's current position and recorded route.
Maintenance
1. MicroSD Card Management
Regularly format your microSD card (at least once a month) to ensure optimal performance and prevent data corruption. Always format the card using the dash cam's menu, not a computer.
2. Cleaning
Use a soft, dry cloth to clean the dash cam lenses and screen. Avoid using abrasive cleaners or solvents that could damage the device.
Troubleshooting
- Q: The dash cam prompts to reformat the SD card, even after formatting on a computer.
- A: Always format the microSD card directly within the dash cam's settings menu. Formatting on a computer, especially with file systems like exFAT or FAT32, can lead to compatibility issues. Ensure the card is properly inserted and then format it via the dash cam's interface.
- Q: The dash cam is not powering on.
- A: Check the connection of the car charger to both the vehicle's power outlet and the dash cam. Ensure the vehicle's power outlet is functional. If using the solar panel, ensure it receives sufficient sunlight.
- Q: Wi-Fi connection to the app is unstable or fails.
- A: Ensure you are within close proximity to the dash cam (inside the vehicle). Restart both the dash cam and your smartphone. Verify that the dash cam's Wi-Fi is enabled and you are connecting to the correct network.
- Q: Video footage is blurry or unclear.
- A: Check if the protective film has been removed from the lenses. Clean the lenses with a soft, dry cloth. Ensure the camera is securely mounted and not vibrating excessively.
Specifications
| Model Name | VD1 Pro |
| Item Model Number | C01198 |
| Product Dimensions | 2.5 x 2.51 x 1.5 inches |
| Item Weight | 5.9 ounces |
| Front Video Resolution | 4K UHD (2160p) |
| Rear Video Resolution | 1080P |
| Front Field of View | 170 Degrees |
| Rear Field of View | 120 Degrees |
| Connectivity Technology | Wi-Fi (5GHz WiFi 6) |
| Special Features | App Control, Voice Control, GPS, STARVIS Night Vision, Solar Sync System, G-Sensor |
| Batteries | 1 Lithium Ion battery (included) |
| Included Components | Dash Cam, Rear Camera, Car Mount, 3m Rear Camera Cable, Car Charger, USB-A to USB-C Cable, Trim Tool, 32GB microSD Card, 3M Adhesive Pad, Static Cling Film |
Warranty Information
The Baseus VD1 Pro Solar Dash Cam comes with a 2-year warranty from the date of purchase. This warranty covers manufacturing defects and malfunctions under normal use. Please retain your proof of purchase for warranty claims.
For detailed warranty terms and conditions, please refer to the official Baseus website or contact customer support.
Customer Support
For further assistance, technical support, or warranty inquiries, please contact Baseus customer service through the following channels:
- Baseus Official Website: Visit the official Baseus website for FAQs, support resources, and contact information.
- Baseus App: The companion app may offer direct support options or links to help resources.


