
DIAFIELD TL16US01
DIAFIELD Automatic Watering System User Manual
Model: TL16US01
Introduction
The DIAFIELD Automatic Watering System is designed to provide precise and worry-free hydration for your potted plants, both indoors and outdoors. This programmable drip irrigation kit ensures your plants receive optimal water, making plant care easier whether you are at home or away. It supports watering up to 15 plants simultaneously with its robust pump and adjustable settings.
Package Contents

Figure 1: Package Contents Overview
This image displays all items included in the DIAFIELD Automatic Watering System kit, ensuring users can verify they have received all necessary components for setup.
Please verify that all the following components are included in your package:
- 1x Programmer (Main Control Unit)
- 1x Instruction Manual
- 1x Power Adapter
- 1x Tube (33ft/10m)
- 15x Watering Stakes
- 1x Filter
- 3x Cross-Joints
- 10x T-Joints
- 5x Tube Blockers
Product Specifications
| Feature | Specification |
|---|---|
| Model Name | Automatic Watering System |
| Model Number | TL16US01 |
| Brand | DIAFIELD |
| Power Source | Electric (AC Adapter included) |
| Hose Length | 33 ft (10 m) |
| Max Plants Supported | 15 |
| Volume Capacity (Pump) | 900 ml/min (without stakes) |
| Watering Duration | 5s to 90s, or 2mins to 15mins |
| Watering Frequency | 1h to 23h, or 1 day to 30 days |
| Control Type | Button Control, Dial |
| Material | Plastic |
| Product Dimensions (L x W x H) | 4.9 x 3 x 2.9 inches |
| Item Weight | 1.92 pounds |
| UPC | 842120106190 |

Figure 2: Control Unit Components
This diagram labels the key parts of the control unit: 1. Inlet, 2. Outlet, 3. Function Dial, 4. LCD Screen, 5. Couple, 6. Child Lock Button, 7. Increment Button, 8. Decrement Button, 9. Confirm Button, 10. DC-IN Jack.
Setup and Installation
Follow these steps to properly set up your DIAFIELD Automatic Watering System:
- Design Your Watering Path: Plan the layout for your plants and the tubing. Cut the provided tubes to the required lengths using scissors.
- Connect Inlet and Outlet Tubes: Connect the inlet tube to the "IN" port and the outlet tube to the "OUT" port on the control unit. Install the filter to the end of the inlet tube and place it into your water reservoir (e.g., a bucket or glass).
- Assemble Drip System: Use the T-joints and Cross-joints to connect the tubes according to your designed watering path. Attach the watering stakes to the ends of the tubes, ensuring they are securely inserted.
- Insert Watering Stakes: Carefully insert the watering stakes into the soil of each plant you wish to water. Ensure the stakes are firmly in place to prevent dislodging.
- Connect Power: Connect the power adapter to the DC-IN Jack (10) on the control unit and plug it into a standard electrical outlet. The system requires continuous AC power and does not have battery backup.

Figure 3: Installation Instructions
This image illustrates the four main steps for installing the watering system: cutting tubes, connecting inlet/outlet and filter, assembling joints and stakes, and connecting power.
Important Note:
- Ensure all stakes are well connected before testing. Testing the equipment with only tubing and no stakes may result in abnormal flow rates.
- Make sure connecting the hose and insert it at the bottom place to avoid leakage.
Operating Instructions
The DIAFIELD Automatic Watering System features a user-friendly interface for programming. Follow these steps to set up your watering schedule:
- Set Clock (Real Time): Turn the Function Dial (3) to "SET CLOCK". Use the Increment (7) and Decrement (8) buttons to adjust the time. Press the Confirm Button (9) to save.
- Set the Start Time: Turn the Function Dial (3) to "START TIME". Adjust the desired start time for watering using the Increment (7) and Decrement (8) buttons. Press the Confirm Button (9) to save.
- Set the Watering Duration: Turn the Function Dial (3) to "DURATION". Adjust the watering duration (from 5 seconds to 15 minutes) using the Increment (7) and Decrement (8) buttons. Press the Confirm Button (9) to save.
- Set the Watering Frequency (Period): Turn the Function Dial (3) to "PERIOD". Adjust how often the system waters (from 1 hour to 30 days) using the Increment (7) and Decrement (8) buttons. Press the Confirm Button (9) to save.
- Activate Automatic Mode: Once all settings are configured, turn the Function Dial (3) to "AUTO". The system will now operate according to your programmed schedule.
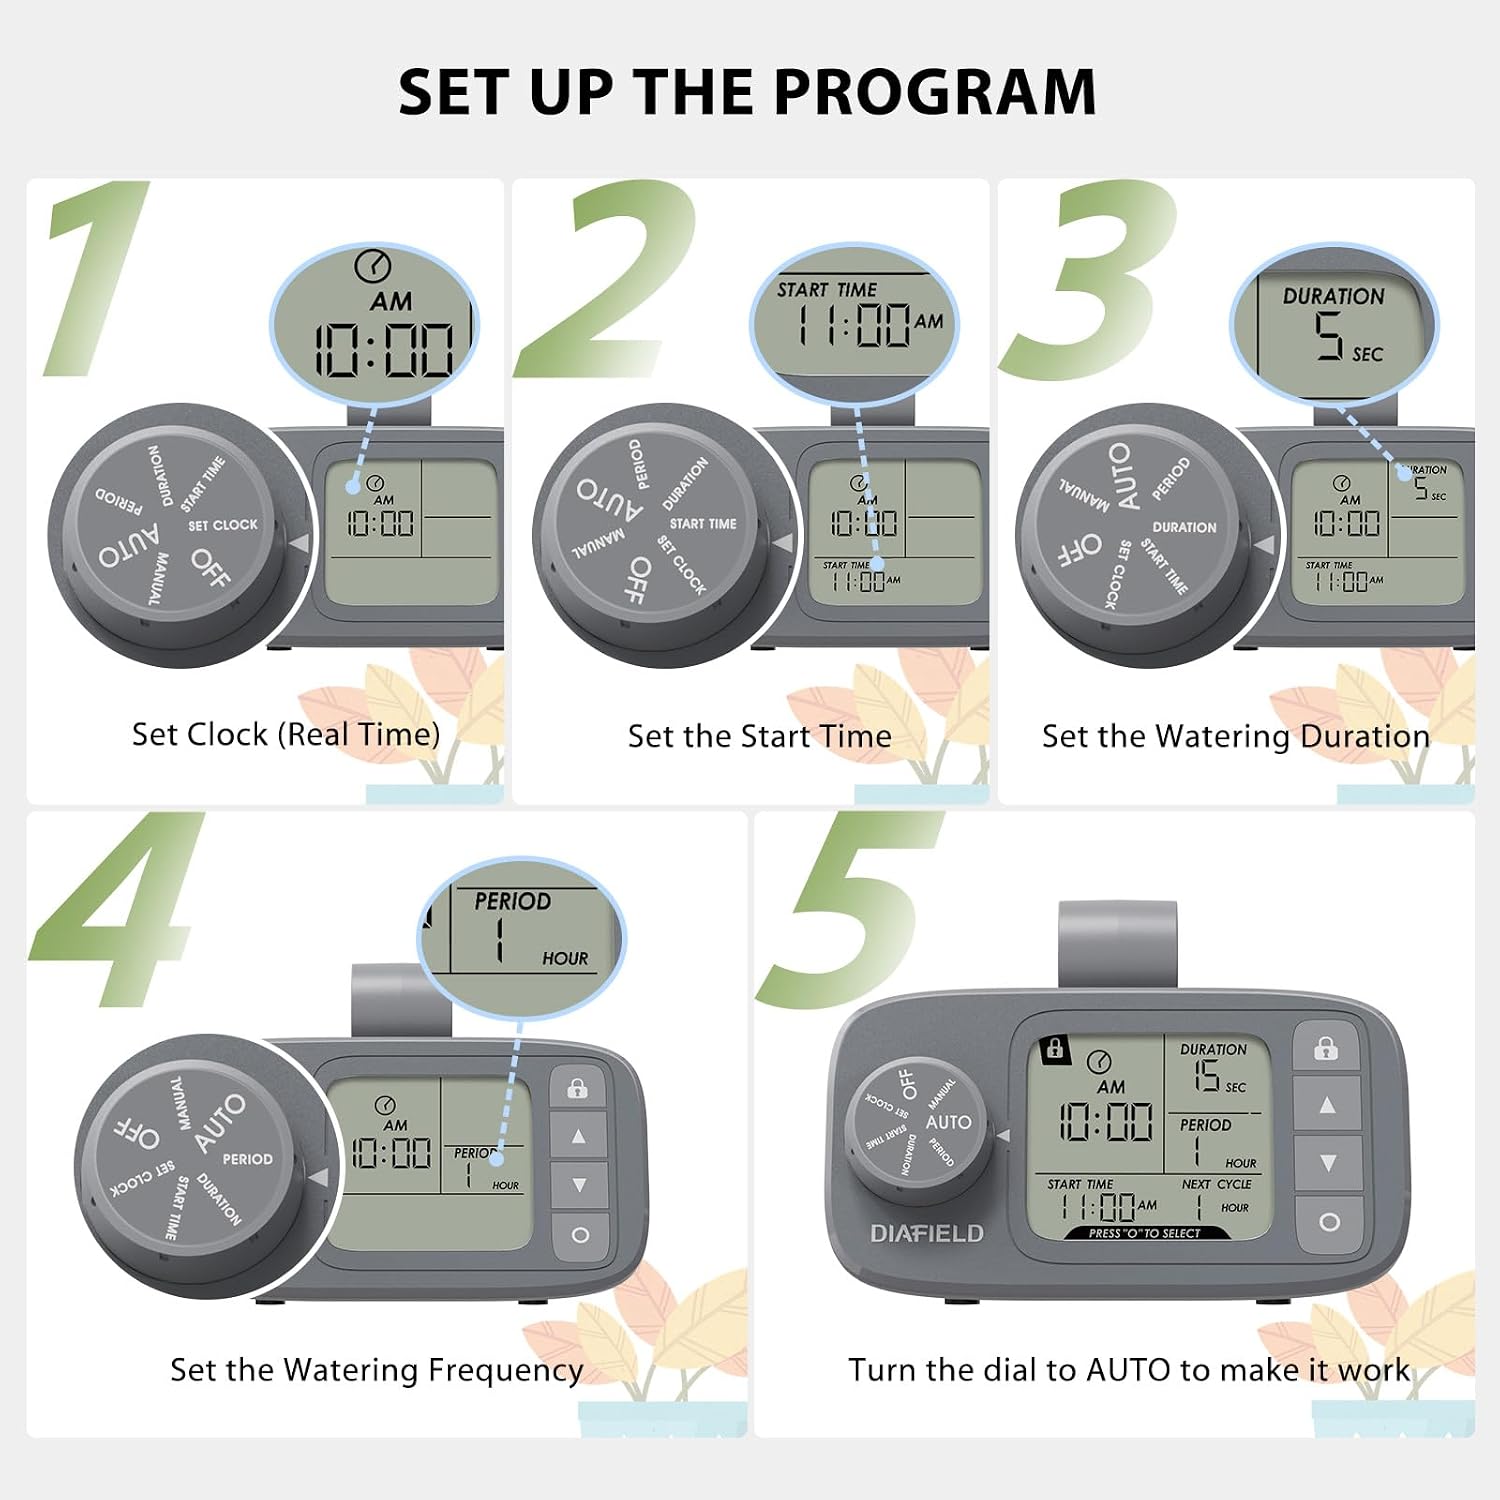
Figure 4: Programming Steps
This image provides a visual walkthrough of the five steps required to program the watering schedule on the control unit.
Child Lock Function
To prevent accidental changes to your settings, the control unit includes a child lock function. Press and hold the Child Lock Button (6) to activate or deactivate the lock. When activated, a lock icon will appear on the LCD screen (4).
Manual Watering
To initiate manual watering, turn the Function Dial (3) to "MANUAL". The system will begin watering immediately. Turn the dial back to "AUTO" or "OFF" to stop manual watering.
Watering Volume Statistics
The actual watering volume per stake can vary based on the number of stakes connected and the duration. Refer to the table below for approximate watering volumes over a 10-second duration:

Figure 5: Watering Volume Statistics (1-15 Stakes)
This chart provides estimated watering volumes in milliliters per minute for different numbers of connected watering stakes, aiding in precise hydration planning.
| Number of Stakes | Approximate Volume (ml/min) |
|---|---|
| 1 | 190 ml |
| 2 | 160 - 175 ml |
| 3 | 150 ml |
| 4 | 130 - 145 ml |
| 5 | 120 - 130 ml |
| 6 | 110 - 115 ml |
| 7 | 105 - 110 ml |
| 8 | 94 - 100 ml |
| 9 | 88 - 92 ml |
| 10 | 85 - 90 ml |
| 11 | 78 - 81 ml |
| 12 | 72 - 75 ml |
| 13 | 66 - 69 ml |
| 14 | 60 - 63 ml |
| 15 | 54 - 57 ml |
Maintenance
Proper maintenance ensures the longevity and optimal performance of your watering system.
- Water Reservoir: Regularly check and refill your water reservoir to ensure continuous operation. If you are going away for weeks, ensure the water storage is large enough for the programmed duration.
- Filter Cleaning: Periodically inspect the filter on the inlet tube for debris and clean it as needed to prevent blockages and maintain efficient water flow.
- Tubing and Stakes: Check tubing and watering stakes for any kinks, blockages, or damage. Clear any obstructions and ensure all connections are secure to prevent leakage.
- Power Supply: Ensure the power adapter is securely connected and the unit is receiving continuous power. This system does not have battery backup, so power interruptions will stop operation.
- Storage: When not in use for extended periods, drain any remaining water from the system, clean all components, and store them in a dry, cool place away from direct sunlight.
Troubleshooting
If you encounter issues with your DIAFIELD Automatic Watering System, refer to the following common problems and solutions:
- System Not Watering:
- Ensure the power adapter is properly connected and the unit is receiving power.
- Check if the Function Dial is set to "AUTO" mode.
- Verify that the water reservoir has sufficient water.
- Inspect the inlet filter for clogs and clean if necessary.
- Confirm that the start time and period settings are correctly programmed and the current time has passed the start time for the first cycle.
- Uneven Water Distribution or Low Flow:
- Check all tubing for kinks or blockages.
- Ensure all T-joints, Cross-joints, and watering stakes are securely connected.
- Clean the filter if water flow is significantly reduced.
- Verify that the water source is positioned lower than the pump to prevent siphoning issues.
- Leakage:
- Ensure all tube connections are tight and properly seated.
- Make sure the hose is inserted at the bottom place of the unit to avoid leakage.
- Inspect tubing and joints for any cracks or damage.
- Settings Lost After Power Outage:
- While the device attempts to save settings, a prolonged power outage may require re-programming.
- If settings appear lost, try switching between manual and auto modes or restarting the unit to see if settings return. If not, re-program the schedule.
- Water Intake/Output Ports are Fragile:
- Handle the unit with care, especially when connecting or disconnecting tubes, to avoid applying sideways pressure to the ports.
Warranty and Support
DIAFIELD offers a warranty for this product. Users are typically able to register their product to receive a 90-day cash back guarantee and a two-year extended warranty on the watering system.
For technical support, troubleshooting assistance, or warranty claims, please refer to the contact information provided in the physical instruction manual included with your product or visit the official DIAFIELD website.
Related documentsTL16US01

Ask a question about this manual
Ask about setup, troubleshooting, compatibility, parts, safety, or missing instructions. Manuals+ will review the question and use this page’s manual context to help answer it.