
Introduction
The WAVLINK 4-Bay Hard Drive Enclosure provides versatile storage expansion for both 3.5-inch and 2.5-inch SATA HDDs and SSDs. It features high-speed USB 3.2 Type-C connectivity, 4K HDMI video output, and an efficient cooling system to ensure optimal performance and data integrity. This manual will guide you through the installation, operation, and maintenance of your device.

Figure 1: Overview of the WAVLINK 4-Bay Hard Drive Enclosure, highlighting its key features and ports.
Setup Instructions
Package Contents
Before beginning, ensure all items are present in the package:
- 1x Quad Bay 3.5" SATA HDD Enclosure
- 1x USB-C to USB-C Cable
- 1x USB-C to USB-A Cable
- 1x Power Adapter
- 1x Power Cable
- 1x Quick Start Guide
- Several Screws and a Screwdriver
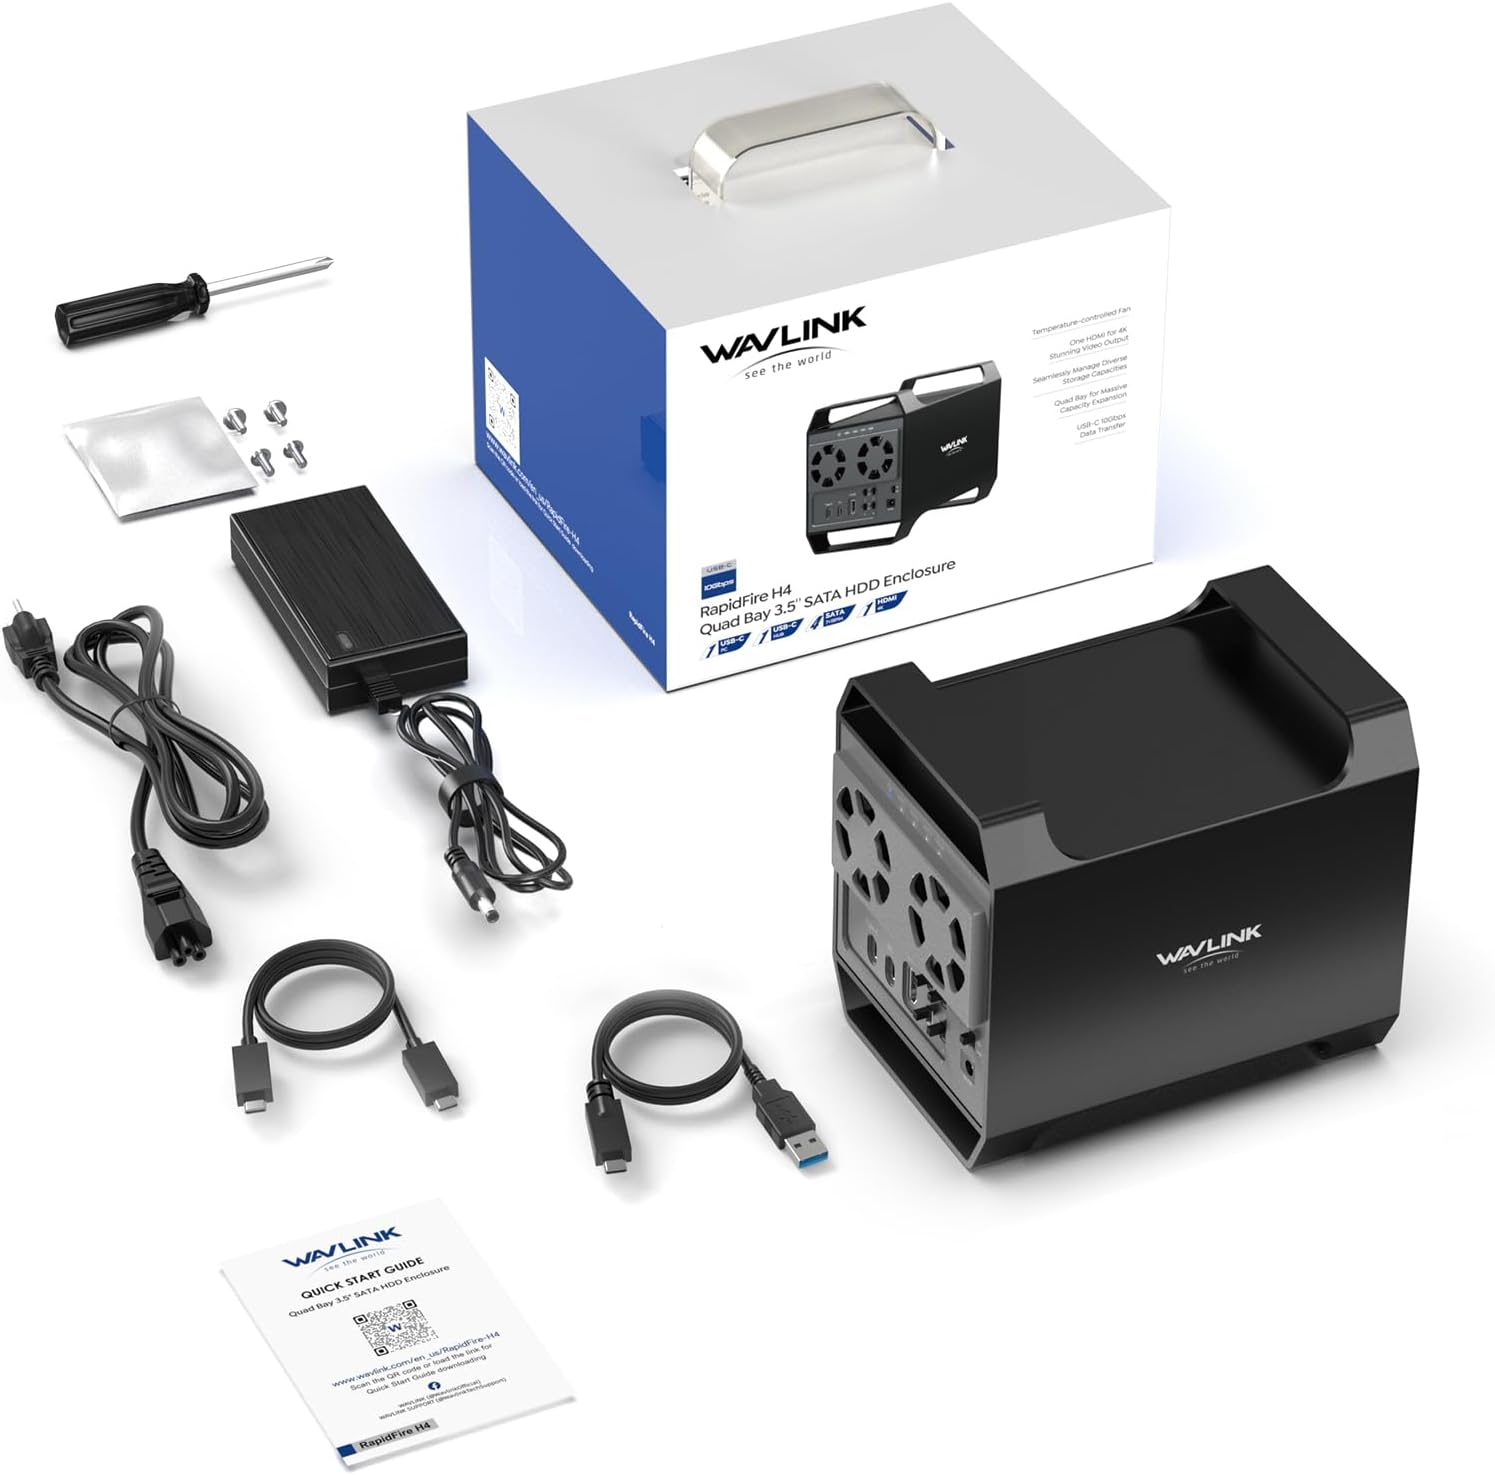
Figure 2: Included accessories and the enclosure.
Hard Drive Installation
- Remove the Brackets: Gently slide out the internal drive bay assembly from the aluminum shell.
- Place HDD 1 & 2, 3 & 4 into the Brackets: Align your 3.5-inch SATA HDDs or SSDs with the mounting holes on the brackets. For 2.5-inch drives, additional 2.5-inch to 3.5-inch mounting brackets are required (not included).
- Secure the Brackets Together: Use the provided screws to firmly attach the drives to the brackets and secure the brackets around the drives.
- Reinstall the Brackets: Carefully slide the assembled drive bay back into the enclosure's aluminum shell.
- Tighten the Screws on the Bottom: Secure the drive bay assembly by tightening the screws on the bottom of the enclosure.
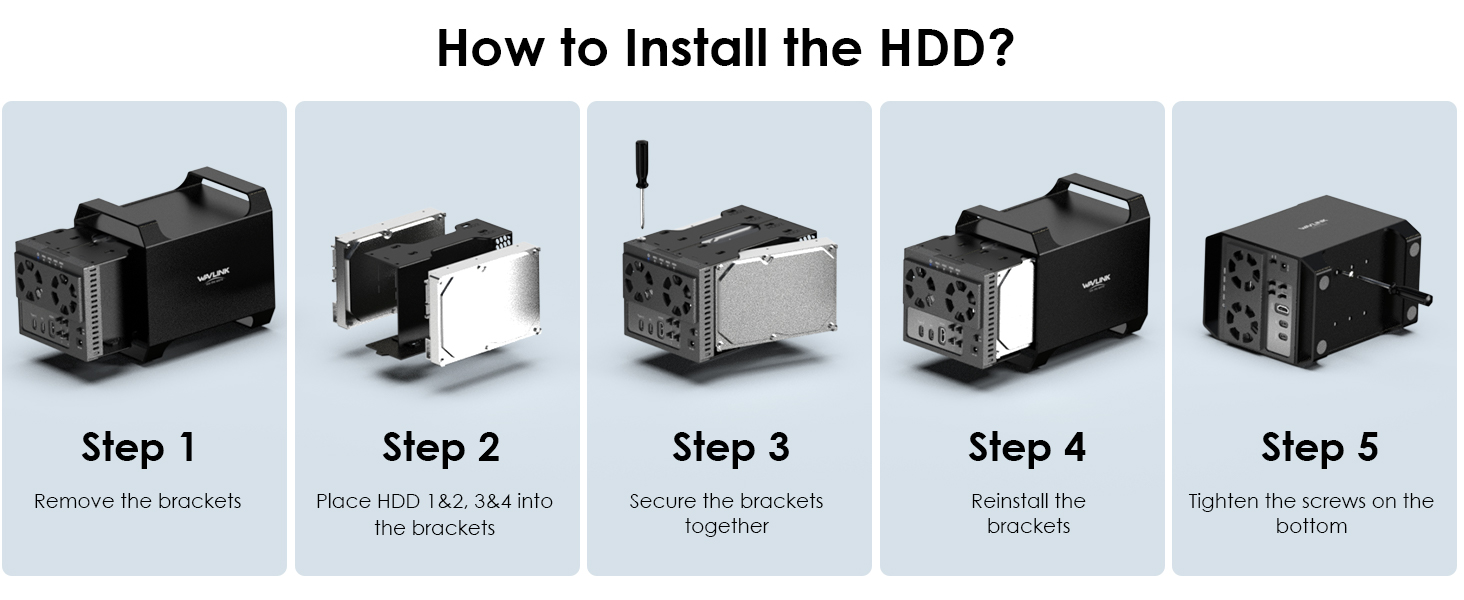
Figure 3: Detailed steps for hard drive installation.
Connecting to Your Computer
- Connect the power adapter to the enclosure's power interface and plug it into a power outlet.
- Use the provided USB-C to USB-C cable to connect the enclosure's "Type-C for PC" port to a compatible USB-C port on your computer. Alternatively, use the USB-C to USB-A cable if your computer only has USB-A ports.
- If utilizing the HDMI output, ensure your computer's USB-C port supports video output (DisplayPort Alternate Mode) and use the USB-C to C cable for proper functionality.
- Turn on the main power switch on the back of the enclosure.
- Individually switch on the power for each installed hard drive using the "HDD Switch" controls.
Operating Instructions
Data Transfer
The enclosure supports USB 3.2 Type-C with data transfer speeds up to 10Gbps. Once connected, your operating system should recognize the installed drives as individual storage devices. You can then access, read, and write data to them as you would with any internal or external drive.

Figure 4: High-speed data transfer capabilities.
Independent Drive Management
Each of the four drive bays features an independent ON/OFF power switch. This allows you to power individual drives on or off without affecting the other drives or the entire system, providing flexibility for managing your storage.
Figure 5: Independent drive power switches for flexible management.
4K HDMI Video Output
The enclosure includes an HDMI interface supporting up to 4K@60Hz resolution (under DP1.4). To use this feature, ensure your host computer's USB-C port supports video output (DisplayPort Alternate Mode) and connect the enclosure to your computer using the USB-C to USB-C cable. The HDMI port will not function with a USB-C to USB-A cable.

Figure 6: Connecting to an external 4K display.
Daisy Chain Connectivity
The enclosure supports daisy-chaining up to three devices simultaneously, allowing for expanded connectivity and an organized workspace.

Figure 7: Daisy chain connection setup.
Compatibility
The enclosure is compatible with 3.5-inch and 2.5-inch SATA HDDs and SSDs. It supports various operating systems including Windows, macOS, Linux, Android, Chrome OS, Harmony OS, and iOS.
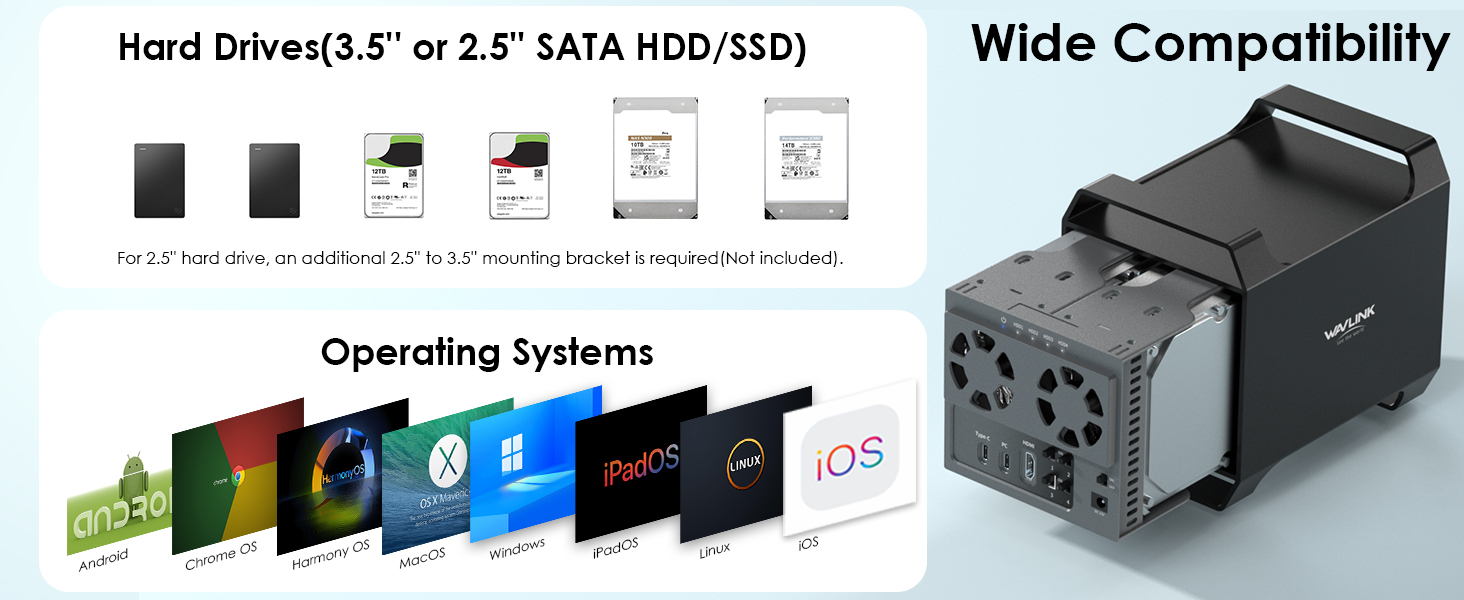
Figure 8: Broad compatibility with hard drives and operating systems.
Maintenance
Cooling System
The WAVLINK enclosure features a high-quality aluminum shell for superior heat dissipation and dual built-in fans. These fans automatically activate when the internal temperature reaches 48°C, ensuring your hard drives remain cool and operate optimally, even during extended use or intensive tasks. Regular cleaning of the fan vents to prevent dust buildup is recommended to maintain efficient cooling.

Figure 9: Intelligent cooling system design.
Auto-Sleep Mode
The enclosure is designed with an auto-sleep mode that activates after 15 minutes of inactivity. This feature helps conserve power and extend the lifespan of your hard drives.

Figure 10: Auto-sleep functionality for power saving.
Troubleshooting
- Drives Not Recognized:
- Ensure the power adapter is securely connected and the main power switch is ON.
- Verify that each individual HDD switch for the installed drives is in the ON position.
- Check all USB cable connections between the enclosure and your computer. Try a different USB port on your computer.
- Confirm that the hard drives are properly seated and secured within their brackets inside the enclosure.
- For new drives, ensure they are initialized, partitioned, and formatted in your operating system's Disk Management (Windows) or Disk Utility (macOS).
- HDMI Output Not Working:
- Confirm that your computer's USB-C port supports video output (DisplayPort Alternate Mode). Not all USB-C ports support this function.
- Ensure you are using the USB-C to USB-C cable to connect the enclosure to your computer. The HDMI port will not function if connected via a USB-C to USB-A cable.
- Check the HDMI cable connection between the enclosure and your monitor.
- Slow Data Transfer Speeds:
- Ensure you are connected to a USB 3.2 Gen 2 (10Gbps) compatible port on your computer using the appropriate USB-C to USB-C cable.
- Performance can be affected by the speed of the installed hard drives themselves.
- Avoid transferring many small files simultaneously, as this can reduce overall transfer rates.
- Enclosure Disconnects Randomly:
- Ensure all cables are securely connected.
- Test with a different USB cable or port on your computer.
- Verify that your computer's power settings are not configured to turn off USB devices to save power.
- While rare, some users have reported connection stability issues with certain system configurations. If issues persist, contact customer support.
Specifications
| Model Number | RapidFire H4--K35284A |
| Brand | WAVLINK |
| Hardware Interface | HDMI, USB 3.2 Gen 2 |
| Connectivity Technology | USB 3.2 Type-C, HDMI |
| Data Transfer Rate | 10 Gigabits per second |
| Supported Devices Quantity | 4 |
| Hard Disk Form Factor | 3.5 inches (supports 2.5 inches with adapter, not included) |
| Max Capacity | Up to 88TB (4x22TB) |
| Enclosure Material | Aluminum |
| Cooling | Built-in Temp-Controlled Cooling Fans (activates at 48°C) |
| Product Dimensions (L x W x H) | 7.2" x 5" x 6.4" (18.4cm x 12.8cm x 16.3cm) |
| Item Weight | 2.4 pounds |
| Compatible Devices | Desktop, Laptop, Personal Computer, Tablet |
| Supported Operating Systems | Windows, macOS, Linux, Android, Chrome OS, Harmony OS, iOS |
Warranty and Support
WAVLINK provides a 12-month worry-free warranty and life-long technical support for this product.
Contact Information:
- Phone Support: +18889730883 (UTC-5) Mon - Fri 9 AM - 6 PM
- Email Support: Contact@wavlink.com
- Solutions will be provided within 8 hours.