1. Introduction
This manual provides detailed instructions for the installation, operation, and maintenance of your Waterdrop WD-T4-A Alkaline pH+ Reverse Osmosis Water Filter System. Please read this manual thoroughly before installation and retain it for future reference. Proper installation and maintenance are crucial for the system's optimal performance and longevity.
The Waterdrop WD-T4-A is a tankless, undersink reverse osmosis system designed to provide both standard RO-purified water and mineral-enhanced alkaline water. It features a 10-stage filtration process, a 450 GPD (Gallons Per Day) capacity, and an efficient 2:1 pure to drain ratio.
2. Product Overview
2.1 Key Features
- Dual Water Flow: Provides both standard RO-purified water and mineral-enhanced alkaline water from a single faucet.
- 10-Stage Filtration: Comprehensive filtration stages effectively reduce PFOA & PFOS, chlorine, heavy metals, rust, colloids, and other impurities.
- 450 GPD Capacity: Delivers a rapid and steady flow of purified water.
- 2:1 Pure to Drain Ratio: An efficient water-saving design that reduces wastewater significantly compared to traditional RO systems.
- Smart Filter Life Reminder: Indicator lights and buzzer alerts notify you when filters require replacement.
- Tankless Design: Compact system saves under-sink space and minimizes the risk of secondary contamination associated with storage tanks.
- Dual LED Function: Ensures water safety from filtration to faucet.
2.2 System Components
The Waterdrop WD-T4-A RO system includes the main filtration unit, a dedicated faucet, and a set of filters (RO, CB, ALK, CF). Additional components such as tubing, adapters, and mounting hardware are also provided for installation.

Image: The Waterdrop WD-T4-A Reverse Osmosis system, showing the main unit, four filter cartridges (RO, CB, ALK, CF), and the dual-flow faucet. The NSF/ANSI 372 certification is visible on the unit.

Image: A visual comparison illustrating the compact, tankless design of the Waterdrop WD-T4-A system on the left, freeing up under-sink space, versus a traditional RO system with a large storage tank on the right, which occupies more space.
2.3 Filtration Process
The system employs a multi-stage filtration process:
- CF Filter (Pre-sediment and Carbon Block): Removes larger particles like sand, rust, and sediment, and reduces chlorine, taste, and odor.
- RO Membrane (Reverse Osmosis): Filters out dissolved solids, heavy metals, PFOA/PFOS, and other microscopic impurities down to 0.0001 microns.
- CB Filter (Activated Carbon Block): Further polishes the water, removing any residual chlorine, taste, and odor.
- ALK Filter (Alkaline pH+): Infuses beneficial alkaline minerals (such as calcium, magnesium, potassium, and sodium) into the water, enhancing its pH and taste.

Image: A detailed diagram showing the internal layers of the filtration cartridges for both Pure RO Water and Alkaline RO Water. It highlights the 0.0001µm RO membrane and the alkaline mineralization stage, indicating removal of various contaminants like PFOA & PFOS, chlorine, sediments, and heavy metals.
3. Setup and Installation
3.1 Pre-Installation Checklist
- Verify all components are present and undamaged.
- Ensure adequate under-sink space for the unit (dimensions: 16.54"L x 6.22"W x 17.95"H).
- Confirm access to a cold water supply line, a drain, and a standard electrical outlet.
- Gather necessary tools: drill, wrench, screwdriver, utility knife, Teflon tape.
3.2 Installation Steps
- Turn off Water Supply: Locate and turn off the cold water supply valve under your sink.
- Install Faucet: Drill a hole (if necessary) in your countertop or sink for the dedicated faucet. Secure the faucet according to the provided instructions.
- Connect Water Supply: Install the feed water adapter to your cold water line and connect the system's inlet tubing.
- Install Drain Saddle: Attach the drain saddle valve to the drain pipe under your sink and connect the system's drain tubing.
- Mount System Unit: The system can be placed on the cabinet floor or wall-mounted. Secure the main unit in a suitable location.
- Insert Filters: Insert the CF, RO, CB, and ALK filters into their respective slots. Ensure they are securely twisted into place.
- Connect Faucet Tubing: Connect the purified water tubing from the system to the dedicated faucet.
- Connect Power: Plug the system into a grounded electrical outlet. The system requires an electrical connection for operation.
- Restore Water Supply: Slowly turn on the cold water supply valve and check for leaks.

Image: An illustration demonstrating the flexible installation options for the Waterdrop WD-T4-A system, showing it can be installed either under the sink or wall-mounted, adapting to various kitchen layouts.
4. Operating Instructions
4.1 Initial Flushing
After installation, it is essential to flush the system to remove air and carbon fines. Turn on the dedicated faucet and let the water run for at least 30 minutes. This ensures the system is properly primed and the filters are ready for use. You may notice some discoloration or air bubbles initially; this is normal.
4.2 Dispensing Water
The WD-T4-A faucet provides two types of water:
- Pure RO Water: Use the designated lever or knob on the faucet to dispense highly purified water.
- Alkaline RO Water: Use the other designated lever or knob to dispense mineral-enhanced alkaline water.
Switch between these options based on your preference. Both streams deliver contaminant-reduced drinking water.
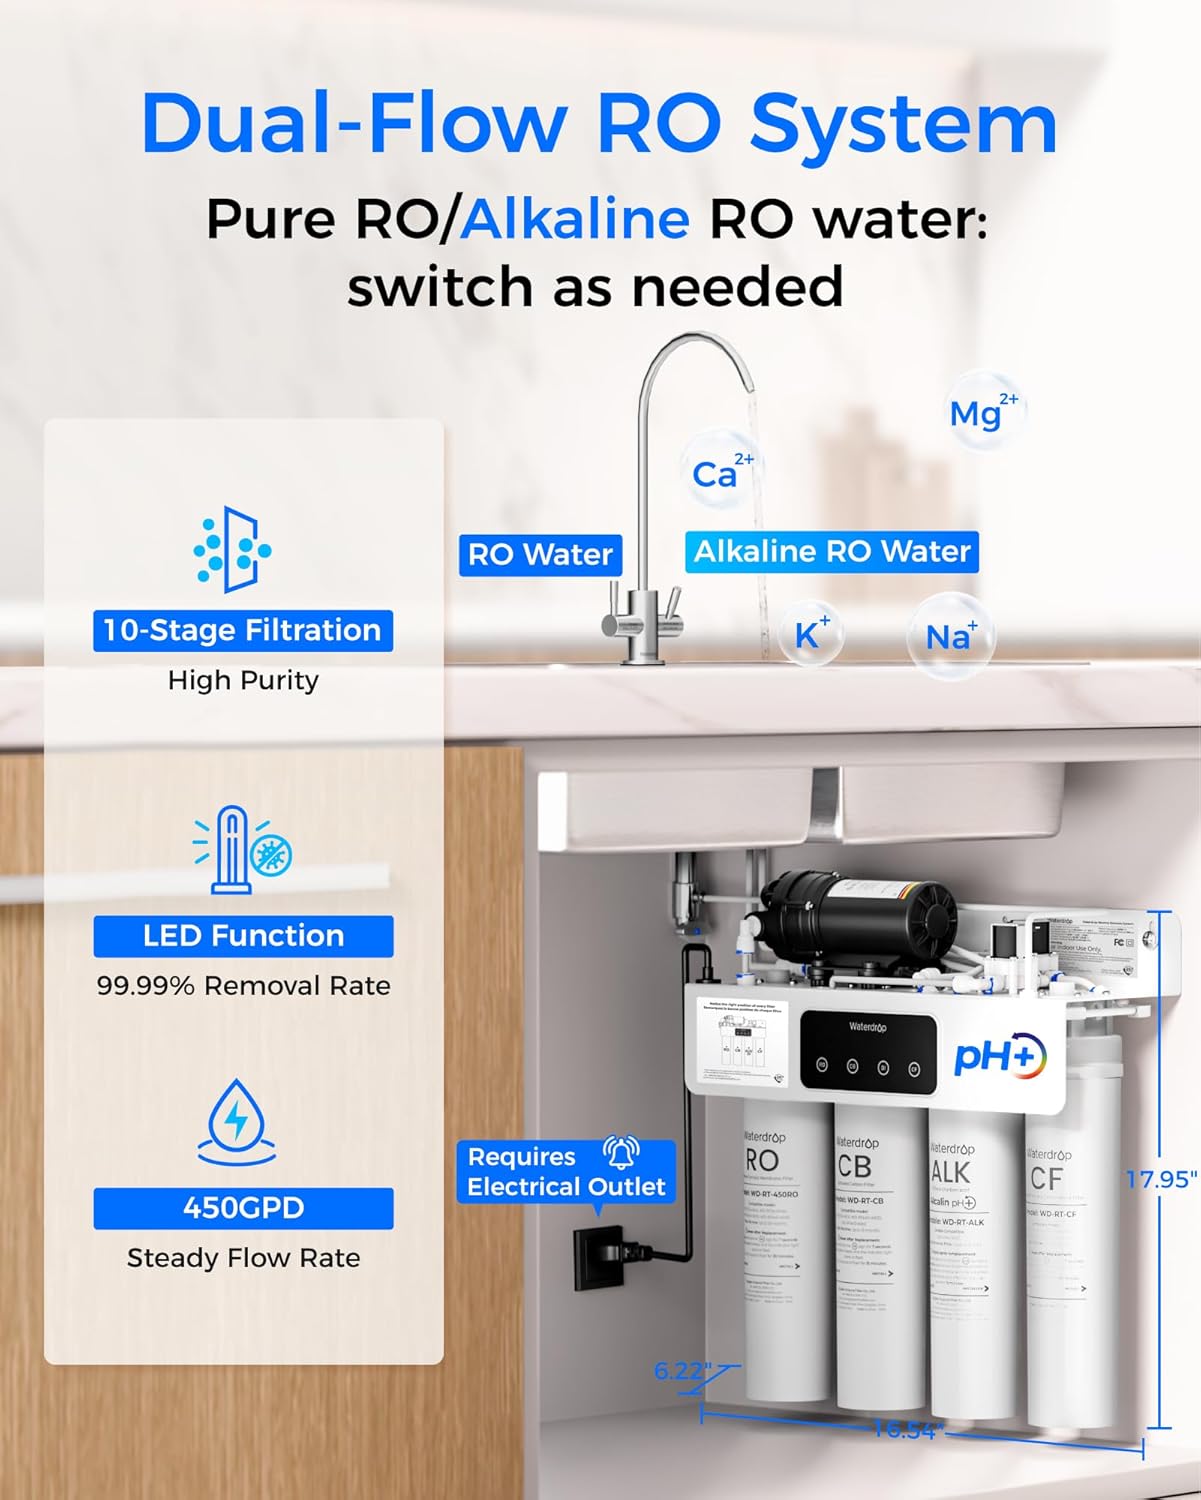
Image: A diagram illustrating the dual-flow functionality of the Waterdrop RO system, showing how it provides both standard RO water and alkaline RO water enriched with minerals like Calcium (Ca), Magnesium (Mg), Potassium (K), and Sodium (Na).

Image: A collage depicting various uses of the purified water, including children drinking pure RO water, a woman preparing meals with pure water, and individuals enjoying mineral-infused alkaline water for healthier drinking.
4.3 Water Flow Rate
The system provides a rapid and steady flow of 450 GPD, ensuring purified water is available on demand without significant waiting times, unlike traditional tank-based systems where flow can diminish as tank pressure drops.

Image: A graph comparing the rapid and steady water flow of the Waterdrop WD-T4-A (450 GPD) with the slower, diminishing flow of a traditional RO system (50 GPD) over time, highlighting the efficiency of the tankless design.
5. Maintenance
5.1 Filter Replacement Schedule
The system features a smart filter life reminder with indicator lights and buzzer alerts to notify you when filters need replacement. Adhere to the following recommended replacement intervals for optimal performance:
- CF Filter: Every 6 months
- CB Filter: Every 12 months
- Alkaline Mineralizer (ALK): Every 12 months
- RO Membrane: Every 24 months
Note: Actual filter lifespan may vary depending on local water quality and usage.

Image: The Waterdrop WD-T4-A unit displaying indicator lights (blue, yellow, red) and buzzer alerts for filter replacement. Recommended replacement intervals for each filter (RO, CB, ALK, CF) are shown: 24, 12, 12, and 6 months respectively.
5.2 Filter Replacement Procedure
The system uses an all-in-one cartridge design for easy replacement:
- Turn off the water supply to the RO system.
- Unplug the power cord from the electrical outlet.
- Twist the old filter cartridge counter-clockwise to unlock and remove it.
- Insert the new filter cartridge into the slot and twist clockwise until it locks securely.
- Restore power and water supply.
- Flush the new filter by running water from the faucet for a few minutes as per specific filter instructions.

Image: An illustration demonstrating the ease of replacing the all-in-one filter cartridges in the Waterdrop WD-T4-A system. It shows a hand twisting a filter for quick replacement, emphasizing the leak-free design compared to traditional systems.
5.3 Auto-Flushing Technology
The WD-T4-A system incorporates auto-flushing technology to maintain filter efficiency and ensure consistent water quality. This feature periodically flushes the RO membrane to prevent scaling and prolong its lifespan, ensuring pure, fresh-tasting water.

Image: A cutaway diagram illustrating the internal auto-flush mechanism of the Waterdrop WD-T4-A system, showing water flow paths during flushing to maintain purity and fresh taste, contrasting with manual flushing required for traditional RO systems.
6. Troubleshooting
If you encounter any issues with your Waterdrop WD-T4-A system, please refer to the following common problems and solutions:
- No Water Flow:
- Check if the water supply valve is fully open.
- Ensure the system is plugged in and receiving power.
- Verify filters are correctly installed and not clogged (check filter life indicators).
- Inspect tubing for kinks or blockages.
- Slow Water Flow:
- Filters may be nearing the end of their lifespan; check indicators and replace if necessary.
- Ensure adequate incoming water pressure.
- Leaks:
- Turn off the water supply immediately.
- Check all connections and fittings for tightness.
- Ensure filter cartridges are properly seated and twisted into place.
- Inspect O-rings for damage or improper seating.
- Unusual Taste or Odor:
- Perform an initial flush if the system is new or filters have just been replaced.
- Check the CF and CB filter life indicators; replace if expired.
- Filter Life Indicator Lights:
- Blue: Filter is in good condition.
- Yellow: Filter is nearing replacement.
- Red & Beeps: Filter needs immediate replacement.
For issues not covered here, or if troubleshooting steps do not resolve the problem, please contact Waterdrop customer support.
7. Specifications
| Specification | Value |
|---|---|
| Model Name | WD-T4 |
| Product Dimensions | 16.54"L x 6.22"W x 17.95"H |
| Item Weight | 24.1 pounds |
| Manufacturer | Waterdrop |
| Included Components | WD-T4 RO system |
| Filtration Stages | 10-Stage |
| Water Production Rate | 450 GPD (Gallons Per Day) |
| Pure to Drain Ratio | 2:1 |
| Certifications | NSF/ANSI 372 Certified |
8. Warranty and Support
8.1 Warranty Information
Please refer to the manufacturer's official warranty documentation included with your product for specific details regarding coverage, terms, and conditions. Typically, Waterdrop products come with a limited warranty covering defects in materials and workmanship.
8.2 Customer Support
For technical assistance, replacement parts, or warranty claims, please contact Waterdrop customer support. Contact information can usually be found on the product packaging, the official Waterdrop website, or the original purchase platform.
You can also refer to the official User Manual (PDF) for additional information: Waterdrop WD-T4-A User Manual


