
1. Introduction
Thank you for choosing the Char-Broil Performance Series FlavorMax 6-Burner Gas Grill. This manual provides essential information for the safe assembly, operation, maintenance, and troubleshooting of your new grill. Please read all instructions carefully before using the appliance to ensure optimal performance and safety.
2. Safety Information
Always follow these safety guidelines to prevent injury or property damage:
- Outdoor Use Only: This grill is designed for outdoor use only. Do not operate indoors or in an enclosed area.
- Gas Leaks: Check for gas leaks before each use. Use a soapy water solution; never use an open flame.
- Clearance: Maintain proper clearance from combustible materials. Refer to the assembly instructions for specific distances.
- Children and Pets: Keep children and pets away from the grill at all times, especially during operation.
- Hot Surfaces: Grill surfaces become extremely hot. Use heat-resistant gloves and appropriate tools.
- LP Tank: Always connect and disconnect the LP tank outdoors. Ensure the tank is upright and secure.
- Grease Fires: In case of a grease fire, turn off the gas supply and keep the lid open. Do not use water to extinguish.
3. Setup
Your Char-Broil Performance Series FlavorMax 6-Burner Gas Grill comes largely pre-assembled. Follow these steps for initial setup:
3.1 Unpacking and Placement
- Carefully remove all packaging materials.
- Place the grill on a level, stable, non-combustible surface in an outdoor area.
- Ensure adequate ventilation and clearance from walls or other structures.
3.2 Gas Connection
- Ensure all burner control knobs are in the OFF position.
- Connect the regulator hose to the LP tank valve. Hand-tighten firmly.
- Perform a leak test: Apply a soapy water solution to all gas connections. Bubbles indicate a leak. Tighten connections or replace parts as needed. Do not use the grill if a leak is detected.
3.3 Initial Burn-Off
Before cooking food for the first time, perform an initial burn-off to remove any manufacturing residues:
- Open the grill lid.
- Turn on the gas supply at the LP tank.
- Turn one main burner knob to HIGH. Ignite the burner according to the operating instructions.
- Once lit, turn on all other main burners to HIGH.
- Close the lid and allow the grill to heat for 15-20 minutes.
- Turn off all burners and the gas supply at the LP tank.

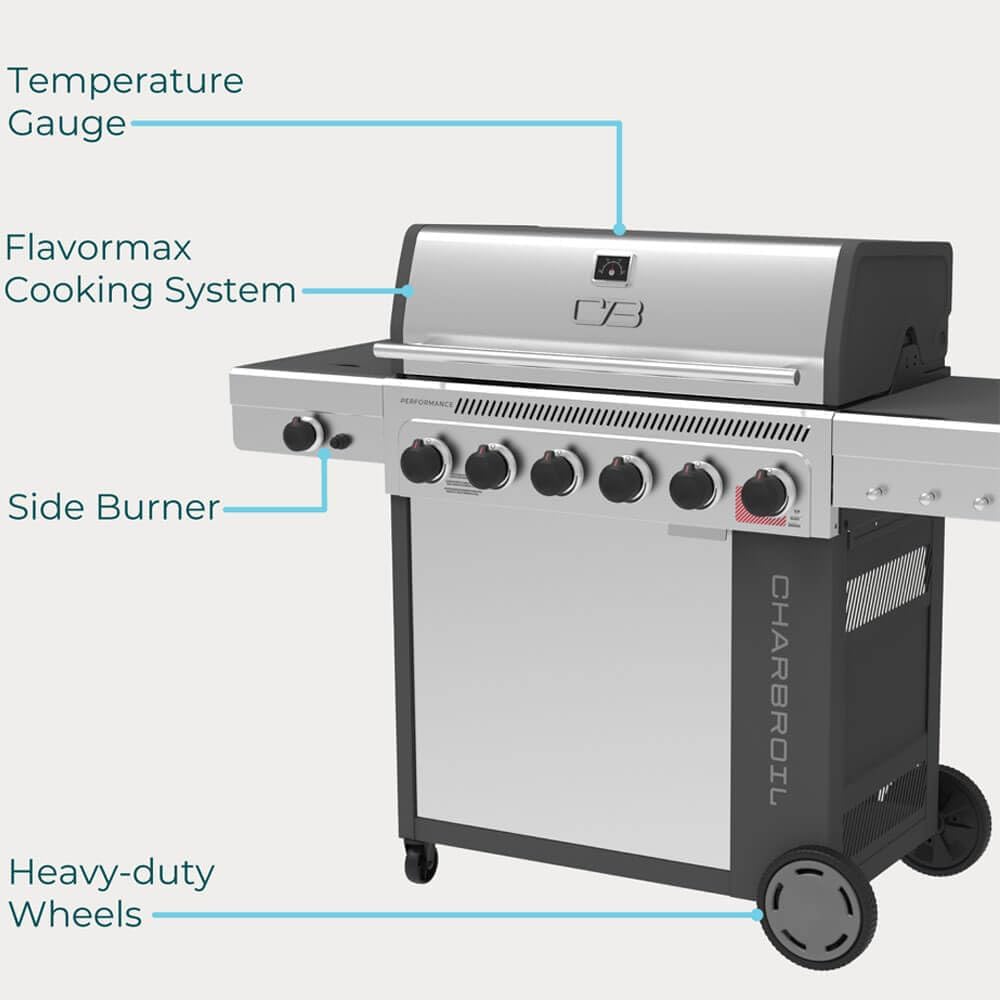
This image provides an annotated view of the grill, pointing out key features like the temperature gauge, FlavorMax cooking system, side burner, and heavy-duty wheels.

This image shows the cast iron griddle component of the grill, highlighting its design for preventing food spillage and its storage capability.
4. Operating Instructions
4.1 Lighting the Main Burners
- Open the grill lid.
- Ensure the LP tank valve is fully open.
- Push and turn any main burner control knob to the HIGH position.
- Press the electronic igniter button repeatedly until the burner lights.
- If the burner does not light within 5 seconds, turn the knob to OFF, wait 5 minutes, and repeat the process.
- Once lit, you can adjust the flame intensity by turning the knob between HIGH and LOW.
4.2 Using the Side Burner
The side burner is ideal for preparing sauces or side dishes while grilling.
- Open the side burner lid.
- Push and turn the side burner control knob to the HIGH position.
- Press the electronic igniter button until the burner lights.
- Adjust the flame as needed.
- Always close the side burner lid when not in use.
This image depicts the side burner in operation, with a pan of vegetables being cooked, illustrating its utility for preparing sauces or side dishes.
4.3 Using the Cast Iron Griddle
The versatile cast iron griddle can be used for cooking items like eggs, pancakes, or delicate vegetables.
- Place the griddle securely on the grill grates over the desired burner(s).
- Preheat the griddle on medium-low heat for 5-10 minutes.
- After use, allow the griddle to cool completely before cleaning and storing.
- When not in use, the griddle can be conveniently stored in the grill cabinet.
4.4 Temperature Control and Cooking Tips
- Use the integrated temperature gauge on the lid to monitor internal grill temperature.
- Adjust burner knobs to achieve desired cooking temperatures.
- For even cooking, preheat the grill for 10-15 minutes with the lid closed.
- Utilize the warming rack for keeping cooked food warm or for indirect cooking.

This image shows the assembled grill in an outdoor environment, with food cooking on the grates and the side burner, demonstrating its full functionality and appearance.

This image focuses on food being cooked on the main grill grates, with a hand using tongs to handle a baked potato, showcasing the grilling process.
5. Maintenance
Regular cleaning and maintenance will extend the life of your grill.
5.1 Cleaning the Grill Grates
- After each use, while the grates are still warm, use a grill brush to remove food residue.
- For deeper cleaning, remove grates and wash with warm, soapy water. Rinse thoroughly and dry.
5.2 Cleaning the Burners
- Periodically inspect burner ports for blockages (e.g., spider webs, food debris).
- Use a wire brush or a stiff wire to clear any obstructions.
- Ensure all gas ports are clear for even flame distribution.
5.3 Grease Management
- Regularly check and empty the grease tray to prevent flare-ups and spills.
- Clean the grease tray with warm, soapy water.
5.4 Exterior Cleaning and Storage
- Wipe exterior surfaces with a damp cloth and mild detergent.
- For stainless steel surfaces, use a stainless steel cleaner to maintain shine.
- Store the grill in a covered area or use a grill cover to protect it from the elements.
6. Troubleshooting
Refer to this section for common issues and their solutions.
| Problem | Possible Cause | Solution |
|---|---|---|
| Burner will not light with igniter | No gas flow; Igniter not sparking; Clogged burner port | Check LP tank connection and gas level; Check igniter electrode and wire; Clean burner ports. |
| Uneven heat across cooking surface | Clogged burner ports; Low gas pressure | Clean burner ports; Check LP tank level and regulator. |
| Excessive flare-ups | Grease buildup; High heat setting; Fatty foods | Clean grease tray and cooking grates; Reduce heat; Trim excess fat from food. |
| Gas odor | Gas leak | Immediately turn off gas supply. Perform a leak test. Do not operate if leak persists. Contact qualified service personnel. |
7. Specifications
Key specifications for the Char-Broil Performance Series FlavorMax 6-Burner Gas Grill:
- Model Name: 463286125
- Brand: Charbroil
- Fuel Type: Gas (Propane)
- Main Burner Count: 6
- Cooking System: Gas with Cast Iron Griddle and Sear Burner
- Primary Cooking Method: Gas
- Total Cooking Area: 725 Square Inches
- Item Dimensions (D x W x H): 25"D x 41"W x 26"H
- Item Weight: 128 Pounds
- Material Type: Stainless Steel
- Special Features: Warming Rack, Cast Iron Griddle, Sear Burner
- Installation Type: Free Standing
- Indoor/Outdoor Usage: Outdoor

This image visually represents the height, width, and weight of the grill, providing essential dimensional information for placement and handling.

This image highlights the primary cooking surface area of the grill, indicating its capacity in square inches and illustrating how many hamburger patties, chicken breasts, or steaks it can accommodate.
8. Warranty Information
This Char-Broil grill is covered by a 1 Year Manufacturer Warranty. For specific details regarding coverage, terms, and conditions, please refer to the warranty documentation included with your purchase or visit the official Char-Broil website.
9. Support
For further assistance, replacement parts, or to register your product, please contact Char-Broil customer support or visit their official website:
- Charbroil Official Store: Visit the Charbroil Store on Amazon
- Refer to the contact information provided in your product packaging for direct customer service numbers.