1. Introduction
Thank you for choosing the Philips Solar Security Light. This manual provides essential information for the safe and efficient operation of your solar-powered LED floodlight. Please read these instructions carefully before installation and use, and retain them for future reference.

Figure 1: Philips Solar Security Light variants. The image displays two types of solar security lights. The top row shows two units, each consisting of a single rectangular LED floodlight panel connected to a separate solar panel via a cable, along with a remote control. The bottom row shows two units, each with three adjustable LED panels (two side panels and one central panel) connected to a separate solar panel, also with a remote control. All components are black.
2. Product Features
- High Brightness: Equipped with high-brightness LEDs, emitting a cool daylight color temperature of 6500K/7500K.
- Multiple Lighting Modes: Features 3 distinct nighttime lighting modes for versatile use.
- PIR Motion Sensor: Integrated Passive Infrared (PIR) motion sensor detects movement up to 26.25/29.35 feet within a 120°/110° angle.
- Remote Control: Allows convenient adjustment of lighting modes without manual interaction with the unit.
- Efficient Solar Panel: Durable polycrystalline solar panel for effective charging.
- High-Capacity Battery: Built-in 1800/2000 mAh battery ensures extended operation.
- Durable Design: IP65 waterproof rating, resistant to corrosion, rust, and various weather conditions.
- Easy Installation: Designed for straightforward setup with all necessary accessories included.
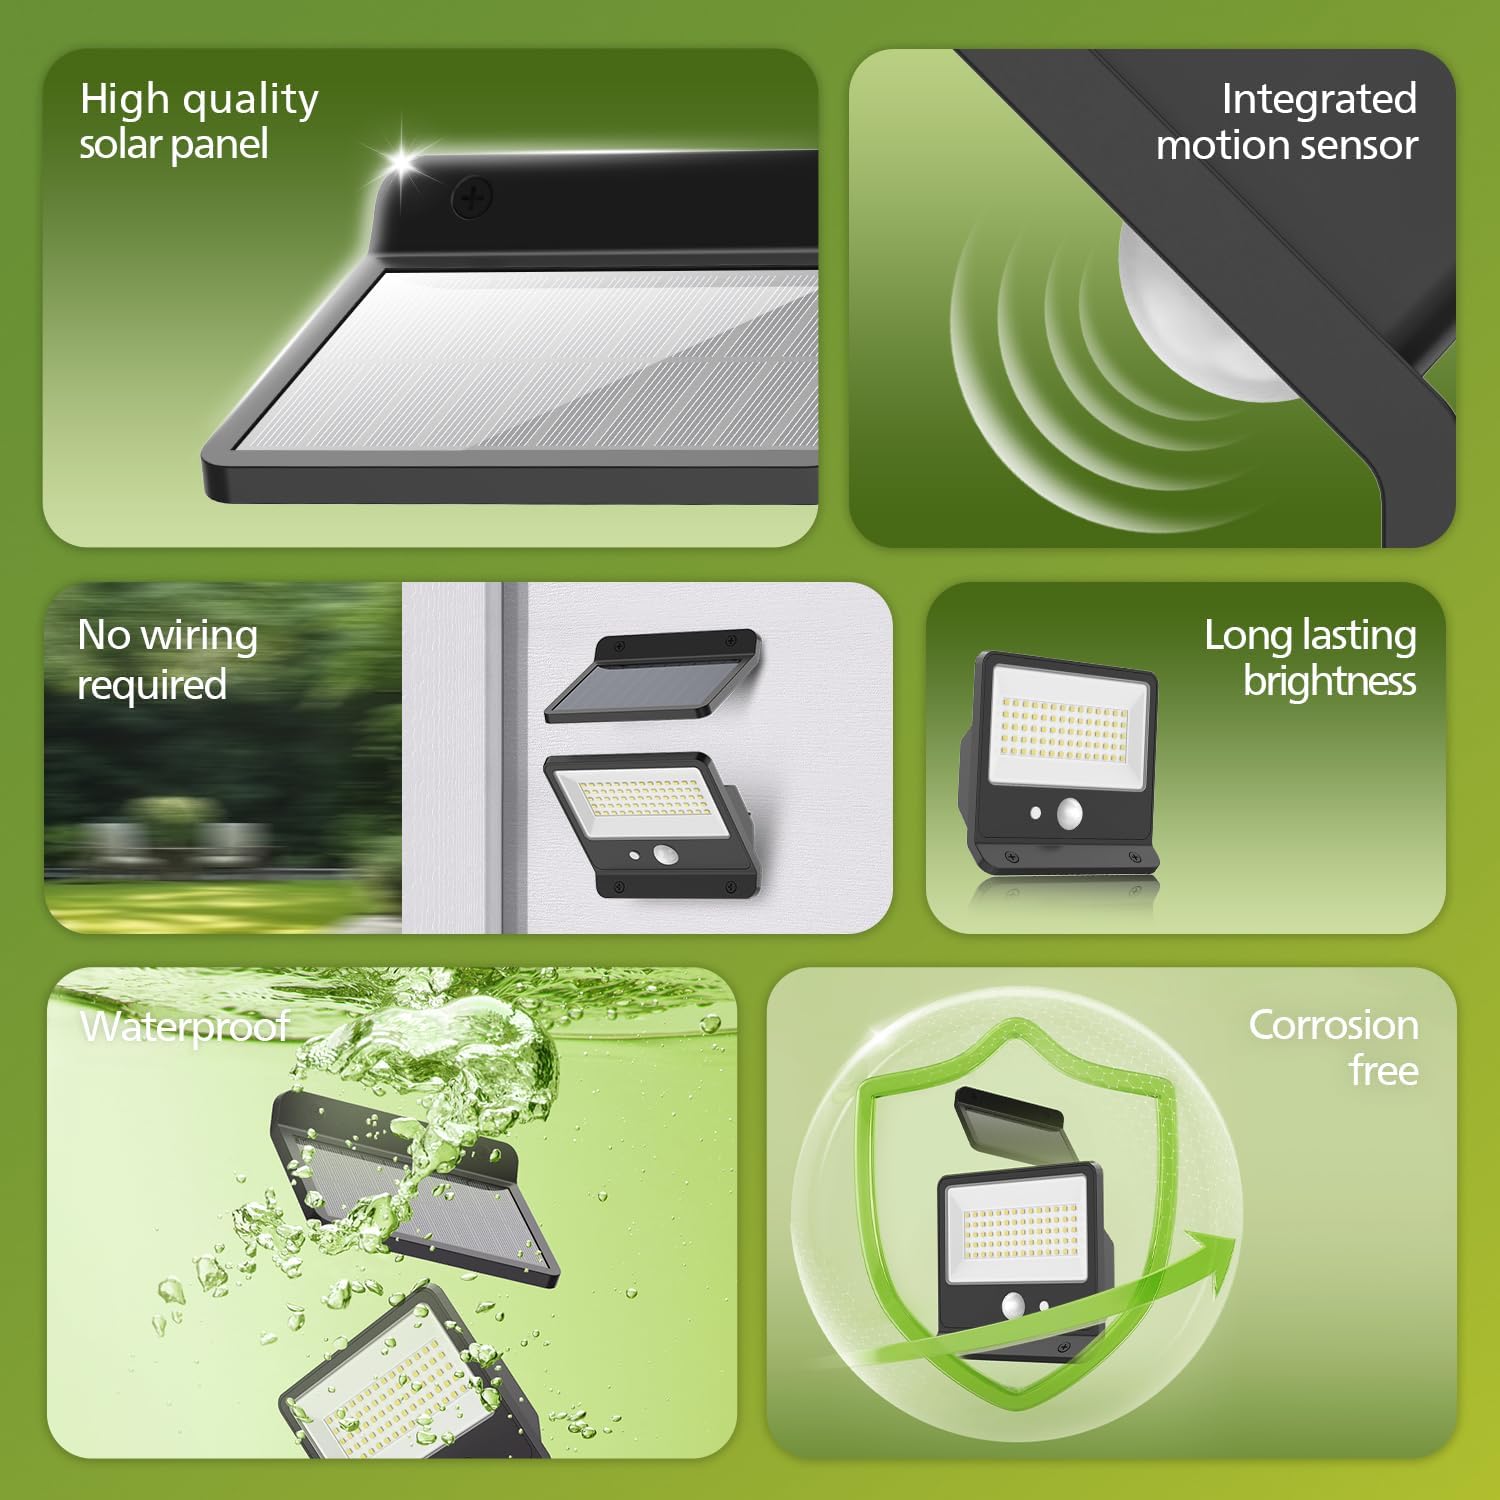
Figure 2: Key features of the Philips Solar Security Light. This image is a collage highlighting six features: a high-quality solar panel, an integrated motion sensor, no wiring required (showing the light mounted on a wall), long-lasting brightness (showing the LED panel illuminated), waterproof capability (showing the light submerged in water), and a corrosion-free design (represented by a shield icon).
3. Setup and Installation
Before installation, ensure the solar panel is placed in a location that receives direct sunlight for at least 6-8 hours daily to ensure optimal charging performance.
3.1 Package Contents
Verify that all components are present:
- Solar LED Floodlight Unit
- Solar Panel (separate, with connecting cable)
- Remote Control
- Mounting Screws and Wall Plugs
- User Manual (this document)
3.2 Installation Steps
- Choose a Location: Select a mounting location for the floodlight that provides the desired illumination area. For the solar panel, choose an unshaded spot that receives maximum direct sunlight throughout the day.
- Mount the Solar Panel: Use the provided screws and wall plugs to securely mount the solar panel. Adjust its angle to face the sun directly for efficient charging.
- Mount the Floodlight: Securely attach the LED floodlight unit to your desired wall or surface using the provided hardware. Ensure it is positioned to cover the area you wish to illuminate.
- Connect the Solar Panel: Connect the cable from the solar panel to the designated port on the LED floodlight unit. Ensure the connection is firm and waterproof.
- Initial Charge: Allow the solar panel to charge the battery for at least one full day (6-8 hours of direct sunlight) before initial use to ensure optimal performance.

Figure 3: Illustration of the upgraded solar panel and battery. The image shows the solar panel mounted on a wall, with sunlight rays indicating charging. Text overlays highlight "Upgraded Solar Panel" and "High-capacity battery 2000mAh" with "Number of Activations 100-200".
4. Operating Instructions
The Philips Solar Security Light features a remote control for easy mode selection and a highly sensitive motion sensor.
4.1 Remote Control Operation
Before using the remote control for the first time, ensure the light unit is powered on. The remote allows you to switch between the three lighting modes and adjust brightness levels (if applicable to your model).

Figure 4: Remote control functionality. The image depicts a hand holding the remote control, pointing towards a Philips Solar Security Light mounted above a door. It indicates a maximum controlling range of 16.4 feet and a maximum lighting angle of 270 degrees. A tip states: "Power on light before first remote use."
4.2 Lighting Modes
The light offers three distinct operating modes, selectable via the remote control:
- Sensor Mode (Motion-Activated):
- No motion: Light stays off.
- Motion detected: Light illuminates at 100% brightness (e.g., 800lm or 1,000lm) for a duration (e.g., 20-25 seconds), then turns off.
- Dim + Sensor Mode:
- No motion: Light stays on at a low brightness level (e.g., 2% or 3% brightness, 16lm or 33lm).
- Motion detected: Light brightens to 100% brightness (e.g., 800lm or 1,000lm) for a duration (e.g., 20-25 seconds), then returns to dim mode.
- Tip: May switch to sensor mode automatically after 6 hours of operation.
- Dim Mode (Always-On):
- Light stays on continuously at a moderate brightness level (e.g., 10% brightness, 80lm or 100lm).
- Tip: May switch to sensor mode automatically after 4 or 8 hours of operation.
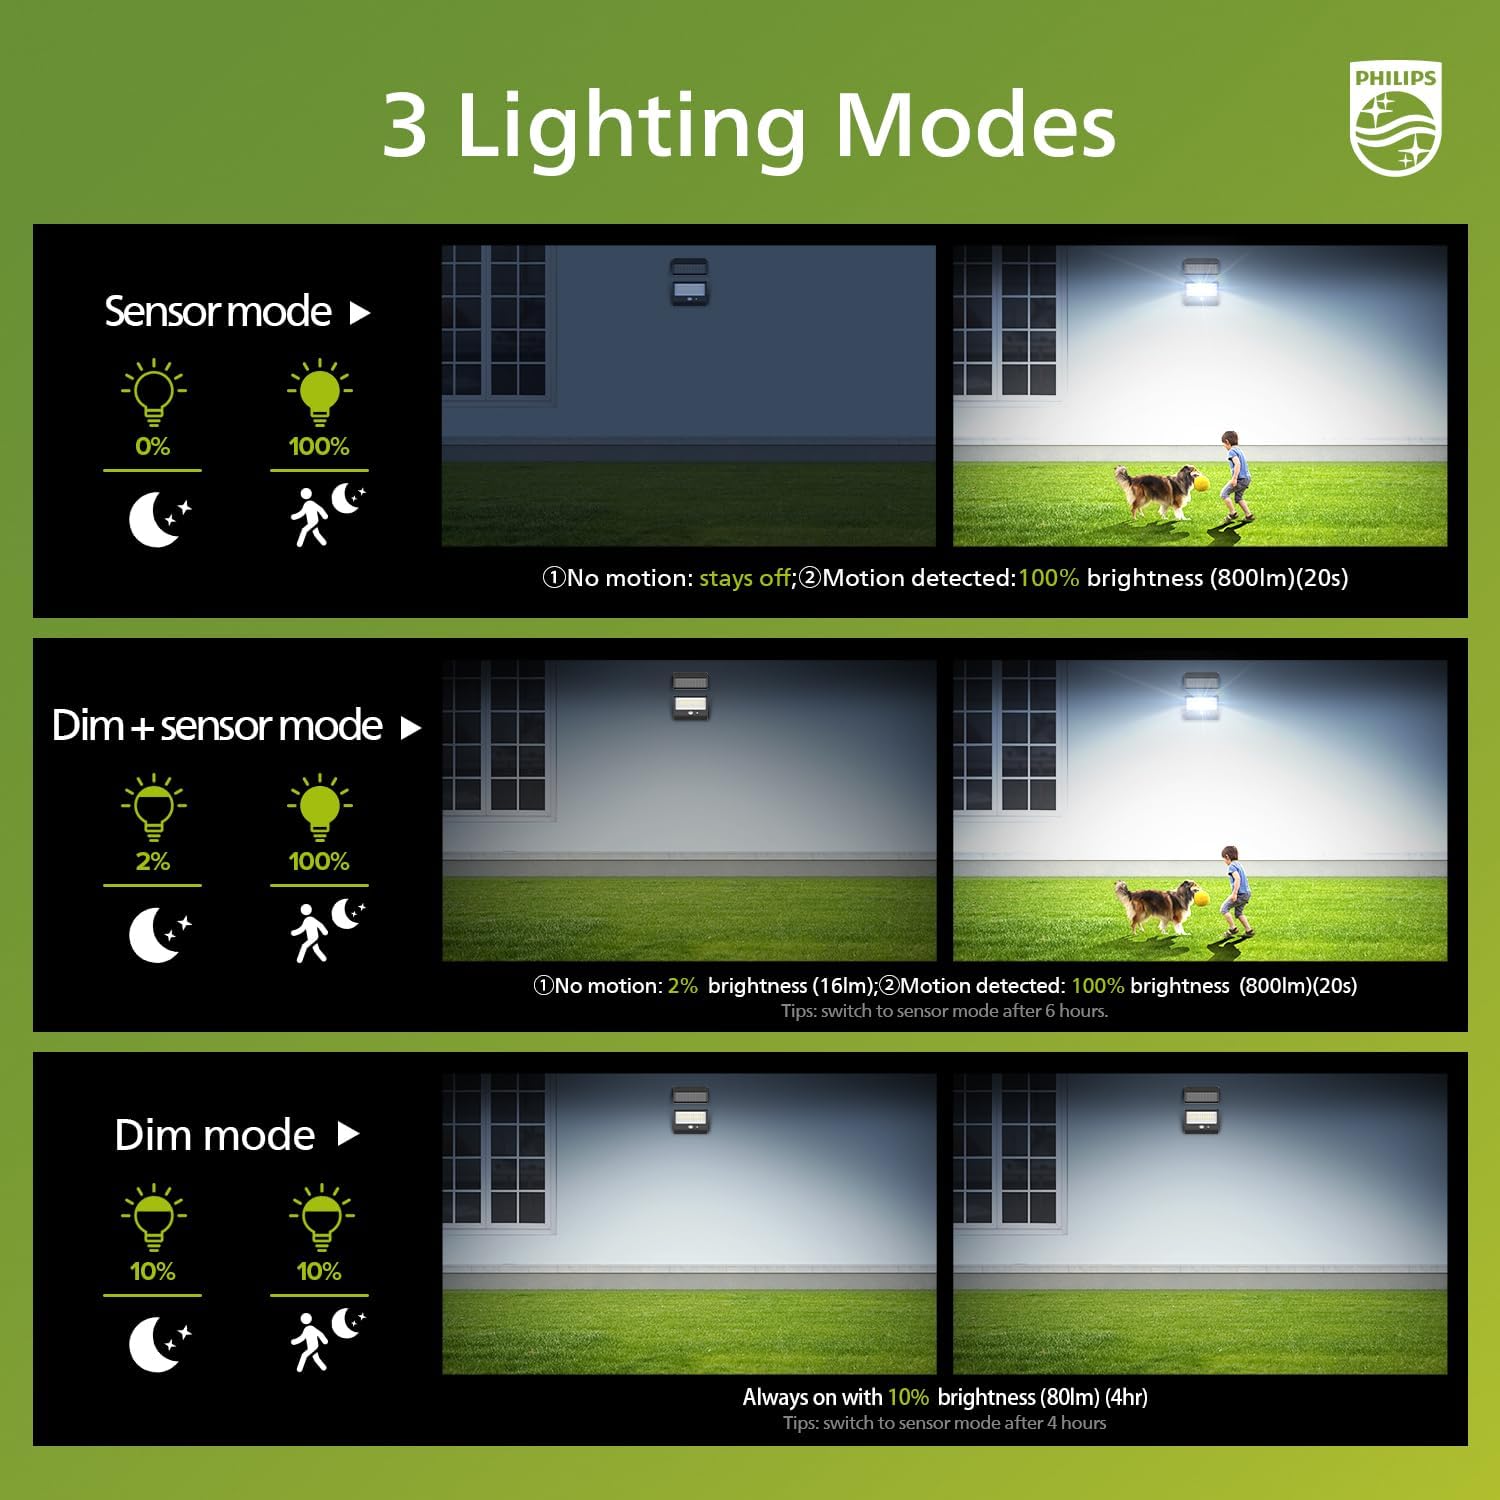
Figure 5: Lighting modes for the single-panel variant. This diagram explains the three lighting modes: Sensor mode (0% brightness with no motion, 100% with motion for 20s), Dim + Sensor mode (2% brightness with no motion, 100% with motion for 20s, switches to sensor mode after 6 hours), and Dim mode (always on at 10% brightness for 4 hours).

Figure 6: Lighting modes for the three-panel variant. This diagram explains the three lighting modes: Sensor mode (off with no motion, 100% brightness for 25s with motion), Dim mode (always on at 10% brightness, auto-off after 8 hours), and Dim + Sensor mode (3% brightness with no motion, 100% brightness for 25s with motion). It also shows brightness levels (30%, 60%, 100%) for adjustment.
4.3 Motion Sensor
The integrated PIR motion sensor is designed to detect movement within its specified range and angle, activating the light according to the selected mode.
- Detection Range: Up to 26.25 feet (for single-panel model) or 29.53 feet (for three-panel model).
- Detection Angle: 120° (for single-panel model) or 110° (for three-panel model).
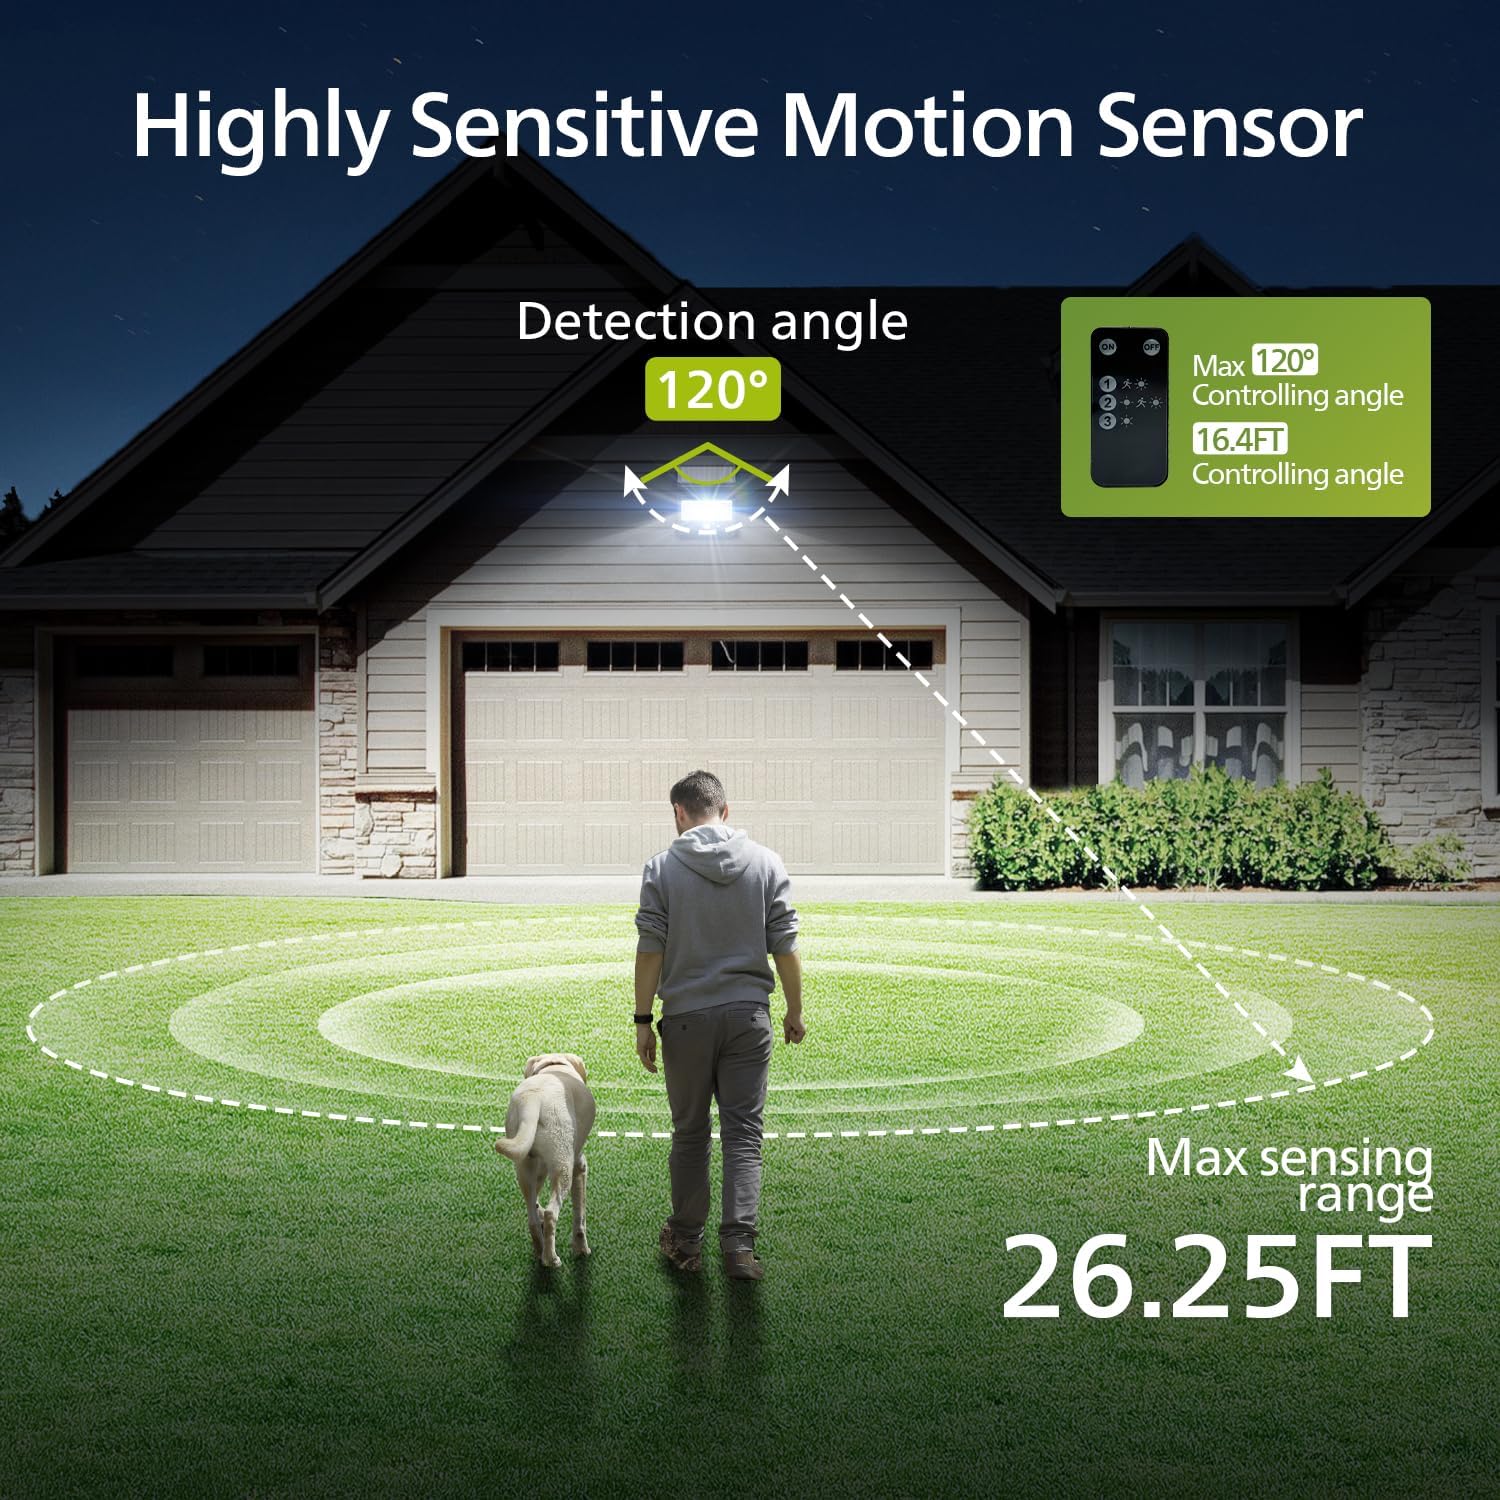
Figure 7: Motion sensor range for the single-panel variant. The image illustrates a person walking with a dog in front of a house, showing the Philips Solar Security Light mounted above a garage. A circular dashed line indicates a maximum sensing range of 26.25 feet and a detection angle of 120 degrees.

Figure 8: Motion sensor range for the three-panel variant. The image illustrates a person riding a bicycle in front of a house, showing the Philips Solar Security Light mounted above the entrance. A circular dashed line indicates a maximum sensing range of 29.53 feet and a detection angle of 110 degrees.
5. Maintenance
Regular maintenance ensures the longevity and optimal performance of your solar security light.
- Clean the Solar Panel: Periodically wipe the solar panel with a soft, damp cloth to remove dust, dirt, leaves, or snow. A clean panel ensures maximum sunlight absorption and charging efficiency.
- Clean the LED Unit: Gently clean the LED light surface and motion sensor lens with a soft, dry cloth to maintain light output and sensor sensitivity.
- Check Connections: Occasionally inspect the cable connection between the solar panel and the light unit to ensure it remains secure and free from damage.
- Battery Care: The integrated battery is designed for long-term use. Avoid prolonged storage in a completely discharged state. If storing the light, ensure it is fully charged first.
6. Troubleshooting
If your Philips Solar Security Light is not functioning as expected, please refer to the following common issues and solutions:
| Problem | Possible Cause | Solution |
|---|---|---|
| Light does not turn on at night. | Insufficient solar panel charging. | Ensure the solar panel is in direct sunlight for 6-8 hours daily. Clean the solar panel surface. |
| Light output is dim or short-lived. | Battery not fully charged or aging battery. | Allow for more charging time. Ensure solar panel is clean. If problem persists after extended use, battery capacity may have diminished. |
| Motion sensor not detecting movement. | Sensor obstructed or incorrect mode. | Clean the sensor lens. Ensure no obstructions are blocking the sensor's field of view. Verify the light is in a motion-sensing mode (Sensor Mode or Dim + Sensor Mode). |
| Remote control not working. | Battery in remote is dead or light unit is off. | Replace the remote control battery. Ensure the main light unit is powered on. |
7. Specifications
| Feature | Detail |
|---|---|
| Brand | Philips |
| Model Numbers | 929004695913, 929004621413 |
| ASIN | B0FHHDDH76 |
| Light Source | LED |
| Color Temperature | 6500K / 7500K (Cool Daylight) |
| Motion Sensor Range | Up to 26.25 ft / 29.35 ft |
| Motion Sensor Angle | 120° / 110° |
| Battery Capacity | 1800 mAh / 2000 mAh |
| Waterproof Rating | IP65 |
| First Available Date | July 4, 2025 |
8. Warranty and Support
Philips products are designed and manufactured to the highest quality standards. For specific warranty information, please refer to the documentation included with your purchase or visit the official Philips website. For technical support or inquiries, please contact Philips customer service through their official channels.
You can find more information and support resources at the official Philips website.


