
Important Safety Instructions
When using an electrical appliance, basic precautions should always be followed, including the following:
- Read all instructions before using this wet/dry vacuum.
- To reduce the risk of electric shock, do not expose to rain. Store indoors.
- Do not allow to be used as a toy. Close attention is necessary when used by or near children.
- Use only as described in this manual. Use only manufacturer’s recommended attachments.
- Do not use with damaged cord or plug. If appliance is not working as it should, has been dropped, damaged, left outdoors, or dropped into water, return it to a service center.
- Do not pull or carry by cord, use cord as a handle, close a door on cord, or pull cord around sharp edges or corners. Do not run appliance over cord. Keep cord away from heated surfaces.
- Do not unplug by pulling on cord. To unplug, grasp the plug, not the cord.
- Do not handle plug or appliance with wet hands.
- Do not put any object into openings. Do not use with any opening blocked; keep free of dust, lint, hair, and anything that may reduce airflow.
- Keep hair, loose clothing, fingers, and all parts of body away from openings and moving parts.
- Do not pick up anything that is burning or smoking, such as cigarettes, matches, or hot ashes.
- Do not use to pick up flammable or combustible liquids, such as gasoline, or use in areas where they may be present.
- Do not use without filters in place.
- Turn off all controls before unplugging.
- Use extra care when cleaning on stairs.
- Unplug before connecting hose, nozzles, or other accessories.
Product Overview
The BLACK+DECKER 2.5 Gallon Wet/Dry Vacuum (Model BDXV18134PA) is a compact and portable cleaning solution designed for various tasks. It features a 3 Peak HP motor for powerful suction and can handle both wet and dry messes. The unit also includes a blower function for added versatility.
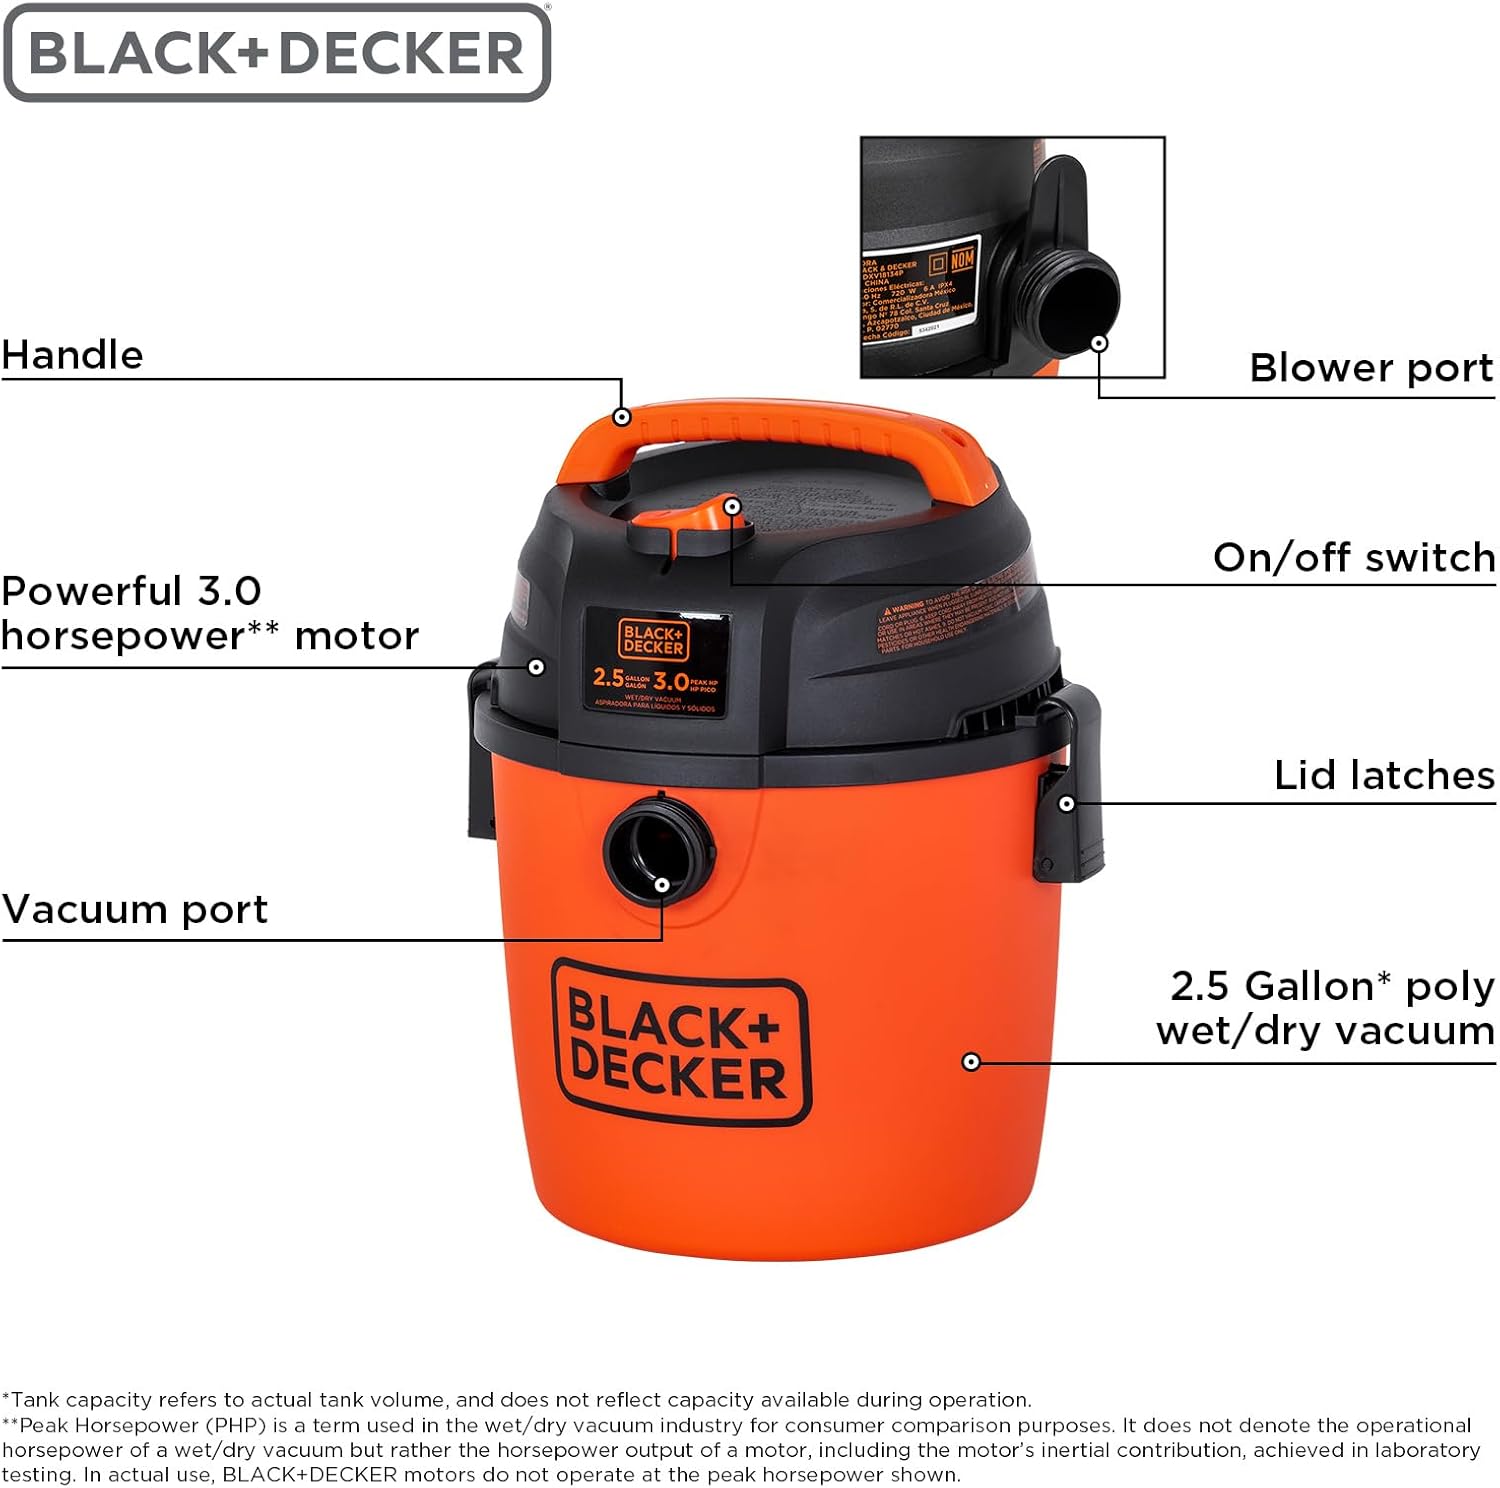
Figure 1: Main components of the BLACK+DECKER 2.5 Gallon Wet/Dry Vacuum.
Key Components:
- Handle: For easy carrying and transport.
- On/Off Switch: Controls power to the unit.
- Blower Port: For connecting the hose to utilize the blowing function.
- Lid Latches: Secure the motor head to the tank.
- Vacuum Port: For connecting the hose for vacuuming.
- 2.5 Gallon Poly Wet/Dry Vacuum Tank: Collects debris and liquids.
- 3.0 Peak Horsepower Motor: Provides powerful suction and blowing capabilities.
Accessories Included
Your BLACK+DECKER Wet/Dry Vacuum comes with the following accessories:

Figure 2: All included accessories.
- 1 x 4 ft. Hose (1-1/4 in. diameter)
- 1 x Foam Filter (for wet pickup)
- 2 x Reusable Dry Filter with Clamp Ring (for dry pickup)
- 1 x Gulper Nozzle
- 1 x Crevice Nozzle
Setup and Assembly
1. Unpacking:
Carefully remove all contents from the packaging. Ensure all listed accessories are present. Keep packaging materials for future storage or transport if needed.
2. Filter Installation:
The correct filter must be installed for the type of cleaning you intend to perform.
- For Dry Pickup: Remove the motor head by unlatching the lid latches. Ensure the foam filter is removed. Install the reusable dry filter over the filter cage, securing it with the clamp ring. Ensure the filter covers the entire cage for optimal performance.
- For Wet Pickup: Remove the motor head. Remove the reusable dry filter and clamp ring. Install the foam filter over the filter cage. Ensure it is seated properly.
Important: Never operate the vacuum without a filter installed. Never use a wet dry filter for wet pickup, or a dry filter for wet pickup.
3. Attaching the Hose:
For vacuuming, insert the larger end of the hose into the vacuum port on the front of the tank until it clicks securely into place. For blowing, insert the hose into the blower port located on the motor head.
4. Connecting Accessories:
Attach the desired cleaning accessory (gulper nozzle or crevice nozzle) to the free end of the hose. Ensure a snug fit for effective suction.
Operating Instructions
1. Dry Vacuuming:
This function is suitable for picking up dry debris such as dust, dirt, wood chips, and pet hair.
- Ensure the reusable dry filter is correctly installed.
- Connect the hose to the vacuum port and attach the appropriate dry cleaning accessory (e.g., gulper nozzle for general cleaning, crevice nozzle for tight spaces).
- Plug the power cord into a suitable electrical outlet.
- Turn the unit ON using the on/off switch.
- Begin vacuuming the desired area.
- When finished, turn the unit OFF and unplug it from the outlet.
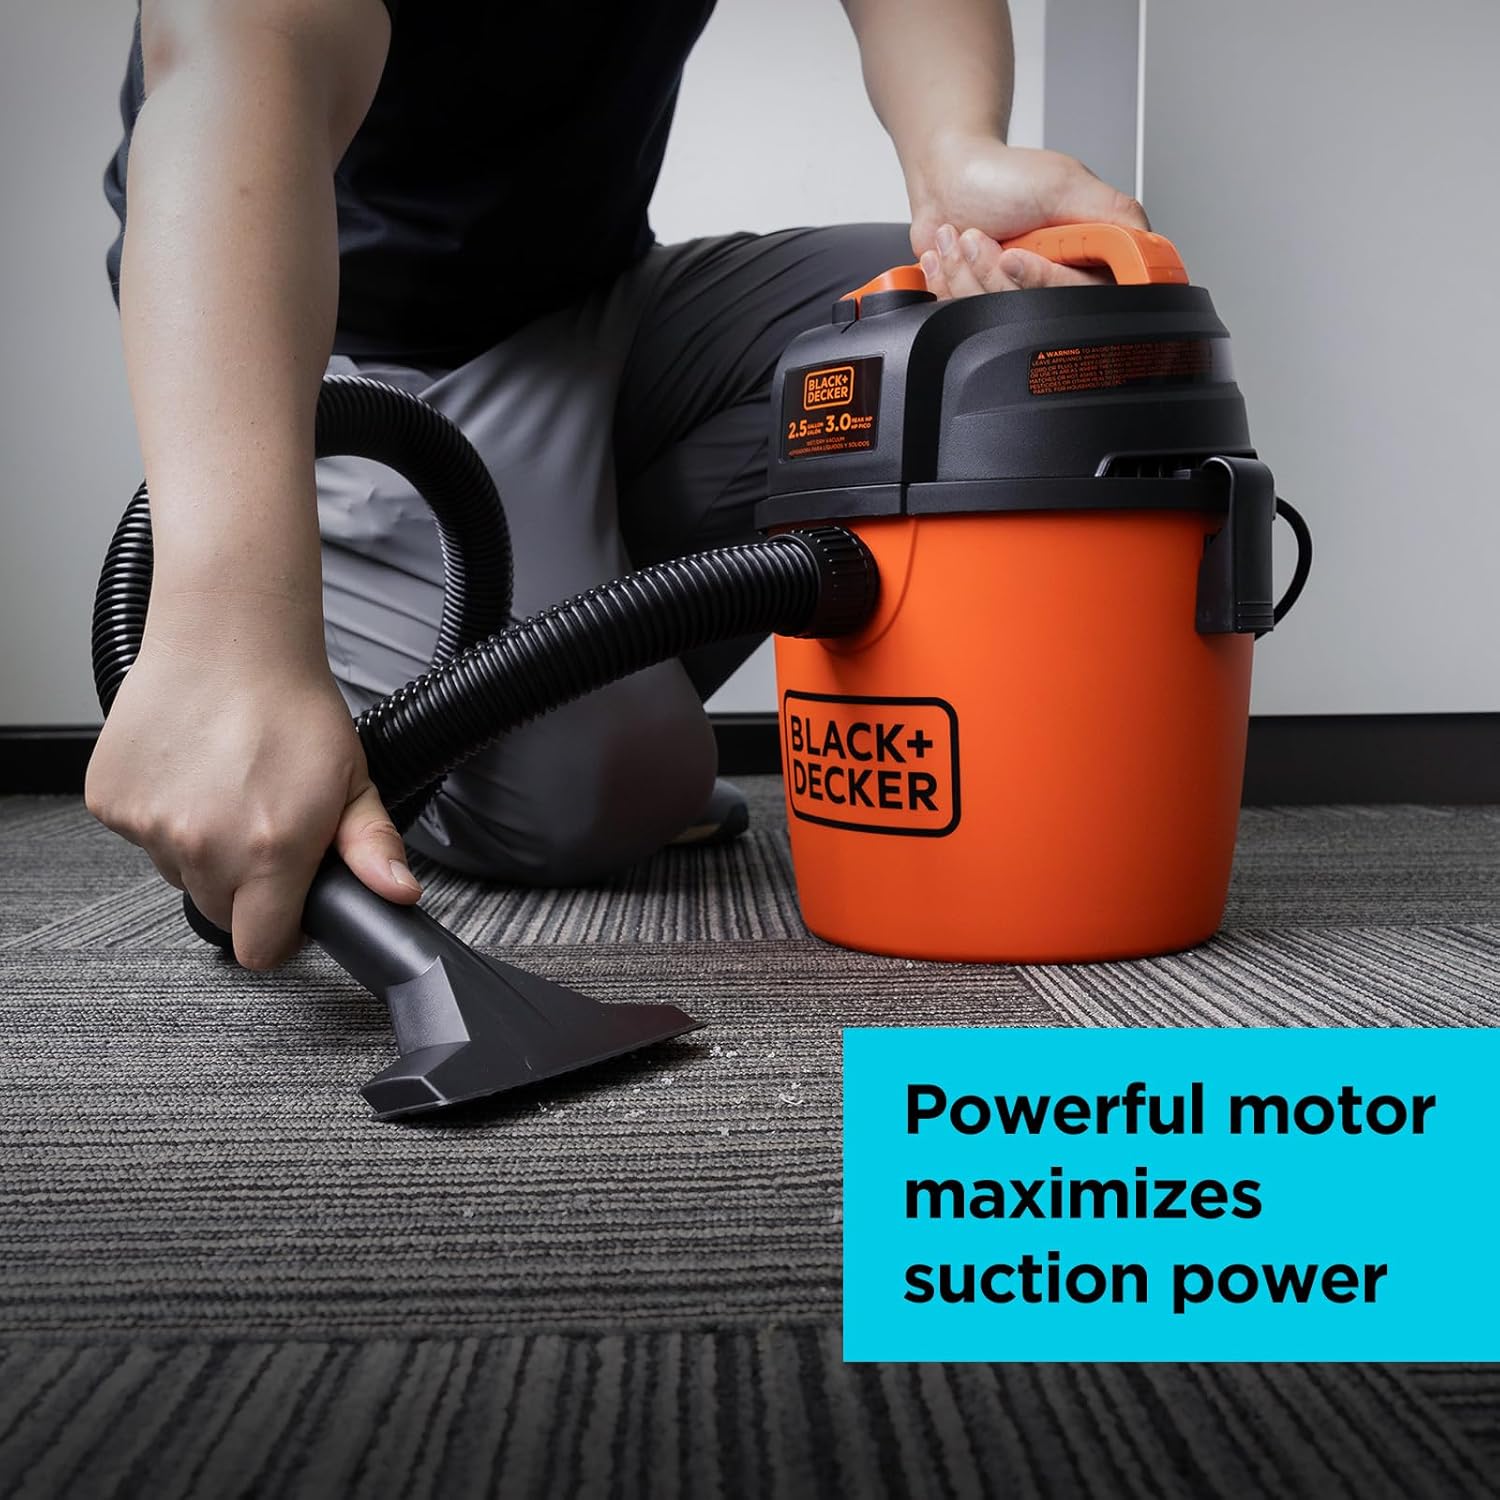
Figure 3: Dry vacuuming on carpet.

Figure 4: Dry vacuuming a car interior.
2. Wet Vacuuming:
This function is for picking up liquids and wet spills.
- Ensure the foam filter is correctly installed and the dry filter is removed.
- Connect the hose to the vacuum port and attach the gulper nozzle.
- Plug the power cord into a suitable electrical outlet.
- Turn the unit ON using the on/off switch.
- Begin vacuuming the liquid. The vacuum has an automatic shut-off feature that will stop suction when the tank reaches its maximum liquid capacity.
- When the tank is full or you are finished, turn the unit OFF and unplug it. Empty the tank immediately after wet pickup.

Figure 5: Wet vacuuming a spill.
3. Blowing Function:
The vacuum can also be used as a blower to clear debris from surfaces.
- Ensure the tank is empty and clean, and the appropriate filter is installed (dry filter is recommended for blowing to prevent debris from entering the motor).
- Remove the hose from the vacuum port and insert it firmly into the blower port on the motor head.
- Plug the power cord into a suitable electrical outlet.
- Turn the unit ON using the on/off switch.
- Direct the hose to blow away leaves, dust, or light debris.
- When finished, turn the unit OFF and unplug it.
Maintenance
Regular maintenance ensures optimal performance and extends the life of your wet/dry vacuum.
1. Emptying the Tank:
After each use, especially after wet pickup, empty the tank. Unlatch the lid latches, remove the motor head, and carefully pour out the contents. Clean the inside of the tank with water and mild soap if necessary, then rinse and dry thoroughly.
2. Cleaning Filters:
- Reusable Dry Filter: For dry debris, gently tap or brush the filter to remove accumulated dust. For heavier dirt, rinse the filter with water and allow it to air dry completely before reinstallation. Do not use a wet dry filter for dry pickup.
- Foam Filter: After wet pickup, remove the foam filter and rinse it thoroughly with water. Squeeze out excess water and allow it to air dry completely before storing or using for subsequent wet pickup.
Caution: Always ensure filters are completely dry before using for dry vacuuming. Using a wet filter for dry vacuuming can damage the motor.
3. Storage:
Store the vacuum and its accessories in a clean, dry place. Wrap the power cord neatly and store accessories in the designated on-board storage if available, or in a separate container.
Troubleshooting
If you encounter issues with your wet/dry vacuum, refer to the following common problems and solutions:
| Problem | Possible Cause | Solution |
|---|---|---|
| Vacuum does not turn ON | No power to the unit Faulty on/off switch | Check power cord connection and wall outlet. Test outlet with another appliance. Contact customer support if switch is faulty. |
| Low suction or no suction | Hose or accessory blocked Filter is clogged or improperly installed Tank is full (wet pickup) Lid latches not secured | Check hose and accessories for obstructions and clear them. Clean or replace filter. Ensure filter is correctly installed for the task. Empty the tank. Ensure motor head is securely latched to the tank. |
| Water leaking from unit | Lid not sealed properly Hose connection loose | Ensure motor head is properly seated and lid latches are securely fastened. Check hose connection to the vacuum port. |
| Motor overheats/shuts off | Blocked airflow Extended heavy use | Check for blockages in hose, accessories, or filters. Clean as needed. Allow the unit to cool down before resuming operation. |
Specifications
| Feature | Specification |
|---|---|
| Brand | BLACK+DECKER |
| Model Name | BDXV18134PA |
| Capacity | 2.5 Gallons |
| Peak Horsepower | 3 HP |
| Maximum Airflow | 80 CFM |
| Power Source | Corded Electric |
| Voltage | 120 Volts |
| Hose Length | 4 feet |
| Power Cord Length | 6 feet |
| Item Weight | 7.7 pounds |
| Dimensions (L x W x H) | 11.8" x 11.6" x 14.8" |
| Filter Type | Foam (wet), Reusable Dry Filter (dry) |
| Indoor/Outdoor Usage | Indoor, Outdoor |
Warranty Information
This BLACK+DECKER 2.5 Gallon Wet/Dry Vacuum (Model BDXV18134PA) is covered by a 1 Year Limited Warranty from the date of purchase. This warranty covers defects in material or workmanship under normal use. It does not cover damage resulting from misuse, abuse, accident, alteration, or unauthorized repair.
For specific warranty terms, conditions, and to make a warranty claim, please retain your proof of purchase and contact BLACK+DECKER customer service.
Customer Support
For further assistance, technical support, or to inquire about replacement parts, please visit the official BLACK+DECKER website or contact their customer service department. Contact information can typically be found on the product packaging or the brand's official website.
Website: www.blackanddecker.com


