
1. Introduction
This manual provides detailed instructions for the installation, operation, and maintenance of your CP PLUS CP-UVR-0401E1-IC2 4 Channel Full HD Digital Video Recorder (DVR). This device is designed for reliable surveillance recording and playback, supporting various camera types and offering efficient video compression.
Key Features:
- 4 Channel Full HD DVR: Supports AHD, TVI, CVI, CVBS, and IP cameras up to 2MP resolution.
- H.265+ Video Compression: Ensures efficient video storage and reduced bandwidth usage.
- Remote Viewing: Access live view and playback via mobile app or desktop software.
- Storage Capacity: Supports up to 6TB HDD via 1 SATA port.
- Video Outputs: HDMI and VGA for monitor connection.
- Smart Features: Motion detection, scheduled recording, privacy masking, and video loss alerts.

Figure 1: Front view of the CP PLUS CP-UVR-0401E1-IC2 DVR unit.
2. Package Contents
Verify that all items are present in the package before proceeding with installation:
- DVR main unit (CP-UVR-0401E1-IC2)
- Power Adapter
- USB Mouse
- Quick Start Guide (if included)
- Screws for HDD installation
3. Hardware Overview
Front Panel:
The front panel typically includes status indicators (power, HDD, network) and the brand logo.
Rear Panel:
The rear panel houses all essential connection ports for cameras, display, network, and power.
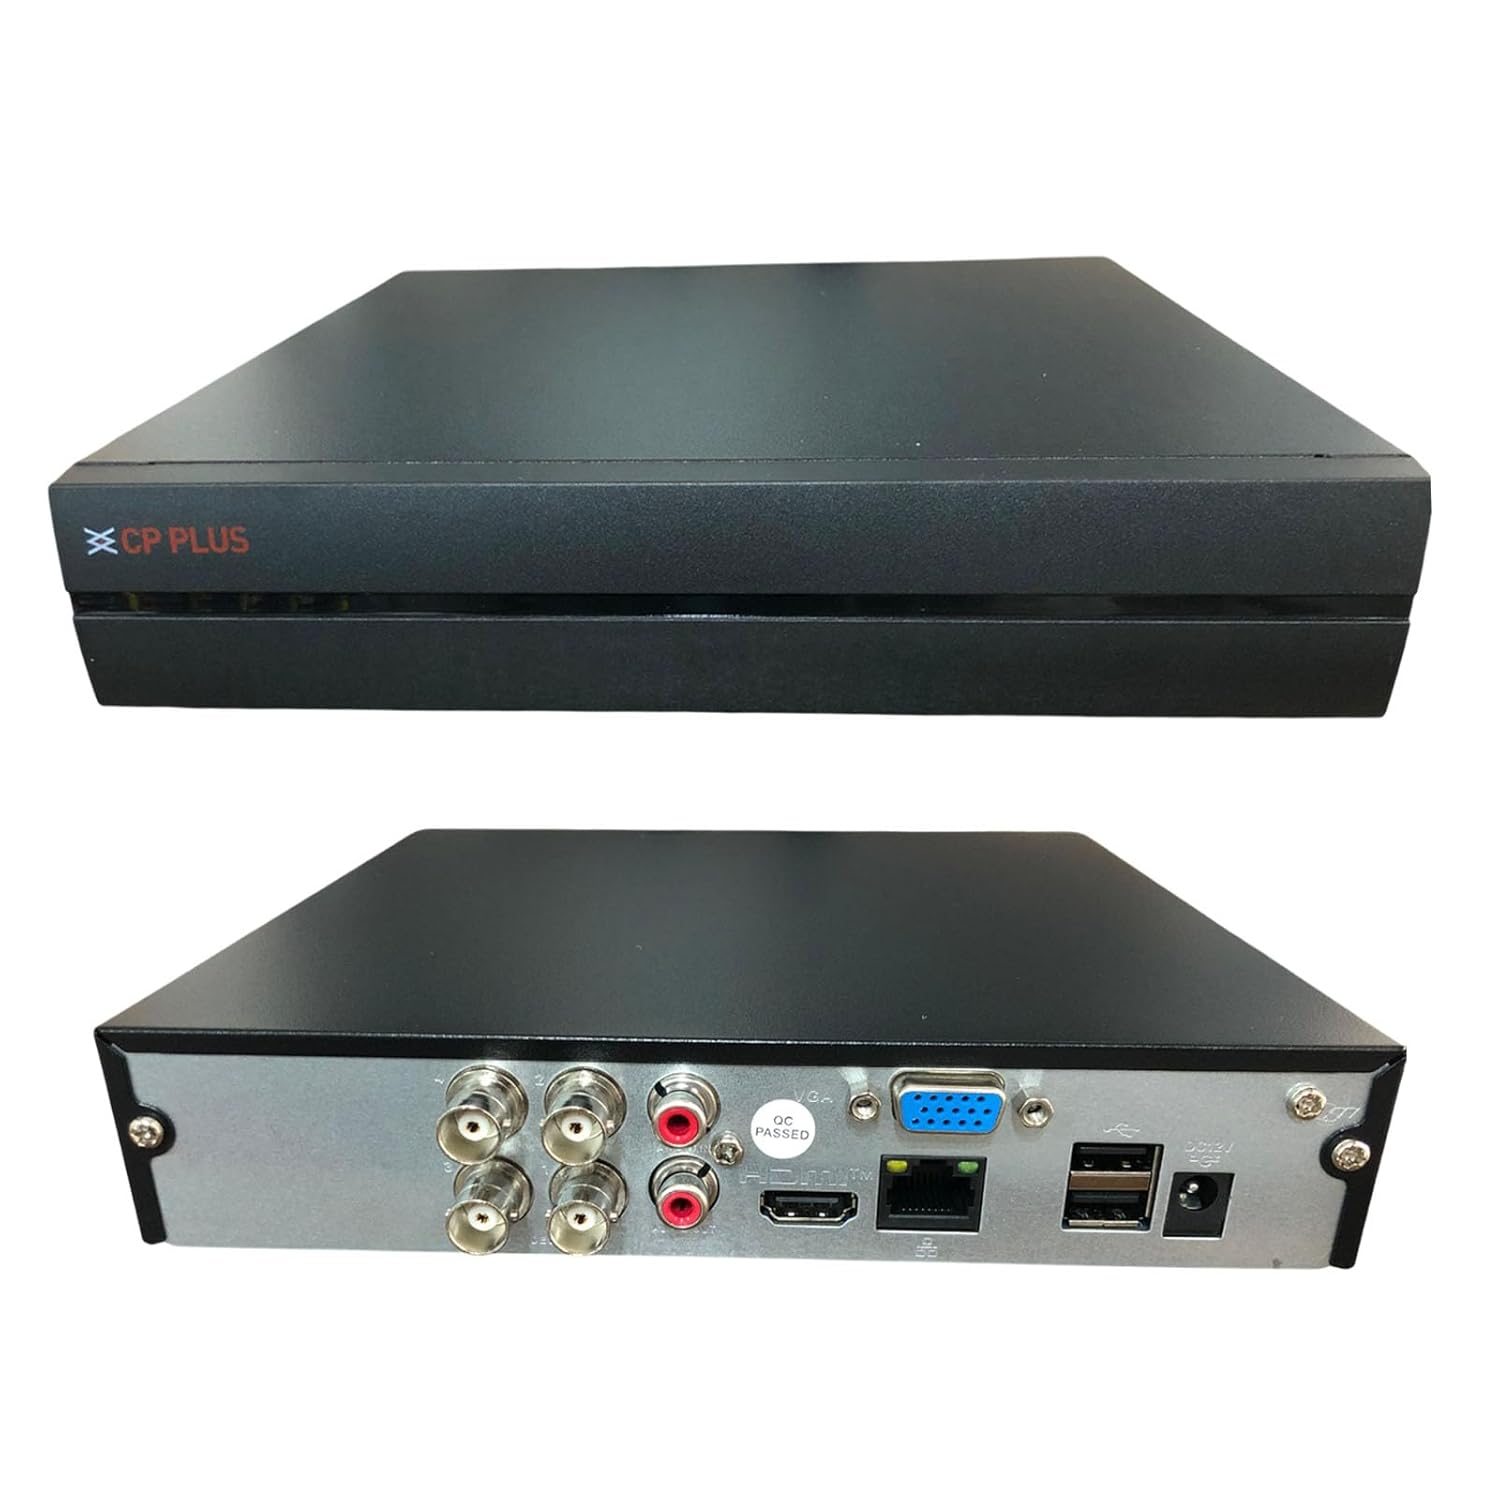
Figure 2: Front and rear panel connections of the DVR, showing BNC inputs, audio ports, HDMI, VGA, Ethernet, USB, and power input.
Port Descriptions:
- Video Input (BNC): Connect up to 4 analog HD or CVBS cameras.
- Audio Input/Output (RCA): For audio recording and playback.
- HDMI Output: Connect to an HDMI-compatible monitor or TV for high-definition video output.
- VGA Output: Connect to a VGA-compatible monitor.
- Ethernet Port (RJ45): Connect to your network for remote access and IP camera integration.
- USB Ports: For connecting the USB mouse, external storage, or for firmware upgrades.
- DC 12V Power Input: Connect the provided power adapter.
4. Setup
4.1 Hard Disk Drive (HDD) Installation
The DVR requires a 3.5-inch SATA HDD for recording. Ensure the DVR is powered off before installation.
- Unscrew and remove the top cover of the DVR chassis.
- Connect the SATA data cable and power cable from the DVR to the HDD.
- Secure the HDD to the bottom of the DVR chassis using the provided screws.
- Replace the top cover and secure it with screws.
4.2 Connecting Peripherals
- Connect Cameras: Attach your analog HD or CVBS cameras to the BNC video input ports on the rear panel.
- Connect Monitor: Use an HDMI or VGA cable to connect your monitor to the corresponding output port on the DVR.
- Connect Mouse: Plug the USB mouse into one of the USB ports.
- Connect Network: Connect an Ethernet cable from the DVR's RJ45 port to your router or network switch for remote access.
- Connect Power: Plug the power adapter into the DC 12V input port, then connect the adapter to a power outlet.
4.3 Initial Power-On and Configuration
Upon first power-on, the DVR will guide you through an initial setup wizard. Follow the on-screen prompts to:
- Set up an administrator password.
- Configure date and time settings.
- Format the installed HDD (essential for recording).
- Configure network settings (DHCP recommended for most users).
Important: Remember your administrator password. If forgotten, a factory reset may be required, which could erase settings.
5. Operating Instructions
5.1 Live View
After initial setup, the DVR will display the live feed from connected cameras on your monitor. Use the USB mouse to navigate the on-screen menu.
5.2 Recording
- Continuous Recording: Configured in the recording schedule settings.
- Motion Detection Recording: Set up motion detection zones and sensitivity for each camera in the alarm settings.
- Scheduled Recording: Define specific time periods for recording in the schedule menu.
5.3 Playback
To review recorded footage:
- Access the "Playback" menu from the main interface.
- Select the desired date and time.
- Choose the camera channel(s) for playback.
- Use the playback controls (play, pause, fast forward, rewind) to navigate through the footage.
5.4 Remote Viewing
The CP PLUS DVR supports remote viewing via a dedicated mobile application (e.g., CP Plus gCMOB) or desktop software (e.g., CP Plus KVMS Pro).
- Ensure the DVR is connected to the internet.
- Download and install the appropriate application on your smartphone or computer.
- Add the DVR device using its serial number, IP address, or QR code (if supported).
- Enter the DVR's username and password to access live view and playback remotely.
Note: For detailed instructions on remote viewing setup, refer to the specific application's guide or the CP PLUS official website.
6. Maintenance
6.1 General Care
- Keep the DVR in a well-ventilated area to prevent overheating.
- Avoid exposing the DVR to direct sunlight, moisture, dust, or extreme temperatures.
- Clean the exterior with a soft, dry cloth. Do not use liquid cleaners.
6.2 Firmware Updates
Periodically check the CP PLUS official website for firmware updates. Updates can improve performance, add features, or address security vulnerabilities. Follow the manufacturer's instructions carefully when performing firmware updates to avoid damaging the device.
6.3 Data Backup
Regularly back up important recorded footage to an external USB drive or network storage. This helps prevent data loss in case of HDD failure or other unforeseen events.
7. Troubleshooting
| Problem | Possible Cause | Solution |
|---|---|---|
| No video output on monitor. | Loose cable connection, incorrect input selected on monitor, DVR not powered on. | Check HDMI/VGA cable connections. Ensure monitor is set to the correct input source. Verify DVR power. |
| No recording. | HDD not installed or formatted, recording schedule not configured, HDD full. | Ensure HDD is installed and formatted. Check recording schedule. Delete old footage or replace HDD if full. |
| Cannot access DVR remotely. | Network cable disconnected, incorrect network settings, firewall blocking access, incorrect app settings. | Verify Ethernet cable connection. Check DVR network settings (IP address, gateway, DNS). Ensure router ports are forwarded if necessary. Recheck app configuration. |
| Camera image is blurry or distorted. | Loose BNC connection, faulty camera, cable interference, camera lens dirty. | Check BNC cable connections. Clean camera lens. Test with a different camera or cable if possible. |
8. Specifications
| Feature | Detail |
|---|---|
| Model Number | CP-UVR-0401E1-IC2 |
| Channels | 4 Channel |
| Video Compression | H.265+ |
| Camera Support | AHD, TVI, CVI, CVBS, IP (up to 2.4MP) |
| Video Output | HDMI, VGA |
| Audio Input/Output | Yes |
| HDD Interface | 1 SATA Port |
| Max HDD Capacity | 6 TB |
| Connectivity | Ethernet, USB |
| Dimensions (LxWxH) | 19.7 x 19.2 x 4.1 Centimeters |
| Weight | 850 g |
| Included Components | DVR main unit, Adapter, Mouse |
9. Warranty Information
Warranty terms and conditions for the CP PLUS CP-UVR-0401E1-IC2 DVR are typically provided with the product packaging or can be found on the official CP PLUS website. Please retain your purchase receipt for warranty claims. For specific details regarding warranty duration and coverage, refer to the documentation included with your product or contact CP PLUS customer support.
10. Support
For technical assistance, product inquiries, or warranty support, please contact CP PLUS customer service:
- Manufacturer: Aditya Infotech Limited
- Contact Number: 8800952952
- Website: Refer to the official CP PLUS website for the latest support resources, FAQs, and contact options.
11. Video Resources (If Available)
Official product videos, including setup guides or feature demonstrations, would be embedded here if provided by the manufacturer. These resources can offer visual assistance for installation and operation.
