
1. Introduction
This manual provides essential information for the proper setup, operation, and maintenance of your GMKtec AI Mini PC Ultra 9 285H EVO-T1. Please read this manual thoroughly before using the device to ensure optimal performance and longevity.
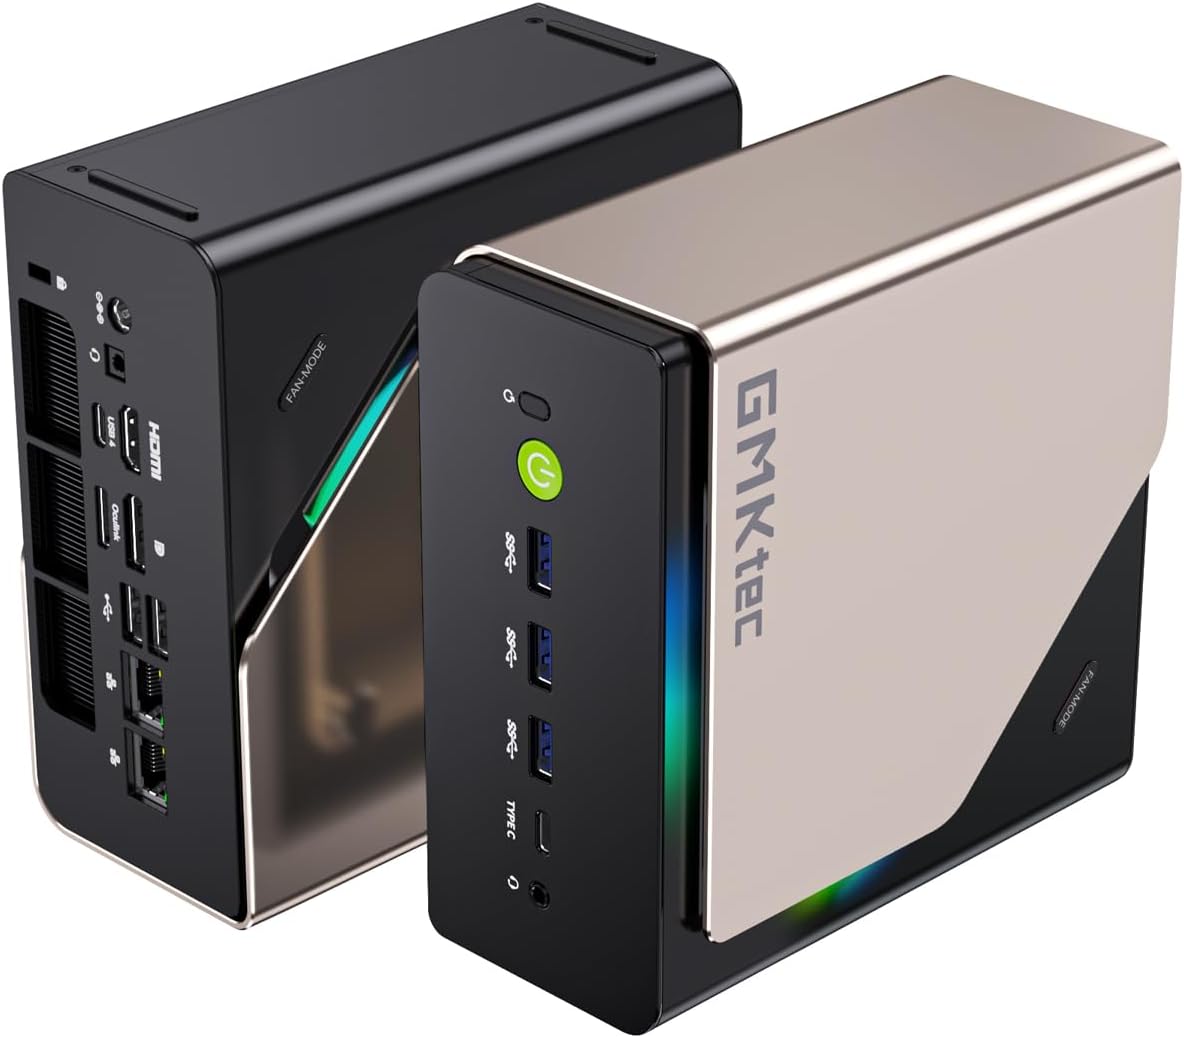
Image: Front and rear view of the GMKtec AI Mini PC Ultra 9 285H EVO-T1, showcasing its compact design and various ports.
2. Package Contents
Verify that all items are present in the package:
- GMKtec Nucbox EVO T1 Intel Core Ultra 9 285H Mini PC Computer
- User Manual (this document)
- Power Supply & Cable
- HDMI Cable
- VESA Mount and Screws

Image: The GMKtec Nucbox EVO-T1 Mini PC and its included accessories, such as power adapter, HDMI cable, and VESA mount.
3. Setup Instructions
3.1 Connecting Peripherals
- Connect Display: Use the provided HDMI cable to connect your monitor to the HDMI 2.1 port on the Mini PC. Alternatively, use a DisplayPort 1.4 or USB Type-C (DP Alt Mode) connection for other display options.
- Connect Keyboard and Mouse: Plug your USB keyboard and mouse into the available USB ports (USB 2.0, USB 3.2, or USB 4.0).
- Network Connection: For a wired connection, connect an Ethernet cable to one of the 2.5GbE LAN ports. For wireless, ensure your Wi-Fi network is available during initial setup.
- Power Connection: Connect the power adapter to the DC IN 5525 port on the Mini PC, then plug the adapter into a power outlet.
3.2 First Boot
- Press the power button located on the front of the Mini PC. The power indicator will illuminate.
- Follow the on-screen instructions to complete the Windows 11 Pro initial setup, including language, region, network, and user account creation.

Image: Detailed diagram of the GMKtec AI Mini PC EVO-T1's front and rear ports, including USB, HDMI, DisplayPort, Oculink, and LAN connections.
4. Operating Instructions
4.1 Key Features Overview
- Processor: Intel Core Ultra 9 285H with 16 cores (6 P-cores + 8 E-cores + 2 LPE-cores) and 16 threads, boosting up to 5.4 GHz.
- AI NPU: Integrated Intel AI Boost NPU, providing up to 13 TOPS for accelerated AI tasks.
- Graphics: Intel Arc 140T GPU with 8 Xe cores, supporting DirectX 12, OpenGL 4.5, OpenCL 3, Quick Sync Video, and AV1 encoding/decoding.
- Memory: 96GB DDR5 5600MHz SO-DIMM memory (Dual Channel).
- Storage: 2TB PCIe 4.0 M.2 2280 SSD with three M.2 expansion slots, each supporting up to 4TB (12TB maximum total).
- Display Output: Quad screen support via HDMI 2.1 (8K@60Hz), DisplayPort 1.4 (4K@60Hz), and two USB Type-C ports (PD3.0/DP1.4/DATA).
- Oculink Port: Provides PCIe x4 speeds (64Gbps bandwidth) for external GPU (eGPU) setups. Note: Oculink does not support hot-plugging. Always power off the Mini PC before connecting or disconnecting Oculink devices.
- Connectivity: Dual 2.5GbE LAN ports, Wi-Fi 6 (802.11ax), and Bluetooth 5.2.
- Cooling: Advanced dual-fan cooling system with VC heatpipe and 360° airflow design.
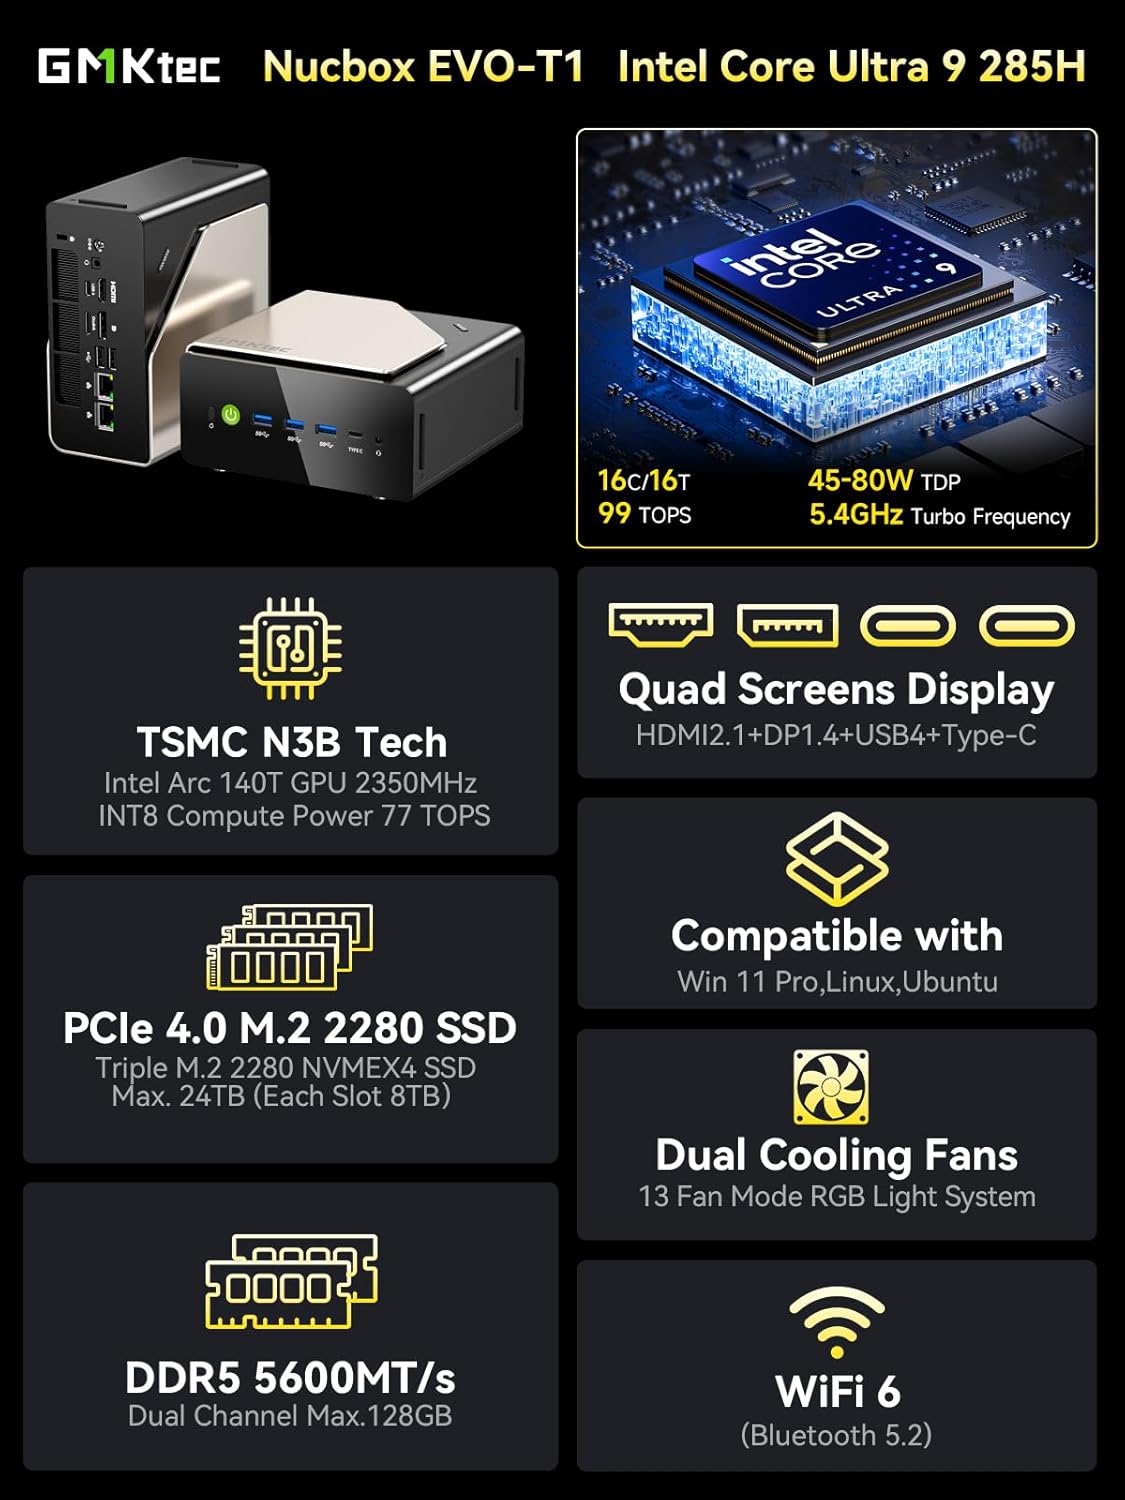
Image: An infographic summarizing the key features of the GMKtec Nucbox EVO-T1, including CPU, GPU, RAM, SSD, display, and connectivity.
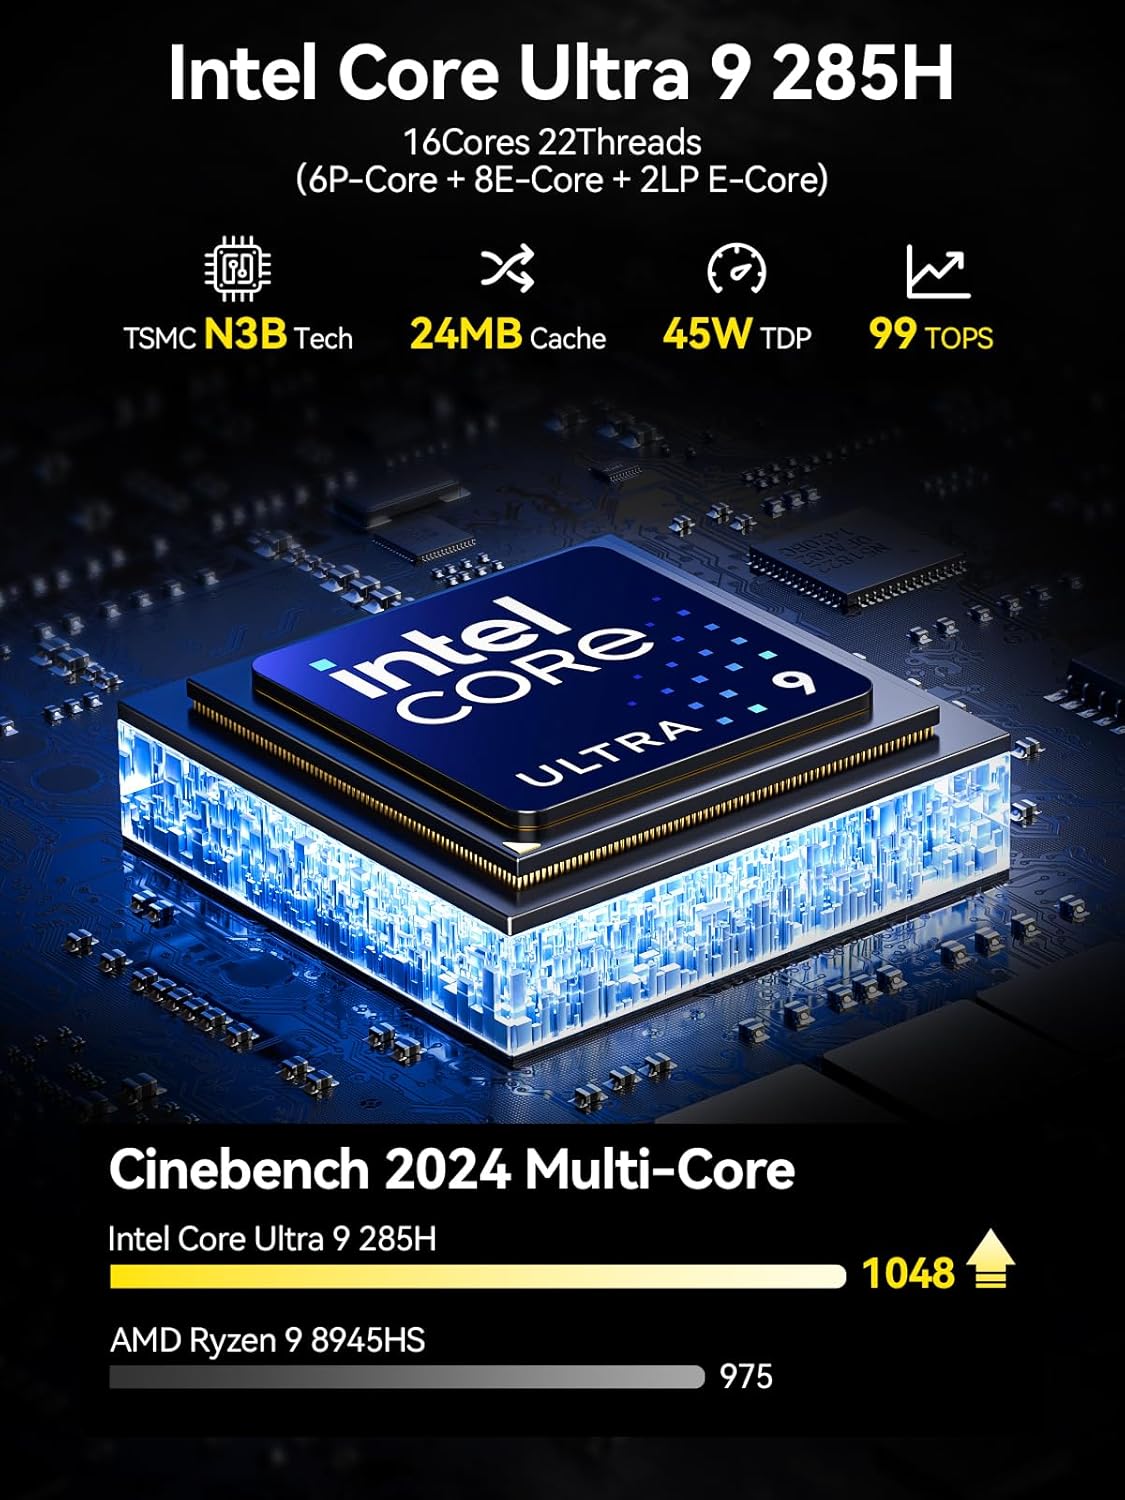
Image: A visual representation of the Intel Core Ultra 9 285H processor, highlighting its 16 cores, 22 threads, 24MB cache, and 99 TOPS AI performance.

Image: Diagram illustrating the Intel AI Boost with a dedicated NPU, emphasizing its 13 TOPS AI power for enhanced creativity and smarter computing.

Image: The Oculink port connected to an external GPU, demonstrating its capability for high-bandwidth eGPU performance compared to Thunderbolt 4 and USB4.
5. Maintenance
5.1 General Cleaning
- Regularly clean the exterior of the Mini PC with a soft, dry cloth.
- Use compressed air to clear dust from ventilation openings to maintain optimal airflow and cooling performance. Ensure the device is powered off before cleaning.
5.2 Storage and Memory Expansion
The EVO-T1 supports expansion of both storage and memory.
- M.2 SSD: The device features three M.2 2280 expansion slots, each supporting up to 4TB PCIe 4.0 NVMe SSDs.
- DDR5 RAM: The dual SO-DIMM slots support up to 128GB DDR5 5600MHz memory.
For internal component upgrades, it is recommended to consult a qualified technician or refer to detailed service guides to avoid damaging the device.

Image: Close-up view of the triple M.2 PCIe 4.0 SSD slots and dual-channel DDR5 memory modules inside the Mini PC, illustrating expansion capabilities.
6. Troubleshooting
6.1 Common Issues
- No Power: Ensure the power adapter is securely connected to both the Mini PC and a working power outlet. Test the outlet with another device.
- No Display: Verify that the display cable (HDMI, DisplayPort, or USB-C) is correctly connected to both the Mini PC and the monitor. Ensure the monitor is powered on and set to the correct input source.
- Peripheral Not Detected: Try connecting the peripheral to a different USB port. Ensure drivers are up to date if necessary.
- System Unresponsive: If the system becomes unresponsive, press and hold the power button for 5-10 seconds to force a shutdown. Then, restart the device.
6.2 Clear CMOS
If you encounter boot issues or system instability after making BIOS changes, you can clear the CMOS settings. Locate the "Clear CMOS" button on the rear panel (refer to the port diagram in Section 3.1) and press it with a thin, non-conductive object while the device is powered off and unplugged. This will reset BIOS settings to their default values.
7. Specifications
| Feature | Detail |
|---|---|
| Model | EVO T1 |
| Processor | Intel Core Ultra 9 285H (5.2 GHz, 16 Cores) |
| Graphics Coprocessor | Intel Arc 140T GPU 2.35GHz (Integrated) |
| RAM | 96 GB DDR5 5600 MHz |
| Storage | 2 TB PCIe 4.0 M.2 2280 SSD (Triple Slots, Max. 12TB) |
| Operating System | Windows 11 Pro |
| Max Screen Resolution | 7680x4320 Pixels (8K) |
| Wireless Connectivity | Wi-Fi 6 (802.11ax), Bluetooth 5.2 |
| Wired Connectivity | Dual 2.5GbE LAN |
| Ports (Front) | 1x Power Button, 3x USB 3.2 (10Gbps), 1x USB 4.0 (PD/DP/Data), 1x 3.5mm Audio Jack |
| Ports (Rear) | 1x DC IN 5525, 1x 3.5mm Audio Jack, 1x USB 4.0 (PD/DP/Data), 1x HDMI 2.1, 1x Oculink PCIe Gen4 x4, 1x DisplayPort 1.4, 2x USB 2.0, 2x Giga LAN (RJ45 2.5G), 1x Clear CMOS Button |
| Color | Black |
| Typical Uses | Education, Multimedia, Video Editing, Everyday Use, Gaming |
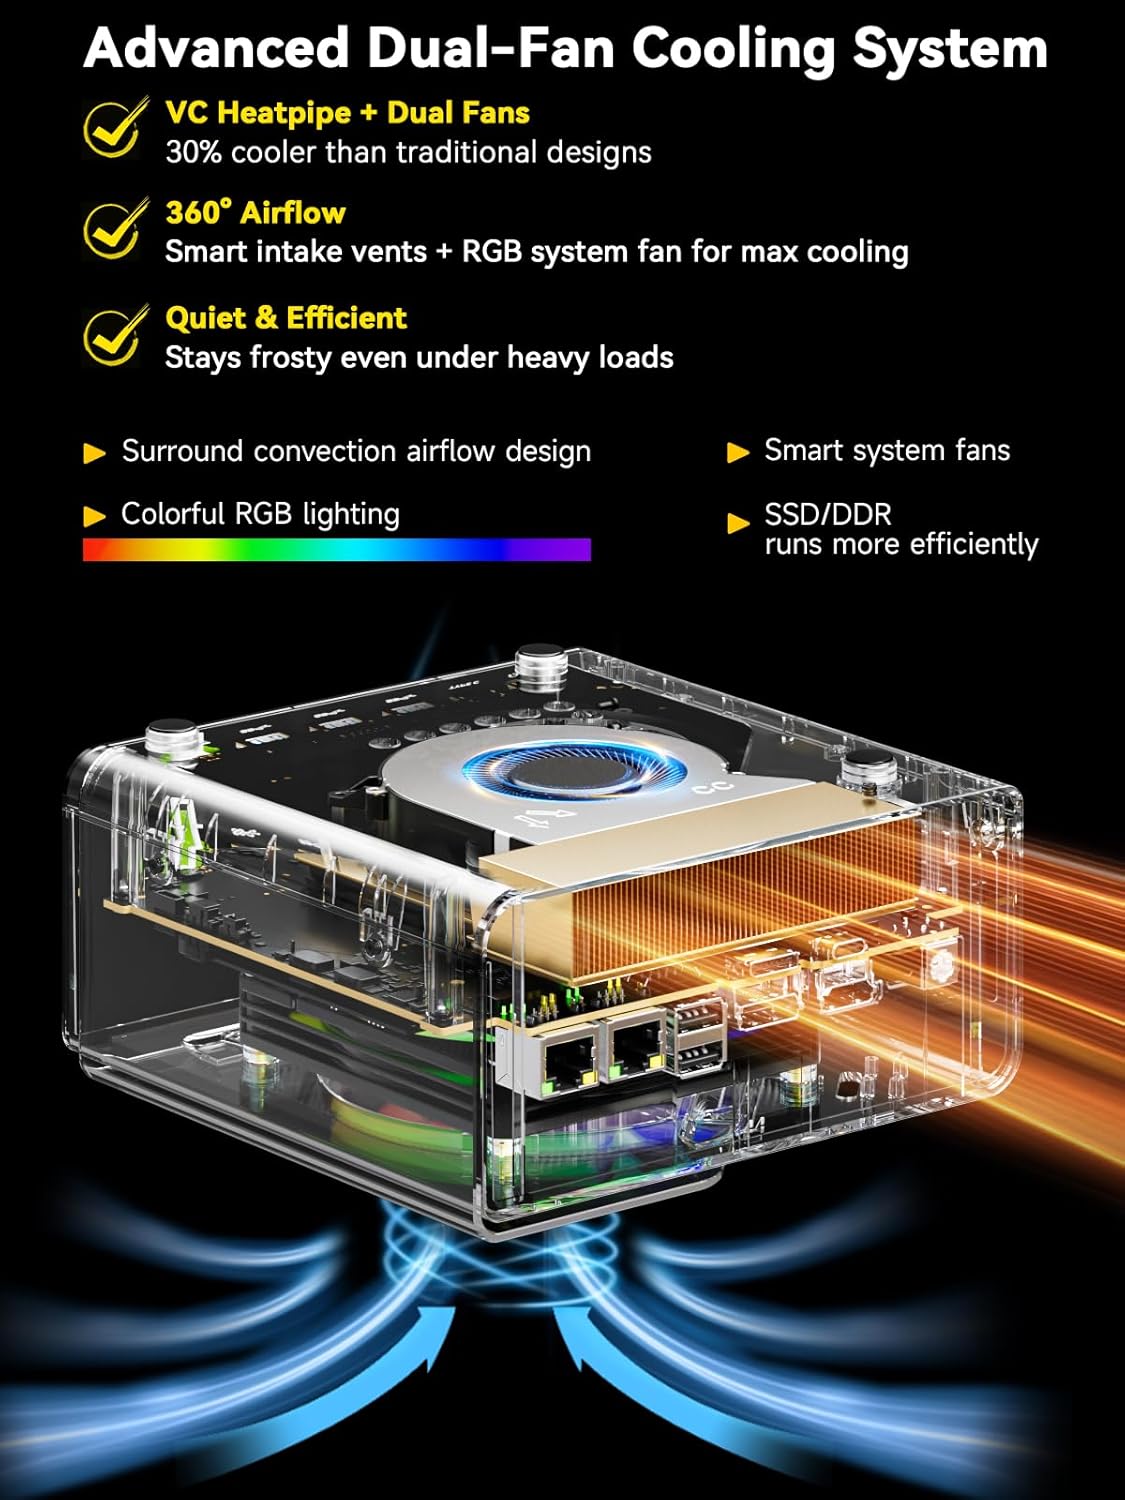
Image: An exploded view diagram of the Mini PC's advanced dual-fan cooling system, showing the VC heatpipe, smart intake vents, and RGB system fan for efficient heat dissipation.
8. Warranty & Support
GMKtec provides comprehensive support for your Mini PC.
8.1 Warranty Information
- Service Period: 12-months satisfying service from the date of purchase.
- Technical Support: Lifetime technical support is provided for all GMKtec products.
8.2 Contact Support
- Amazon Support: For issues related to your purchase, log in to your Amazon account, navigate to "Your Orders," and select "Ask Product Question" for direct assistance.
- After-Sales Support: For technical inquiries or after-sales service, you can email the GMKtec support team at support@gmktec.com. Customer support is available 24/7.


