
aycy H15
aycy H15 Digital Camera User Manual
UHD 4K 48MP Point and Shoot Digital Camera
Introduction
Thank you for choosing the aycy H15 Digital Camera. This compact and user-friendly camera is designed for beginners, children, and teens, offering high-quality imaging and video capabilities. With its 48MP photo resolution, UHD 4K video recording, and 16X digital zoom, it's perfect for capturing everyday moments and fostering an interest in photography. This manual provides essential information for setting up, operating, and maintaining your camera.
What's in the Box
Please check the package contents to ensure all items are present:
- Digital Camera x1
- 64GB SD Card x1
- USB-C Charging Cable x1
- User Manual x1
- Lanyard x1
- Storage Bag x1
- Adapter x1
Camera Overview
Familiarize yourself with the camera's components and controls:

Rear view of the aycy H15 Digital Camera, highlighting the 2.4-inch IPS screen and control buttons.

Front view of the aycy H15 Digital Camera, showing the lens, flash, and screen displaying a captured image.

Detailed diagram of the aycy H15 Digital Camera's control buttons and their functions.
Setup
1. Inserting the SD Card
Locate the SD card slot on the side of the camera. Insert the included 64GB TF card with the metal contacts facing down until it clicks into place. Ensure the card is fully inserted for proper function.
2. Charging the Battery
Connect the camera to a power source using the provided USB-C charging cable. The charging indicator light will illuminate. A full charge typically takes a few hours. The camera features an automatic turn-off function to conserve battery life.
Operating Instructions
1. Power On/Off
Press and hold the power button (usually marked with a circle and a vertical line) to turn the camera on or off. The screen will display a welcome message upon startup.
2. Taking Photos
In photo mode, frame your shot using the 2.4-inch IPS screen. Press the shutter button (typically on the top of the camera) to capture a 48MP image. The camera is designed for simple point-and-shoot operation.
Demonstration of basic camera operation, including powering on and taking a photo.
3. Recording Videos
Switch to video mode using the mode button. Press the shutter button to start recording UHD 4K video. Press it again to stop recording.
Demonstration of recording 4K video with the digital camera.
4. Digital Zoom
Use the 'W' (Wide) and 'T' (Telephoto) buttons to adjust the 16X digital zoom. This allows you to magnify distant subjects.

Visual representation of the 16X digital zoom feature, showing different zoom levels.
5. Anti-Shake Function
The camera features an anti-shake function to help stabilize images and videos, reducing blur caused by camera movement. This is particularly useful for active users.

Comparison image demonstrating the effectiveness of the anti-shake function for clearer photos.
6. Built-in Fill Light
Activate the built-in fill light to improve image quality in low-light or dark environments. This feature helps brighten your subjects.

Illustration of the fill light feature, showing its effect in low-light conditions.
7. Self-Timer
Utilize the self-timer function for delayed shots, with options for 2, 5, or 10 seconds. This is useful for group photos or self-portraits.

Visual guide for using the self-timer function with 2, 5, and 10-second delay options.
8. Auto-Focus
The camera features an auto-focus system to ensure your subjects are sharp and clear without manual adjustments.

Image demonstrating the auto-focus feature, highlighting how it sharpens subjects.
9. Filter Effects
Experiment with 12 different filter effects to add creative touches to your photos and videos.

Examples of various filter effects available on the camera, including Normal, Black/White, Warm, and Cold filters.
10. Continuous Shooting
Capture fast-moving action with the continuous shooting mode, taking multiple photos in quick succession.
Transferring Files
To transfer photos and videos to your computer:
- Connect the camera to your computer using the provided USB-C data cable.
- The camera should appear as a removable disk drive on your computer.
- Open the drive and locate your photos and videos. You can then copy them to your computer.
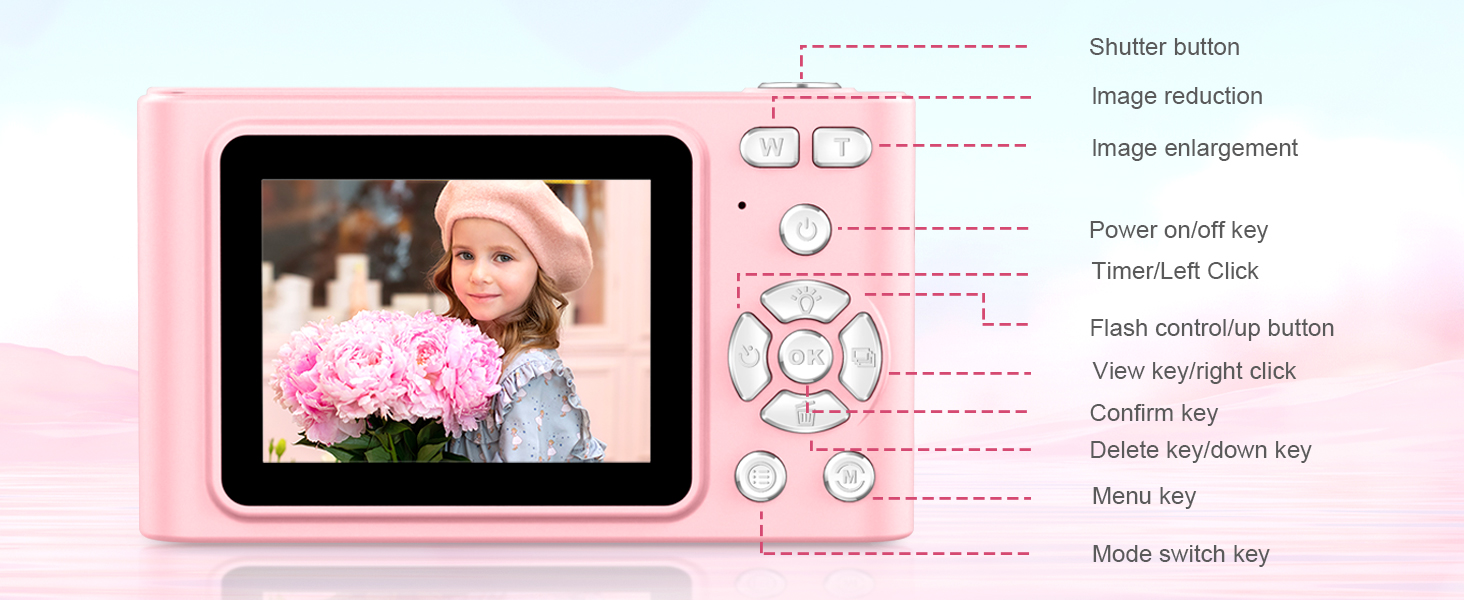
Diagram showing how to connect the camera to a PC using the USB-C cable for file transfer.
Maintenance
- Cleaning: Use a soft, dry cloth to clean the camera body. For the lens, use a specialized lens cleaning cloth and solution.
- Storage: Store the camera in a cool, dry place away from direct sunlight and extreme temperatures.
- Battery Care: Charge the battery regularly, even if not in use, to maintain its lifespan.
Troubleshooting
- Camera not turning on: Ensure the battery is charged. Check if the SD card is properly inserted.
- "No File" message: This indicates no photos or videos are stored on the SD card, or the card is not properly inserted/formatted.
- Blurry images: Ensure the anti-shake function is enabled. Hold the camera steady while shooting.
- Cannot transfer files: Verify the USB-C cable connection. Try a different USB port or computer.
Specifications
| Feature | Detail |
|---|---|
| Brand | aycy |
| Model Name | H15 |
| Photo Sensor Resolution | 48 MP |
| Video Resolution | 1080p, 2160p (UHD 4K) |
| Digital Zoom | 16 x |
| Screen Size | 2.4 Inches |
| Image Stabilization | Digital, Optical |
| Memory Storage Capacity | 64 GB (SD Card included) |
| Supported File Format | RAW, JPEG (Images), AVI (Video) |
| Connectivity Technology | USB |
| Special Features | Time Stamp, Anti-shake, Time-lapse, Slow Motion, Continuous Shoot, Motion Detection, Face Detection, Self-timer, Webcam, Filter Effect |
| Item Weight | 0.22 Kilograms |
Warranty and Support
This product comes with a 2-Year Manufacturer Warranty. For any technical support, warranty claims, or further assistance, please refer to the contact information provided with your purchase or visit the official aycy website.
Ask a question about this manual
Ask about setup, troubleshooting, compatibility, parts, safety, or missing instructions. Manuals+ will review the question and use this page’s manual context to help answer it.