
1. Introduction
Thank you for choosing the BUXFMHT Mini Portable Electric Sewing Machine 705. This compact and versatile sewing machine is designed for various sewing projects, offering 12 built-in stitch patterns, an LED light, and an extension table for enhanced functionality. This manual provides essential information for safe operation, setup, maintenance, and troubleshooting to ensure optimal performance and longevity of your machine.

Image: BUXFMHT Sewing Machine 705, designed for beginners with 12 stitch modes, reverse stitch, speed adjustment, buttonhole, and built-in light.

Image: The BUXFMHT Sewing Machine 705 shown with its extension table, highlighting features such as sewing up to 5 layers of fabric, a storage drawer, LED light, anti-skid base pad, and battery power option.
2. Product Components
Familiarize yourself with the various parts of your sewing machine:

Image: Top view of the sewing machine with labels for Take-up Lever, Upper Thread Tension Dial, Pattern Selection Dial, Hand Wheel, Reverse Sewing Button, Bottom Bobbin, LED Light, Cutter, and Power Off & Speed Switch.
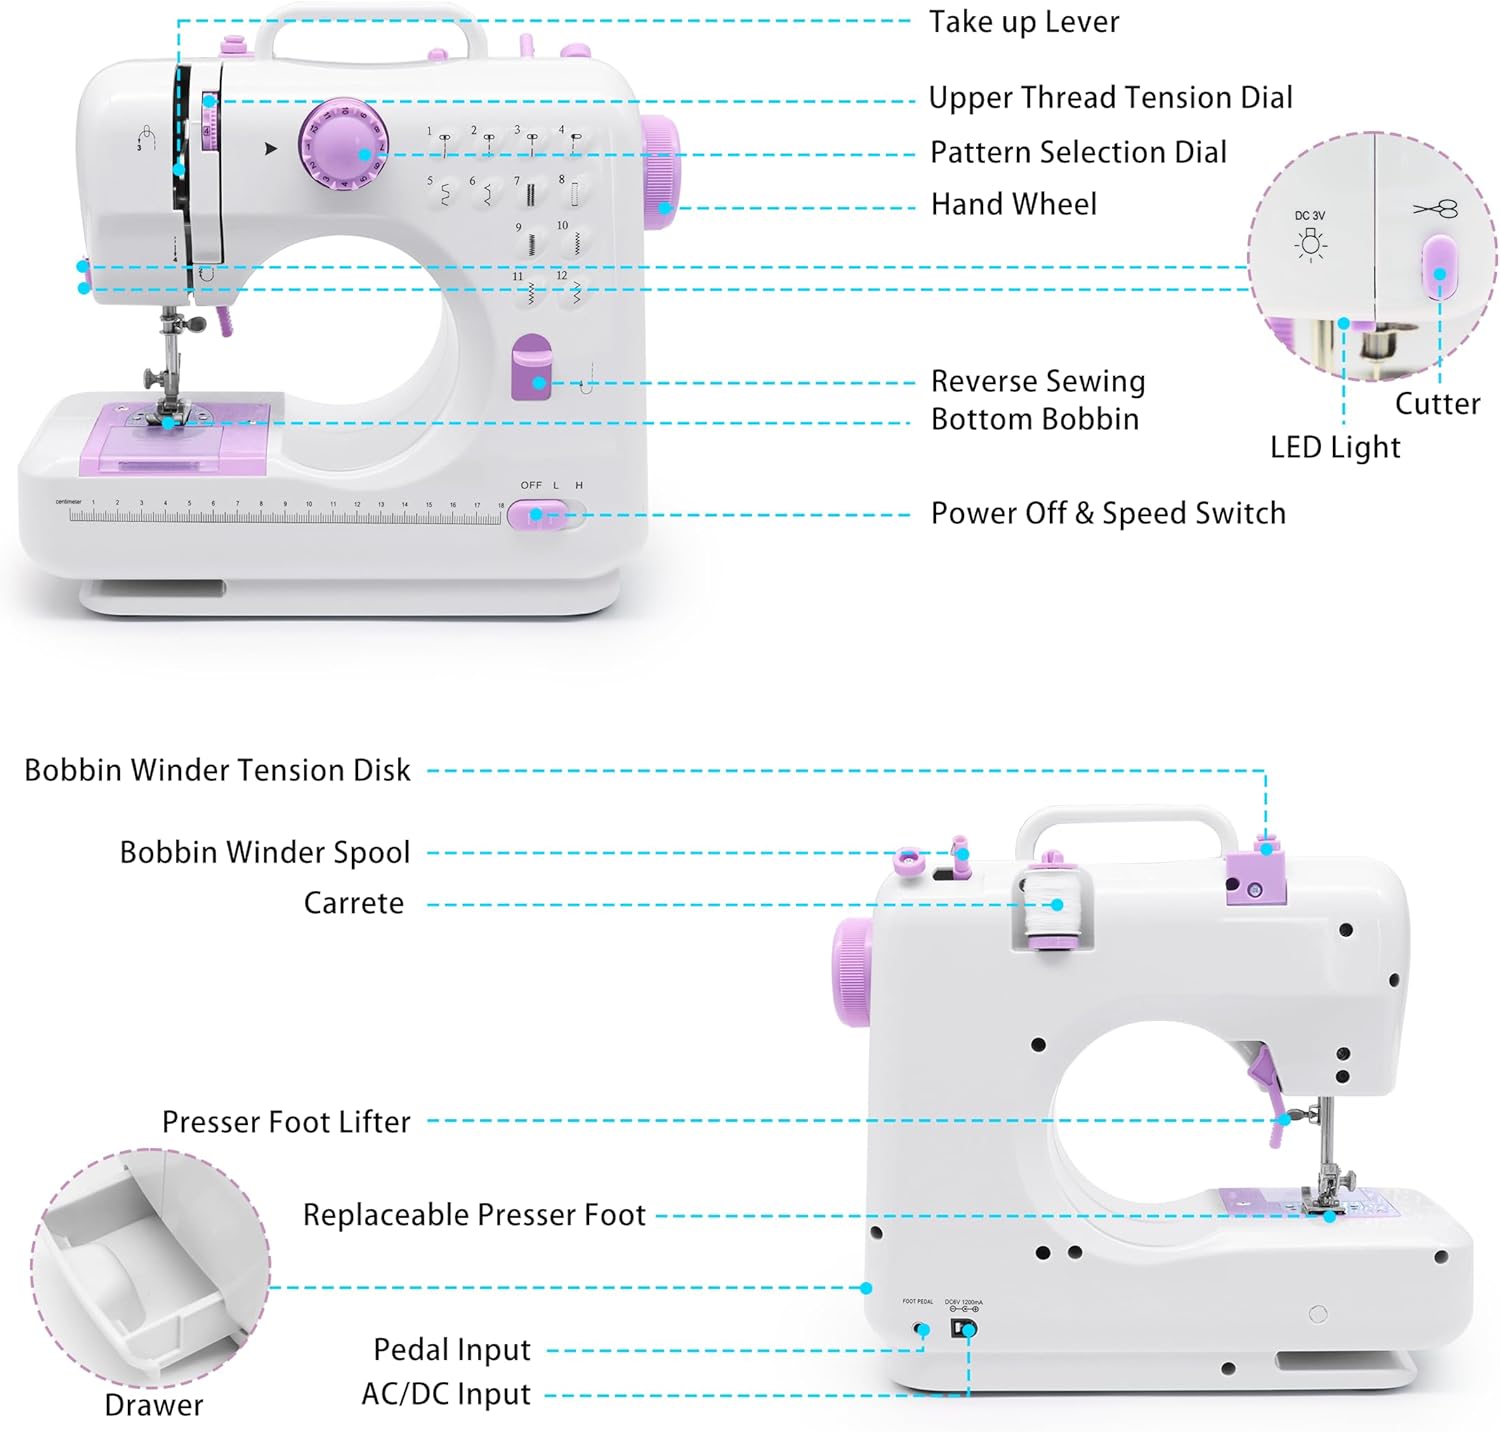
Image: Side view of the sewing machine with labels for Bobbin Winder Tension Disk, Bobbin Winder Spool, Presser Foot Lifter, Replaceable Presser Foot, Pedal Input, AC/DC Input, and Drawer.

Image: Detailed view of the sewing machine demonstrating double thread stitching, replaceable presser feet, and capabilities for sewing buttonholes and buttons.

Image: Features of the sewing machine including replaceable sewing needles, convenient storage drawers, its portable design, and integrated tangential thread knives.
3. Setup
3.1 Powering the Machine
The sewing machine can be powered by either the included AC/DC power adapter or 4 AA batteries (not included). Ensure the power switch is in the "OFF" position before connecting power. Do not use both power sources simultaneously.

Image: The sewing machine demonstrating its power options (AC adapter or 4 AA batteries) and the attachment of the original expansion table.
3.2 Attaching the Extension Table
Align the pins on the extension table with the corresponding holes on the sewing machine and gently push to secure it. This provides a larger working surface for your projects.
3.3 Threading the Machine
Correct threading is crucial for proper operation. Follow these steps carefully:
- Upper Threading: Follow the numbered guides on the machine for the upper thread path. Ensure the thread passes through the take-up lever and needle eye correctly.
- Bobbin Winding: Place an empty bobbin on the bobbin winder spool. Guide the thread from the spool pin through the bobbin winder tension disk and onto the bobbin. Start the machine briefly to wind the bobbin.
- Lower Bobbin: Insert the wound bobbin into the bobbin case located under the needle plate. Ensure the thread is correctly positioned in the tension spring.

Image: Step-by-step guide (Set 1) illustrating the correct threading path for the BUXFMHT Sewing Machine 705, emphasizing the importance of not missing any steps.

Image: Instructions (Set 3) on winding the handwheel and threading the bottom thread before powering on the machine.
4. Operating Instructions
4.1 Selecting Stitch Patterns
Your machine offers 12 built-in stitch patterns. Turn the Pattern Selection Dial to choose the desired stitch. Refer to the stitch pattern guide on the machine for visual reference.

Image: Instructions (Set 2) on how to twist the gear knob to select the appropriate stitch pattern on the sewing machine.

Image: Display of the 12 built-in stitch patterns available on the BUXFMHT Sewing Machine 705, including twisted stitch modes (#9-#12) and button modes (#7-#8), and how they appear on fabric.
4.2 Adjusting Thread Tension
Before sewing, adjust the tightness of the upper thread using the Upper Thread Tension Dial. Incorrect tension can lead to thread breakage or uneven stitches.
Image: Instructions (Set 4) on adjusting the tightness of the thread before sewing to prevent breakage and ensure proper stitch formation.
4.3 Speed Control and Reverse Sewing
Use the Power Off & Speed Switch to select between low (L) and high (H) sewing speeds. The reverse sewing button allows you to reinforce stitches at the beginning and end of seams.

Image: Features including the backstitch function, fast/slow speed control, cylinder sewing capability, and the integrated floodlight (LED light).
4.4 Starting and Stopping
You can operate the machine using either the foot pedal or the button switch on the machine. Press the foot pedal or slide the button switch to start sewing. Release or slide back to stop.
Image: Instructions (Set 5) showing the option to use either the foot pedal or the button switch to start the sewing machine.
4.5 Finishing a Seam
Once your seam is complete, lift the presser foot, pull the fabric away, and use the integrated thread cutter or a pair of scissors to trim the threads.
Image: Instructions (Set 6) on how to remove excess thread after sewing, using either the built-in thread cutter or complimentary scissors.
5. Maintenance
5.1 Cleaning
Regularly clean lint and dust from the bobbin area and feed dogs using a small brush. Ensure the machine is unplugged before cleaning.
5.2 Needle Replacement
Replace the needle regularly, especially if it becomes bent, dull, or if you are experiencing skipped stitches. Always use the correct needle type and size for your fabric.
5.3 Storage
When not in use, store the machine in a dry, dust-free environment. The compact design and storage drawers make it easy to keep accessories organized.
6. Troubleshooting
If you encounter issues, refer to the following common problems and solutions:
- Thread Breaking: Check if the thread is correctly tensioned (refer to section 4.2). Ensure the needle is not bent or dull and is inserted correctly. Verify the thread path is clear and not snagged.
- Skipped Stitches: Replace the needle with a new one. Ensure the needle is inserted fully and correctly. Check that the fabric is properly placed under the presser foot.
- Bottom Thread Tangling: This often indicates incorrect bobbin threading or tension. Re-thread the bobbin carefully, ensuring it sits correctly in its case and the thread is properly guided. Adjust upper thread tension if necessary.
- Machine Not Starting: Ensure the power adapter is securely connected or that fresh batteries are installed. Check that the power switch is in the 'ON' position.
- Reverse Sewing Malfunction: Ensure the reverse sewing button is fully engaged. If the issue persists, re-check threading and needle condition.
For further assistance, please contact customer support.
7. Specifications
| Feature | Detail |
|---|---|
| Model Number | 705 |
| Product Dimensions | 7.3"D x 14.7"W x 12"H (11.81 x 3.94 x 3.94 inches) |
| Item Weight | 6 Pounds |
| Power Source | AC Adapter or 4*AA Batteries |
| Material | Acrylonitrile Butadiene Styrene (ABS) |
| Stitch Patterns | 12 Built-in |
| Special Features | LED Light, Extension Table, Double Thread, Two Speed, Automatic Rewind, Reverse Sewing, Thread Cutter, Storage Drawer |
| UPC | 727370275974 |
8. Warranty & Support
Your BUXFMHT Mini Portable Electric Sewing Machine 705 comes with a 12-month quality guarantee from the date of purchase. This warranty covers manufacturing defects under normal use.
If you have any questions, require technical assistance, or need to claim warranty service, please do not hesitate to contact BUXFMHT customer support. We are committed to resolving any issues within 24 hours.
For support, please visit the BUXFMHT Store on Amazon or refer to the contact information provided with your purchase.