1. Introduction
Thank you for choosing the WallarGe Large Digital Wall Clock. This electric wall clock features a clear LED display, showing time, temperature, date, and day of the week. It includes an automatic Daylight Saving Time (DST) function and 5-level adjustable brightness for optimal visibility in various environments. Designed for ease of use and silent operation, it is suitable for homes, offices, classrooms, and more.
2. Package Contents
Please verify that all items listed below are included in your package:
- WallarGe Large Digital Wall Clock (Model: CL8003)
- Power Adapter
- Power Cord (approximately 5 feet long)
- Wall-mounting Hardware (2 screws and plastic anchors)
- Mounting Template
- CR3032 Battery (pre-installed for memory backup)
- User Manual (this document)

Image: All components included in the WallarGe Digital Wall Clock package. This includes the clock unit, power adapter, power cord, wall mounting screws and anchors, and the user manual.
3. Product Features
The WallarGe Large Digital Wall Clock is designed with several key features to enhance its functionality and user experience:
- Plug-in Electric Operation: The clock operates continuously when plugged into a power outlet. A pre-installed CR3032 battery provides memory backup, preserving settings during power outages.
- 8-Inch Multi-Function LED Display: Features a clear, full-screen LED display with large 2.5-inch time digits. It shows time (12/24-hour format), indoor temperature (°F/°C), current date, and day of the week. The display is easily visible from various angles and distances, making it suitable for individuals with vision or memory challenges.
- 5-Level Adjustable Dimmer: Customize the display brightness to your preference, ranging from a soft glow for nighttime to a bright setting for daytime visibility. This feature ensures eye comfort in any lighting condition.
- Automatic Daylight Saving Time (DST): The clock automatically adjusts for spring forward and fall back, eliminating the need for manual time changes.
- Versatile Placement: Equipped with a foldable stand for tabletop use and hanging holes for wall mounting. Its modern design complements various room decors.
- Silent Operation: The clock operates without any ticking sounds, ensuring a quiet environment ideal for bedrooms, nurseries, and workspaces.
- Alarm Function: Includes an alarm feature for convenient reminders.

Image: The main display of the WallarGe Digital Wall Clock, showing current time, temperature, day of the week, and date.

Image: A visual representation of the clock's 8-inch display size and the large 2.5-inch digits for easy readability.
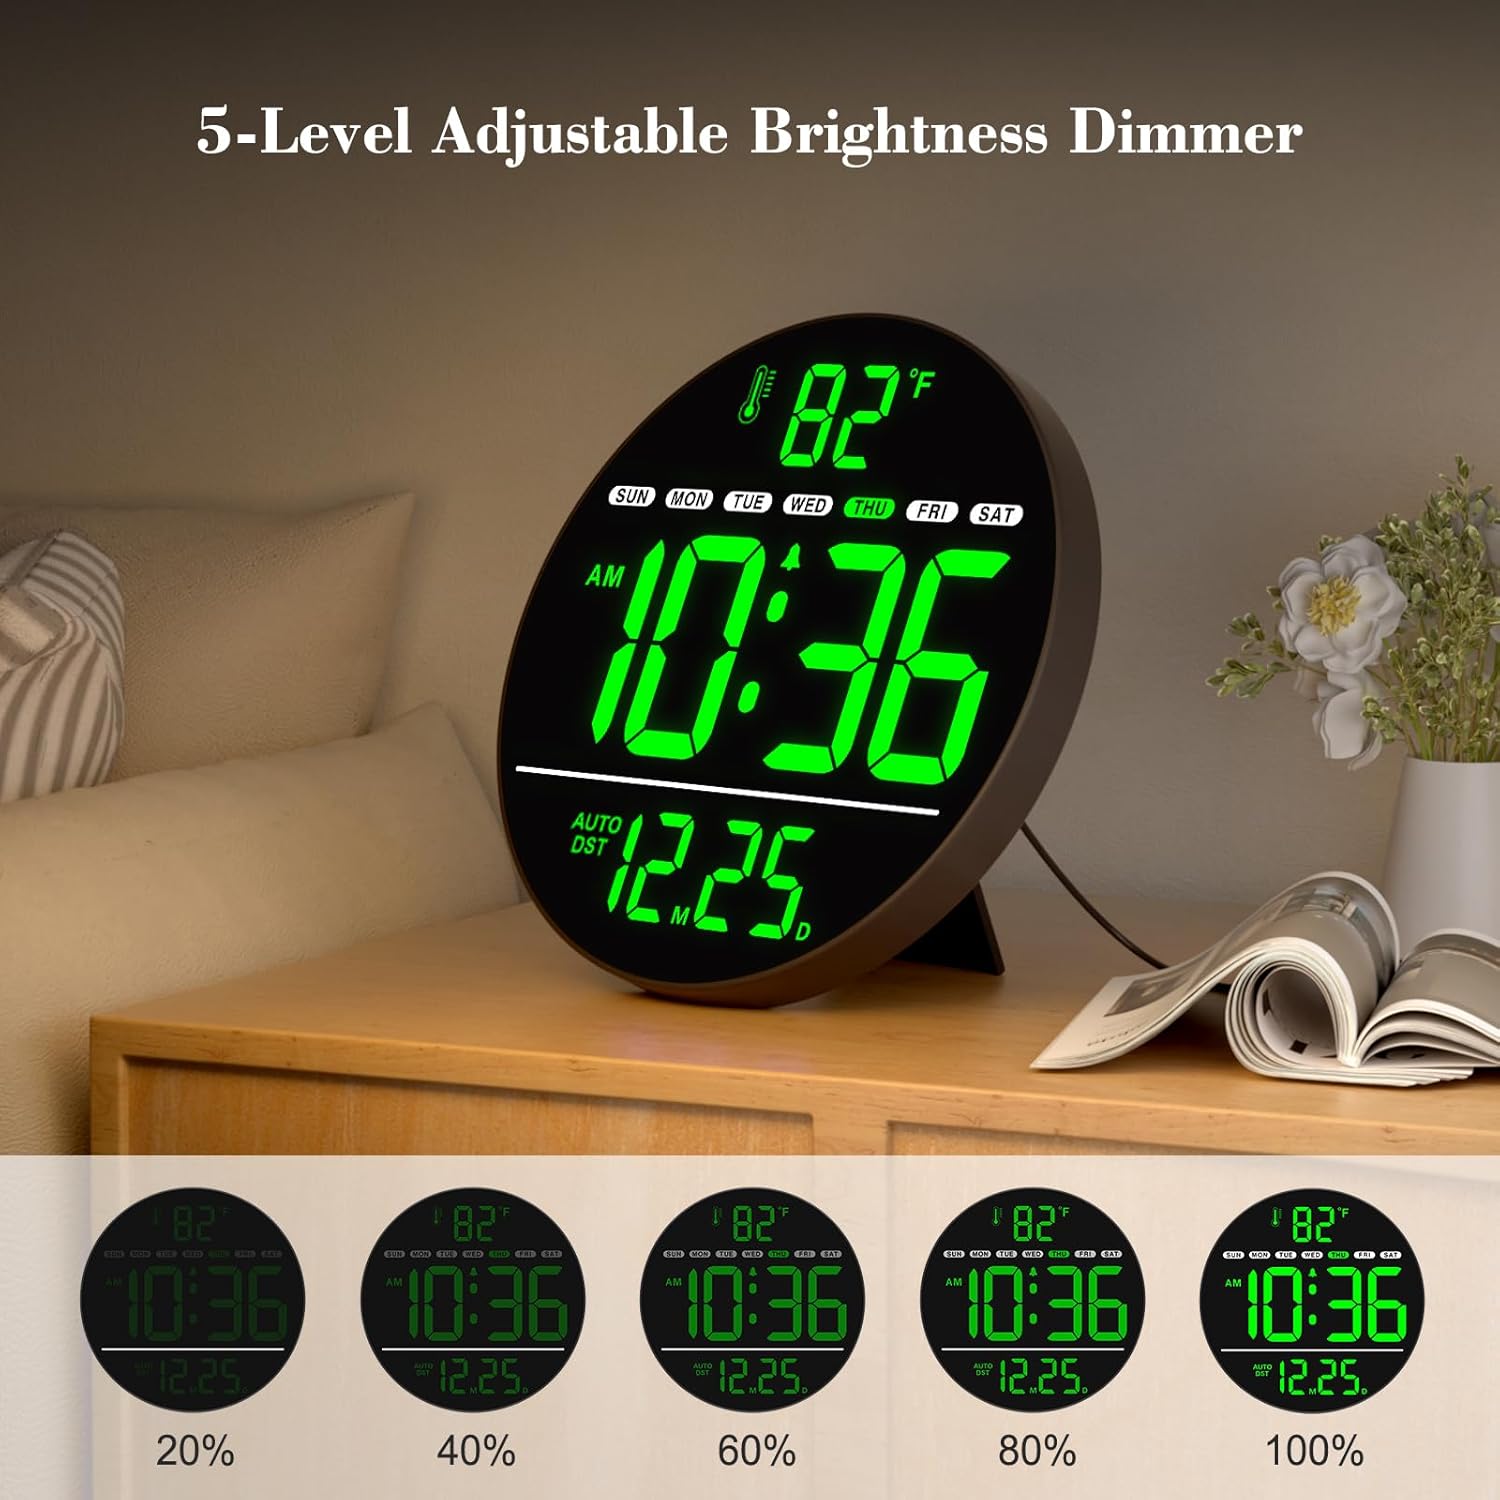
Image: This graphic demonstrates the five adjustable brightness levels of the clock's LED display, allowing users to set the illumination to their preference.

Image: A visual explanation of the clock's automatic DST feature, which adjusts the time without manual intervention during seasonal changes.

Image: This image highlights the various display modes and the intuitive buttons on the back of the clock for easy switching between 12/24-hour time and Celsius/Fahrenheit temperature units.

Image: The clock displayed in a quiet environment, illustrating its silent operation feature, which is beneficial for bedrooms and other spaces requiring minimal noise.
Product Overview Video
Video: An official overview of the WallarGe Large LED Digital Wall Clock, showcasing its features and design.
4. Setup
Follow these steps to set up your WallarGe Digital Wall Clock:
- Unpack the Clock: Carefully remove all components from the packaging.
- Power Connection: Connect the provided power cord to the clock's power port and plug the adapter into a standard electrical outlet. The clock will power on and display the time.
- Battery Backup: The clock comes with a pre-installed CR3032 battery. This battery is for memory backup only and will retain your settings in case of a power interruption. It does not power the display.
- Placement:
- Tabletop: Extend the foldable stand located on the back of the clock to place it on a flat surface.
- Wall Mount: Use the provided wall-mounting hardware (screws and plastic anchors) and the mounting template to securely hang the clock on a wall. Ensure the power cord can reach an outlet.
Image: The rear of the clock, indicating the power input, control buttons, wall mounting points, and the foldable stand.
5. Operating Instructions
The clock features several buttons on the back for easy adjustment:
- UP (12/24HR): Used to increase values during setting or to toggle between 12-hour and 24-hour time formats.
- TIME SET: Used to enter time setting mode.
- DOWN (°C/°F): Used to decrease values during setting or to toggle between Celsius and Fahrenheit temperature units.
- ALARM SET & ON/OFF: Used to set the alarm time and to turn the alarm on or off.
- DST ON/OFF: Used to enable or disable the automatic Daylight Saving Time function.
- DIMMER: Used to adjust the display brightness through 5 levels.
Setting the Time and Date
- Press the TIME SET button. The hour digits will flash.
- Use the UP or DOWN buttons to adjust the hour.
- Press TIME SET again to confirm the hour and move to minutes. The minute digits will flash.
- Use the UP or DOWN buttons to adjust the minutes.
- Continue pressing TIME SET to cycle through setting the year, month, and day, adjusting each with the UP or DOWN buttons.
- After setting the day, press TIME SET one last time to exit the setting mode.
Toggling 12/24-Hour Format
In normal time display mode, press the UP (12/24HR) button to switch between 12-hour (with AM/PM indicator) and 24-hour formats.
Changing Temperature Unit (°C/°F)
In normal time display mode, press the DOWN (°C/°F) button to switch between Celsius and Fahrenheit temperature displays.
Setting and Activating the Alarm
- Press the ALARM SET & ON/OFF button. The alarm hour digits will flash.
- Use the UP or DOWN buttons to adjust the alarm hour.
- Press ALARM SET & ON/OFF again to confirm the hour and move to minutes. The alarm minute digits will flash.
- Use the UP or DOWN buttons to adjust the alarm minutes.
- Press ALARM SET & ON/OFF one last time to save the alarm setting and activate the alarm. An alarm icon will appear on the display.
- To turn the alarm off, press the ALARM SET & ON/OFF button once in normal display mode. The alarm icon will disappear.
Adjusting Display Brightness
Press the DIMMER button repeatedly to cycle through the 5 available brightness levels.
Daylight Saving Time (DST) Control
Press the DST ON/OFF button to enable or disable the automatic Daylight Saving Time adjustment. When enabled, the clock will automatically adjust for seasonal time changes.
6. Maintenance
- Cleaning: To clean the clock, gently wipe the display and casing with a soft, dry cloth. Do not use abrasive cleaners, solvents, or chemical sprays, as these may damage the surface.
- Power: Ensure the clock remains plugged into a power source for continuous operation. The internal CR3032 battery is solely for memory backup during power outages and does not power the main display.
- Battery Replacement: If the clock loses its settings after a power outage, the CR3032 memory battery may need replacement. Open the battery compartment on the back of the clock and replace the old battery with a new CR3032 battery, observing polarity.
- Environment: Avoid placing the clock in direct sunlight, extreme temperatures, or high humidity, as these conditions can affect its performance and lifespan.
7. Troubleshooting
| Problem | Possible Cause | Solution |
|---|---|---|
| Display is off. | Clock is not plugged in or power outage. | Ensure the power adapter is securely plugged into the clock and a working electrical outlet. |
| Clock loses time/settings after power outage. | Memory backup battery (CR3032) is dead or missing. | Replace the CR3032 battery on the back of the clock. |
| Incorrect time/date displayed. | Time/date not set correctly or DST setting is incorrect. | Refer to "Setting the Time and Date" section to adjust. Check the DST ON/OFF setting. |
| Temperature reading seems inaccurate. | Clock recently moved to a new environment; needs time to adjust. | Allow the clock to stabilize in its new location for at least 20-30 minutes for an accurate reading. |
| Alarm does not sound. | Alarm not set or not activated. | Ensure the alarm time is set and the alarm icon is visible on the display. Refer to "Setting and Activating the Alarm". |
8. Specifications
| Brand | WallarGe |
| Model Number | CL8003 |
| Color | Green |
| Display Type | Digital LED |
| Special Features | Time, Alarm, Indoor Temperature, Date, Day of the Week, 5-Level Dimmer, Auto DST |
| Product Dimensions | 0.7"W x 8"H (Diameter: 8 inches) |
| Power Source | Corded Electric (Adapter and Power Cord included) |
| Battery (Backup) | 1 x CR3032 (included, for memory function only) |
| Mounting Type | Wall Mount, Tabletop |
| Item Weight | 15.2 ounces |
9. Warranty and Support
For any questions, technical support, or warranty inquiries regarding your WallarGe Digital Wall Clock, please contact our customer support team:
Email: WallarGe@outlook.com
Please provide your model number (CL8003) and a detailed description of your issue when contacting support to ensure a prompt resolution.

