1. Introduction
Thank you for choosing the KEMIMOTO Motorcycle Sound Bar. This high-performance audio system is designed to provide clear and powerful sound for your motorcycle, ATV, or electric scooter. Featuring Bluetooth 5.3/EDR connectivity, USB playback, and vibrant RGB LED lighting, it enhances your riding experience with both sound and style. Its durable, waterproof (IP65 rated), and shockproof aluminum alloy construction ensures reliable performance in various weather conditions.
The sound bar delivers 40W RMS power with an 80W peak, equipped with 2x 2-inch woofers, 2x 1-inch tweeters, and 2x 45mm passive radiators for a rich audio experience. The versatile mounting system fits handlebars from 7/8-inch to 1.25-inch and includes a 360-degree rotatable mount for optimal positioning.
2. Safety Information
- Always ensure the sound bar is securely mounted to prevent detachment during operation.
- Verify all wiring connections are correct and insulated to avoid short circuits or electrical hazards.
- Do not operate the sound bar at excessively high volumes that could impair your ability to hear traffic or emergency signals.
- Disconnect the vehicle's battery before performing any electrical installation or maintenance.
- Ensure wiring is routed away from hot engine parts, moving components, and pinch points.
3. Package Contents
Please check that all accessories are included and in good condition upon opening the package.

Image: KEMIMOTO Motorcycle Sound Bar with all included accessories.
- Speaker x1
- L-shaped Hex Key x1
- User Guide x1
- Open-end Wrench x1
- Adhesive Rubber Pads x8
- Nylon Cable Tie x4
- Silicone Cap x4
4. Setup and Installation
4.1. Mounting the Sound Bar
The sound bar features a near 360-degree rotatable mount, allowing it to adapt to various handlebar shapes and angles. It fits most motorcycle handlebars ranging from 7/8-inch to 1.25-inch.
- Identify the desired mounting location on your handlebar. Ensure it does not obstruct your view, controls, or interfere with any moving parts.
- Select the appropriate size mounting clamps and rubber pads for your handlebar diameter. The kit includes various sizes to ensure a snug fit.
- Attach the clamps to the sound bar using the provided screws and hex key. Do not fully tighten yet.
- Position the sound bar on the handlebar. Use the non-slip rubber padding to securely grip the handlebars without scratching paint or surfaces.
- Adjust the angle of the sound bar to direct the sound towards the rider for optimal audio experience.
- Once the desired position and angle are achieved, securely tighten all mounting screws.

Image: The KEMIMOTO Sound Bar securely mounted on a motorcycle handlebar, showing its position relative to the rider's view.
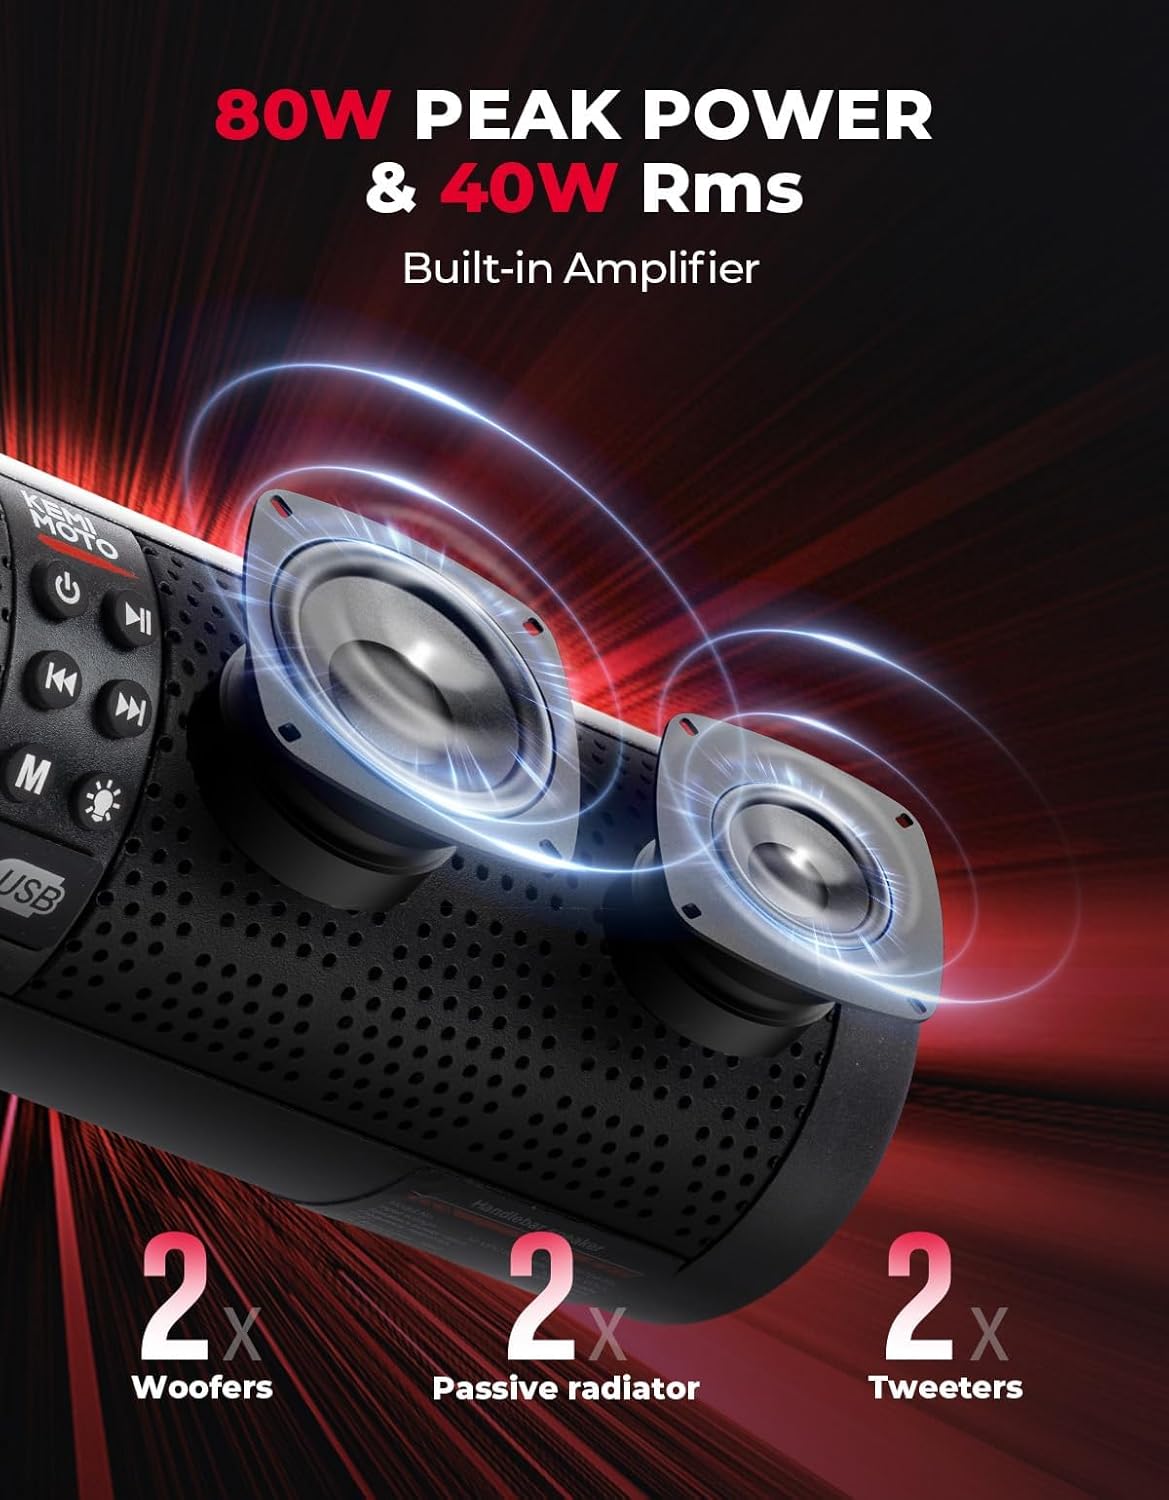
Image: A side perspective of the sound bar, highlighting its compact design and how it integrates with the motorcycle's controls.

Image: A visual representation of the sound bar's wide-angle rotatable mount, illustrating its flexibility to fit various handlebar shapes and angles.
4.2. Wiring Connections
The sound bar requires a 12-volt power source. Ensure the vehicle's battery is disconnected before making any electrical connections.
- Connect the red wire from the sound bar's power cable to the positive (+) terminal of your vehicle's 12V battery.
- Connect the black wire from the sound bar's power cable to the negative (-) terminal of your vehicle's 12V battery.
- The sound bar includes an orange wire for accessory or switched power. Connect this wire to a switched 12V source on your vehicle so the sound bar turns on/off with the ignition.
- A blue wire is provided for connecting additional amplifiers. If not using additional amplifiers, ensure this wire is properly insulated and secured.
- Route all wiring securely using the provided nylon cable ties, ensuring they are away from hot engine parts, moving components, and any areas where they could be pinched or damaged.
- Once all connections are made and secured, reconnect your vehicle's battery.
Video: This video demonstrates the installation process of the KEMIMOTO RGB Motorcycle Speaker, including mounting and wiring connections. (Source: Goolmile)
Video: A short video showcasing the KEMIMOTO RGB Motorcycle Sound Bar's features and a brief overview of its installation on a motorcycle. (Source: Goolmile)
5. Operating Instructions
5.1. Power On/Off
Press and hold the power button (usually marked with a circle and a vertical line) on the sound bar's control panel to turn the unit on or off.
5.2. Volume Adjustment
Use the volume up (+) and volume down (-) buttons on the control panel to adjust the audio level.
5.3. Mode Selection
Press the 'M' (Mode) button to cycle through available audio sources: Bluetooth, USB, and FM Radio.
- Bluetooth Mode: The sound bar will enter pairing mode automatically. Search for 'KEMIMOTO' or similar on your smartphone/MP3 player's Bluetooth settings and connect.
- USB Mode: Insert a USB flash drive containing MP3/WMA audio files into the USB port. The sound bar will automatically detect and play the music.
- FM Radio Mode: Use the track forward/backward buttons to scan for radio stations.
5.4. RGB LED Lights
The sound bar features RGB LED lights that can be controlled via a dedicated button (often marked with a lightbulb icon). Press this button to cycle through different lighting modes or turn the lights on/off.
6. Maintenance
The KEMIMOTO Sound Bar is designed with IP65-rated waterproof and dustproof features for durability in various outdoor conditions. Follow these guidelines for optimal performance and longevity:
- Regularly clean the exterior of the sound bar with a soft, damp cloth. Avoid using harsh chemicals or abrasive cleaners.
- Ensure the USB port cover is securely closed when not in use to maintain its waterproof rating.
- Inspect mounting hardware periodically for tightness and wear. Tighten any loose screws to prevent vibration or detachment.
- If the sound bar is exposed to heavy rain or water, allow it to dry completely before operating or storing.
7. Troubleshooting
If you encounter any issues with your KEMIMOTO Sound Bar, refer to the following common solutions:
- No Power:
- Check all power connections to the battery and switched accessory wire.
- Ensure the vehicle's battery has sufficient charge.
- Verify the fuse in the power cable is intact. Replace if blown.
- No Sound:
- Increase the volume on both the sound bar and your connected device.
- Ensure the correct audio source (Bluetooth, USB, FM) is selected.
- If using Bluetooth, ensure the device is properly paired and within range.
- If using USB, check that the USB drive is formatted correctly and contains compatible audio files.
- Bluetooth Connectivity Issues:
- Ensure the sound bar is in Bluetooth pairing mode.
- Delete the sound bar from your device's Bluetooth list and attempt to re-pair.
- Move your device closer to the sound bar to ensure it's within the 33ft/10m range.
- Poor Radio Reception:
- Ensure you are in an area with good FM signal strength.
- Adjust the position of the sound bar or vehicle to improve reception.
8. Specifications
| Feature | Specification |
|---|---|
| Brand | KEMIMOTO |
| Model Name | KEMIMOTO Motorcycle Sound Bar |
| Input Voltage | 12 Volts |
| Speaker Type | Soundbar |
| Speaker Maximum Output Power | 80 Watts (Peak) |
| RMS Power | 40 Watts |
| Audio Driver Type | Dynamic Driver (2x 2” woofers, 2x 1” tweeters, 2x 45mm passive radiator) |
| Frequency Response | 22 KHz |
| Wireless Communication Technology | Bluetooth 5.3/EDR |
| Connectivity Technology | Bluetooth, USB |
| Control Method | Touch |
| Is Waterproof | True (IP65 Rated) |
| Water Resistance Level | Moisture Resistant |
| Special Feature | Dustproof, LED Light, Lightweight, USB Port, Waterproof |
| Mounting Type | Handlebar Mount (7/8” to 1.25” compatible) |
| Product Dimensions | 2.97"D x 11"W x 2.87"H |
| Item Weight | 2.88 pounds |
9. Warranty and Support
KEMIMOTO products are designed for quality and reliability. For specific warranty information, please refer to the warranty card included in your package or contact KEMIMOTO customer support directly.
If you require technical assistance, have questions about installation, or need to troubleshoot an issue not covered in this manual, please contact KEMIMOTO customer service through their official website or the retailer where the product was purchased.


