
Introduction
This manual provides essential information for the safe and efficient use of your Electactic 3-Burner Propane Gas Grill with Side Burner. Please read all instructions carefully before assembly, operation, and maintenance. Retain this manual for future reference.

Image: Electactic 3-Burner Propane Gas Grill with Side Burner, showcasing its stainless steel construction and overall design.
Important Safety Information
Always follow basic safety precautions when using this appliance to reduce the risk of fire, explosion, electric shock, or injury. Use outdoors only in a well-ventilated area. Do not store flammable materials near the grill.
- Ensure all gas connections are tight and leak-free before use.
- Never operate the grill unattended.
- Keep the grill area clear and free from combustible materials, gasoline, and other flammable vapors and liquids.
- Do not obstruct the flow of combustion and ventilation air.
- Always open the grill lid before lighting the main burners.
Setup and Assembly
The Electactic 3-Burner Propane Gas Grill is designed for straightforward assembly. A Phillips head screwdriver is the only tool required. Follow the step-by-step instructions provided in the included assembly guide.
Propane Tank Installation
- Open the cabinet doors located at the base of the grill.
- Carefully place a standard 20-pound propane cylinder into the designated holder within the cabinet.
- Connect the regulator hose from the grill to the propane tank valve, ensuring a secure and leak-free connection.
- Close the cabinet doors to conceal the propane tank.
Video: Demonstrates the assembly process and propane tank installation for the 3-Burner Propane Gas Grill with Side Burner.
Caster Wheel Assembly
The grill is equipped with four heavy-duty casters, two of which are locking, for easy mobility and stability. Attach the casters to the base of the grill as per the assembly instructions. Ensure locking casters are engaged when the grill is in a stationary position.

Image: Close-up of the heavy-duty casters, highlighting the locking mechanism for stability.
Operating Instructions
Lighting the Main Burners
- Open the grill lid.
- Ensure all burner control knobs are in the "OFF" position.
- Slowly open the propane tank valve.
- Push and turn one main burner control knob to the "HIGH" position.
- Immediately press and hold the electronic igniter button until the burner lights.
- If ignition does not occur within 5 seconds, turn the burner control(s) OFF, wait 5 minutes, and repeat the lighting procedure.
- Once lit, adjust the flame to the desired cooking temperature using the control knobs.
Using the Side Burner
The 10,000 BTU side burner is ideal for preparing sauces, boiling water, or cooking side dishes. To light the side burner, open its lid, turn the control knob to "HIGH", and press the electronic igniter button.

Image: The grill's side burner with a pot, and the adjacent side table for food preparation.
Temperature Control
The built-in thermometer on the lid allows for monitoring the internal temperature of the grill. Adjust the main burner control knobs to achieve and maintain your desired cooking temperature. The three main burners (8,000 BTU each) provide versatile heat zones.

Image: Detailed view of the control panel, including the built-in thermometer and individual burner control knobs.
Care and Maintenance
Cleaning the Cooking Grates
The cast iron cooking grates should be cleaned after each use. Allow the grates to cool, then remove them and clean with a grill brush or warm soapy water. The grates are designed to be easily removable for cleaning.

Image: Close-up of the cast iron cooking grates, showing their robust construction.
Grease Management
The grill features a removable grease tray to simplify cleanup. Regularly check and empty the grease tray to prevent flare-ups and maintain cleanliness. Ensure the tray is properly reinserted before operating the grill.
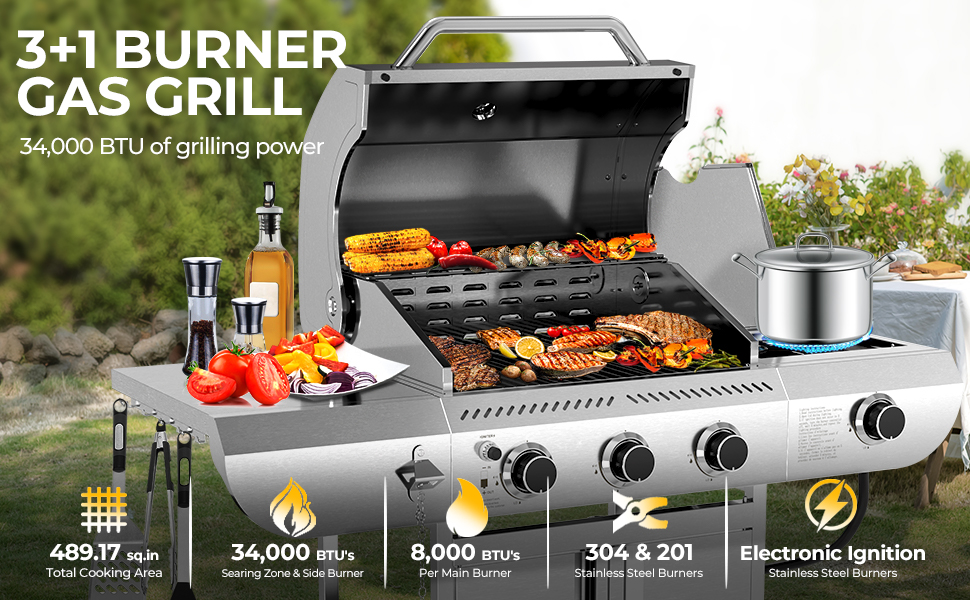
Image: Illustration of the detachable stainless steel oil collection tray being removed for cleaning.
Exterior Cleaning
The stainless steel exterior can be cleaned with a soft cloth and a mild detergent. Avoid abrasive cleaners or scouring pads that could scratch the surface. Regular cleaning helps maintain the grill's appearance and longevity.
Troubleshooting
| Problem | Possible Cause | Solution |
|---|---|---|
| Burner fails to light | No gas flow; igniter not sparking; low propane. | Check propane tank level and connections. Ensure igniter battery is functional. Repeat lighting procedure after 5 seconds. |
| Uneven heating | Blocked burner ports; low gas pressure. | Clean burner ports. Check gas regulator for proper function. |
| Excessive flare-ups | Grease buildup; high heat setting. | Clean grease tray and cooking grates. Reduce heat setting. |
Specifications
- Brand: Electactic
- Model Name: Propane Grills (Model Number: 00031GBA0--G31PRO)
- Product Dimensions: 48.27"D x 20.47"W x 42.99"H
- Material: Stainless Steel (AISI 304 for upper grill)
- Fuel Type: Propane Gas
- Main Burners: 3 x 8,000 BTU
- Side Burner: 1 x 10,000 BTU
- Total BTU Output: 34,000 BTU
- Cooking Surface Area: 489.17 sq. in. (358.95 sq. in. main grilling + 130.22 sq. in. warming area)
- Grates: Cast Iron
- Special Feature: Rust Resistant, Built-in Thermometer, Electronic Ignition, Removable Grease Tray, Portable with Locking Wheels, Built-in Bottle Opener, Side Hooks
- Item Weight: 75.9 Pounds
- Indoor/Outdoor Usage: Outdoor

Image: Diagram showing the key dimensions of the Electactic 3-Burner Propane Gas Grill.
Warranty and Support
For warranty information or technical support, please refer to the warranty card included with your product or contact Electactic customer service directly. Keep your purchase receipt as proof of purchase.
Customer Support: For assistance, please visit the Electactic Store on Amazon or refer to the contact information provided in your product packaging.


