
1. Introduction
This manual provides detailed instructions for the installation, operation, and maintenance of the WATTSBVD TC4-S Intelligent Temperature Controller. The TC4-S is designed for precise temperature regulation in various industrial and commercial applications. Please read this manual thoroughly before using the device to ensure safe and efficient operation.
2. Product Overview
The WATTSBVD TC4-S is an intelligent temperature controller featuring a clear digital display for both process value (PV) and set value (SV). It supports K-type thermocouples for temperature sensing and provides various output options for control.
2.1 Front Panel Layout
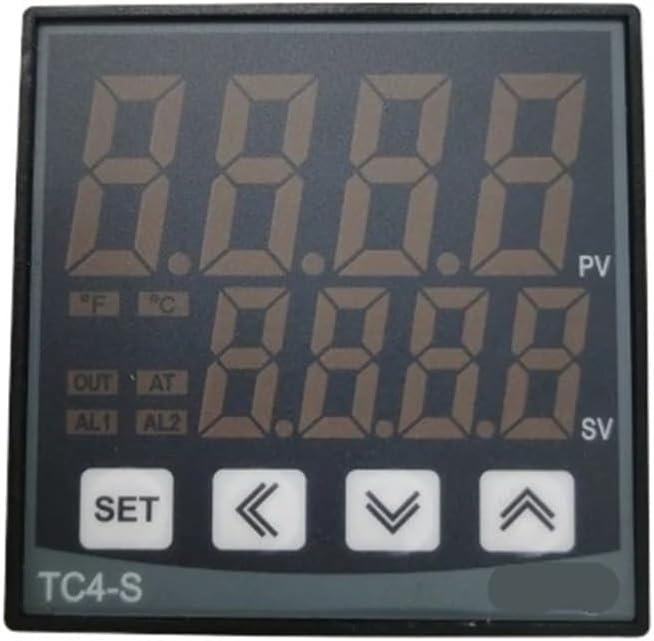
Image 2.1: Front view of the TC4-S controller. This image shows the digital display for Process Value (PV) and Set Value (SV), along with control buttons (SET, arrow keys) and indicator lights for output (OUT), alarm (AL1, AL2), and temperature units (°F, °C).
- PV Display: Shows the current measured temperature (Process Value).
- SV Display: Shows the desired temperature setpoint (Set Value).
- SET Button: Used to enter parameter setting mode.
- Arrow Buttons (Up/Down/Left): Used to navigate menus and adjust values.
- Indicator Lights: Display status for output (OUT), alarm 1 (AL1), and alarm 2 (AL2).
3. Setup and Installation
Proper installation and wiring are crucial for the safe and accurate operation of the TC4-S controller. Ensure all power is disconnected before proceeding with installation.
3.1 Mounting
The TC4-S is designed for panel mounting. Cut an appropriate opening in your control panel and secure the controller using the provided mounting brackets. Ensure adequate ventilation around the unit to prevent overheating.
3.2 Wiring Diagram

Image 3.1: Side view of the TC4-S controller showing the terminal block and wiring diagram. This diagram illustrates connections for power supply, sensor input, and control outputs (SSR and Relay).
Refer to the wiring diagram on the side of the unit and the image above for correct connections. The specific model (W1T/R-2 K Type) indicates a K-type thermocouple input and both SSR (Solid State Relay) and conventional relay outputs.
- Power Supply (100-240VAC, 50/60Hz): Connect to terminals 8 and 9 (or as indicated on the diagram). Ensure correct voltage is applied.
- K-Type Thermocouple Input: Connect the thermocouple to the designated input terminals (e.g., 3 and 4 for TC/RTD input, observing polarity).
- SSR Output: Connect to terminals 11 and 12 for Solid State Relay control.
- Relay Output: Connect to terminals 3, 4, 5 (or as indicated) for conventional relay control. This output typically has Normally Open (NO) and Normally Closed (NC) contacts.
- Alarm Output (ALM1): Connect to terminals 6 and 7 for alarm functionality.
Always use appropriate gauge wiring and ensure all connections are secure to prevent electrical hazards and ensure reliable operation.
4. Operating Instructions
Once installed and powered on, the TC4-S will display the current temperature (PV) and the setpoint (SV).
4.1 Setting the Temperature Setpoint (SV)
- Press the SET button once. The SV display will begin to flash.
- Use the Up and Down arrow buttons to adjust the desired temperature setpoint.
- Press the SET button again to confirm the new setpoint and exit the setting mode. The SV display will stop flashing.
4.2 Accessing Advanced Parameters
To access advanced configuration parameters (e.g., PID settings, alarm types, input sensor type), press and hold the SET button for several seconds until the parameter menu appears. Use the arrow buttons to navigate through parameters and adjust values. Refer to the full technical manual for a complete list and description of all parameters.
5. Maintenance
The WATTSBVD TC4-S controller is designed for reliable operation with minimal maintenance. Follow these guidelines to ensure longevity:
- Cleaning: Periodically clean the front panel with a soft, dry cloth. Do not use abrasive cleaners or solvents.
- Environment: Ensure the operating environment is free from excessive dust, moisture, corrosive gases, and strong electromagnetic interference.
- Connections: Periodically check all wiring connections for tightness and signs of corrosion.
- Calibration: If temperature readings appear inaccurate, consider checking the thermocouple and, if necessary, recalibrating the controller according to advanced parameter instructions or consulting a qualified technician.
6. Troubleshooting
This section addresses common issues you might encounter with the TC4-S controller.
| Problem | Possible Cause | Solution |
|---|---|---|
| No display/No power | No power supply; Incorrect wiring; Blown fuse | Check power connections; Verify wiring against diagram; Check power source and internal fuse (if accessible by qualified personnel). |
| PV display shows 'HHHH' or 'LLLL' | Thermocouple open circuit (HHHH); Thermocouple short circuit or reverse connection (LLLL); Incorrect sensor type setting. | Check thermocouple wiring and integrity; Ensure correct polarity; Verify sensor type setting in advanced parameters. |
| Output not switching | Incorrect setpoint; Control mode issue; Output wiring error; Faulty output device. | Adjust setpoint; Check control mode (e.g., PID, ON/OFF); Verify output wiring; Test external SSR/relay. |
| Inaccurate temperature reading | Sensor error; Sensor not properly placed; Environmental interference; Calibration offset. | Check sensor for damage; Ensure sensor is in correct measuring location; Shield from interference; Check calibration settings. |
If the problem persists after attempting these solutions, please contact customer support.
7. Specifications
- Model: TC4-S W1T R-2 K Type
- Brand: WATTSBVD
- Input Type: K-Type Thermocouple
- Output Type: SSR (Solid State Relay) and Relay
- Power Supply: 100-240VAC, 50/60Hz
- Control Method: PID / ON-OFF
- Weight: Approximately 50 Grams
- ASIN: B0FGW1H3RX
8. Warranty and Support
For warranty information and technical support, please refer to the documentation provided with your purchase or contact WATTSBVD customer service directly. Ensure you have your product model number (TC4-S W1T R-2 K Type) and purchase details available when seeking support.