
1. Introduction
Thank you for choosing the KUXISA CZK-5642 Portable Tire Inflator. This device is designed for convenient and efficient inflation of various items, including vehicle tires, bicycle tires, and sports balls. It features a powerful 25000mAh battery, a digital pressure gauge, and multiple inflation modes for versatile use. Please read this manual thoroughly before operation to ensure safe and optimal performance.
2. What's Included
The package contains the following items:
- Tire Inflator (1)
- Air Hose (1)
- Atmospheric Nozzle (1)
- Stingy Mouthpiece (1)
- French Adapter (1)
- Ball Needle (1)
- USB Charging Cable (1)
- Cigarette Lighter Plug (1)
- Storage Bag (1)
- User Manual (1)

Figure 2.1: Package contents of the KUXISA CZK-5642 Portable Tire Inflator.
3. Product Overview
3.1 Components and Controls
Familiarize yourself with the main components and controls of your KUXISA CZK-5642 inflator:

Figure 3.1: Introduction of Buttons and Display.
- Dual Digital LCD Display: Shows real-time pressure and preset values.
- Control Buttons: For power, mode selection, value adjustment, and unit switching.
- Inflation Port: Where the air hose connects.
- USB-A Output Port: For charging external devices.
- USB-C Input Port: For charging the inflator.
- LED Light: For illumination and emergency signaling.
4. Setup
4.1 Initial Charging
Before first use, fully charge the inflator. Connect the USB charging cable to the inflator's USB-C input port and a suitable power adapter (not included) or the provided cigarette lighter plug for in-car charging. The battery indicator on the display will show charging progress.
4.2 Attaching the Air Hose
Screw the air hose securely into the inflation port on the top of the inflator. Ensure a tight connection to prevent air leakage.

Figure 4.1: Inflator connected to a tire.
5. Operating Instructions
5.1 Power On/Off
Press and hold the power button (central button with a circle and line) for 3 seconds to turn the inflator on or off.
5.2 Selecting Inflation Mode
Once powered on, press the 'M' button (mode selection button, usually indicated by an arrow icon) to cycle through the preset inflation modes:
- Car Mode: Recommended pressure range 30-42 PSI.
- Motorcycle Mode: Recommended pressure range 26-43 PSI.
- Bicycle Mode: Recommended pressure range 30-145 PSI.
- Ball Mode: Recommended pressure range 7-14 PSI.
- Manual Mode: Allows custom pressure setting from 3 to 180 PSI.
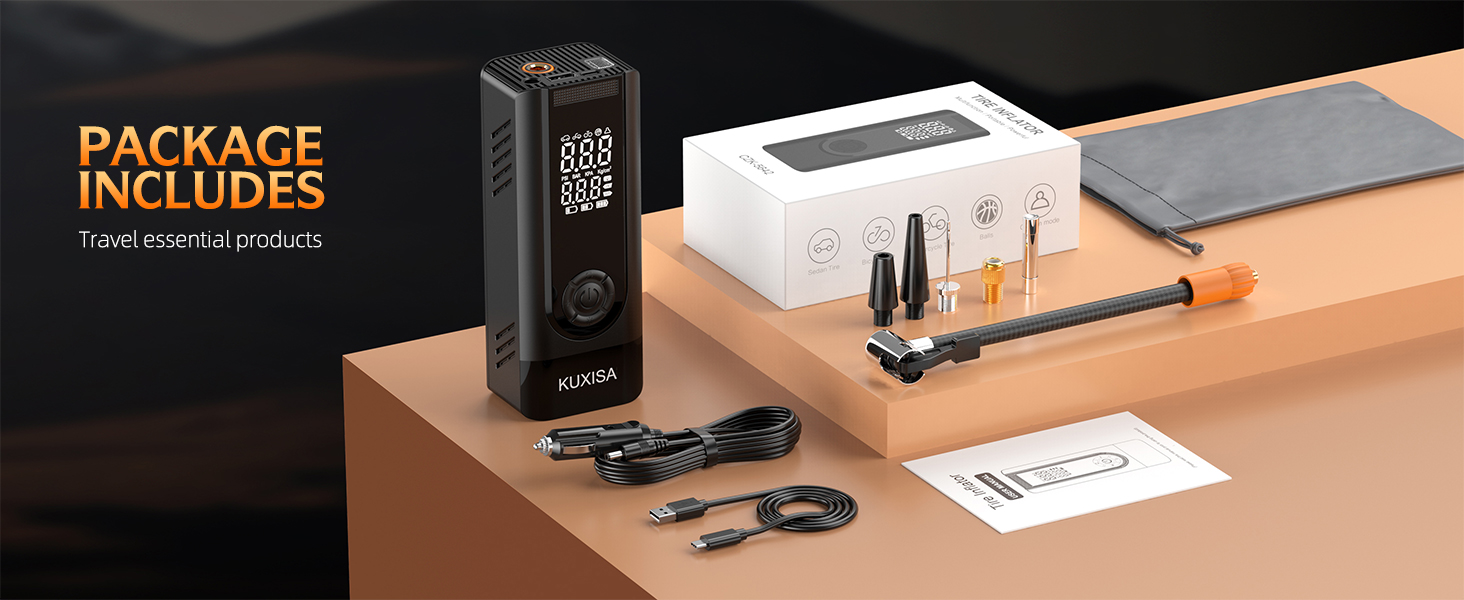
Figure 5.1: Multiple Inflation Modes.
5.3 Setting Desired Pressure
In any mode, use the '+' and '-' buttons to adjust the target pressure. The dual display will show both the current pressure and your set target pressure.
5.4 Starting and Stopping Inflation
Connect the air hose to the item you wish to inflate. Once the desired pressure is set, press the power button to begin inflation. The inflator will automatically stop when the preset pressure is reached. To manually stop inflation, press the power button again.

Figure 5.2: Easy to Use Steps.
5.5 Using the LED Light
Press the light button (usually indicated by a sun icon) to turn on the LED light. Press again to cycle through different light modes (e.g., steady, flashing, SOS). Hold the button to turn off the light.

Figure 5.3: Built-in LED Flashlight.
6. Charging and Power Bank Function
6.1 Charging the Inflator
The inflator can be charged using the provided USB-C cable connected to a USB power source or the car's cigarette lighter plug. The 25000mAh battery ensures long-lasting operation.
6.2 Using as a Power Bank
Connect your mobile device or other USB-powered gadgets to the inflator's USB-A output port to use it as an emergency power supply.

Figure 6.1: Multifunctional Integration - Power Supply and Emergency Light.
7. Maintenance
- Keep the device clean and free from dust and debris.
- Store the inflator and its accessories in the provided storage bag when not in use.
- Avoid exposing the device to extreme temperatures or direct sunlight for prolonged periods.
- Ensure the air hose and nozzles are clean and undamaged before each use.
8. Troubleshooting
If you encounter any issues with your KUXISA CZK-5642 Portable Tire Inflator, please refer to the following common solutions:
- Device not turning on: Ensure the battery is charged. Connect to a power source and try again.
- Inflation not starting: Check if the air hose is securely connected to both the inflator and the item. Verify that a target pressure has been set.
- Inaccurate pressure reading: Ensure the air hose connection is tight. Recalibrate if necessary (refer to specific instructions in the full manual if available).
- Slow inflation: Check for blockages in the air hose or nozzles. Ensure the battery is sufficiently charged.
For persistent issues, please contact KUXISA customer support.
9. Specifications
| Feature | Specification |
|---|---|
| Brand | KUXISA |
| Model Number | CZK-5642 |
| Max Pressure | 180 PSI |
| Battery Capacity | 25000mAh |
| Power Source | Battery Powered (12 Volts DC) |
| Noise Level | 60 Decibels |
| Special Feature | Quick Inflation, Dual Digital LCD Display, LED Light, Power Bank Function |
| Material | Plastic |
| Color | Black |
10. Safety Information
- Do not leave the inflator unattended during operation.
- Keep out of reach of children.
- Avoid over-inflating items; always refer to the manufacturer's recommended pressure.
- Do not operate the inflator in wet conditions or near flammable liquids/gases.
- If the device becomes excessively hot, discontinue use and allow it to cool down.
11. Warranty and Support
For warranty information or technical support, please refer to the contact details provided on the product packaging or visit the official KUXISA website. Keep your purchase receipt for warranty claims.
