
1. Introduction
This manual provides essential instructions for the safe and efficient operation, installation, and maintenance of your SANOTECHNIK Sauna LUXOR 2. Please read this manual thoroughly before using the sauna and retain it for future reference. The LUXOR 2 is designed for up to 3 persons, featuring a Harvia 6 kW electric heater and LED lighting, offering a classic Finnish sauna experience.
2. Safety Instructions
Important: Failure to follow these safety instructions may result in injury or damage to the sauna.
- Ensure proper electrical installation by a qualified electrician.
- Do not use the sauna if you are pregnant, have heart conditions, high blood pressure, or other medical conditions without consulting a physician.
- Avoid consuming alcohol or drugs before or during sauna use.
- Limit sauna sessions to 10-20 minutes to prevent overheating.
- Keep children and pets away from the sauna heater.
- Do not place flammable materials near the heater.
- Always use the protective grille around the heater.
- Ensure adequate ventilation as described in the setup section.
3. Package Contents
Verify that all components are present before beginning assembly:
- Sauna Cabin Panels (Walls, Floor, Ceiling)
- 8mm Tempered Glass Door and Front Panels
- Harvia 6 kW Electric Heater
- Sauna Stones
- Wooden Benches (Upper and Lower)
- LED Interior Lighting System
- Ventilation System Components
- Sauna Bucket
- Sauna Ladle
- Thermometer
- Hourglass
- Heater Protective Grille
- Assembly Hardware and Fasteners
- User Manual (this document)
4. Setup and Installation
Professional installation is recommended for electrical components. Ensure the installation area is level, dry, and has adequate space around the sauna for maintenance and ventilation.
- Site Preparation: Choose a suitable location with a solid, level floor. Ensure sufficient clearance from walls and other objects for proper air circulation and access.
- Base Assembly: Assemble the sauna base frame according to the included assembly diagrams.
- Wall Panel Installation: Erect the wall panels, securing them to the base and to each other. Pay attention to the designated positions for the glass front and door.
- Glass Panel and Door Installation: Carefully install the 8mm tempered glass front panels and the door. Ensure the door opens and closes smoothly and seals properly.
- Ceiling Installation: Place and secure the ceiling panel.
- Bench Installation: Install the upper and lower wooden benches. Ensure they are securely fastened and stable.
- Heater Installation: Mount the Harvia 6 kW electric heater in its designated position. Follow the heater's specific installation instructions for electrical connections. This step must be performed by a certified electrician.
- Sauna Stone Placement: Place the sauna stones into the heater's stone compartment. Arrange them loosely to allow for good air circulation.
- LED Lighting and Ventilation: Install the LED lighting system and connect the ventilation components as per the wiring diagrams.
- Accessory Placement: Position the sauna bucket, ladle, thermometer, and hourglass inside the sauna.
- Final Inspection: Before first use, inspect all connections, ensure all panels are secure, and verify electrical safety.

Image 1: The SANOTECHNIK Sauna LUXOR 2 with blue LED lighting, showcasing its glass front and wooden interior.
5. Operating Instructions
5.1 First Use
Before the first sauna session, heat the sauna to its maximum temperature for approximately one hour to burn off any manufacturing residues and odors. Ensure good ventilation during this process.
5.2 Using the Harvia Heater
- Power On: Turn on the main power switch for the sauna heater.
- Set Temperature: Use the heater's control panel to set the desired temperature (typically 70-90 °C for a classic Finnish sauna).
- Preheating: Allow 30-60 minutes for the sauna to reach the desired temperature.
- Adding Water (Löyly): For increased humidity, carefully ladle small amounts of water onto the hot sauna stones. Do not pour excessive amounts of water at once, as this can damage the heater. Use only clean water.
- Power Off: After use, turn off the heater and allow it to cool down.
5.3 LED Lighting Control
The integrated LED lighting system can be controlled via a dedicated switch or remote (if included). You can typically adjust colors (e.g., blue, red, green) and brightness to enhance your sauna experience.
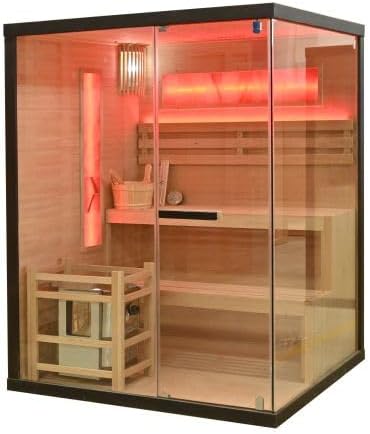
Image 2: The SANOTECHNIK Sauna LUXOR 2 interior illuminated with red LED lighting, showing the benches and heater.
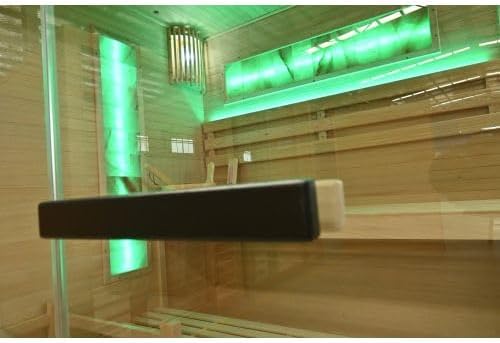
Image 3: The SANOTECHNIK Sauna LUXOR 2 interior illuminated with green LED lighting, highlighting the vertical and horizontal light strips.

Image 4: Interior view of the sauna, showing the two-tier benches, bucket, ladle, and thermometer.
6. Maintenance
- Cleaning: Wipe down the interior wood surfaces with a damp cloth after each use. Do not use harsh chemical cleaners, as they can damage the wood and release fumes when heated.
- Bench Care: Periodically clean the benches with a mild sauna cleaner or a mixture of water and vinegar. Sanding lightly can remove stains and restore the wood's appearance.
- Sauna Stones: Inspect sauna stones annually. Replace any cracked or crumbling stones to ensure efficient heating and prevent damage to the heater.
- Ventilation: Ensure the ventilation openings are clear and unobstructed for proper air circulation.
- Electrical Components: Regularly check all electrical connections for signs of wear or damage. Any repairs should be performed by a qualified technician.
7. Troubleshooting
| Problem | Possible Cause | Solution |
|---|---|---|
| Heater not turning on | No power, circuit breaker tripped, faulty wiring, heater thermostat issue. | Check power supply and circuit breaker. Consult a qualified electrician for wiring or thermostat issues. |
| Sauna not heating sufficiently | Incorrect temperature setting, insufficient preheating time, poor stone arrangement, faulty heating elements. | Increase temperature setting, allow more preheating time, rearrange stones for better airflow. Contact service if heating elements are suspected. |
| LED lights not working | Loose connection, faulty LED strip, power supply issue. | Check connections. If problem persists, contact customer support. |
| Excessive steam/humidity | Too much water poured on stones, poor ventilation. | Pour less water. Ensure ventilation openings are clear. |
8. Specifications
- Model: SANOTECHNIK LUXOR 2 (SB50150)
- Capacity: 3 Persons
- Exterior Dimensions (L x W x H): 150 cm x 140 cm x 190 cm
- Interior Dimensions (approx.): 140 cm x 130 cm x 178 cm
- Heater Type: Harvia Electric Heater
- Heater Power: 6 kW
- Glass: 8 mm Tempered Safety Glass
- Wood Type: Hemlock
- Lighting: LED Interior Lighting
- Included Accessories: Sauna Bucket, Ladle, Thermometer, Hourglass, Heater Protective Grille
- Product Weight: 258 kg
9. Warranty and Support
For warranty information, please refer to the documentation provided at the time of purchase or contact SANOTECHNIK customer service. For technical support, spare parts, or any inquiries not covered in this manual, please visit the official SANOTECHNIK website or contact your authorized dealer.
Contact Information: Please refer to your purchase documentation or the manufacturer's official website for the most current contact details.
