1. Introduction
The KONNWEI KW860 is a professional diagnostic scan tool designed to help you identify and resolve issues with your vehicle's engine, ABS, SRS (airbag), and transmission systems. This device supports all OBDII protocols and is compatible with most vehicles manufactured in the USA since 1996, EU gasoline vehicles since 2001, and EU diesel vehicles since 2003. It provides comprehensive diagnostic functions including reading and clearing Diagnostic Trouble Codes (DTCs), displaying live data, freeze frame data, and I/M readiness status.
This manual provides detailed instructions on how to set up, operate, and maintain your KW860 scanner to ensure accurate and efficient vehicle diagnostics.
2. Product Overview
The KONNWEI KW860 features a user-friendly interface with a 2.8-inch TFT color screen for clear readability. Its robust design ensures durability for regular use.

Image 2.1: The KONNWEI KW860 OBD2 Scanner, showing its compact design and color display.
Key components include the main unit with its display and navigation buttons, and the integrated OBDII diagnostic cable. The device is powered directly from the vehicle's OBDII port, eliminating the need for external batteries during operation.
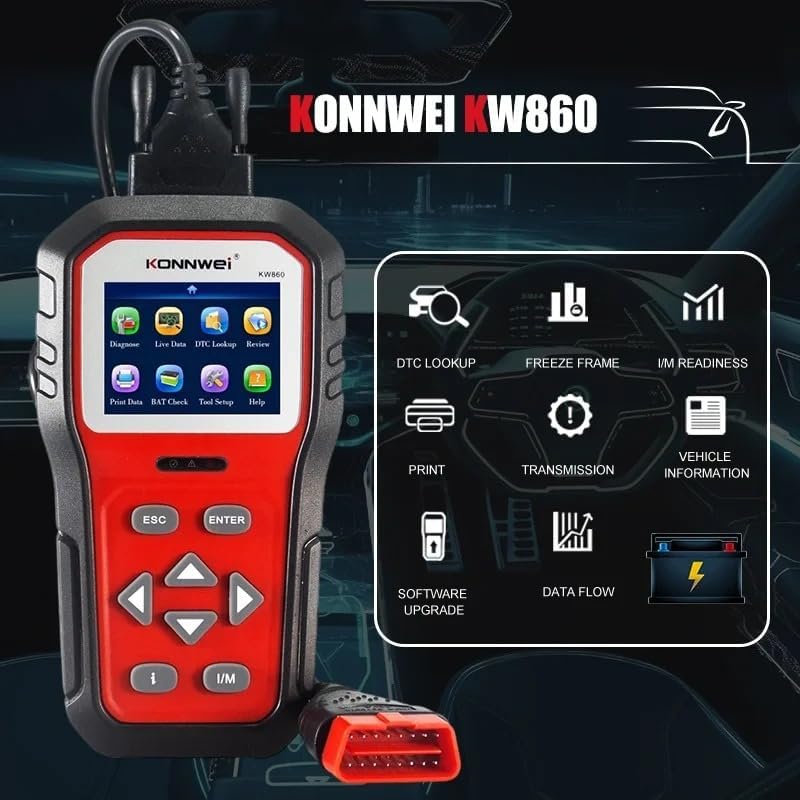
Image 2.2: The KW860 displaying its main menu with options such as Diagnose, Live Data, DTC Lookup, and Tool Setup.
3. Setup
Follow these steps to prepare your KONNWEI KW860 for use:
- Locate the OBDII Port: The OBDII diagnostic port is typically located under the dashboard on the driver's side of the vehicle. Refer to your vehicle's owner's manual if you have difficulty locating it.
- Connect the Scanner: With the vehicle's ignition off, firmly plug the KW860's OBDII connector into the vehicle's OBDII port.
- Power On: Turn the vehicle's ignition to the 'ON' position (do not start the engine). The scanner will automatically power on.
- Language Selection: If this is your first time using the device, or after a factory reset, you may be prompted to select your preferred language. Use the navigation buttons to select 'English' and press 'ENTER'.
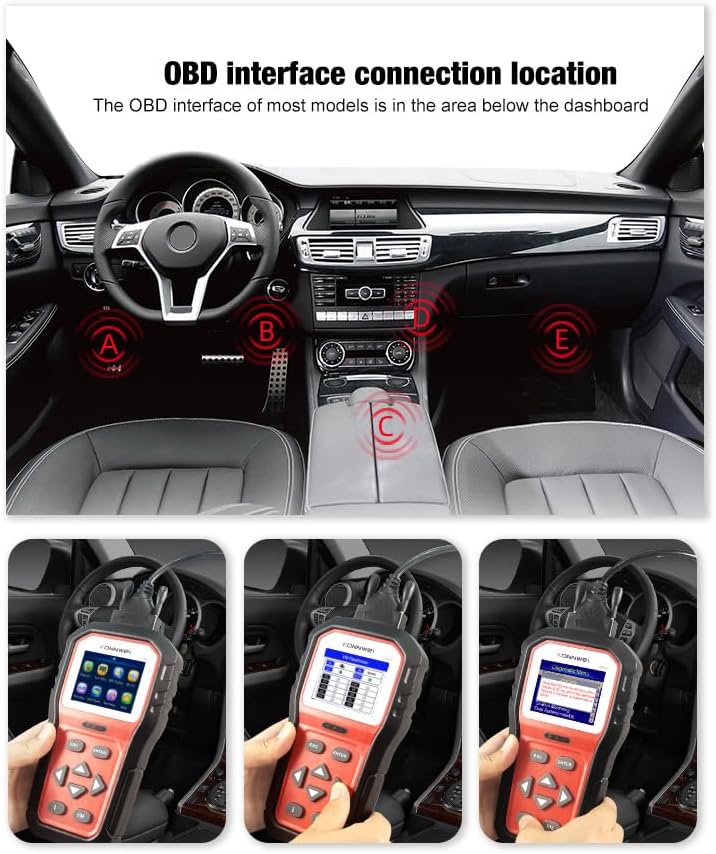
Image 3.1: Common locations for the OBDII port within a vehicle's interior, usually beneath the dashboard.
4. Operating Instructions
The KW860 offers various diagnostic functions accessible through its main menu. Use the UP/DOWN arrow buttons to navigate and the ENTER button to confirm selections. The ESC button returns to the previous screen.

Image 4.1: The KW860 showing a menu with options such as Read Codes, Erase Codes, I/M Readiness, and Data Stream.
4.1. Diagnose
This is the primary function for reading and clearing trouble codes.
- Read Codes: Select 'Diagnose' from the main menu, then 'Read Codes'. The scanner will retrieve Diagnostic Trouble Codes (DTCs) from the vehicle's control modules.
- Erase Codes: After addressing the underlying issue, select 'Erase Codes' to clear the DTCs and turn off the Check Engine Light (MIL). Ensure the ignition is on but the engine is off before clearing codes.
4.2. Live Data
View real-time operational parameters of the vehicle. This data can be displayed in text or graph format.
- Select 'Live Data' from the main menu.
- Choose 'View All Items' or specific parameters like RPM, coolant temperature, or fuel trim.
4.3. I/M Readiness
This function checks the status of the vehicle's emission-related monitoring systems to determine if they are ready for an emissions test. Color-coded LED indicators on the device also provide a quick visual status.
- Press the dedicated I/M button or select 'I/M Readiness' from the menu.
- The display will show the status of various monitors (e.g., Misfire Monitor, Fuel System Monitor). 'OK' indicates the monitor has completed its test, 'INC' means incomplete.

Image 4.2: A visual representation of the KW860's quick check functions, highlighting I/M Readiness and O2 Sensor Test.
4.4. Freeze Frame
When an emission-related fault occurs, the ECU records certain vehicle parameters at the moment the fault was detected. This data is called Freeze Frame data.
- Select 'Freeze Frame' from the main menu to view this snapshot of data.
4.5. DTC Lookup
The built-in DTC library allows you to look up definitions of Diagnostic Trouble Codes.
- Select 'DTC Lookup' from the main menu.
- Enter the DTC code using the navigation buttons to get its definition.

Image 4.3: The KW860's diagnostic menu providing brief explanations for functions like Read Codes and Data Stream.
4.6. Battery Voltage Test
Monitor the vehicle's battery voltage in real-time.
- Select 'BAT Check' from the main menu to view the current battery voltage.
4.7. Other Functions

Image 4.4: A comprehensive overview of the KW860's diagnostic capabilities, presented as a grid of icons and labels.
- O2 Sensor Test: Retrieves O2 sensor monitor test results for the most recently completed tests from the vehicle's on-board computer.
- On-Board Monitor Test: Retrieves test results for emission-related powertrain components and systems that are not continuously monitored.
- EVAP System Test: Initiates a test of the Evaporative Emission Control System.
- Vehicle Information: Displays the Vehicle Identification Number (VIN), Calibration ID (CALID), and Calibration Verification Number (CVN) of the test vehicle.
- Print Data: Allows you to print diagnostic data via a connected PC.
- Review: Access previously saved diagnostic data.
5. Maintenance
Proper maintenance ensures the longevity and optimal performance of your KW860 scanner.
- Software Updates: The KW860 offers free lifetime software updates. Connect the scanner to a Windows PC (Windows 7/8/10) using the provided USB cable and visit the KONNWEI official website for update instructions and software. Regular updates ensure compatibility with newer vehicles and improved functionality.
- Cleaning: Clean the device with a soft, damp cloth. Do not use abrasive cleaners or solvents.
- Storage: Store the scanner in its protective nylon bag in a dry, cool environment when not in use.
6. Troubleshooting
If you encounter issues with your KW860 scanner, refer to the following common troubleshooting steps:
| Problem | Possible Cause | Solution |
|---|---|---|
| Scanner does not power on | Loose connection; Vehicle ignition off; Blown fuse in vehicle's OBDII circuit | Ensure secure connection; Turn ignition to 'ON'; Check vehicle's fuse box for OBDII fuse. |
| Link Error / Communication Error | Incorrect protocol; Faulty connection; Vehicle not OBDII compliant | Verify vehicle compatibility; Re-establish connection; Try on another OBDII compliant vehicle. |
| Screen is frozen | Software glitch | Disconnect the scanner from the vehicle, then reconnect. If issue persists, perform a software update. |
7. Specifications
- Model: KW860
- Display: 2.8-inch TFT Color Screen
- Operating System: Linux
- Dimensions (L x W x H): 7.8" x 4" x 1.6" (19.8 cm x 10.2 cm x 4.1 cm)
- Item Weight: 1.47 pounds (0.67 kg)
- Power Source: Corded Electric (via OBDII port)
- Supported Protocols: ISO9141, KWP2000, CAN, J1850 PWM, J1850 VPW
- Supported Languages: English, German
- Automotive Fit Type: Universal Fit (OBDII compliant vehicles)
8. What's in the Box
- KONNWEI KW860 OBD2 Scanner
- User's Manual
- OBD2 Cable
- USB Cable
- Protective Nylon Bag
9. Warranty and Support
KONNWEI products are designed for reliability and performance. For warranty information, technical support, or service inquiries, please refer to the warranty card included with your product or visit the official KONNWEI website. Keep your purchase receipt as proof of purchase for warranty claims.


