
1. Introduction
Thank you for choosing the Heybly HAS001BK Fish Tank Stand. This manual provides essential information for the safe assembly, operation, and maintenance of your new aquarium stand. Please read these instructions carefully before assembly and retain them for future reference.
This stand is designed to support a 20-29 gallon main aquarium on its top tier and a 5-10 gallon tank on its bottom tier. It features a robust metal frame, waterproof panels, integrated power outlets, and storage drawers for your aquatic supplies.
2. Safety Information
- Weight Capacity: Do not exceed the maximum weight capacity of 330 lbs per tier. Overloading can cause structural failure and damage.
- Level Surface: Always place the stand on a flat, level, and stable surface to prevent tipping and ensure the safety of your aquariums.
- Water and Electricity: Exercise extreme caution when handling electrical components near water. Ensure all power cords are routed safely and away from potential water spills.
- Assembly: Assemble the stand according to the instructions. Ensure all screws and fasteners are securely tightened before placing any weight on the stand.
- Anti-Tip Kit: Utilize the included anti-tip kit to secure the stand to a wall, especially in households with children or pets, to prevent accidental tipping.
- Children and Pets: Keep children and pets away from the assembly area. Do not allow them to climb on or play with the assembled stand.
- Waterproof Panels: While panels are waterproof, promptly wipe up any water spills to prevent long-term damage to the stand and surrounding area.
3. Package Contents
Before beginning assembly, verify that all components listed below are present and undamaged. If any parts are missing or damaged, please contact customer support.
- 1 x Aquarium Stand (Disassembled components)
- 1 x Accessory Kit (Hardware, screws, tools)
- 1 x Anti-Tip Kit
- 1 x Instructions (This manual)
4. Assembly Instructions
Please follow these steps carefully. It is recommended to assemble the stand with two people.
Step 4.1: Unpack and Identify Parts
Carefully unpack all components and lay them out on a clean, soft surface to prevent scratches. Refer to the parts list (if provided separately) to identify each piece.
Step 4.2: Assemble the Metal Frame
Begin by connecting the main vertical and horizontal metal frame pieces using the provided screws and tools. Ensure all connections are firm but do not fully tighten screws until the entire frame is assembled.

This image highlights key structural and functional features of the stand, including convenient accessory hooks, adjustable leveling feet for stability, a waterproof surface for easy cleaning, and the robust iron tube support frame.
Step 4.3: Attach Panels and Shelves
Once the basic frame is stable, attach the waterproof panels for the top and bottom tiers. Secure them using the designated fasteners. Ensure the panels are correctly oriented.
Step 4.4: Install Drawers
Assemble the drawer boxes according to their specific instructions. Install the drawer slides onto the stand frame and then insert the assembled drawers. Test for smooth operation.

This image illustrates the spacious storage drawers, designed to organize various fishkeeping essentials such as medication, filter media, and tools. Dimensions of the drawers are also indicated.
Step 4.5: Attach Power Outlet and Accessory Hooks
Mount the integrated power outlet unit to the designated location on the stand. Secure the accessory hooks to the side frame as shown in the diagrams.
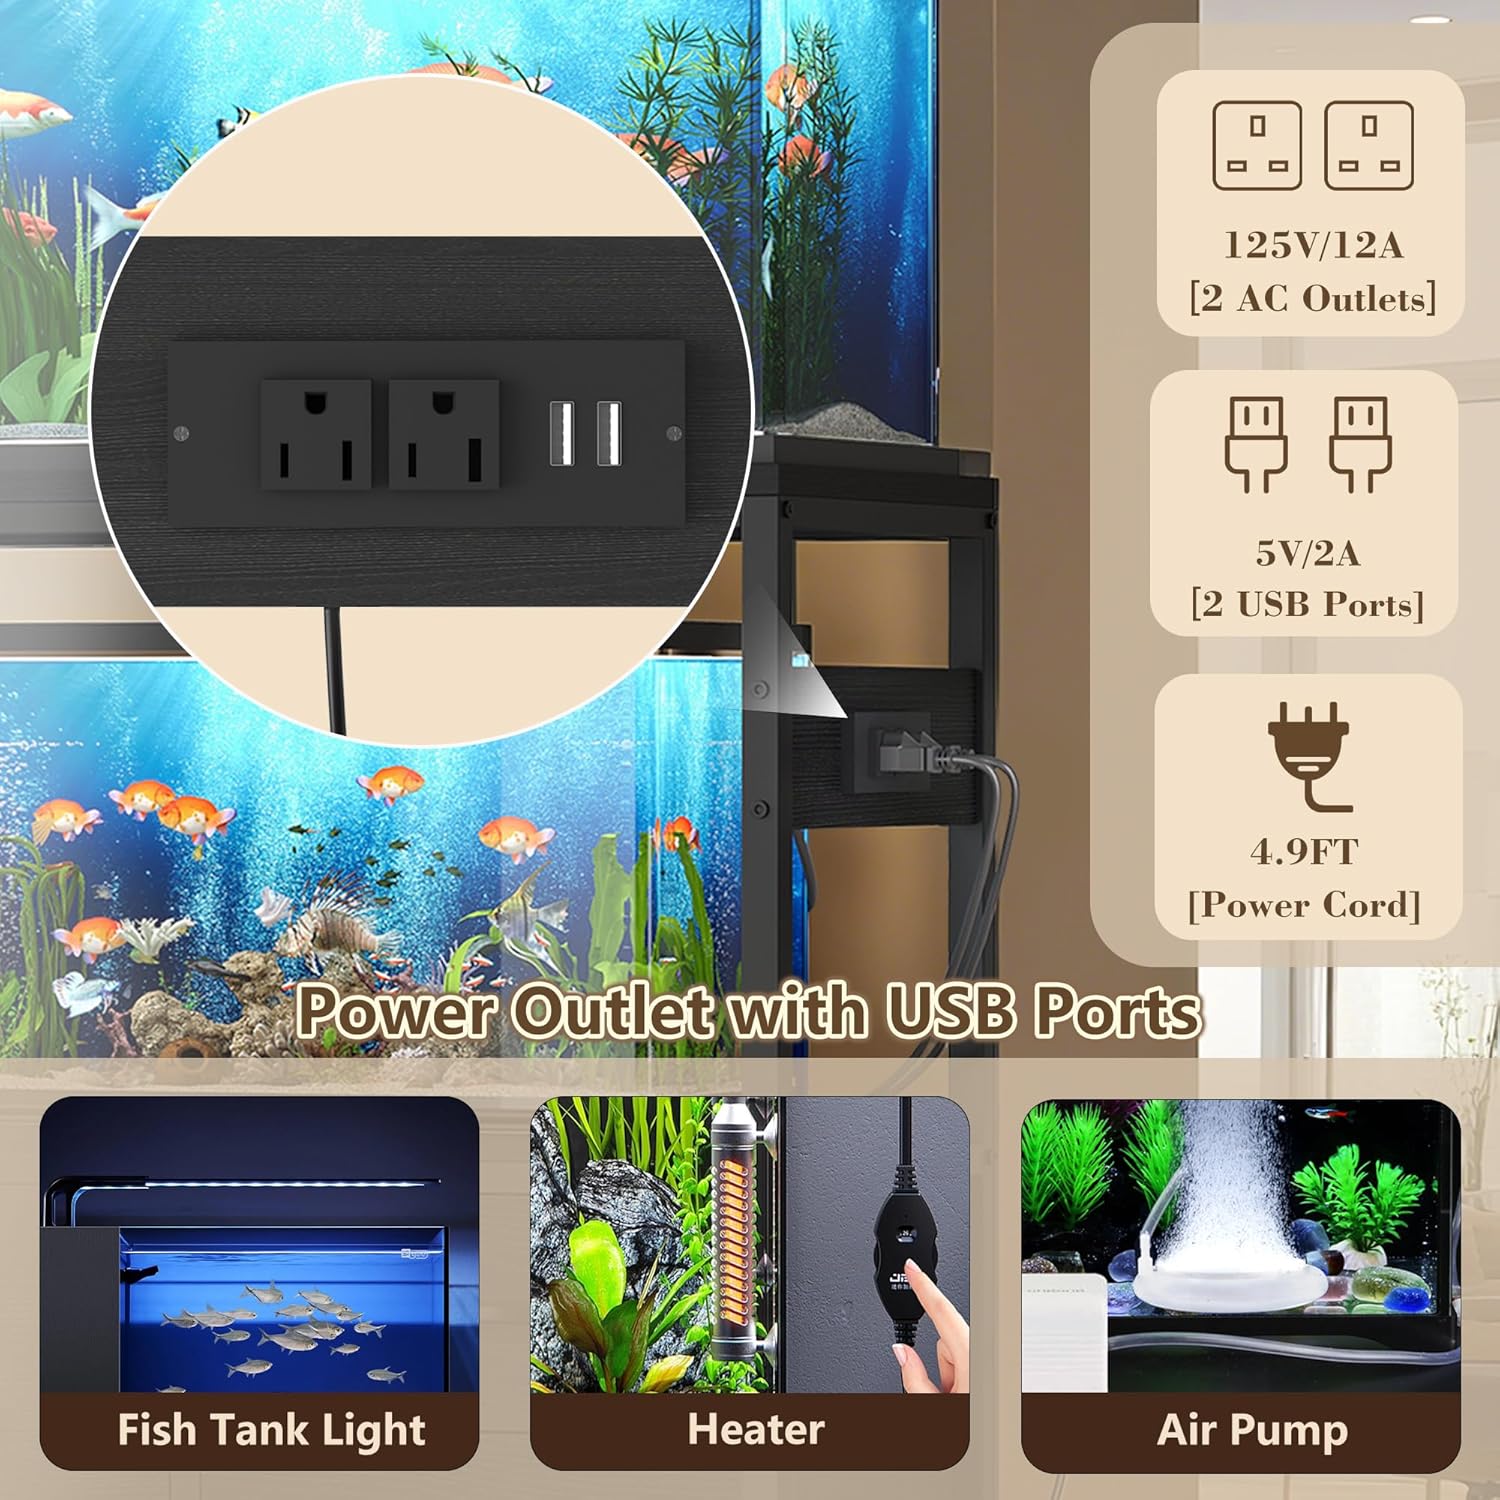
A detailed view of the integrated power strip, featuring two 125V/12A AC outlets and two 5V/2A USB ports, along with a 4.9-foot power cord. This allows for centralized power for aquarium equipment like lights, heaters, and air pumps.
Step 4.6: Final Tightening and Leveling
Once all components are in place, fully tighten all screws. Adjust the leveling feet at the bottom of the stand to ensure it is perfectly stable and does not wobble on your floor.
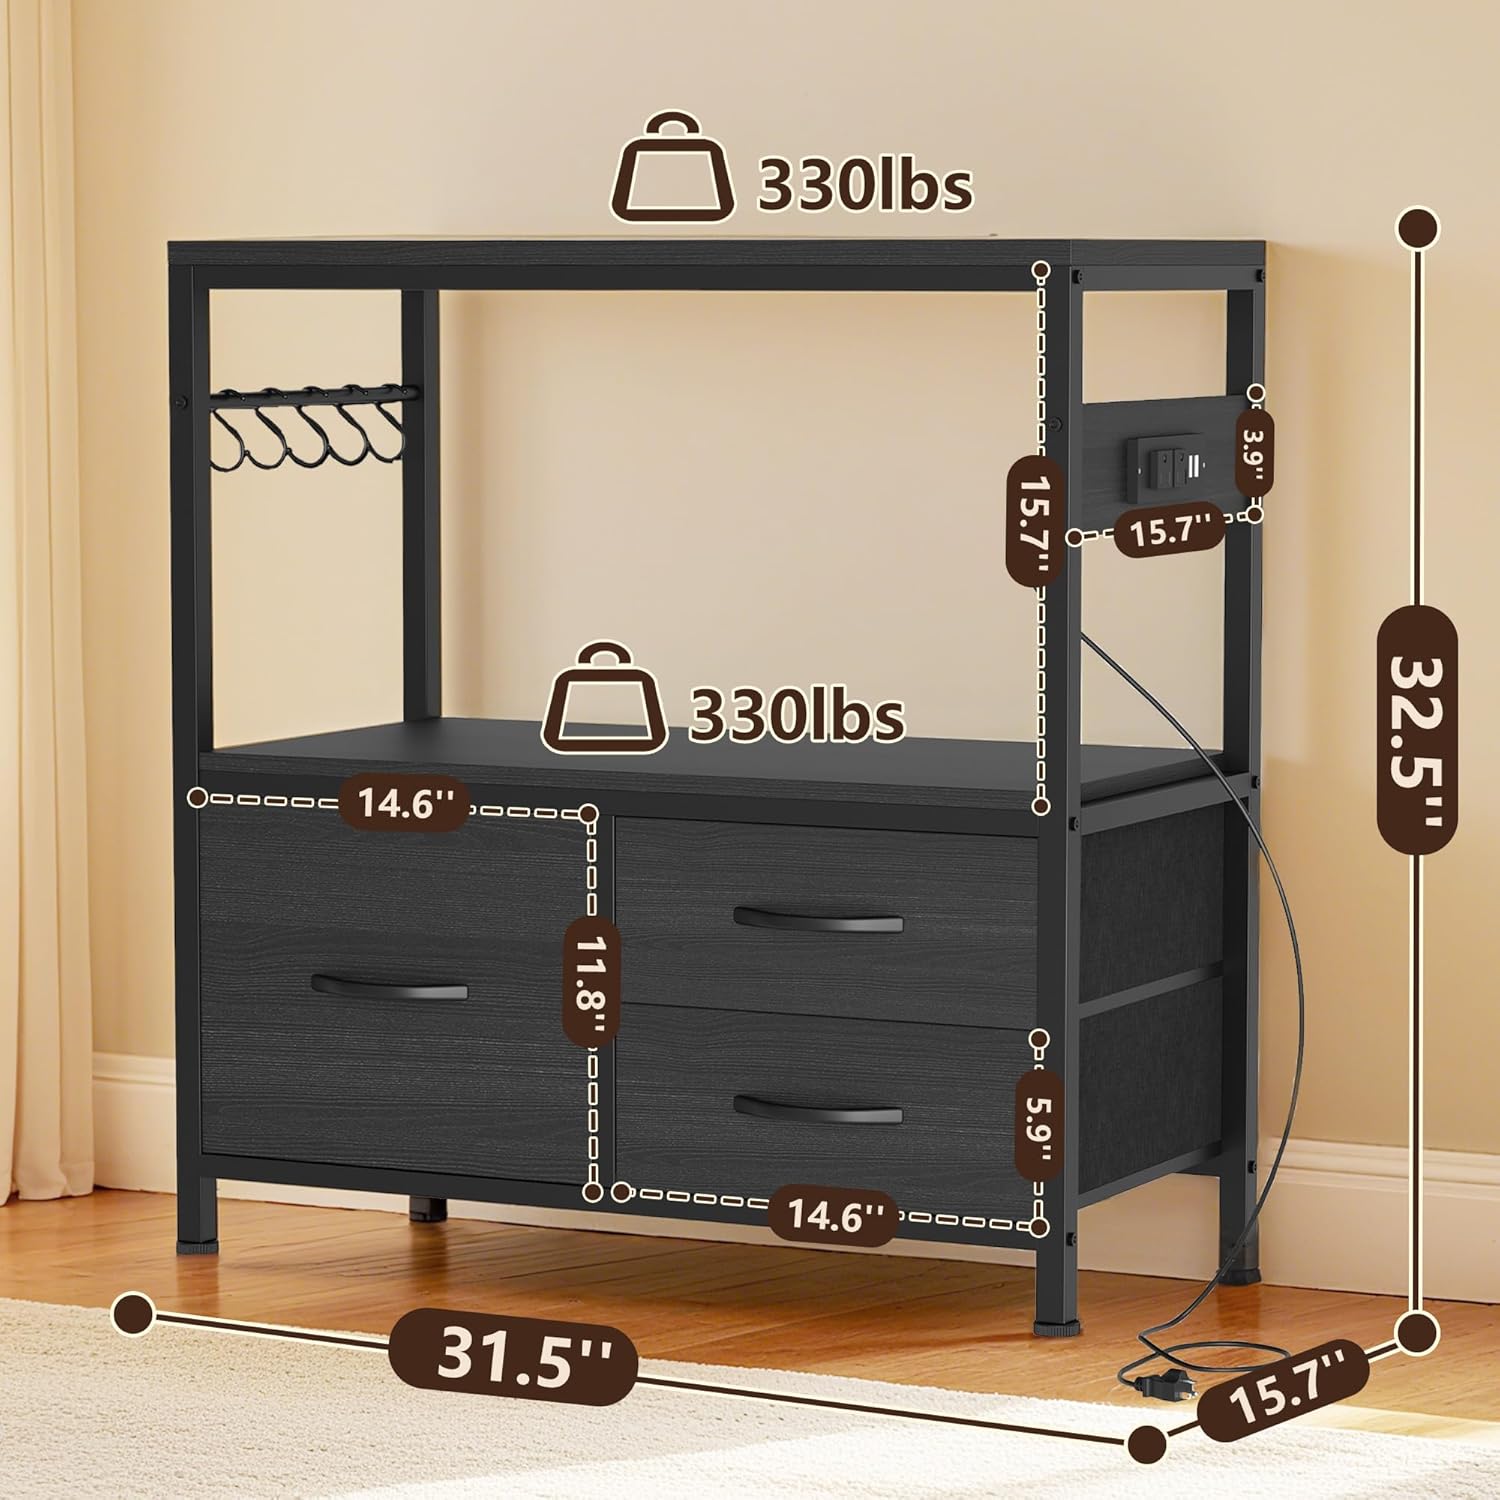
A comprehensive diagram providing all critical dimensions of the stand, including height (32.5"), width (31.5"), depth (15.7"), and internal measurements for shelves and drawers. It also indicates a 330 lbs load capacity per tier.
5. Setup and Usage
5.1: Aquarium Placement
- Top Tier: Designed for 20-29 gallon aquariums. Ensure the tank's base fits within the dimensions of the top surface (31.5"L x 15.7"W).
- Bottom Tier: Suitable for 5-10 gallon aquariums or sumps.
- Always ensure the weight is evenly distributed across the stand.

This diagram details the capacity of each tier: the top tier accommodates 20-29 gallon aquariums (31.5" x 15.7" surface), and the bottom tier holds 5-10 gallon aquariums. It emphasizes measuring your aquarium for proper fit.
5.2: Using the Integrated Power Outlet
The stand includes 2 AC outlets and 2 USB ports. Plug the stand's power cord into a grounded wall outlet. You can then connect your aquarium lights, heaters, air pumps, and other devices directly to the stand's power strip.
- AC Outlets: 125V/12A maximum.
- USB Ports: 5V/2A maximum.
- Do not overload the power strip. Ensure the total wattage of connected devices does not exceed the strip's capacity.
5.3: Storage Drawers and Accessory Hooks
Utilize the large and small drawers for organized storage of fish food, water conditioners, cleaning tools, and other aquarium maintenance supplies. The side hooks provide a convenient location to hang nets, tongs, or other frequently used tools.
6. Maintenance
- Cleaning: Wipe the stand surfaces with a soft, damp cloth. Avoid abrasive cleaners or harsh chemicals that could damage the finish.
- Spills: Promptly clean any water spills to prevent water damage to the stand and surrounding flooring.
- Stability Check: Periodically check all screws and fasteners to ensure they remain tight. Re-tighten if necessary. Verify the stand remains level and stable.
- Electrical Safety: Regularly inspect the power cord and outlets for any signs of wear or damage. Discontinue use if damage is observed and contact a qualified electrician or customer support.
7. Troubleshooting
- Stand is Wobbly:
Solution: Ensure the stand is on a flat surface. Adjust the leveling feet at the bottom of the stand until it is stable. Check that all assembly screws are fully tightened. - Power Outlets Not Working:
Solution: Verify the stand's main power cord is securely plugged into a functional wall outlet. Check if the wall outlet itself is receiving power. Ensure no circuit breakers have tripped. Do not attempt to repair the power strip yourself. - Drawers Do Not Slide Smoothly:
Solution: Check that the drawer slides are correctly installed and aligned. Ensure no objects are obstructing the drawer's movement.
8. Specifications
| Feature | Specification |
|---|---|
| Model Number | HAS001BK |
| Dimensions (L x W x H) | 31.5" x 15.74" x 32.48" (80 x 40 x 82.5 cm) |
| Material | Metal, Particle Board |
| Item Weight | 31.9 lbs (14.5 kg) |
| Load Capacity (Per Tier) | 330 lbs (150 kg) |
| Recommended Top Aquarium Size | 20-29 Gallons |
| Recommended Bottom Aquarium Size | 5-10 Gallons |
| AC Outlets | 2 (125V/12A) |
| USB Ports | 2 (5V/2A) |
| Power Cord Length | 4.9 feet |

This graphic provides a summary of the Heybly HAS001BK stand's specifications, including its construction from particle board and metal, overall dimensions (31.5"L x 15.7"W x 32.5"H), weight (32.0 lbs), load capacity (330 lbs per tier), and recommended aquarium sizes (upper tier ≤ 29 gallons, lower tier ≤ 10 gallons).
9. Warranty and Support
For warranty information, please refer to the documentation included with your purchase or contact Heybly customer support directly. If you encounter any issues or have questions regarding your Heybly HAS001BK Fish Tank Stand, please reach out to our support team for assistance.
Contact Information: Please refer to the contact details provided on the product packaging or the official Heybly website.