
1. Product Overview
The Barrina TR40 Hanging Grow Light is designed to provide optimal lighting for indoor plants. It features a 40W 5000K full spectrum light, an adjustable beam angle from 15° to 60°, high Photosynthetic Photon Flux Density (PPFD), and a convenient mechanical timer. This light is suitable for various plant types and growth stages, ensuring healthy development and vibrant foliage.

Figure 1: Barrina TR40 Hanging Grow Light in an indoor setting.
Key Features:
- Adjustable Beam Angle: Offers 15°, 30°, 45°, and 60° options for focused or broad illumination.
- High PPFD: Delivers powerful light intensity for efficient photosynthesis.
- 40W 5000K Full Spectrum: Provides light tailored for all plant growth stages, with a high CRI 96 for natural color rendering.
- Mechanical Timer: Easy to set and retains settings after power outages.
- Easy Installation: Simple hanging setup with a long 16.4FT power cord.
- Durable Design: Features aluminum housing for effective heat dissipation.
2. Setup and Installation
Follow these steps to properly set up and install your Barrina TR40 Hanging Grow Light.
2.1 Unpacking and Components
Carefully unpack all components and ensure everything is present before beginning installation.
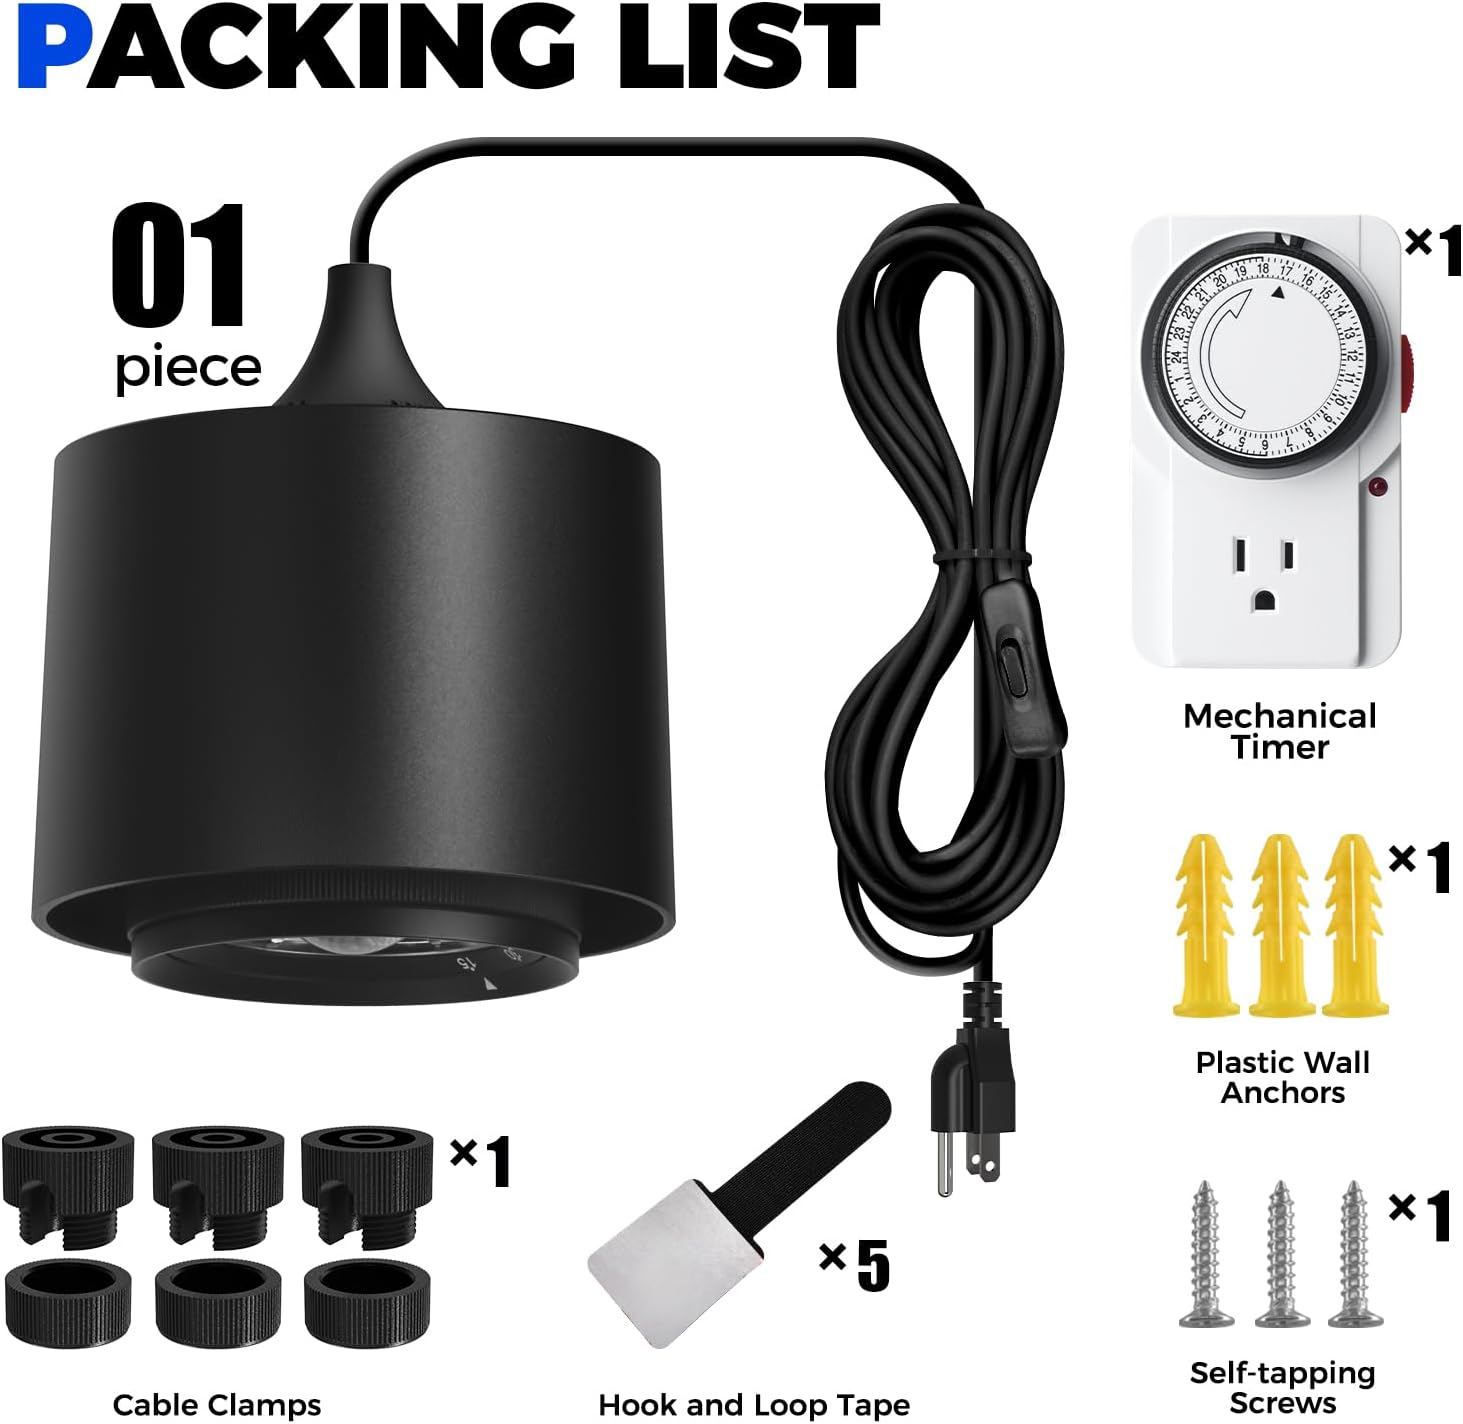
Figure 2: Included components.
Included Components:
- 1 x TR40 Hanging Grow Light
- 1 x Long Power Cord (16.4 FT / 196.85 inches)
- 1 x COB LED Bulb (pre-installed)
- 1 x Mechanical Timer
- Installation Accessories (Plastic Wall Anchors, Self-tapping Screws, Cable Clamps, Hook and Loop Tape)
2.2 Installation Steps
- Choose Location: Select a suitable location for your grow light, ensuring it is directly above the plants you wish to illuminate. The 16.4 FT power cord allows for flexible placement.
- Mark Drill Points: Use the provided cable clamps to mark the desired points on your ceiling or wall for routing the power cord.
- Drill Holes: Use a percussion drill to make 0.23-inch holes at the marked points. Insert the plastic wall anchors into these holes.
- Secure Cable Clamps: Attach the cable clamps using the self-tapping screws, securing the power cord along your desired path.
- Hang the Light: Use the provided hook and loop tape or additional mounting hardware to securely hang the grow light unit. Ensure the light is stable and positioned correctly above your plants.
- Connect Power: Plug the power cord into the mechanical timer, and then plug the timer into a standard 3-prong electrical outlet.

Figure 3: Installation diagram.
2.3 Installation Video Guide
Video 1: How to install the Barrina TR40 Spotlight Hanging Grow Light.
3. Operation
3.1 Adjusting the Beam Angle
The TR40 features an adjustable beam angle (15°, 30°, 45°, 60°) to customize the light coverage for individual plants or groups. Gently rotate the lens ring on the grow light to select the desired beam angle. A narrower angle provides more focused intensity, while a wider angle covers a larger area.

Figure 4: Visual representation of adjustable beam angles.
The PPFD (Photosynthetic Photon Flux Density) varies with the beam angle and distance from the plant. For example, at 12 inches, the PPFD can reach up to 1819.4 µmol/m²/s at a 15° beam angle, providing intense light for demanding plants.

Figure 5: PPFD map for various beam angles and distances.
3.2 Using the Mechanical Timer
The included mechanical timer allows you to automate the ON/OFF cycles of your grow light. This timer retains its settings even after a power outage, eliminating the need for frequent resets.

Figure 6: Mechanical Timer.
- Clear Previous Settings: Lift all pins on the timer dial to their "up" position to clear any prior settings.
- Set ON/OFF Times: Push down the pins corresponding to the time range you want the light to be ON. Each pin represents 15 minutes. For example, to set the light ON from 7:00 AM to 6:00 PM, push down all pins between these hours.
- Set Current Time: Rotate the entire dial clockwise until the arrow on the timer points to the current time.
- Select Mode: Use the red switch on the side of the timer to select "Clock" mode for timed operation.
- Plug In: Plug the grow light into the timer, and then plug the timer into a 3-prong wall outlet. The timer will now operate the light according to your settings.
3.3 Timer Usage Video Guide
Video 2: How to use the mechanical timer for the Barrina TR40 Spotlight Hanging Grow Light.
3.4 Full Spectrum Lighting
The TR40 provides a 5000K full spectrum light with a high CRI 96, mimicking natural sunlight. This spectrum supports all stages of plant growth, from seeding to flowering and fruiting, by providing the necessary wavelengths for photosynthesis.

Figure 7: Full spectrum light distribution.
4. Maintenance
Proper maintenance ensures the longevity and optimal performance of your grow light.
- Cleaning: Periodically wipe the light fixture and lens with a soft, dry cloth to remove dust and debris. Ensure the light is unplugged before cleaning. Do not use harsh chemicals or abrasive materials.
- Heat Dissipation: The aluminum housing is designed for efficient heat dissipation. Ensure there is adequate airflow around the fixture to prevent overheating.
- Cable Inspection: Regularly check the power cord for any signs of damage, fraying, or wear. Replace if necessary.
- Indoor Use Only: This product is designed for indoor use only. Avoid exposure to water or high humidity environments.
5. Troubleshooting
If you encounter any issues with your Barrina TR40 Grow Light, refer to the following common problems and solutions:
| Problem | Possible Cause | Solution |
|---|---|---|
| Light does not turn ON. | No power, timer not set correctly, or switch in wrong position. | Check power outlet. Ensure timer is plugged in and set to "Clock" mode. Verify timer pins are pressed down for current time. |
| Light turns ON/OFF at incorrect times. | Timer not set correctly. | Re-adjust timer pins for desired ON/OFF schedule. Ensure the dial's arrow points to the current time. |
| Light appears dim or coverage is insufficient. | Incorrect beam angle, light too far from plants, or dust on lens. | Adjust the beam angle to a narrower setting. Lower the light closer to plants (refer to PPFD map). Clean the lens with a soft, dry cloth. |
| Light is getting too hot. | Poor ventilation. | Ensure adequate airflow around the fixture. Do not cover the light. |
6. Product Specifications
| Feature | Detail |
|---|---|
| Brand | Barrina |
| Model Number | B0FG2QHCJ9 |
| Wattage | 40 watts |
| Color Temperature | 5000 Kelvin |
| Light Color | Adjustable White (Full Spectrum) |
| Beam Angle | Adjustable (15°, 30°, 45°, 60°) |
| Material | Aluminium, Metal |
| Power Source | AC |
| Indoor/Outdoor Usage | Indoor use only |
| Item Dimensions (L x W x H) | 16.75"L x 15.75"W x 15.75"H |
| Power Cord Length | 16.4 FT (196.85 inches) |
| Included Components | TR40 Hanging Grow Light, Long Power Cord, COB LED Bulb, Installation Accessories, Mechanical Timer |
7. Warranty and Support
7.1 Manufacturer's Warranty
The Barrina TR40 Hanging Grow Light comes with a 2-year warranty from the manufacturer. This warranty covers defects in materials and workmanship under normal use. Please retain your proof of purchase for warranty claims.
7.2 Customer Support
For technical assistance, warranty claims, or any questions regarding your Barrina TR40 Grow Light, please contact Barrina customer support. Refer to the contact information provided in your product packaging or visit the official Barrina website for the most up-to-date support details.
You can also visit the Barrina store on Amazon for more products and information: Barrina Amazon Store