1. Introduction
This manual provides detailed instructions for the setup, operation, and maintenance of your Sainlogic SA8 Home Weather Station. Please read this manual thoroughly before use to ensure proper functionality and to prevent damage to the device.
2. Safety Information
- Ensure the outdoor sensor is securely mounted to prevent damage from wind or other environmental factors.
- Avoid placing the display console in direct sunlight or near heat sources.
- Use only the provided power adapter for the display console.
- Keep batteries out of reach of children. Dispose of used batteries responsibly.
3. Package Contents
Verify that all items are present in the package:
- 1x Display Console
- 1x Integrated Outdoor Transmitter (Outdoor Sensor)
- 1x Power Adapter
- 1x Foot Mounting (with pole insert)
- 1x Mounting Bracket Back Plate (pole mount)
- 1x Mounting Pole
- 2x Pole mounting nuts (M3) / bolts (D3)
- 4x Pole mounting nuts (M5) / bolts (D5)
- 4x Tapping screws
- 1x User Manual
4. Product Overview
The Sainlogic SA8 Home Weather Station consists of two main components: the Display Console and the Integrated Outdoor Transmitter.
4.1. Display Console
The display console features a 7.5-inch high-contrast color screen with extra-large, bold fonts for easy readability. It shows indoor and outdoor weather data, including temperature, humidity, barometric pressure, wind speed/direction, rainfall, dew point, 'feels like' temperature, moon phases, and calendar information. It also includes a manual 3-level backlight adjustment.

Image: The 7.5-inch color display console showing various weather parameters with large, easy-to-read fonts.
4.2. Integrated Outdoor Transmitter
This wireless sensor array measures various outdoor weather conditions. It includes components for measuring wind speed, wind direction, rainfall, temperature, and humidity. The unit is designed for easy installation in various outdoor locations.

Image: Diagram illustrating the components of the outdoor sensor array, including the rain gauge, UV/sunlight sensor, wind cup, wind vane, and temperature/humidity sensor.
5. Setup and Installation
5.1. Outdoor Sensor Installation
The outdoor sensor can be mounted in various ways using the provided hardware. Ensure the sensor is placed in an open area, away from obstructions, to obtain accurate readings for wind and rain.
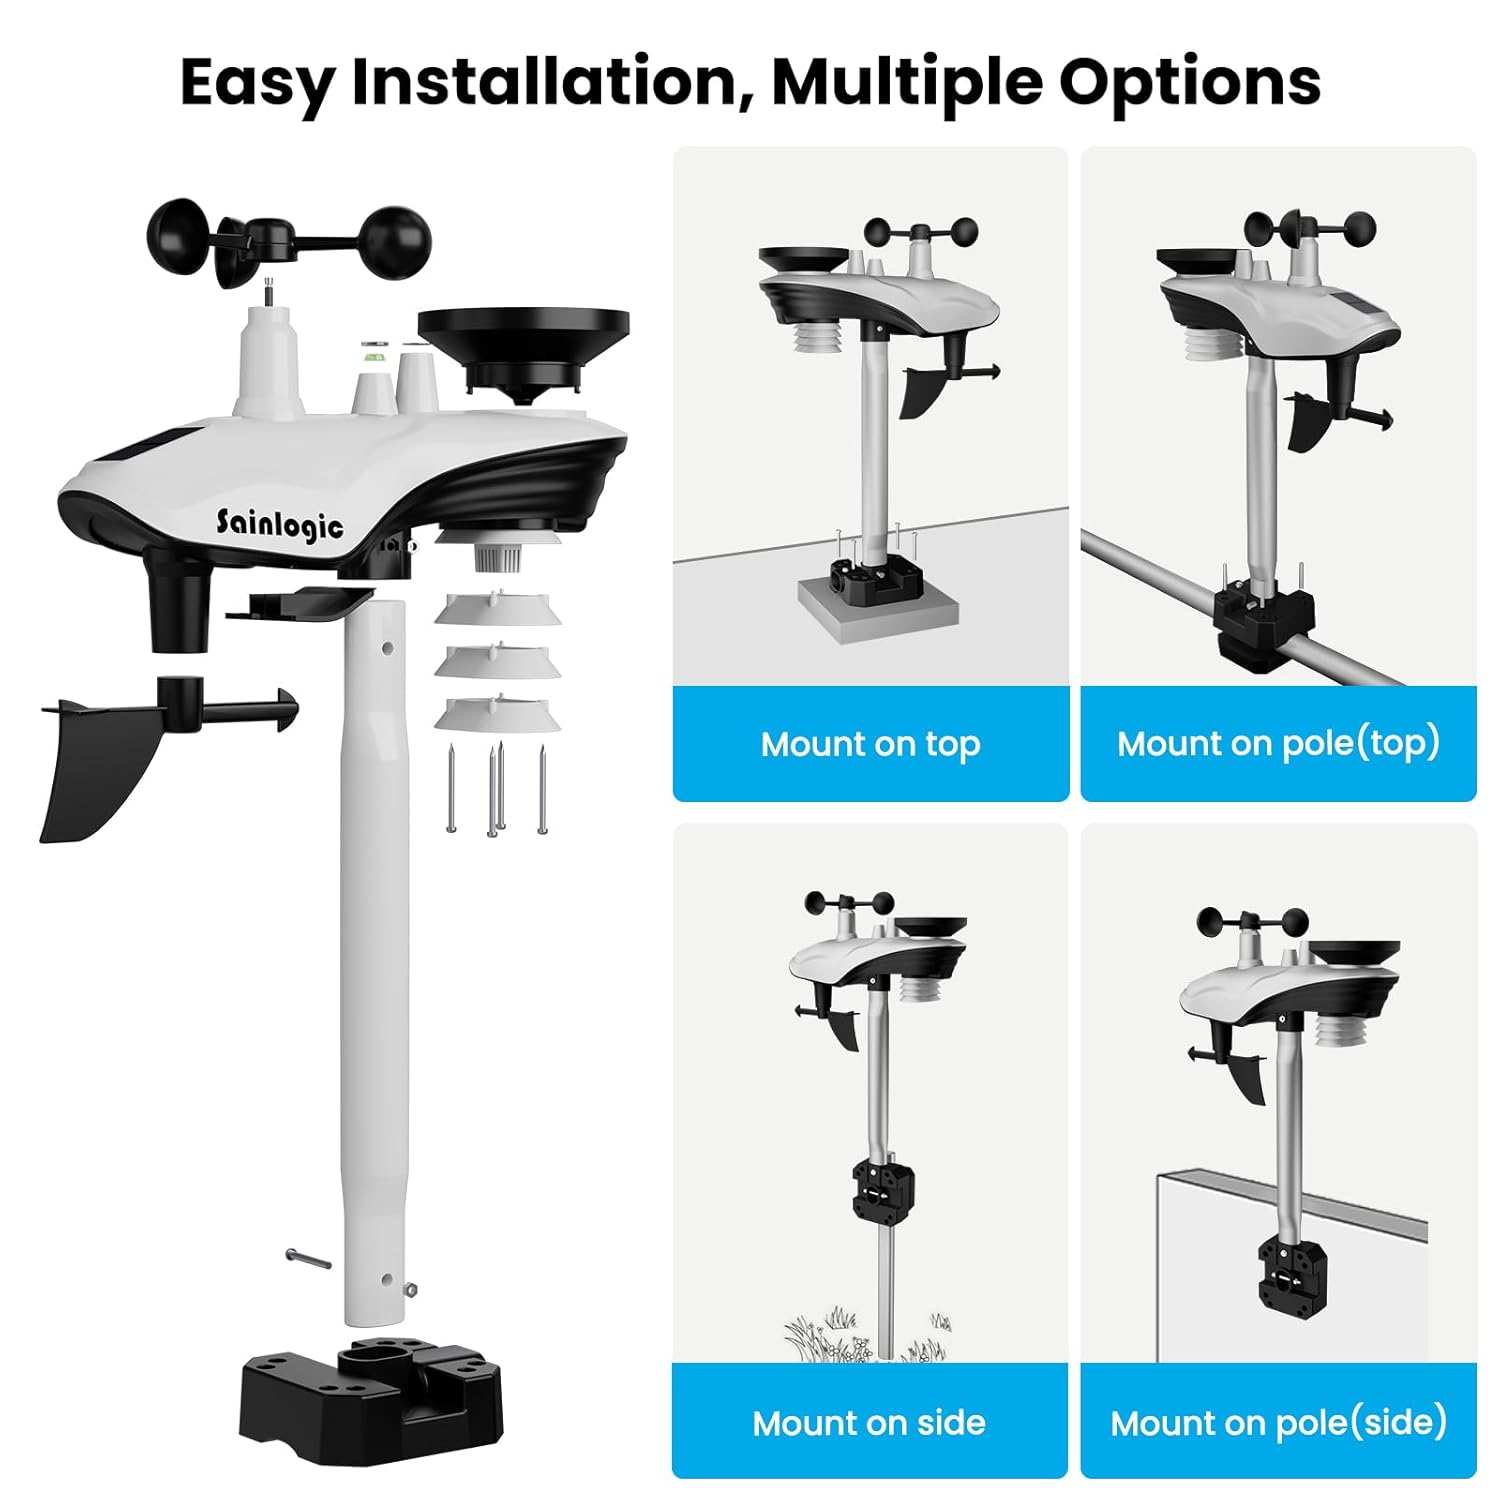
Image: Various mounting options for the outdoor sensor, including top mount, pole top mount, side mount, and pole side mount.
- Insert Batteries: Open the battery compartment on the outdoor sensor and insert 3 AA batteries (not included). Close the compartment securely.
- Choose Mounting Location: Select a location that is clear of obstructions for accurate wind and rain measurements. The sensor should be mounted at least 1.5 meters (5 feet) above the ground.
- Mount the Sensor: Use the provided mounting pole, foot mounting, and bracket to secure the sensor. Ensure the sensor is level using the built-in bubble level for accurate rain and wind readings.
5.2. Display Console Setup
- Power On: Plug the power adapter into the display console and a power outlet. The console will power on and begin searching for the outdoor sensor signal.
- Insert Backup Batteries: For power outage backup, insert 3 AAA batteries (not included) into the battery compartment on the back of the display console.
- Sensor Pairing: The display console will automatically attempt to pair with the outdoor sensor. This process may take a few minutes. Once connected, outdoor data will appear on the screen.
6. Operation
6.1. Display Layout
The 7.5-inch color display is divided into several sections, each showing specific weather data:

Image: Detailed view of the display console, highlighting sections for outdoor temperature/humidity, indoor temperature/humidity, wind direction, wind speed/gust, barometric pressure, rainfall, moon phase, time, and date.
- Outdoor Temperature & Humidity: Displays current outdoor temperature (0°C - 60°C) and humidity (10% - 99%).
- Indoor Temperature & Humidity: Displays current indoor temperature (-40°C - 60°C) and humidity (10% - 99%).
- Wind Speed & Direction: Shows current wind speed, gust, and direction.
- Barometric Pressure: Displays current atmospheric pressure (300 - 1100 hPa).
- Rainfall: Tracks hourly, daily, weekly, monthly, and cumulative rainfall data with high accuracy (±1mm for <15mm, ±7% for 15-9999mm).
- Time & Date: Current time, day of the week, and date.
- Moon Phase: Indicates the current moon phase.
- Weather Forecast: Graphical icons predict upcoming weather conditions.
6.2. Backlight Adjustment
The display console features a 3-level adjustable backlight (100%, 60%, 20%) for optimal viewing in various lighting conditions. Use the 'LIGHT/SNOOZE' button to cycle through the brightness levels.

Image: The display console showing three different backlight intensity levels (100%, 60%, 20%) and the location of the 'LIGHT/SNOOZE' button.
6.3. Setting Time, Date, and Units
Refer to the user manual for detailed instructions on how to set the time, date, and preferred units of measurement (e.g., Celsius/Fahrenheit for temperature, hPa/inHg for pressure).
6.4. Alarm Function
The weather station includes an alarm clock function. Consult the user manual for steps to set and manage alarms.
7. Maintenance
- Cleaning: Regularly wipe the display console with a soft, dry cloth. Clean the outdoor sensor periodically to remove dust, debris, or insects that may affect its accuracy.
- Battery Replacement: Replace batteries in both the outdoor sensor and display console (if used for backup) when the low battery indicator appears on the screen.
- Rain Gauge: Ensure the rain gauge funnel is clear of debris to maintain accurate rainfall measurements.
8. Troubleshooting
- No Outdoor Data: Ensure the outdoor sensor has fresh batteries and is within range of the display console. Check for any strong interference sources.
- Inaccurate Readings: Verify the outdoor sensor is correctly installed and leveled. Ensure no obstructions are affecting wind or rain sensors.
- Display Not Responding: Try resetting the display console by removing and reinserting the power adapter and backup batteries.
9. Specifications
| Product Dimensions | 1 x 7.5 x 6.3 inches; 2.3 Pounds |
| Item Model Number | SA8 |
| Batteries Required | 3 AA batteries (for outdoor sensor) |
| Material | Acrylonitrile Butadiene Styrene (ABS) |
| Connectivity Technology | Wireless |
| Indoor Temperature Range | 0°C - 60°C |
| Outdoor Temperature Range | -40°C - 60°C |
| Humidity Range | 10% - 99% |
| Barometric Pressure Range | 300 - 1100 hPa |
| Rainfall Accuracy | ±1mm (under 15mm), ±7% (15-9999mm) |
10. Warranty and Support
Sainlogic offers dedicated customer support for your weather station. For assistance, you can reach us via:
- Phone Support: Available Monday through Friday, 10:00 AM to 6:00 PM (Eastern Time).
- Email Support: Expect a reply within 24 hours on weekdays and 48 hours on weekends.
- Online Resources: Visit the Sainlogic official website for additional guides and support resources.
For warranty information and registration, please refer to the documentation included in your package or visit the official Sainlogic website.


