
NOYAFA NF-816
NOYAFA NF-816 Underground Wire Locator User Manual
Model: NF-816
1. Introduction
The NOYAFA NF-816 Underground Wire Locator is a professional tool designed for locating and tracking buried and hidden wires. It is ideal for identifying the path and break-points of cables in various applications, including pet fences, buried sprinkler valves, irrigation systems, and general electrical wiring. This device consists of a transmitter and a receiver, working together to provide accurate wire tracing.
2. Safety Information
WARNING:
- DO NOT use this device on live circuits. It is designed for locating non-energized cables or low voltage circuits below 24V. Using it on live circuits may cause damage to the tester and pose a safety risk.
- Always ensure the power to the circuit being tested is OFF before connecting the transmitter.
- Keep the device away from water and extreme temperatures.
- Do not attempt to disassemble or modify the device. Refer all servicing to qualified personnel.
- Use appropriate personal protective equipment (PPE) when working with electrical systems.
3. Package Contents
Please check the package to ensure all items are present:
- NOYAFA NF-816 Transmitter
- NOYAFA NF-816 Receiver
- Earphone
- RJ11 Cable
- RJ45 Cable
- Alligator Clip Adapter Cable (Red/Black)
- Instruction Manual

Image: Contents of the NOYAFA NF-816 package, showing the transmitter, receiver, various cables, earphones, and the instruction manual.
4. Product Overview
The NF-816 consists of two main units: the Transmitter and the Receiver.
Transmitter (Wire Locator Transmitter)
- Power LED: Indicates power status.
- Cable Scan Switch: Toggles between OFF, Cable Scan, and Battery Test modes.
- Status LED: Indicates signal transmission status.
- RJ11/RJ45 Ports: For connecting telephone or network cables.
- Alligator Clips & Leads: For connecting to bare wires or terminals.
Receiver (Wire Locator Receiver)
- Power LED: Indicates power status.
- Push To Lamp Button: Activates the LED flashlight.
- Thumb Wheel Switch: Adjusts receiver sensitivity/volume.
- ON/OFF Switch: Powers the receiver on or off.
- Earphone Jack: For connecting earphones for clearer audio in noisy environments.
- Antenna: The probe used to detect the signal from the transmitter.
- LED Flashlight: Provides illumination in dark areas.

Image: Detailed diagram illustrating the various parts and controls of both the NF-816 Transmitter and Receiver.

Image: The NOYAFA NF-816 Transmitter and Receiver units displayed side-by-side.
5. Setup
Before using the NF-816, ensure batteries are properly installed.
5.1 Battery Installation
Both the transmitter and receiver require 9V batteries (not included). To install:
- Locate the battery compartment on the back of each unit.
- Open the battery cover.
- Insert a 9V battery, ensuring correct polarity (+/-).
- Close the battery cover securely.

Image: A 9V battery, indicating that two such batteries are needed for the device.
5.2 Initial Power On
After installing batteries:
- For the transmitter, hold the power button for at least 3 seconds to turn it on.
- For the receiver, slide the ON/OFF switch to the 'ON' position.
- The Power LED on both units should illuminate.
6. Operating Instructions
The NF-816 is designed to locate single-strand or double-strand wires in parallel. It is not suitable for multi-strand wires.

Image: A visual note clarifying that the device is intended for single-strand or parallel double-strand wires, not multi-strand configurations.
6.1 Basic Wire Locating Procedure
- Prepare the Wire: Ensure the wire to be detected is non-energized (power is off).
- Connect Transmitter: Connect the red alligator clip of the transmitter to the wire you want to trace. The black alligator clip does not need to be connected to anything for basic tracing, but can be grounded for improved performance in some scenarios.
- Turn on Transmitter: Set the transmitter's switch to 'Cable Scan'. The Status LED should indicate signal transmission.
- Turn on Receiver: Turn on the receiver and adjust the thumb wheel switch to increase the volume/sensitivity.
- Trace the Wire: Slowly move the receiver's antenna probe along the suspected path of the buried wire. The receiver will emit a louder sound (beeps) when it is directly over the wire.

Image: The transmitter connected to a wire in the ground, and a user holding the receiver to trace the wire.

Image: A hand adjusting the transmitter's power and the receiver's probe detecting a buried wire, with sound waves indicating detection.
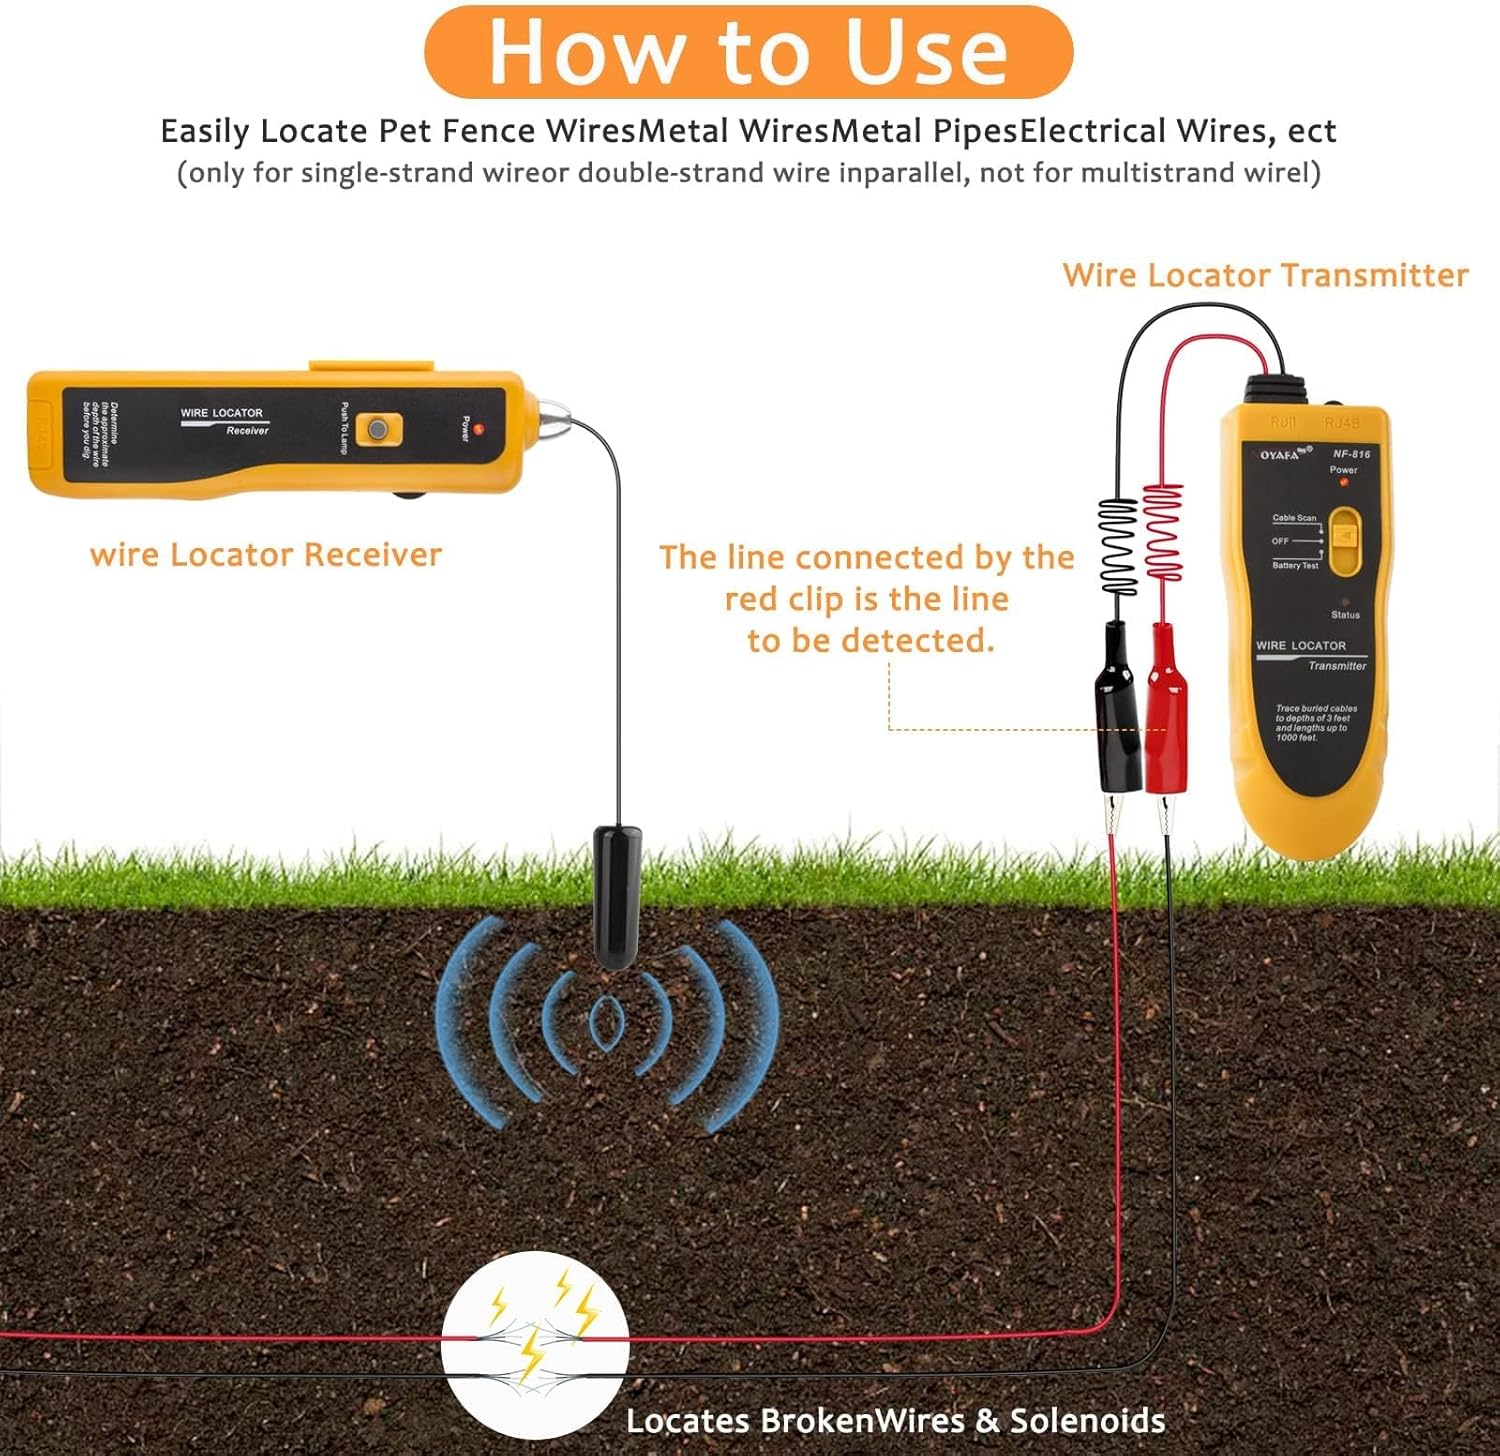
Image: A step-by-step diagram showing the connection of the transmitter and the use of the receiver to locate a buried wire and its break point.
6.2 Locating Break-Points
To find a break in a wire:
- Follow the wire as described above.
- The signal from the receiver will abruptly stop or significantly weaken at the point of the break.

Image: A diagram illustrating how the receiver emits beeps when over an intact wire and stops beeping when it passes a break in the wire.
6.3 Using Earphones and LED Flashlight
- Earphones: For noisy environments, plug the included earphones into the receiver's earphone jack. This allows for clearer detection of the signal.
- LED Flashlight: Press the 'Push To Lamp' button on the receiver to activate the built-in LED flashlight, useful for working in dark conditions.

Image: A user connecting earphones to the receiver for improved audio clarity, and a close-up of the receiver's integrated LED flashlight in use.

Image: The receiver's LED flashlight providing illumination in a dark environment, demonstrating its utility.
6.4 Applications
The NF-816 can be used for various applications:
- Locating pet fence wires.
- Tracing buried sprinkler valve wires.
- Finding irrigation system cables.
- Identifying electrical wires in walls or underground (non-energized or low voltage).

Image: A collage depicting common scenarios where the NF-816 can be used, such as locating wires for pet fences, outdoor lighting, and sprinkler systems.
7. Maintenance
- Clean the device with a soft, dry cloth. Do not use abrasive cleaners or solvents.
- Remove batteries if the device will not be used for an extended period to prevent leakage.
- Store the device in a cool, dry place, away from direct sunlight and extreme temperatures.
- Regularly check the cables and connectors for any signs of wear or damage.
8. Troubleshooting
| Problem | Possible Cause | Solution |
|---|---|---|
| No signal from receiver | Batteries low or dead; Transmitter not on; Incorrect connection; Wire is energized. | Replace batteries; Ensure transmitter is on and in 'Cable Scan' mode; Check all connections; Ensure wire is NOT energized. |
| Weak or inconsistent signal | Low battery; Wire too deep; High interference; Receiver sensitivity too low. | Replace batteries; Note depth limitations (up to 2-3 feet); Try to reduce interference sources; Increase receiver sensitivity with thumb wheel. |
| False positives/signal everywhere | Receiver sensitivity too high; Interference from other electrical sources. | Decrease receiver sensitivity; Move away from known electrical interference. |
| Transmitter not powering on | Batteries dead or incorrectly installed; Power button not held long enough. | Check/replace batteries, ensure correct polarity; Hold power button for at least 3 seconds. |
9. Specifications
- Model: NF-816
- Brand: NOYAFA
- Power Source: Battery Powered (2 x 9V batteries, not included)
- Max. Working Current (Transmitter): <120mA
- Tone Frequency: 455kHz
- Max. Length Distance: Up to 500m (1640 feet)
- Max. Depth Distance: Up to 0.8m (2.6 feet)
- Max. Signal Voltage: 45V
- Transmitter Dimensions (LxWxD): Approximately 4.9 x 1.3 x 1.3 inches (12.5 x 3.3 x 3.3 cm)
- Receiver Dimensions (LxWxD): Approximately 6.6 x 1.7 x 1.1 inches (16.8 x 4.3 x 2.8 cm)
- Item Weight: 13.4 ounces
- Color: Yellow

Image: Visual representation of the dimensions for both the NF-816 transmitter and receiver units.

Image: A summary of technical specifications for both the transmitter and receiver, including maximum working current, tone frequency, and physical dimensions.
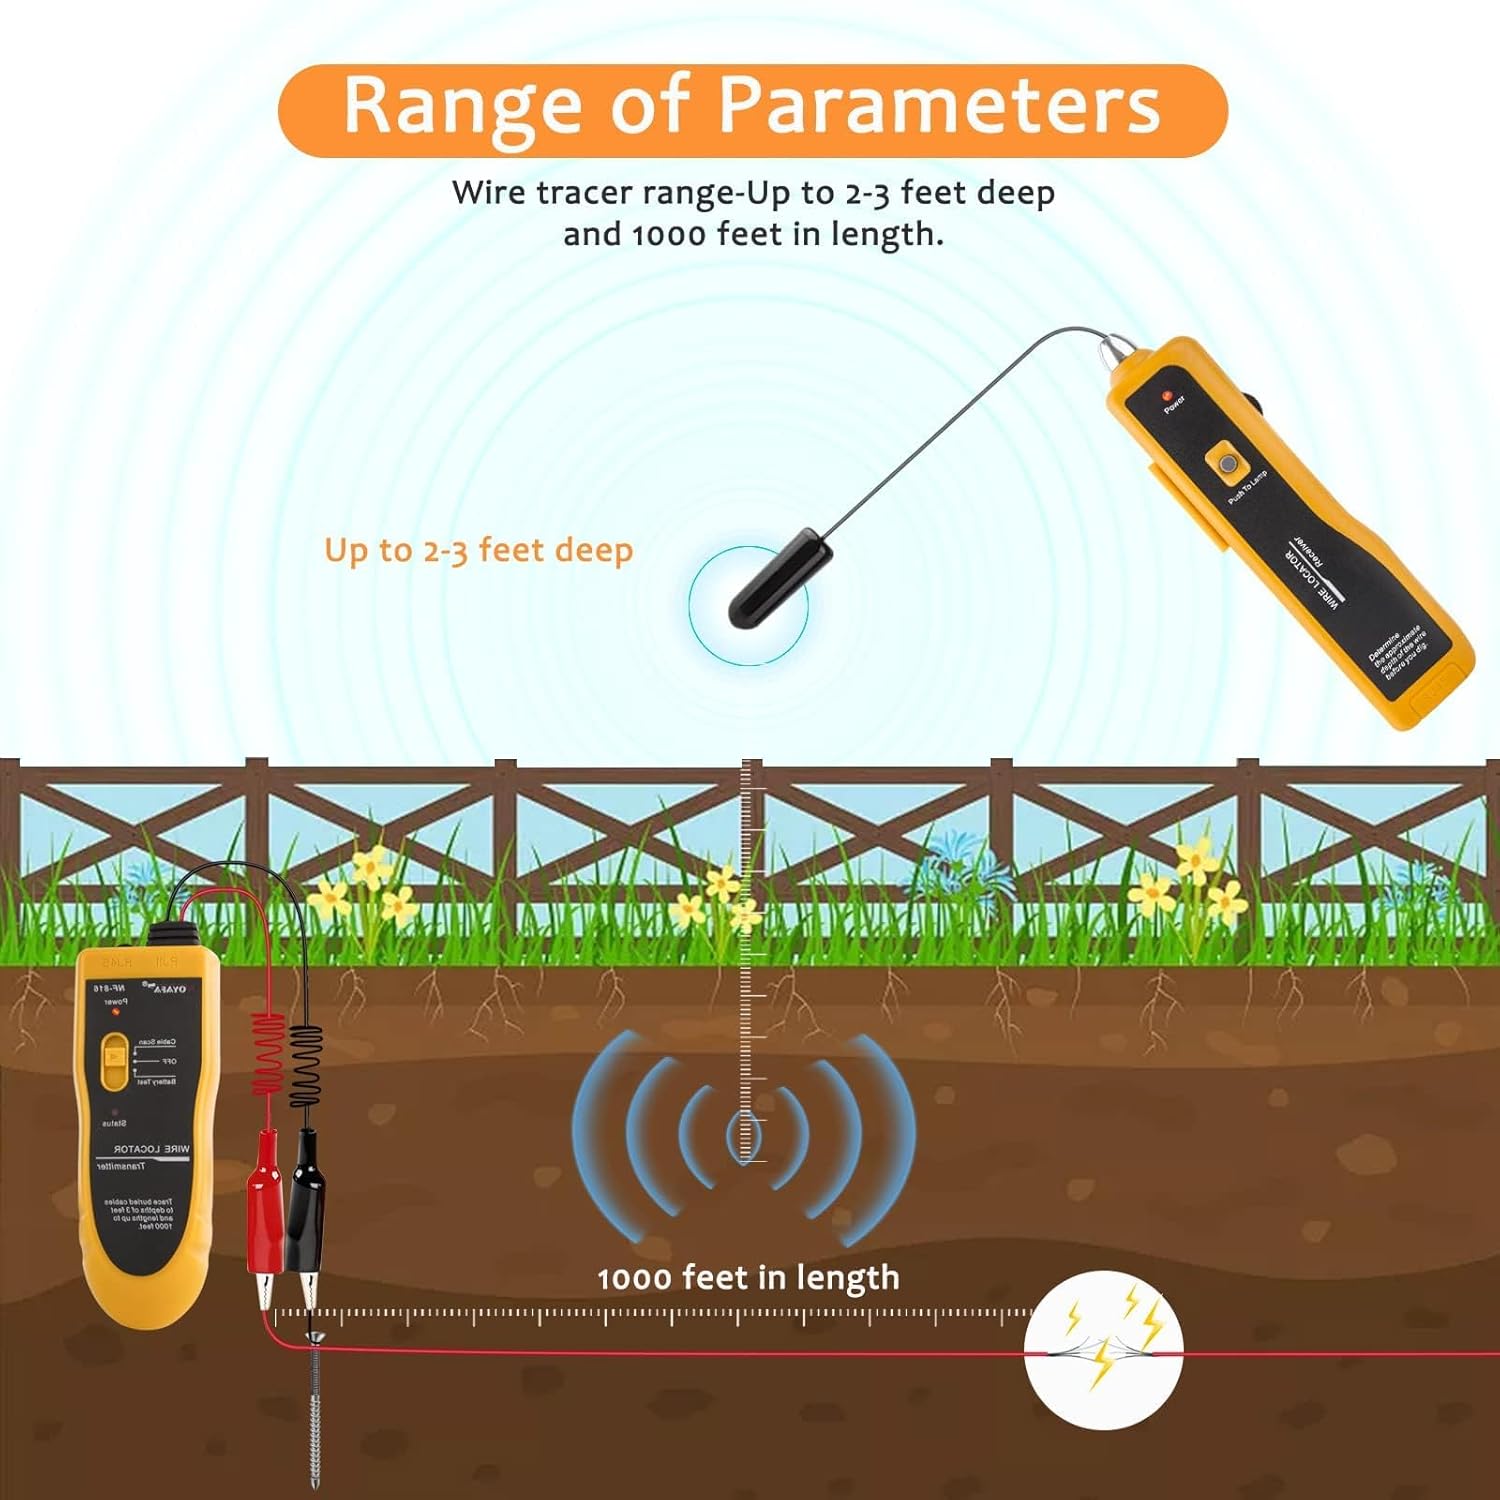
Image: A diagram visually representing the detection capabilities of the wire locator, showing it can trace wires up to 2-3 feet deep and 1000 feet in length.
10. Warranty and Support
NOYAFA products typically come with a manufacturer's warranty. Please refer to the warranty card included with your product or visit the official NOYAFA website for detailed warranty information and terms.
For technical support, troubleshooting assistance, or any inquiries regarding your NOYAFA NF-816, please contact NOYAFA customer service. Contact information can usually be found on the product packaging, the official website, or the purchase platform.
Ask a question about this manual
Ask about setup, troubleshooting, compatibility, parts, safety, or missing instructions. Manuals+ will review the question and use this page’s manual context to help answer it.