
1. Introduction
This manual provides detailed instructions for the installation, configuration, and maintenance of your TP-Link SX3832 Omada 24-Port 10GBASE-T L2+ Managed Switch. This high-performance switch is designed for robust network environments, offering advanced Layer 2+ features, high-speed connectivity, and centralized cloud management capabilities.
2. Package Contents
Verify that your package contains the following items:
- 1 x SX3832 Managed Switch
- 1 x Power Cord
- 1 x Console Cable
- 2 x Mounting Brackets
- 4 x Rubber Feet
- 8 x Screws
3. Product Overview
3.1 Front Panel
The front panel of the SX3832 switch features 24 1/2.5/5/10 Gbps RJ45 ports and 8 1/10 Gbps SFP+ slots, along with LED indicators for power, system status, and port activity.
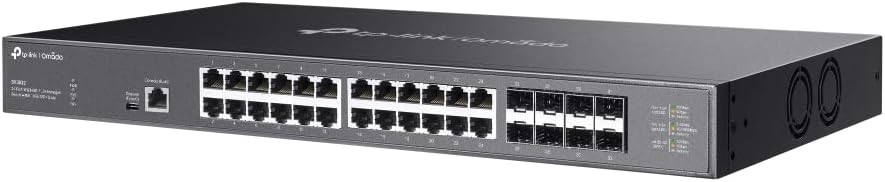
Image: Front angled view of the TP-Link SX3832 Omada switch, highlighting the 24 RJ45 ports and 8 SFP+ slots for high-speed network connections.

Image: Top-down angled view of the TP-Link SX3832 Omada switch, providing a clearer look at the port labels and LED indicators for status monitoring.
3.2 Rear Panel
The rear panel includes the power input, a grounding terminal for safety, and a physical security lock slot.

Image: Rear view of the TP-Link SX3832 Omada switch, detailing the power input, grounding terminal, and physical security lock slot.
3.3 Bottom Panel
The bottom panel features mounting points for rack installation and locations for attaching rubber feet for desktop use.

Image: Bottom view of the TP-Link SX3832 Omada switch, illustrating the mounting points for various installation scenarios.
3.4 Key Features
- 24× 1/2.5/5/10 Gbps RJ45 ports for versatile high-speed connections.
- 8× 1/10 Gbps SFP+ slots for fiber optic uplinks.
- 640 Gbps switching capacity for high-bandwidth demands.
- Centralized cloud management via web or Omada app.
- Standalone management via web, CLI, SNMP, and RMON.
- Static Routing for efficient internal traffic management.
- VLAN, ACL, QoS, IGMP Snooping, OAM, and DDM support for advanced network control.
- ERPS for rapid protection and recovery in ring topologies.
- Durable metal casing and rack-mountable design.
4. Setup
4.1 Physical Installation
The SX3832 switch can be installed on a desktop or mounted in a standard 19-inch equipment rack. For desktop use, attach the provided rubber feet to the bottom of the switch. For rack mounting, secure the two mounting brackets to the sides of the switch using the included screws, then mount the switch into the rack.
4.2 Connecting to the Network
- Power Connection: Connect the provided power cord to the switch's power inlet and to an appropriate AC power source.
- Ethernet Connections: Connect your network devices (servers, workstations, other switches) to the RJ45 ports using standard Ethernet cables. For fiber optic connections, insert compatible SFP+ modules into the SFP+ slots and connect fiber optic cables.
- Console Connection (Optional): For initial configuration or advanced troubleshooting via CLI, connect the console cable from your computer to the switch's console port.
5. Operating
5.1 Management Options
The SX3832 switch offers flexible management options:
- Omada Cloud Management: Integrate the switch into the TP-Link Omada Software Defined Networking (SDN) platform for centralized management via a web browser or the Omada app. This allows for remote control and monitoring of your entire Omada network.
- Web-based GUI: Access the switch's graphical user interface via a web browser for intuitive configuration and monitoring.
- Command Line Interface (CLI): Use the console port or Telnet/SSH for command-line based configuration, ideal for experienced network administrators.
- SNMP/RMON: Utilize Simple Network Management Protocol (SNMP) and Remote Monitoring (RMON) for network monitoring and management with compatible tools.
5.2 Basic Configuration
Upon initial power-up, the switch will obtain an IP address via DHCP by default. You can then access its web-based GUI or Omada controller for further configuration. Refer to the Omada SDN Controller User Guide for detailed instructions on cloud-based management.
6. Maintenance
6.1 Firmware Updates
Regularly check the TP-Link official website for the latest firmware versions. Updating the firmware ensures optimal performance, security, and access to new features. Follow the instructions provided with the firmware download for the update process.
6.2 Factory Reset
In case of configuration issues or if you need to restore the switch to its default settings, a factory reset can be performed. This typically involves pressing and holding a reset button on the device for a specified duration. Consult the full product manual for the exact procedure.
7. Troubleshooting
If you encounter issues with your SX3832 switch, consider the following basic troubleshooting steps:
- No Power: Ensure the power cord is securely connected to both the switch and the power outlet. Verify the power source is active.
- No Link/Activity LED: Check the Ethernet or fiber optic cable connections. Ensure connected devices are powered on and functioning correctly. Verify port settings (speed, duplex) if manually configured.
- Cannot Access Management Interface: Verify your computer's IP address is in the same subnet as the switch (if not using DHCP). Check network cable connections. Try accessing via console port if web access fails.
- Performance Issues: Check for network congestion, cable quality, and ensure devices are negotiating at expected speeds. Review QoS settings if configured.
For more advanced troubleshooting, refer to the comprehensive user guide available on the TP-Link support website or contact TP-Link technical support.
8. Specifications
| Attribute | Value |
|---|---|
| Item Weight | 9.6 Pounds |
| Upper Temperature Rating | 60 Degrees Celsius |
| Interface Type | RJ45, SFP+ |
| Data Transfer Rate | 640 Gigabits Per Second |
| Manufacturer | TP-Link |
| UPC | 810142821445 |
| Package Dimensions | 26 x 17 x 9 inches |
| Number of Ports | 24 |
| Color | Black |
| Compatible Devices | Desktop, Laptop, Printer |
9. Official Product Videos
9.1 Product Overview Video
Video: A concise product overview of the TP-Link Omada switch, highlighting its key features and design. This video is provided by the seller, Amazon Product Imaging.
9.2 10G-T SFP+ RJ45 Module Overview
Video: An overview of a 10G-T SFP+ RJ45 module, demonstrating its use and compatibility with SFP+ slots found on switches like the SX3832. This video is provided by the seller, 10Gtek.
10. Warranty and Support
The TP-Link SX3832 Omada 24-Port 10GBASE-T L2+ Managed Switch is backed by a 3-year warranty, ensuring reliability and peace of mind. For technical support, warranty claims, or additional resources, please visit the official TP-Link support website or contact their customer service. You can also find more information and resources on the TP-Link Store on Amazon.


