
1. Introduction
Thank you for choosing the GlowWise Cold Press Juicer MK-SJ22. This manual provides essential information for the safe operation, maintenance, and optimal performance of your new juicer. Please read it thoroughly before first use and retain it for future reference.
2. Important Safety Information
To reduce the risk of fire, electric shock, or injury, always follow these basic safety precautions:
- Read all instructions carefully before operating the appliance.
- Keep the appliance out of reach of children.
- Do not immerse the motor base in water or other liquids.
- Ensure all parts are correctly and securely assembled before operating the juicer.
- Do not feed hard objects, pits, or non-food items into the juicer.
- Always unplug the appliance from the power outlet when not in use, before assembling or disassembling parts, and before cleaning.
- Do not operate the juicer if the power cord or plug is damaged, or if the appliance malfunctions or has been dropped or damaged in any manner.
- Use only manufacturer-recommended attachments and accessories.
- Avoid contact with moving parts.
- Do not use outdoors.
3. Product Overview and Components
The GlowWise Cold Press Juicer is designed for efficient juice extraction from various fruits and vegetables. Familiarize yourself with its main components:
- Motor Base: Contains the motor and control knob.
- Juicing Chamber: Where fruits and vegetables are processed.
- Auger: The spiral component that crushes and presses produce.
- Filter: Separates juice from pulp.
- Lid with Feed Chute: Top cover with a wide opening for feeding ingredients.
- Food Pusher: Used to gently guide ingredients into the feed chute.
- Pulp Container: Collects the extracted pulp.
- Juice Container: Collects the fresh juice.

Image: The complete GlowWise Cold Press Juicer setup, showing the main unit, juice container, and pulp container.

Image: An illustration highlighting the upgraded spiral auger and its components, emphasizing less oxidation, more freshness, and fewer bubbles in the juice.
4. Setup and Assembly
Follow these steps to assemble your GlowWise Cold Press Juicer:
- Place the motor base on a stable, flat surface.
- Align the juicing chamber with the motor base and rotate it clockwise until it locks into place.
- Insert the auger into the juicing chamber, ensuring it sits firmly.
- Place the filter over the auger.
- Attach the lid with the feed chute, aligning the lock symbols. Rotate the lid clockwise until it clicks into the locked position.
- Position the pulp container under the pulp outlet and the juice container under the juice outlet.

Image: A visual guide demonstrating the three main steps for assembling the juicer components onto the motor base.
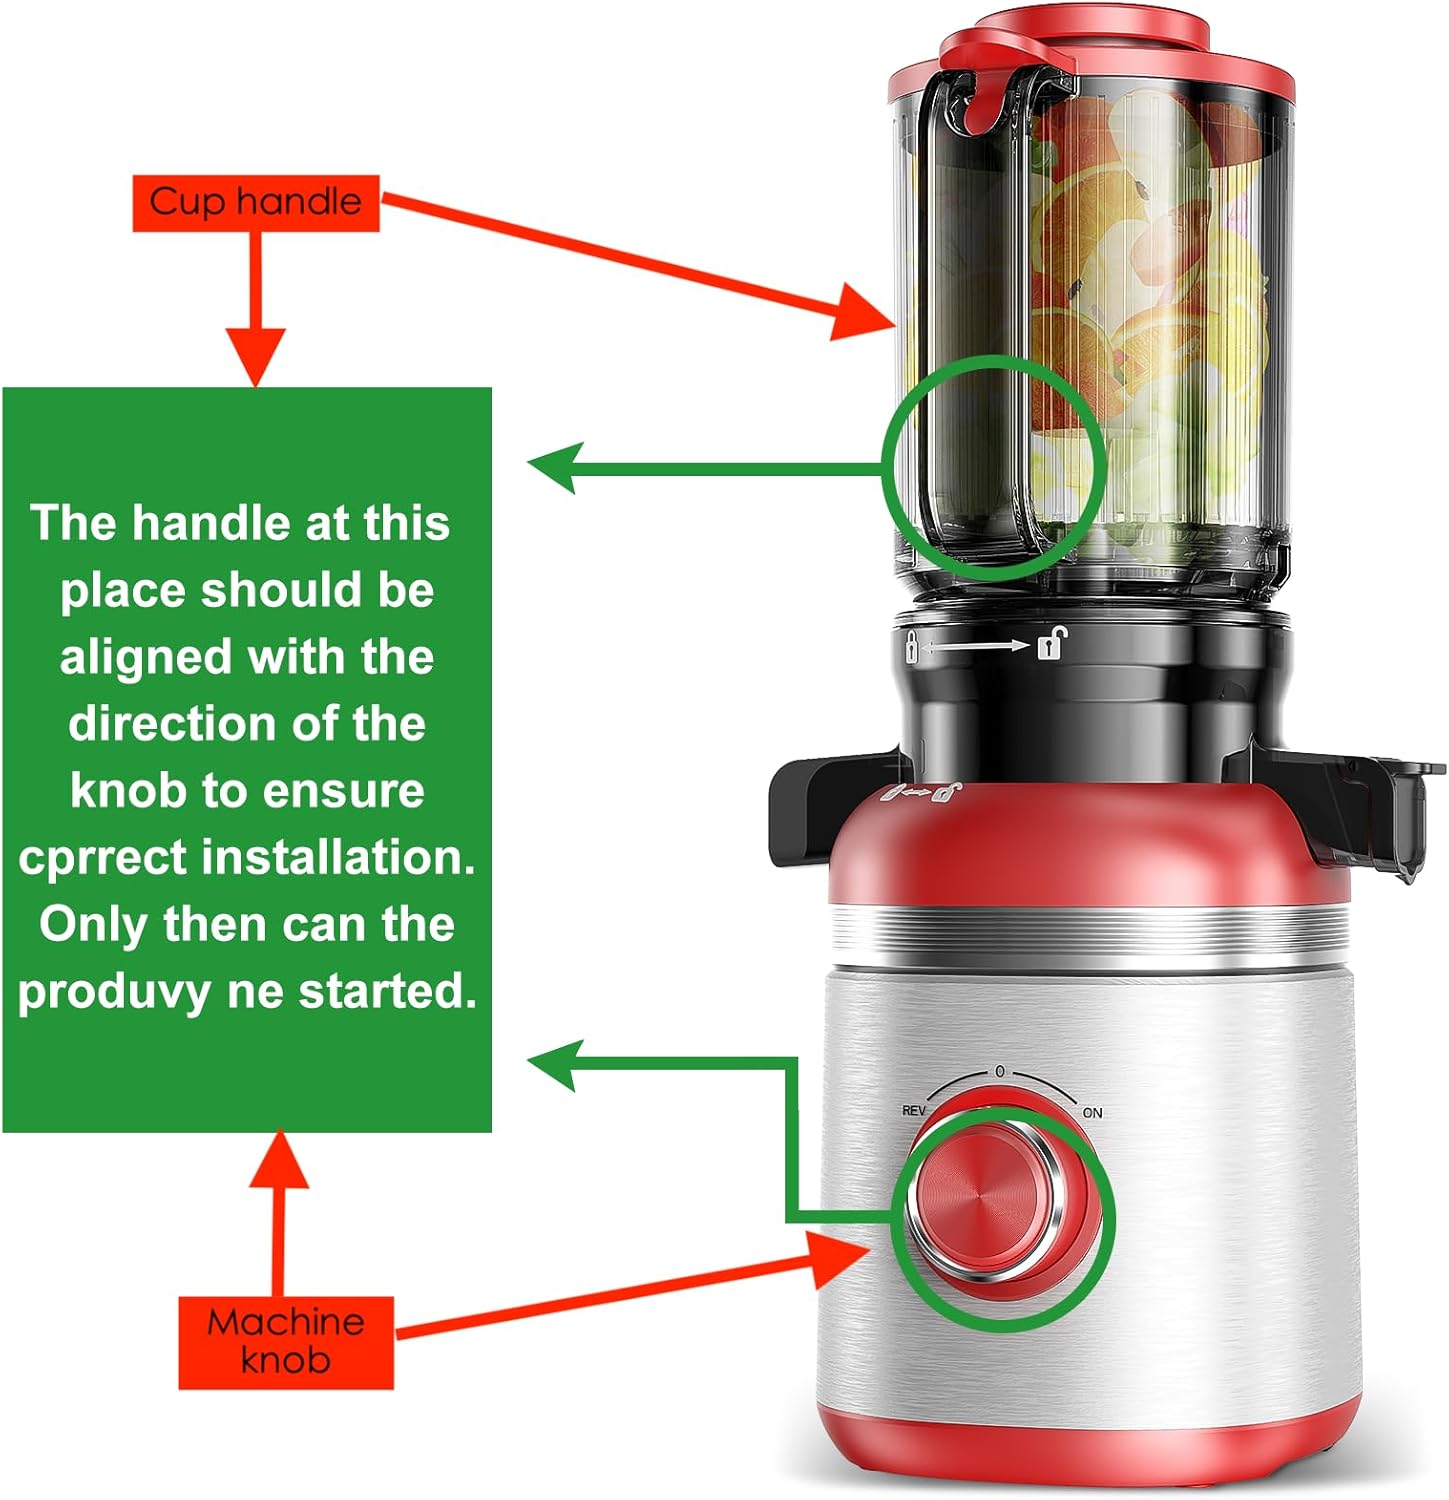
Image: A warning illustrating the importance of aligning the lid's handle with the knob's direction for correct installation and operation.
Video: This video demonstrates the step-by-step installation and initial use of the GlowWise Cold Press Juicer, showing how to assemble the parts and begin juicing.
5. Operating Instructions
5.1. Preparing Ingredients
- Wash all fruits and vegetables thoroughly.
- For most items, the wide feed chute allows for whole fruits and vegetables, reducing prep time. However, very large or fibrous items may benefit from being cut into smaller pieces.
- Remove hard pits from fruits like peaches, plums, or cherries.
- Peel citrus fruits (oranges, lemons) to avoid bitter taste from the rind.
5.2. Juicing Process
- Ensure the juicer is properly assembled and the juice and pulp containers are in place.
- Plug the power cord into a suitable electrical outlet.
- Turn the control knob to the 'ON' position.
- Slowly feed prepared ingredients into the feed chute. Use the food pusher to gently guide them down. Do not force ingredients.
- Observe the juice flowing into the juice container and pulp collecting in the pulp container.
- Once juicing is complete, turn the control knob to the 'OFF' position and unplug the appliance.

Image: The juicer's large 4.35-inch feed chute, demonstrating how it can accommodate whole carrots, oranges, and celery, minimizing the need for pre-chopping.
5.3. Reverse Function
If ingredients become jammed or the juicer stops during operation, use the reverse function:
- Turn the control knob to the 'REV' (Reverse) position and hold for a few seconds. This will rotate the auger in the opposite direction to clear the blockage.
- Release the knob to return to the 'OFF' position.
- If the blockage persists, repeat the reverse function or disassemble the juicer to clear the obstruction manually.
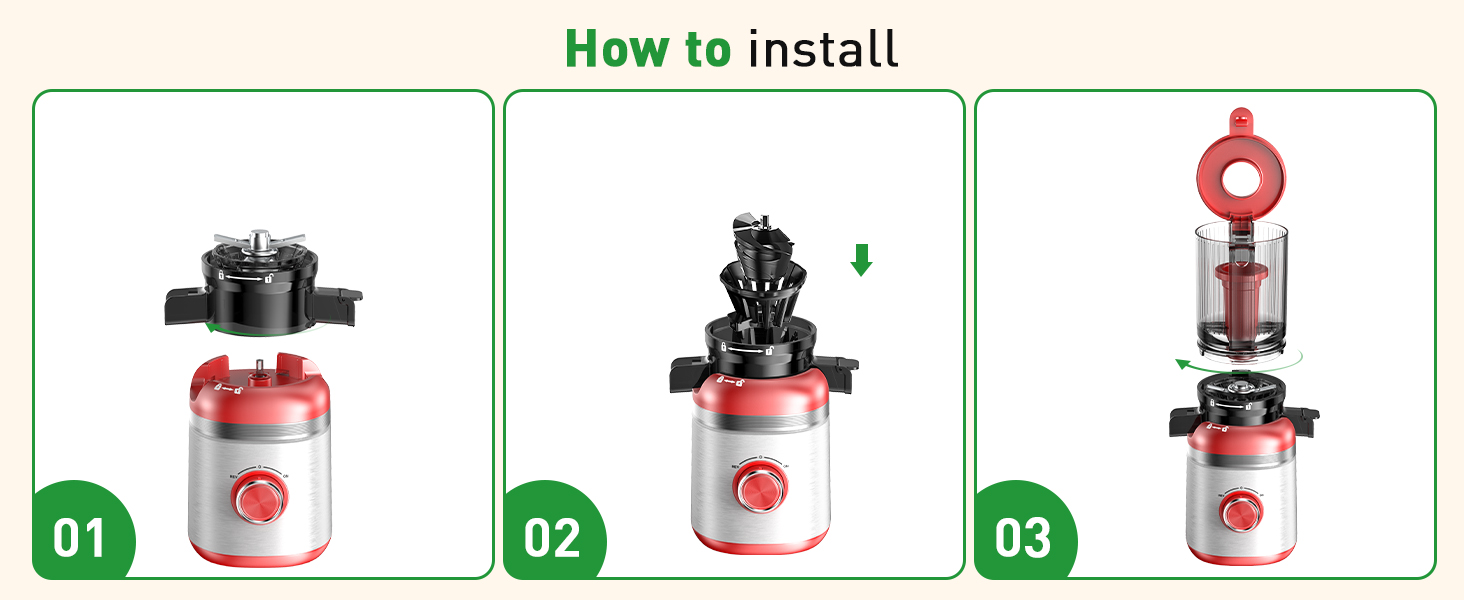
Image: A visual representation of the juicer's control knob, highlighting the 'REV' (Reverse) function to prevent clogging during operation.
6. Maintenance and Cleaning
Regular cleaning ensures the longevity and hygienic operation of your juicer. Clean the juicer immediately after each use.
6.1. Disassembly for Cleaning
- Unplug the juicer from the power outlet.
- Remove the juice and pulp containers.
- Rotate the lid counter-clockwise to unlock and remove it.
- Remove the filter and auger from the juicing chamber.
- Rotate the juicing chamber counter-clockwise to unlock and remove it from the motor base.
6.2. Cleaning the Components
- Rinse all detachable parts (juicing chamber, auger, filter, lid, food pusher, containers) under running water.
- Use the included cleaning brush to remove any pulp residue from the filter and other components.
- For thorough cleaning, wash parts with warm, soapy water. All components are constructed from SUS304 stainless steel (auger) and baby-food-grade PP material, which resist sticking pulp and absorbing odors.
- Wipe the motor base with a damp cloth. Never immerse the motor base in water.
- Dry all parts completely before reassembling or storing.

Image: A visual guide illustrating the simple assembly and cleaning process, highlighting that the juicer consists of only a few parts for quick stain removal and easy washing.
7. Troubleshooting
If you encounter any issues with your juicer, refer to the following table for common problems and solutions:
| Problem | Possible Cause | Solution |
|---|---|---|
| Juicer does not turn on. | Not plugged in; parts not assembled correctly; power outage. | Check power connection; ensure all parts are locked into place; check household power. |
| Juicer stops during operation. | Ingredients jammed; motor overheating. | Use 'REV' function to clear jam; if motor overheats, unplug and let cool for 30 minutes before restarting. |
| Low juice yield or wet pulp. | Ingredients fed too quickly; certain soft fruits/vegetables. | Feed ingredients slowly; for soft items, alternate with harder items. |
| Excessive vibration or noise. | Parts not assembled correctly; uneven surface. | Disassemble and reassemble all parts, ensuring they are locked; place juicer on a stable, flat surface. |
8. Specifications
| Feature | Detail |
|---|---|
| Brand | GlowWise |
| Model Name | MK-SJ22 |
| Color | Red |
| Product Dimensions | 7.4"D x 6.4"W x 15.3"H |
| Material | ABS, PC, Stainless Steel |
| Power Source | AC |
| Number of Speeds | 1 (with Reverse function) |
| Special Features | Easy to Clean, Large Feed Chute, Masticating, Quiet Motor, Whole Fruit Processing |
| Item Weight | 5.92 pounds |
| Recommended Uses | Apple, Beetroot, Carrot, Celery, Cucumber, Grape, Lemon, Orange |

Image: The GlowWise juicer displayed on a kitchen countertop, illustrating its compact dimensions (7.4"D x 6.4"W x 15.3"H) and 40oz capacity, ideal for various kitchen spaces.
9. Warranty and Support
Your GlowWise Cold Press Juicer MK-SJ22 comes with a manufacturer's warranty. Please refer to the product packaging or the official GlowWise website for specific warranty terms and conditions.
For technical support, troubleshooting assistance, or to inquire about replacement parts, please contact GlowWise customer service:
- Website: www.glowwise.com (Example URL, please refer to actual product documentation)
- Email: support@glowwise.com (Example Email)
- Phone: 1-800-XXX-XXXX (Example Phone Number)

