1. Introduction
The FEELWORLD P6XL is a high-brightness 6-inch camera monitor designed to enhance your video production workflow. Featuring a 1200nit touchscreen display, 4K HDMI input, built-in battery, and advanced monitoring tools like Waveform, 3D LUT, and HDR support, it provides clear and accurate visual feedback for professional and enthusiast filmmakers.

Image: The FEELWORLD P6XL monitor displaying various monitoring tools, with a hand touching the screen.
2. What's in the Box
Verify that all items listed below are included in your package:
- 1x P6XL FEELWORLD Monitor
- 1x A-A HDMI Cable
- 1x Micro HDMI Cable
- 1x USB-A to USB-C Cable
- 1x Mini Hot Shoe Mount + Hex Wrench
- 1x USB-A to USB-C Adapter
- 1x Sunshade + Frame
- 1x Cable Management Tie
- 1x User Manual
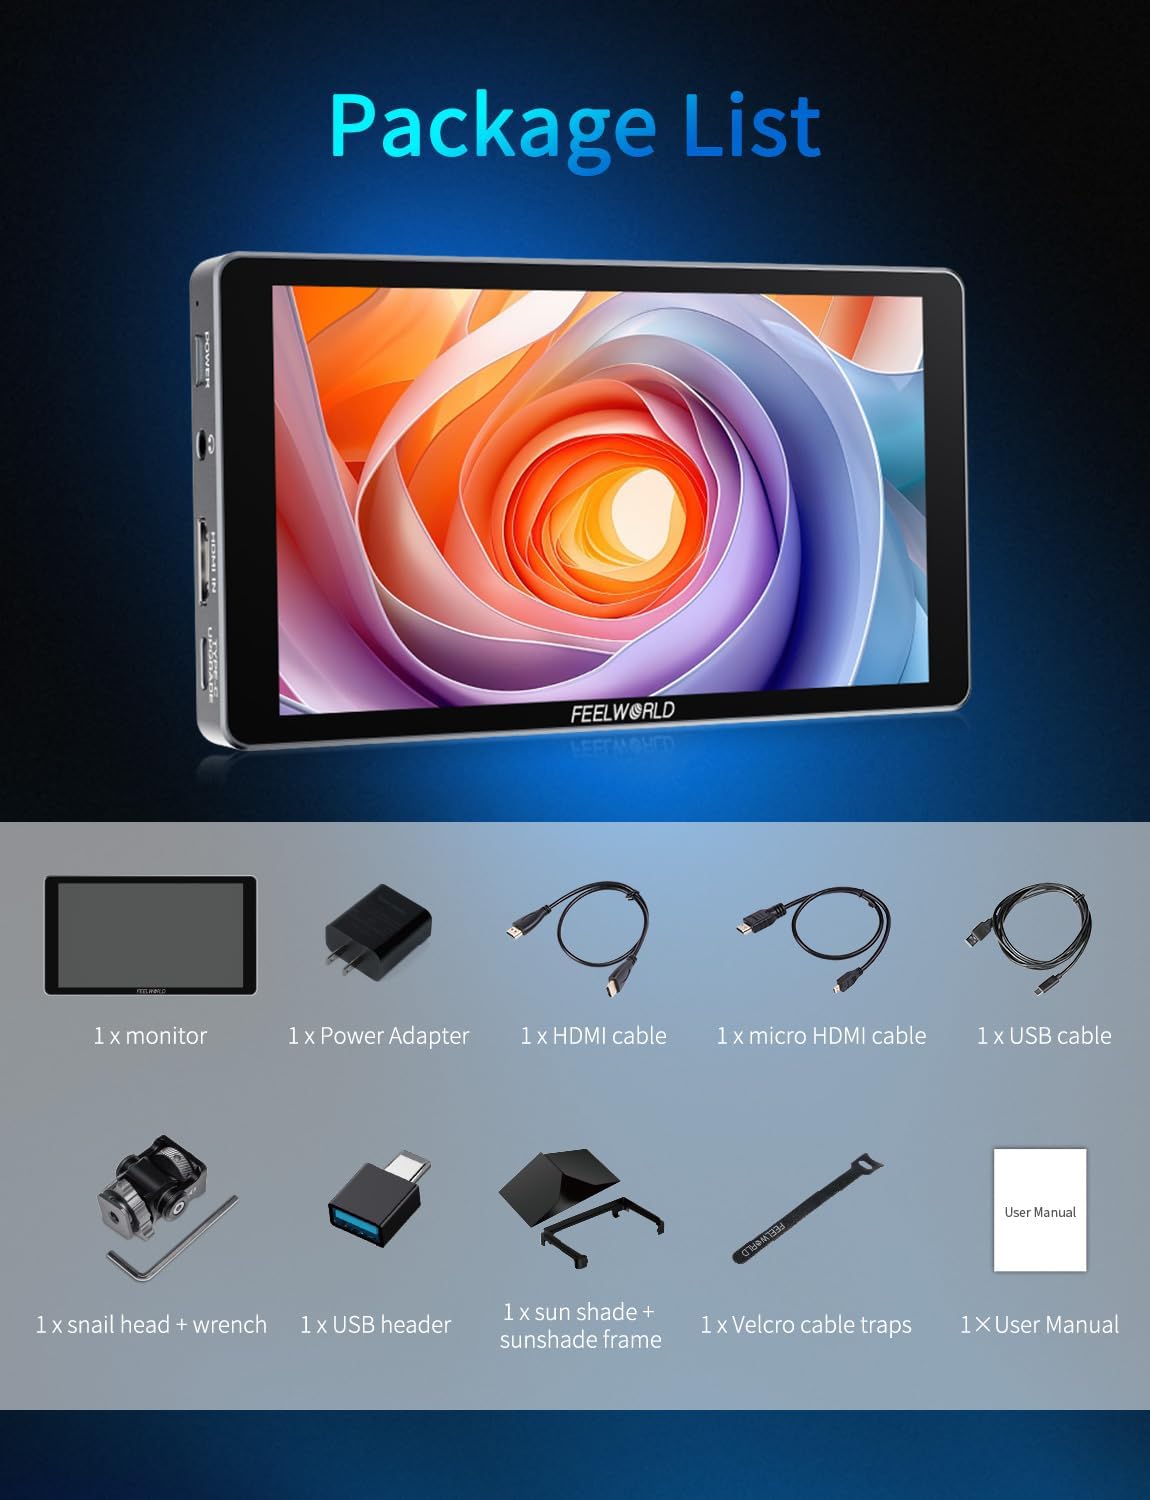
Image: All accessories included with the FEELWORLD P6XL monitor, neatly arranged.
3. Product Overview
3.1 Physical Features
The P6XL monitor features a rugged, full aluminum alloy body, ensuring durability while maintaining a lightweight profile. Its compact dimensions and robust construction make it suitable for various shooting environments.

Image: The FEELWORLD P6XL monitor's aluminum housing and dimensions.
3.2 Ports and Controls
- Power Button: Long press to power on/off, short press for touch on/off.
- Headphone Jack: 3.5mm output for audio monitoring.
- HDMI In: 4K HDMI input, supports up to 2160p/30p signals.
- Type-C (Upgrade/LUT Upload): Used for firmware updates and loading custom 3D LUT files via a USB flash drive.
- Type-C (9V/2A Power Supply/Charging): For charging the built-in battery or powering the monitor.
- 1/4" Screw Thread: For mounting accessories.
- Cooling Fan: Built-in adjustable fan for heat dissipation.
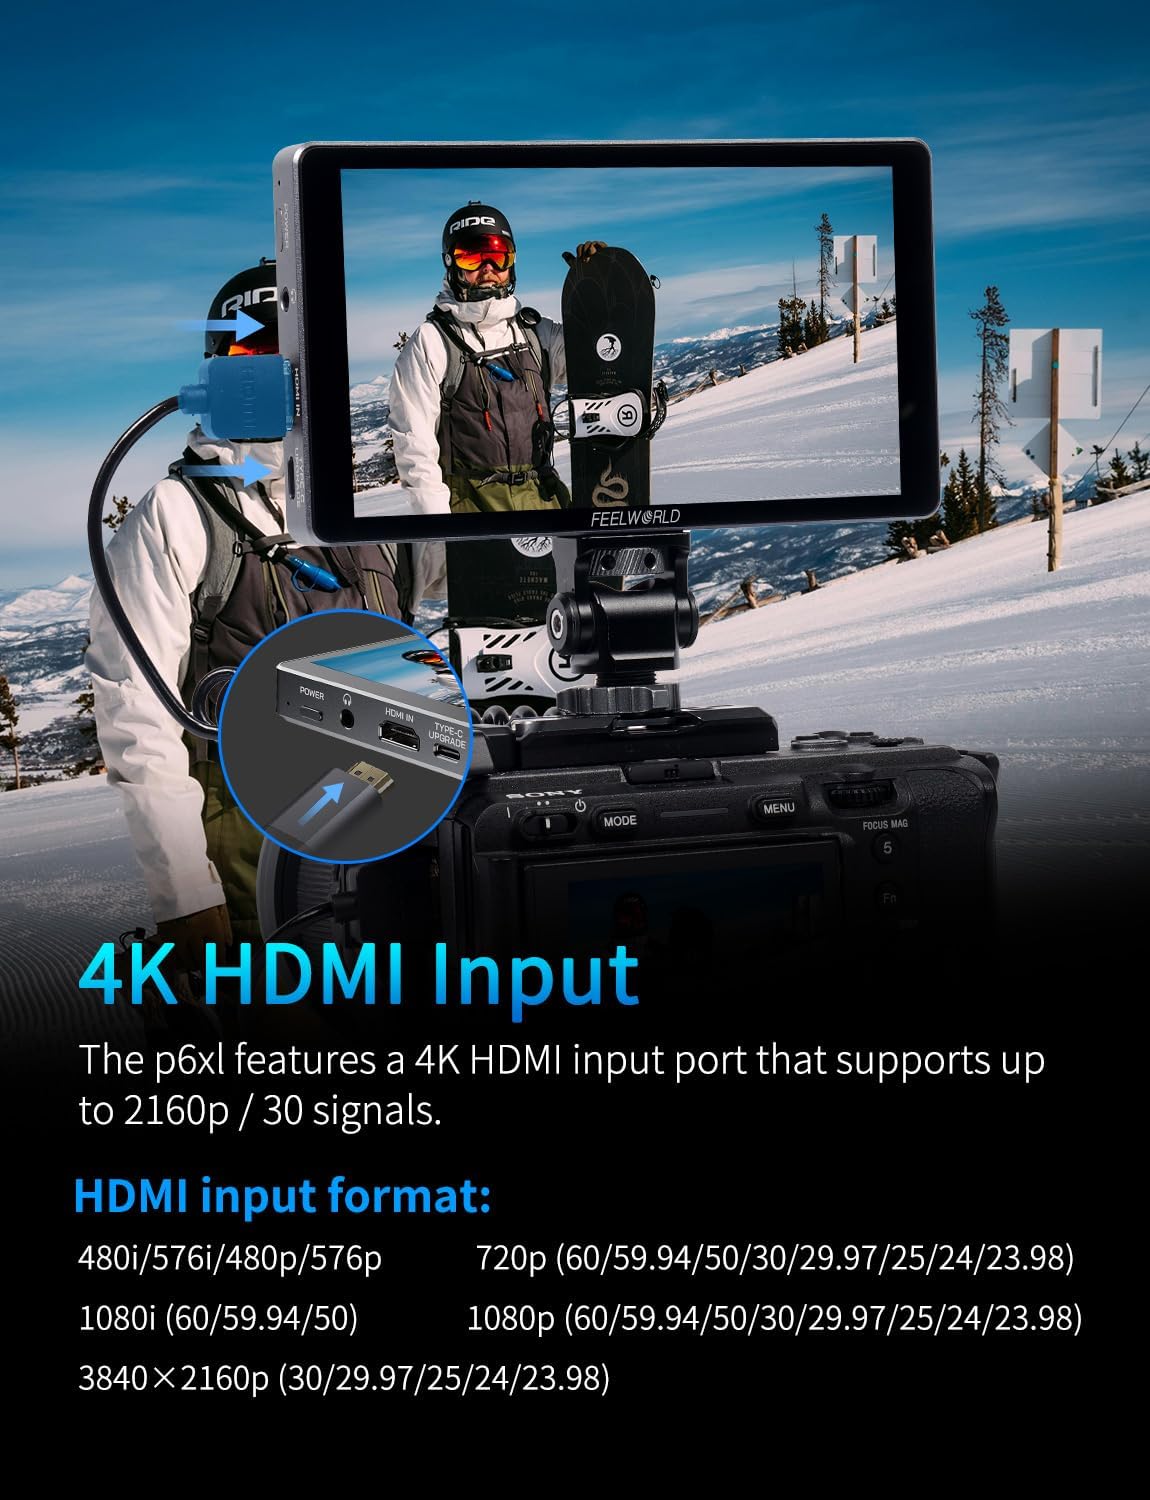
Image: The 4K HDMI input port on the FEELWORLD P6XL monitor.
4. Setup
4.1 Charging the Built-in Battery
The P6XL features a built-in 22.2Wh/7.4V rechargeable battery. Use the provided USB-A to USB-C cable and a 9V charger to charge the monitor. The indicator light will turn green when fully charged. A full charge provides approximately 2 hours of run-time at 100% brightness.
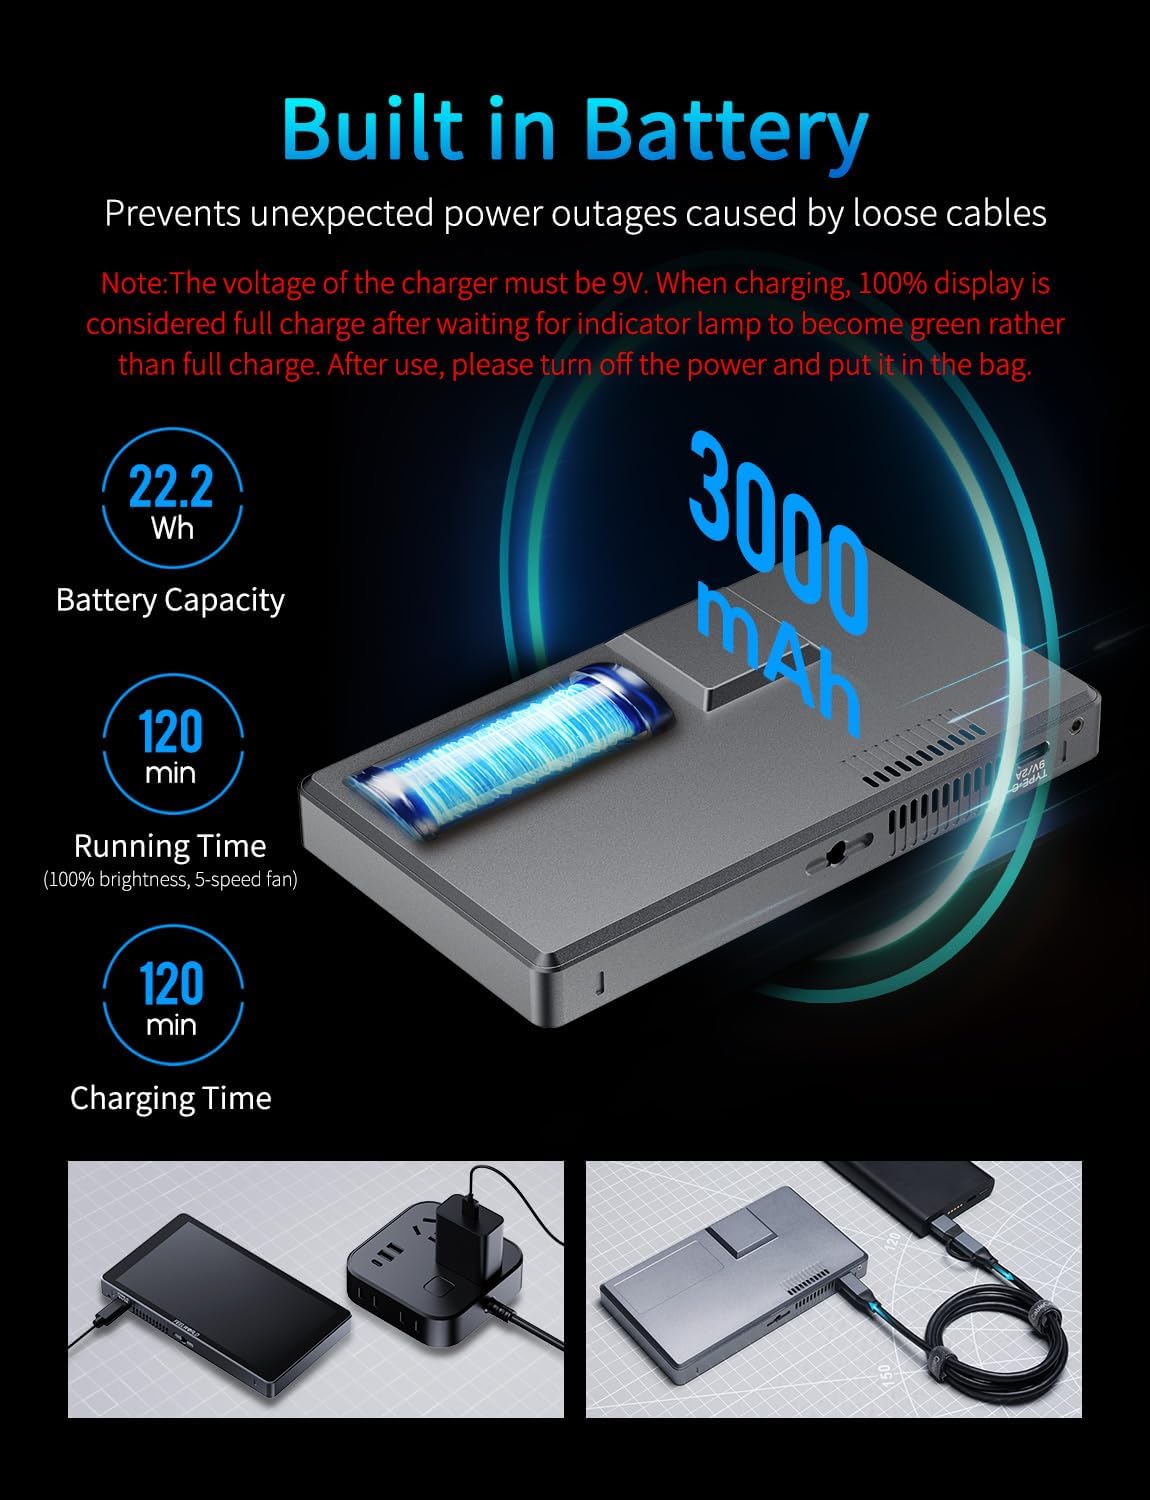
Image: Information regarding the monitor's built-in battery, capacity, and charging details.
4.2 Mounting the Monitor
Attach the mini hot shoe mount to your camera's hot shoe or a compatible rig. Secure the monitor to the mount using the 1/4" screw thread on the monitor's bottom.
4.3 Connecting to a Camera
Connect your DSLR or mirrorless camera to the monitor using the provided HDMI cable. Ensure the camera's HDMI output settings are compatible with the monitor's input (up to 4K 2160p/30p).
5. Operating Instructions
5.1 Touchscreen Interface
The P6XL features an intuitive touchscreen interface for easy control:
- Double-tap: Access the main menu.
- Swipe Left Side: Adjust backlight.
- Swipe Right Side: Adjust volume.
- Swipe Bottom: Access quick menu shortcuts.

Image: The 6-inch touchscreen interface of the FEELWORLD P6XL monitor.
5.2 Menu Navigation
Double-tap the screen to open the main menu. Navigate through the following categories:
- Assist: Access various monitoring tools.
- Marker: Configure on-screen guides.
- Image: Adjust image display settings.
- User Option: Manage LUTs, HDR, and display/color adjustments.
- System: Access general system settings.
5.3 Assist Functions
The Assist menu provides professional tools for accurate monitoring:
- Waveform: Displays luminance and color information.
- Vector: Shows color saturation and hue.
- Histogram: Visualizes tonal distribution.
- Focus Assist (Peaking): Highlights in-focus areas (adjustable color/level).
- Embedded Audio: Displays audio levels.
- Zebra Pattern: Indicates overexposed areas (adjustable threshold).
- Check Field: Isolates specific color channels.
- False Colors: Aids in exposure setting by displaying different exposure levels in distinct colors.
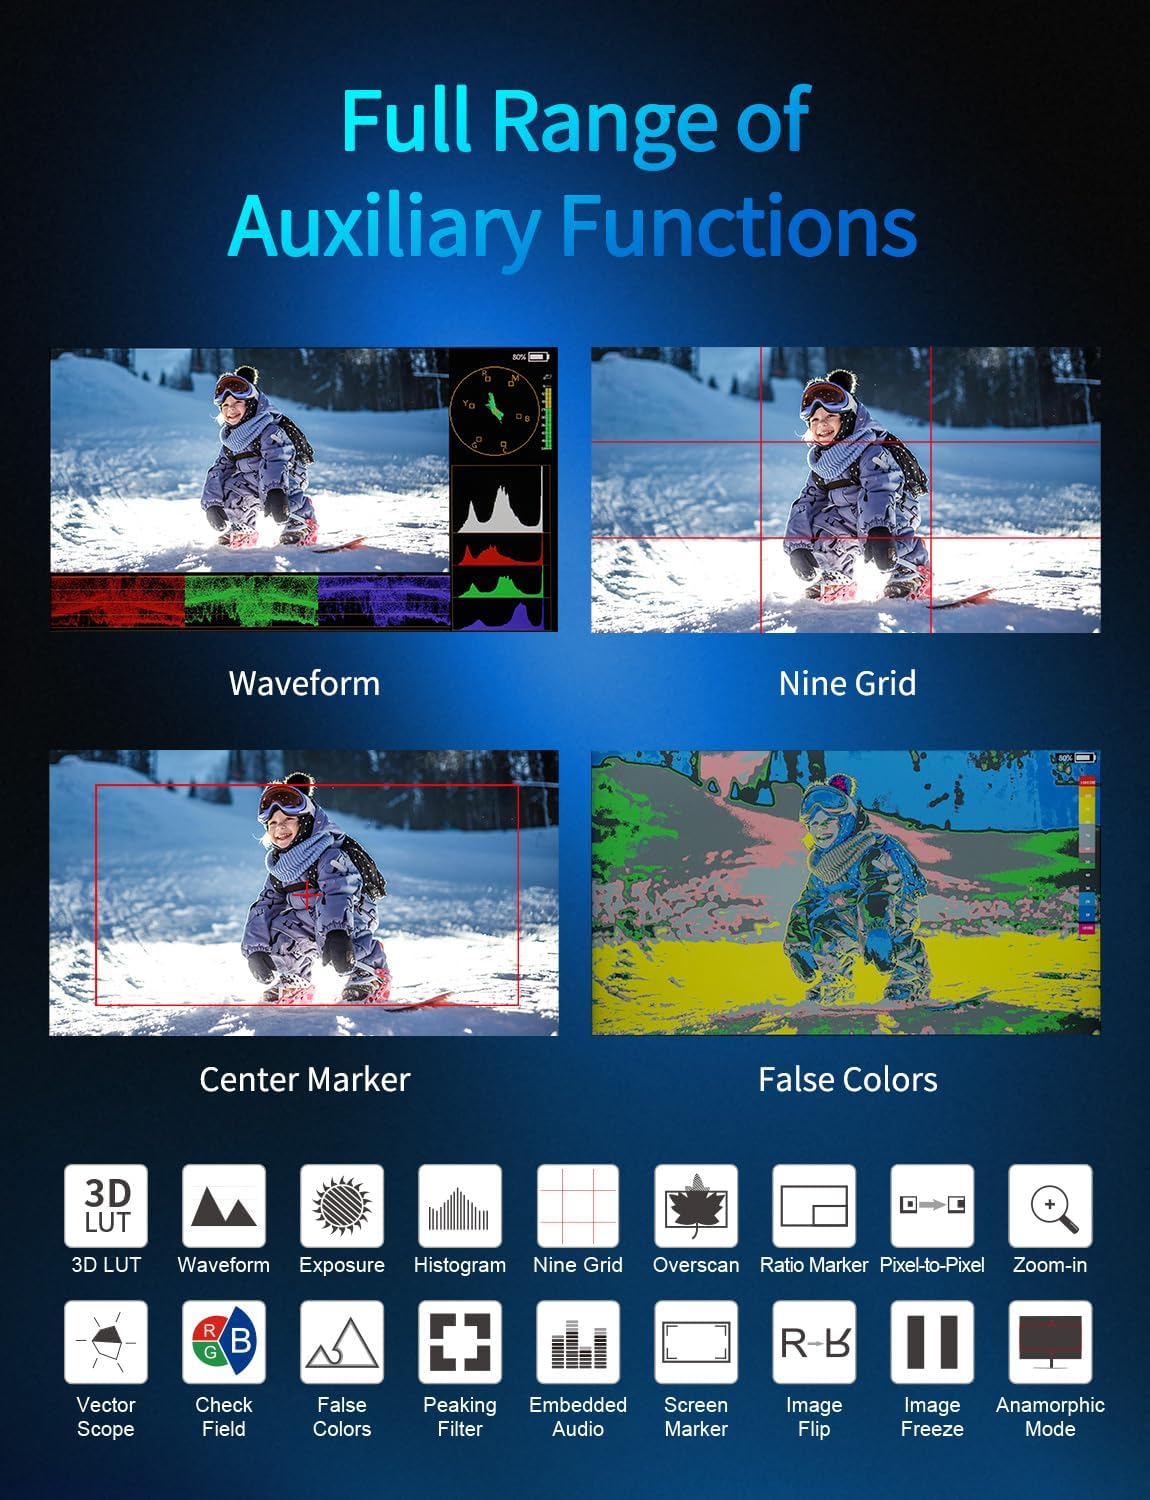
Image: A visual representation of the monitor's full range of auxiliary functions.
5.4 Marker Functions
Customize on-screen guides for framing and composition:
- Grids: Display various grid patterns (e.g., Rule of Thirds, 2x2, 4x4, custom).
- Safe Frames: Define safe areas for broadcast or social media aspect ratios.
- Center Marker: Places a crosshair in the center of the screen.
- Ratio Marker: Overlays various aspect ratio guides (e.g., 4:3, 16:9, 2.35:1).
5.5 Image Functions
Adjust how the image is displayed on the monitor:
- Scan Mode: Adjusts the display area (e.g., Under Scan).
- Aspect Ratio: Selects display aspect ratio (e.g., Auto, 16:9, 4:3).
- Anamorphic: Desqueezes anamorphic footage (1.33x, 1.6x, 2.0x, custom).
- Image Flip: Flips the image horizontally or vertically.
- Zoom Mode: Magnifies a portion of the image (2X, 4X, 8X).
- Image Freeze: Pauses the live video feed.
- P2P (Pixel-to-Pixel): Displays the image at its native resolution.
5.6 User Options
Customize advanced display settings:
- LUT (Look Up Table): Enable/disable LUTs, import custom .cube files via USB-C, and select from built-in DE-log LUTs (S-Log2, S-Log3, C-Log, V-Log to Rec.709).
- HDR: Enable/disable HDR display mode (HLG1, HLG2, HLG3).
- Display Adjustment: Adjust backlight, brightness, contrast, saturation, hue, and sharpness.
- Color Adjustment: Fine-tune color temperature (5600K, 6500K, 9300K, User) and individual RGB levels.

Image: The monitor's screenshot and image overlay feature for composition comparison.
5.7 System Settings
General monitor settings:
- User Switch: Manage multiple user profiles.
- Language: Select display language.
- OSD Option: Adjust On-Screen Display settings.
- Volume: Control audio output volume.
- Cooling Fan: Adjust fan speed (modes 1-5).
- Reset: Restore factory default settings.
- Firmware Update: Update monitor firmware via USB-C.
6. Specifications
| Feature | Specification |
|---|---|
| Display Size | 6 inches |
| Brightness | 1200 nits |
| Resolution | Full HD 1920x1080 |
| Input | 4K HDMI (up to 2160p/30p) |
| Battery | Built-in 22.2Wh/7.4V rechargeable battery |
| Charging | Type-C (9V/2A) |
| Housing | Aluminum Alloy |
| Weight | 332 grams (approx. 0.73 lbs) |
| Dimensions | 154 x 87 x 17 mm (approx. 6.06 x 3.43 x 0.67 inches) |
7. Troubleshooting
- No Signal: Ensure HDMI cable is securely connected and camera's HDMI output is active and set to a compatible resolution.
- Monitor Not Powering On: Check battery level. Connect to a 9V/2A Type-C charger.
- Touchscreen Unresponsive: Short press the power button to toggle touch functionality. If issue persists, try resetting the monitor to factory settings.
- Overheating: Ensure cooling fan is enabled in System settings. Avoid blocking ventilation holes.
- LUT Import Failure: Ensure USB flash drive is formatted correctly and contains only .cube LUT files. Do not remove the USB drive during import.
8. Maintenance
- Cleaning: Use a soft, dry cloth to clean the monitor screen and body. For stubborn smudges, use a screen-specific cleaning solution.
- Storage: Store the monitor in a cool, dry place away from direct sunlight and extreme temperatures. Use the provided sunshade and frame for protection.
- Battery Care: For long-term storage, charge the battery to approximately 50-60% to prolong its lifespan.
9. Warranty and Support
FEELWORLD products typically come with a standard manufacturer's warranty. Please refer to the warranty card included in your package or visit the official FEELWORLD website for detailed warranty terms and conditions.
For technical support, troubleshooting assistance, or service inquiries, please contact FEELWORLD customer service through their official channels.


