
1. Introduction
Thank you for choosing the Huepar DP04CG Electronic Self-Leveling Laser Level. This manual provides essential information for the safe operation, setup, and maintenance of your device. Please read it thoroughly before use to ensure optimal performance and safety.
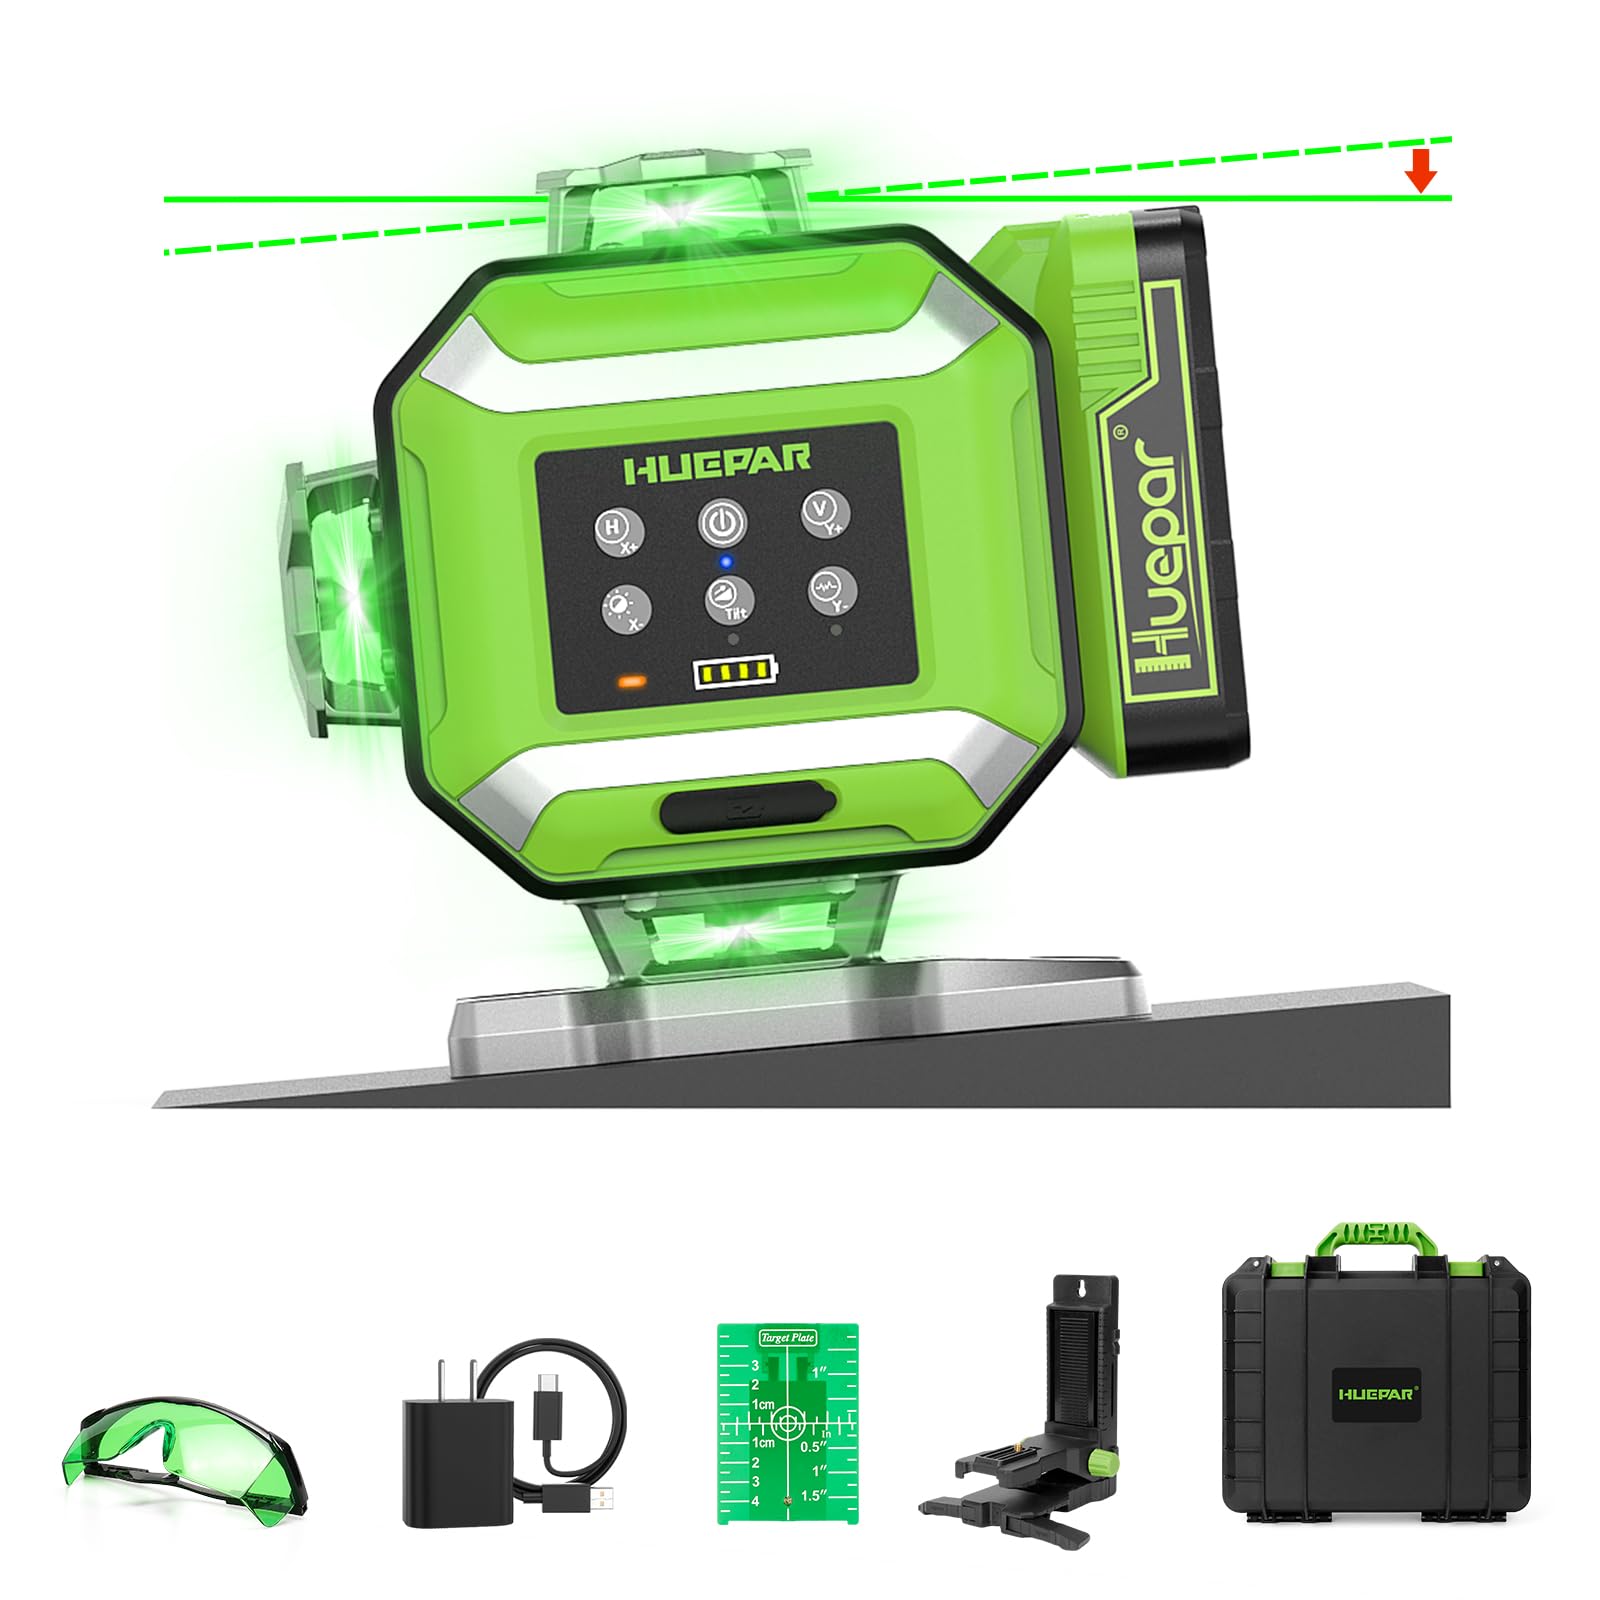
Image: The Huepar DP04CG laser level in use on a construction site, demonstrating its self-leveling capabilities for steady precision work.
2. Safety Information
WARNING: This is a Class 2 laser product. Avoid direct eye exposure to the laser beam. Do not stare into the beam or view directly with optical instruments. Always wear appropriate safety glasses when operating the laser level.
- Do not attempt to disassemble or modify the laser level. Repairs should only be performed by authorized service personnel.
- Keep the device out of reach of children.
- Ensure the work area is clear of obstructions and potential hazards.
- Use only the specified battery and charging accessories.
3. Package Contents
Verify that all items are present in your package:
- 1 x Huepar DP04CG Electronic Green Laser Level
- 1 x Hard Carry Case
- 1 x User Manual (this document)
- 1 x Laser Target Plate
- 1 x Green Glasses
- 1 x Magnetic Bracket
- 1 x Rechargeable Battery
- 1 x Power Adapter
- 1 x Type-C Cord
4. Product Features
4.1 Advanced Electronic Self-Leveling Mode
The DP04CG features an electronic self-leveling system that activates automatically upon power-on. This provides enhanced precision and stability compared to traditional pendulum levels. It self-levels within a range of ±4°. If the device is outside this leveling range, the laser line will flash, and an audible beep will sound to alert the user, preventing inaccurate measurements. Observe the laser line as it precisely adjusts to a level position during calibration.

Image: The laser level demonstrating its self-leveling function, indicating a ±4° leveling range and an alert for tilts exceeding this range.
4.2 High Precision Accuracy
This laser level offers a high precision accuracy of ±1/18 inch at 33 feet, making it suitable for professional applications. It is ideal for precise alignment tasks in tile installation, cabinetry, framing, and various interior construction projects.
4.3 Manual Mode with Slope Adjustment
In manual mode, the laser level allows for the projection of angled lines. Additionally, it supports up to 7% grade adjustment on both the X and Y axes. This feature is particularly useful for projects requiring sloped surfaces, such as stair installations or drainage systems.
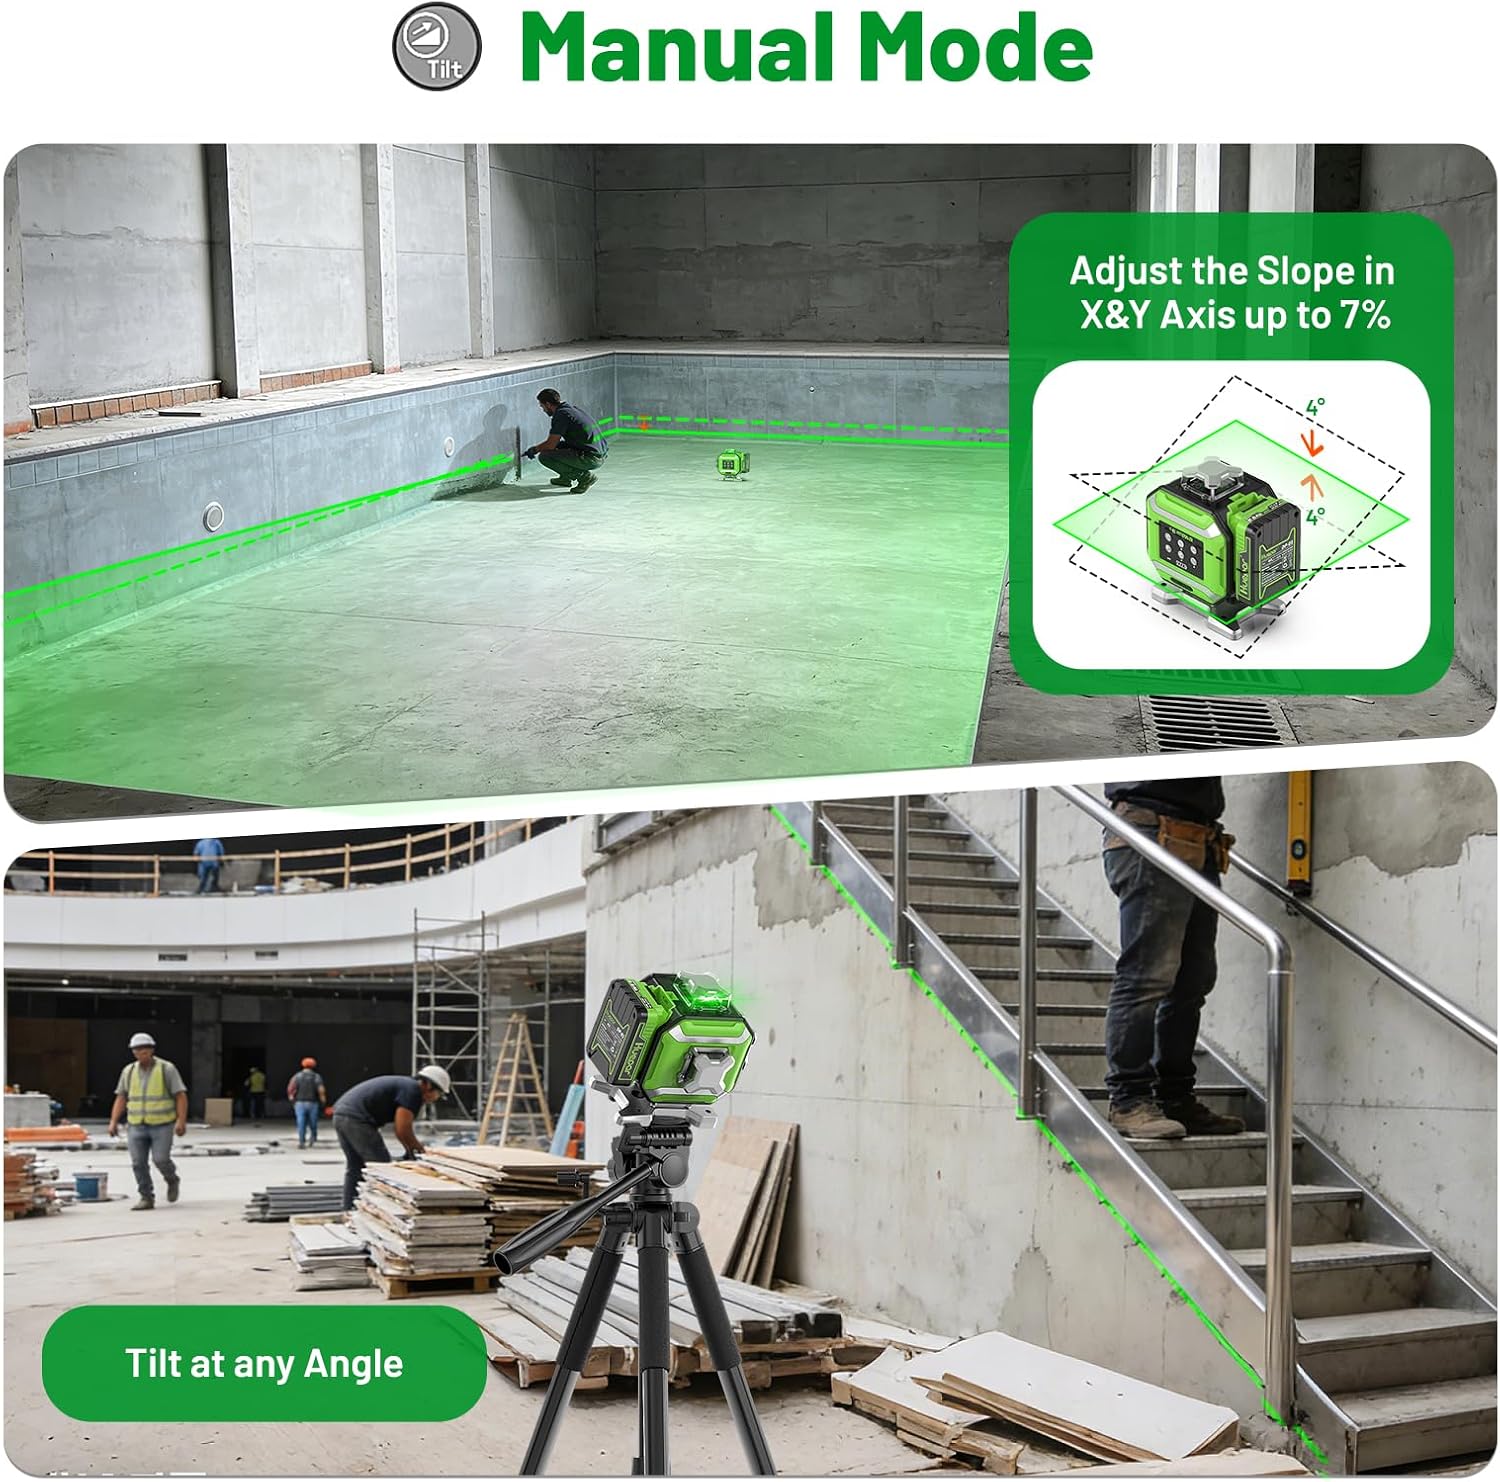
Image: The laser level illustrating its manual mode capabilities, including adjusting slopes up to 7% on X and Y axes and tilting at any angle.
4.4 Pulse Mode for Extended Range
Activate Pulse Mode to extend the working distance of the laser level up to 200 feet when used with a compatible Huepar laser receiver (sold separately). This mode is essential for outdoor construction and bright jobsite conditions where laser line visibility is critical.

Image: The laser level operating in Pulse Mode, extending its range up to 200 feet with a Huepar laser receiver in an outdoor construction setting.
4.5 4x360° Full Layout & Switchable Laser Lines
The DP04CG projects four 360° laser planes, providing comprehensive coverage for various layout tasks. You can independently switch any laser line (horizontal or vertical) using the dedicated 'H' and 'V' buttons, allowing for flexible application in different scenarios.
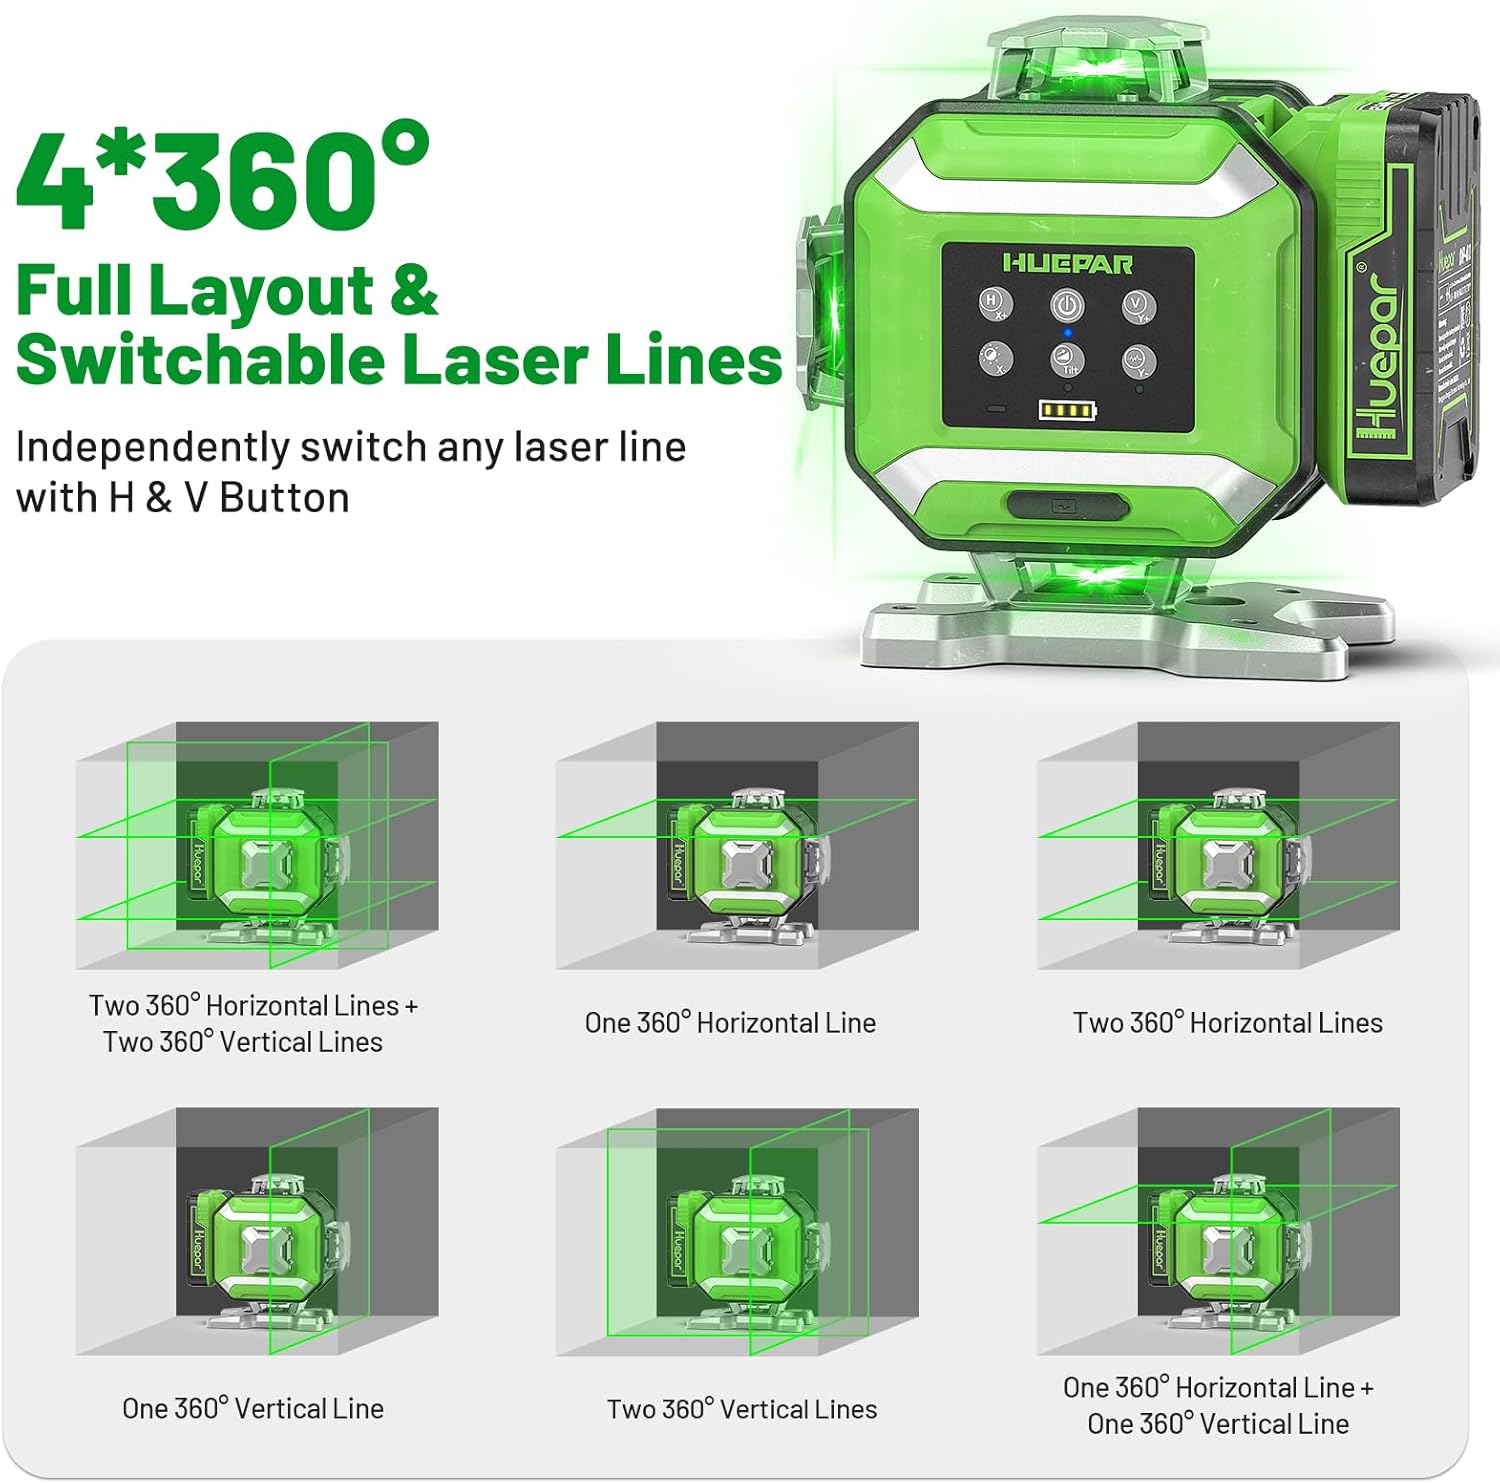
Image: Visual representation of the 4x360° laser lines, demonstrating how horizontal and vertical lines can be independently switched for full layout flexibility.
4.6 Adjustable Brightness Levels
The laser level offers 5 brightness levels (100%, 75%, 50%, 25%) and a Flash Mode to optimize visibility. Adjusting the brightness helps conserve battery life and adapts the laser visibility to both indoor and outdoor environments. Flash Mode enhances beam visibility in strong sunlight.

Image: The laser level demonstrating its 5 brightness levels and Flash Mode, optimized for visibility in both indoor and outdoor settings.
4.7 Versatile Mounting Options & Durability
Equipped with both 1/4"-20 and 5/8"-11 mounting threads, the laser level is compatible with various tripods and poles. It includes a magnetic bracket for secure attachment to metal surfaces and fold-out support legs for enhanced stability. The device is built with IP54 water and dust resistance, ensuring durability in tough jobsite conditions.
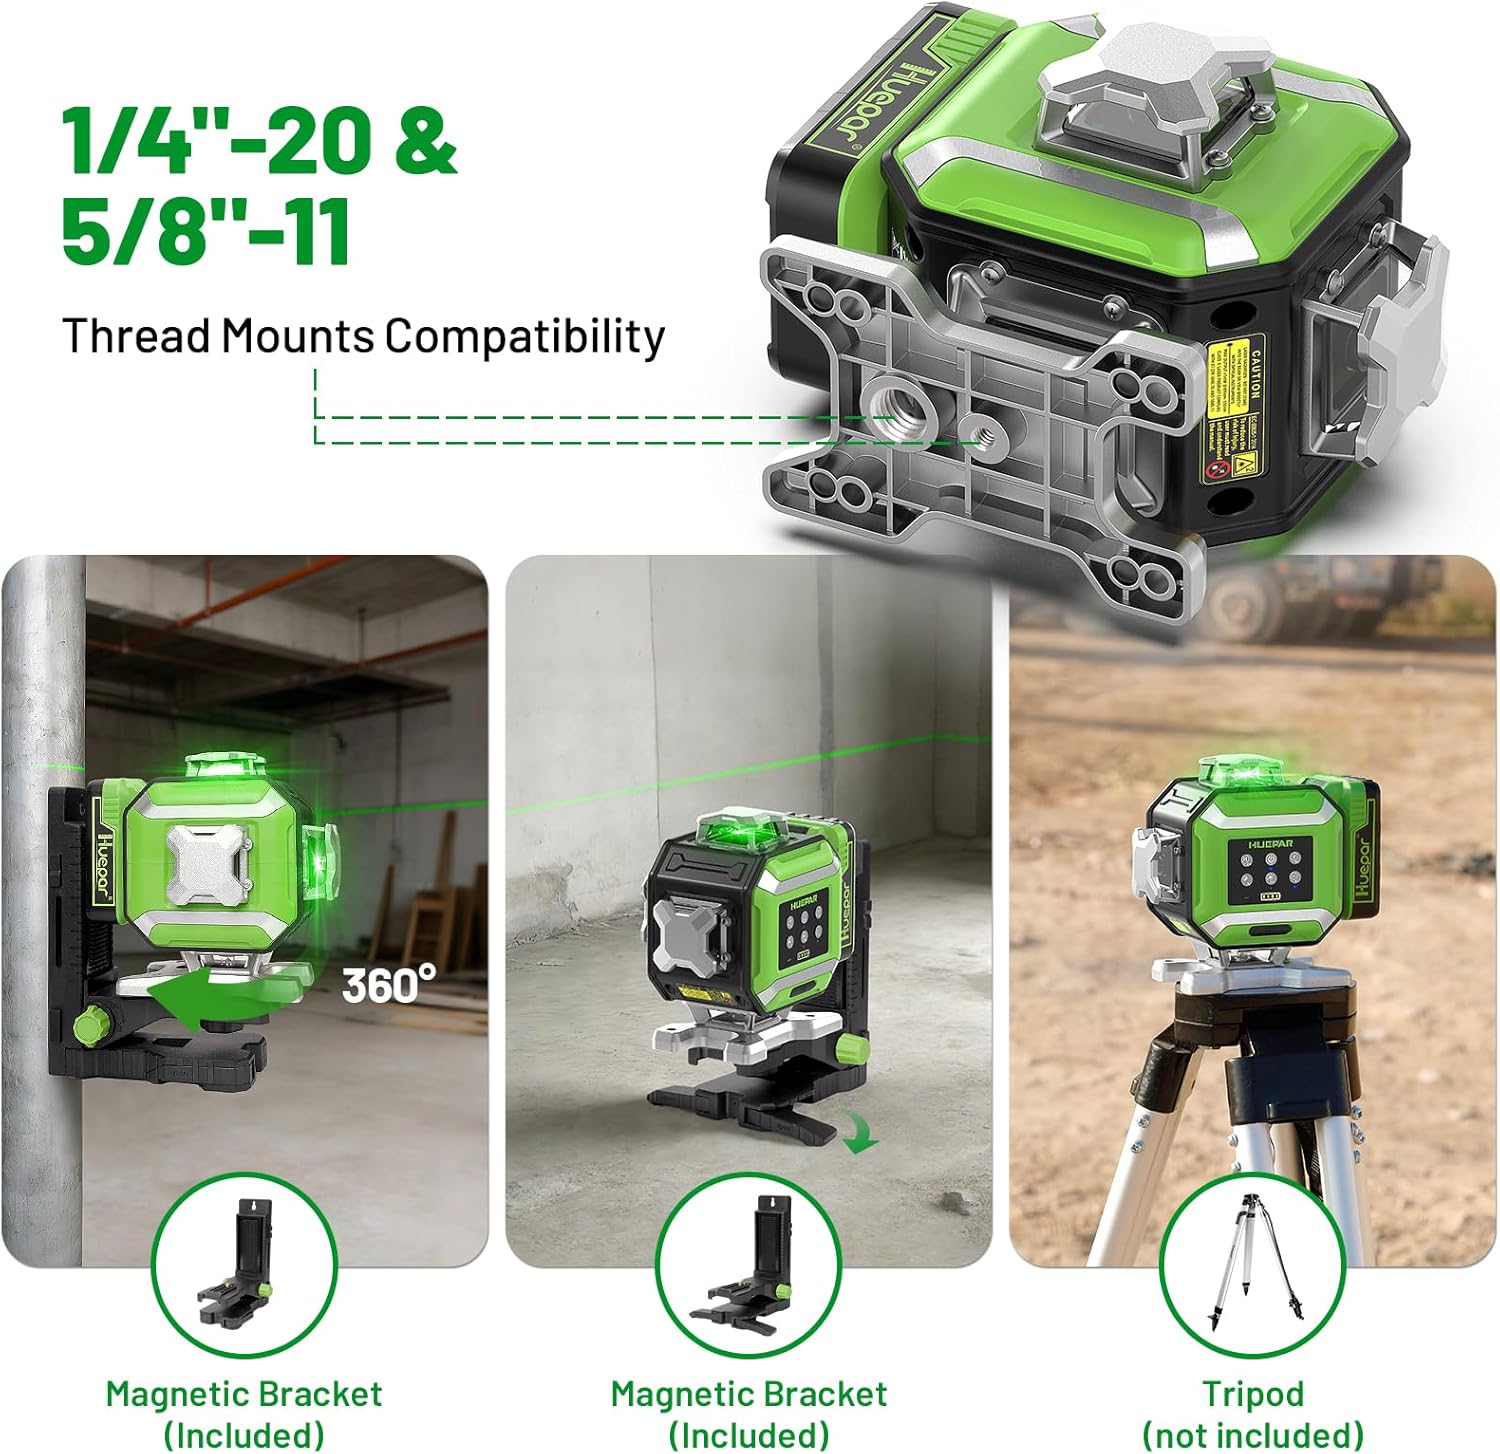
Image: The laser level highlighting its versatile mounting options, including magnetic bracket and tripod compatibility, for various work setups.
4.8 Long Working Time
The DP04CG provides up to 10 hours of continuous operation when all laser lines are active. Four indicators on the device display the current battery level and charging status. The Type-C charging port on the battery allows for separate charging, and the battery can be charged using various sources like phones, laptops, power banks, or car chargers.
5. Setup
5.1 Battery Charging and Installation
- Charging: Connect the provided Type-C cord to the battery and a power adapter. The battery indicators will show charging progress. Ensure the battery is fully charged before first use.
- Installation: Insert the charged battery into the designated battery compartment on the laser level, ensuring proper orientation.
5.2 Mounting the Laser Level
Choose a stable surface or mounting accessory based on your project needs:
- Magnetic Bracket: Attach the magnetic bracket to a metal surface. Secure the laser level to the bracket using its mounting threads.
- Tripod/Pole: Screw the laser level onto a compatible tripod or telescopic pole using either the 1/4"-20 or 5/8"-11 mounting threads.
- Flat Surface: Place the laser level on a stable, flat surface. Extend the fold-out support legs for added stability if needed.
6. Operation
6.1 Powering On/Off
- Power On: Slide the main power switch to the 'ON' position. The device will automatically enter Self-Leveling Mode.
- Power Off: Slide the main power switch to the 'OFF' position.
6.2 Switching Operating Modes
- Self-Leveling Mode: This is the default mode when powered on. The laser will self-level within ±4°. If tilted beyond this, the laser will flash and beep.
- Manual Mode: To enter Manual Mode, press and hold the 'M' button for a few seconds. The laser lines will lock, allowing you to project angled lines. The self-leveling function is deactivated in this mode.
- Pulse Mode: In either Self-Leveling or Manual Mode, press the 'P' button to activate Pulse Mode. This mode is indicated by a specific light pattern and is used with a laser receiver for outdoor or long-distance applications. Press 'P' again to exit Pulse Mode.
6.3 Adjusting Laser Lines and Brightness
- Horizontal Lines: Press the 'H' button to cycle through the available horizontal laser lines.
- Vertical Lines: Press the 'V' button to cycle through the available vertical laser lines.
- Brightness: In Self-Leveling Mode, press the brightness button (often indicated by a sun icon) to cycle through the 5 brightness levels (100%, 75%, 50%, 25%, Flash Mode).
6.4 Video Guide: Huepar 2026 New Electronic Self Leveling Laser Level
Video: An official product video from Huepar-US Direct demonstrating the features and operation of the Huepar 2026 New Electronic Self Leveling Laser Level.
7. Maintenance
- Cleaning: Use a soft, damp cloth to clean the device. Do not use abrasive cleaners or solvents. Keep the laser apertures clean and free of dust.
- Storage: Store the laser level in its hard carry case in a dry, cool place when not in use. Remove the battery if storing for extended periods.
- Battery Care: Avoid fully discharging the battery frequently. Recharge the battery regularly, even if not in use, to maintain its lifespan.
8. Troubleshooting
| Problem | Possible Cause | Solution |
|---|---|---|
| Laser line flashes and beeps in Self-Leveling Mode. | Device is tilted beyond ±4° self-leveling range. | Place the device on a more level surface or adjust its position until it is within the self-leveling range. |
| Laser lines are dim or not visible outdoors. | High ambient light or incorrect brightness setting. | Increase brightness level or activate Flash Mode. Use a Huepar laser receiver for outdoor applications. Wear green safety glasses to enhance visibility. |
| Device does not power on. | Battery is low or not installed correctly. | Ensure the battery is fully charged and correctly inserted. Check the power switch position. |
| Laser lines are not straight or accurate. | Device is not properly calibrated or is in Manual Mode when self-leveling is required. | Ensure the device is in Self-Leveling Mode for accurate horizontal/vertical lines. If issues persist, contact support for calibration. |
9. Specifications
| Feature | Detail |
|---|---|
| Brand | Huepar |
| Model Number | DP04CG |
| Material | Acrylonitrile Butadiene Styrene |
| Color | Green Beam |
| Style | Electronical 4D laser level |
| Operation Mode | Self-leveling Mode/Manual Mode/Slope Mode |
| Accuracy | ±1/18" at 33 Ft |
| Self-Leveling Range | ±4° |
| Slope Adjustment | Up to 7% (X & Y axes in Manual Mode) |
| Working Time | 10 hours (all laser lines on) |
| Mounting Threads | 1/4"-20 and 5/8"-11 |
| IP Rating | IP54 (Water and Dust Resistant) |
10. Warranty and Support
10.1 Warranty Information
Huepar provides a comprehensive warranty for its products. Please refer to the warranty card included in your package or visit the official Huepar website for detailed warranty terms and conditions.
10.2 Customer Support
For product questions, technical assistance, or troubleshooting, please contact Huepar support:
- Email: support@huepar.com
- WhatsApp Support: Click here to chat with Lisa Support
- Support Duration: 2-5 Years Support for every Huepar tool.
- Technical Help: Lifetime technical support for setup and troubleshooting.
- Response Time: 12-hour response time for inquiries.
You can also visit the official Huepar store on Amazon for more information and related products: Huepar Brand Store