
1. Introduction
Thank you for purchasing the Flrrtenv L-Shaped Desk. This manual provides detailed instructions for assembly, operation, maintenance, and troubleshooting to ensure optimal use and longevity of your desk. Please read this manual thoroughly before beginning assembly and retain it for future reference.

Image 1.1: The Flrrtenv L-Shaped Desk in an L-shaped configuration, showcasing its spacious design and integrated features.
2. Safety Information
- Always assemble the desk on a soft, clean surface to prevent scratches.
- Ensure all screws and fasteners are securely tightened before use. Periodically check and re-tighten as necessary.
- Do not overload the desk or shelves beyond their weight capacity.
- Keep children and pets away from the assembly area. Small parts can be a choking hazard.
- Use only the provided power adapter for the LED lights and power outlets.
- Avoid exposing the desk to excessive moisture or direct sunlight.
3. Package Contents
Before assembly, verify that all components listed in the packing list are present and undamaged. If any parts are missing or damaged, please contact customer support for assistance.
- Desk panels (various sizes)
- Metal frame components
- Fabric drawers (4 units)
- Tableside storage bag
- Power outlet unit with USB ports
- LED light strip with remote control
- Assembly hardware (screws, bolts, Allen wrench)
- Instruction manual
4. Assembly Instructions
This desk offers two primary configurations: an L-shaped setup or a straight, extended desk. Choose the configuration that best suits your space before beginning assembly.
4.1 Choosing Your Configuration
The desk can be assembled in an L-shape (left or right orientation) or as a long, straight desk. The assembly steps will vary slightly depending on your chosen layout. Refer to the diagrams below to visualize the options.

Image 4.1: Two possible desk configurations: L-shaped and straight.
4.2 General Assembly Steps
- Unpack and Identify Parts: Lay out all components and hardware. Match them against the packing list.
- Assemble the Metal Frames: Connect the metal legs and support bars using the provided screws. Ensure all connections are firm.
- Attach Desk Panels: Secure the main desk panels to the assembled metal frames. Pay attention to the orientation for your chosen L-shape or straight configuration.
- Install Monitor Stand: Attach the monitor stand risers and top panel to the main desk surface.
- Integrate Power Outlet: Carefully place the power outlet unit into its designated slot on the desk surface.
- Insert Fabric Drawers: Slide the fabric drawers into their respective compartments.
- Attach Tableside Bag: Secure the tableside storage bag to the side of the desk frame.
- Apply LED Light Strip: Adhere the LED light strip to the underside of the monitor stand or desired location.
- Final Check: Ensure all connections are tight and the desk is stable before placing items on it.
5. Operating Instructions
5.1 Power Outlet and USB Ports
The desk is equipped with 3 AC outlets, 1 USB-A port, and 1 USB-C port for convenient device charging and power access.
- AC Outlets: Provide standard power for devices up to 230V/13A.
- USB-A Port: Delivers 5V/3A for charging compatible USB devices.
- USB-C Port: Delivers 5V/3A for charging compatible USB-C devices.
To use, connect the desk's main power cord to a wall outlet. Then, plug your devices into the integrated outlets and ports.

Image 5.1: Integrated power outlets and USB ports for convenient charging.
5.2 LED Light Strip
The built-in RGB LED light strip offers customizable lighting to enhance your workspace or gaming environment. It is controlled via a wireless remote.
- Power On/Off: Use the power button on the remote to turn the lights on or off.
- Color Selection: Choose from 30 static colors using the color buttons on the remote.
- Dynamic Modes: Select from 22 dynamic modes for various lighting effects.
- Brightness Adjustment: Adjust the light intensity with 5 brightness levels.
- Speed/Flicker Frequency: Modify the speed of dynamic modes or flicker frequency for certain effects.

Image 5.2: LED light strip remote control and its functions.
6. Features Overview
6.1 Monitor Stand
The elevated monitor stand helps to raise your screen to an ergonomic viewing height, reducing neck and eye strain. It also provides additional storage space underneath for small items.
Image 6.1: The integrated monitor stand provides ergonomic height and extra storage.
6.2 Fabric Drawers
The desk includes four removable fabric drawers, offering ample storage for documents, stationery, and other office or gaming accessories. These drawers help keep your desktop organized and clutter-free.

Image 6.2: Four removable fabric drawers for organized storage.
6.3 Tableside Storage Bag
A convenient tableside storage bag is included for quick access to frequently used items like magazines, notebooks, or pens. It can be folded when not in use.
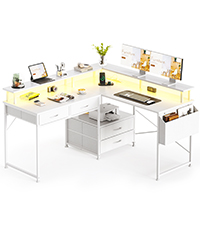
Image 6.3: Tableside storage bag for easy access to items.
7. Maintenance
- Cleaning: Wipe the desk surfaces with a soft, damp cloth. Avoid harsh chemicals or abrasive cleaners that may damage the finish.
- Dusting: Regularly dust the desk and its components to prevent buildup.
- Hardware Check: Periodically inspect all screws and fasteners to ensure they remain tight. Re-tighten if necessary to maintain stability.
- Fabric Drawers: The fabric drawers can be spot cleaned with a mild detergent and water. Allow them to air dry completely.
8. Troubleshooting
| Problem | Possible Cause | Solution |
|---|---|---|
| Desk is wobbly or unstable. | Loose screws or uneven floor. | Ensure all assembly screws are tightened. Adjust leveling feet if present, or place shims under legs on uneven surfaces. |
| LED lights are not working. | Power connection issue, remote battery dead, or light strip damage. | Check if the LED strip is properly connected to its power source. Replace remote control batteries. Inspect the light strip for visible damage. |
| Power outlets/USB ports not functioning. | Desk's main power cord unplugged, or internal wiring issue. | Ensure the desk's main power cord is securely plugged into a working wall outlet. Test with another device. If issues persist, contact customer support. |
| Missing or damaged parts during assembly. | Shipping damage or packaging error. | Do not return the entire product. Contact Flrrtenv customer support with your purchase details and a description of the missing/damaged part for replacement. |
9. Specifications
| Feature | Detail |
|---|---|
| Brand | Flrrtenv |
| Model Number | F-ZJSC-BK-CA-NEW |
| Color | Black |
| Product Dimensions (L-Shape) | 120D x 94W x 128H Centimetres (approx. 50.4" L-side, 47.3" W-side, 29.5" H) |
| Item Weight | 26.5 kg |
| Shape | L-Shape (Reversible to Straight) |
| Number of Drawers | 4 (Fabric) |
| Number of Shelves | 1 (Monitor Stand) |
| Power Outlets | 3 AC Outlets (230V/13A) |
| USB Ports | 1 USB-A (5V/3A), 1 USB-C (5V/3A) |
| LED Lights | RGB, 30 Colors, 22 Dynamic Modes, 5 Brightness Levels |
| Recommended Uses | Working, Gaming, Studying |

Image 9.1: Detailed product dimensions.
10. Warranty and Support
Flrrtenv provides excellent after-sales service to address any issues you may encounter. For warranty claims, missing parts, or technical support, please refer to your purchase documentation for contact information or visit the official Flrrtenv website. Please have your model number (F-ZJSC-BK-CA-NEW) and purchase date ready when contacting support.