1. Safety Information
Always prioritize safety when operating the plasma cutter. Failure to follow safety guidelines can result in serious injury or death.
- Electrical Safety: Ensure the machine is properly grounded. Do not operate in wet conditions. Always disconnect power before performing maintenance or changing parts.
- Eye and Face Protection: Wear appropriate welding helmets with suitable shade levels to protect against intense light and UV radiation.
- Body Protection: Wear flame-resistant clothing, heavy-duty gloves, and safety shoes. Avoid loose clothing.
- Fume Ventilation: Operate in a well-ventilated area to avoid inhaling hazardous fumes. Use fume extractors if necessary.
- Fire Prevention: Keep flammable materials away from the cutting area. Have a fire extinguisher readily available.
- Hot Parts: Allow the machine and cut materials to cool before handling.
- Compressed Air: Ensure air lines are securely connected and free from leaks. Do not exceed recommended air pressure.
2. Product Overview
The Reboot RBC4000PUMP is a compact and efficient plasma cutter designed for various metal cutting tasks. It features an integrated air compressor, eliminating the need for external air supply, which enhances portability and simplifies setup.
2.1 Key Features
- Built-in Air Compressor: Integrated high-efficiency air pump for immediate operation without external air units.
- Portability: Compact and self-contained design for easy transport and use in various locations.
- Digital Control: IGBT inverter technology with digital display for precise current and voltage adjustments.
- Clean and Max Cut: Capable of 3/8 inch clean cuts and 3/5 inch maximum cuts at 40A.
- Optimized Airflow: Engineered pump delivers stable, continuous airflow for consistent plasma arc and clean cuts.
2.2 Components and Accessories
The following items are typically included with your Reboot RBC4000PUMP Plasma Cutter:
- Reboot RBC4000PUMP Plasma Cutter Machine
- Plasma Cutting Torch (PT-31 type)
- Ground Clamp (2M/6.6FT)
- Electrode and Nozzle Kit (consumables)
- User Manual
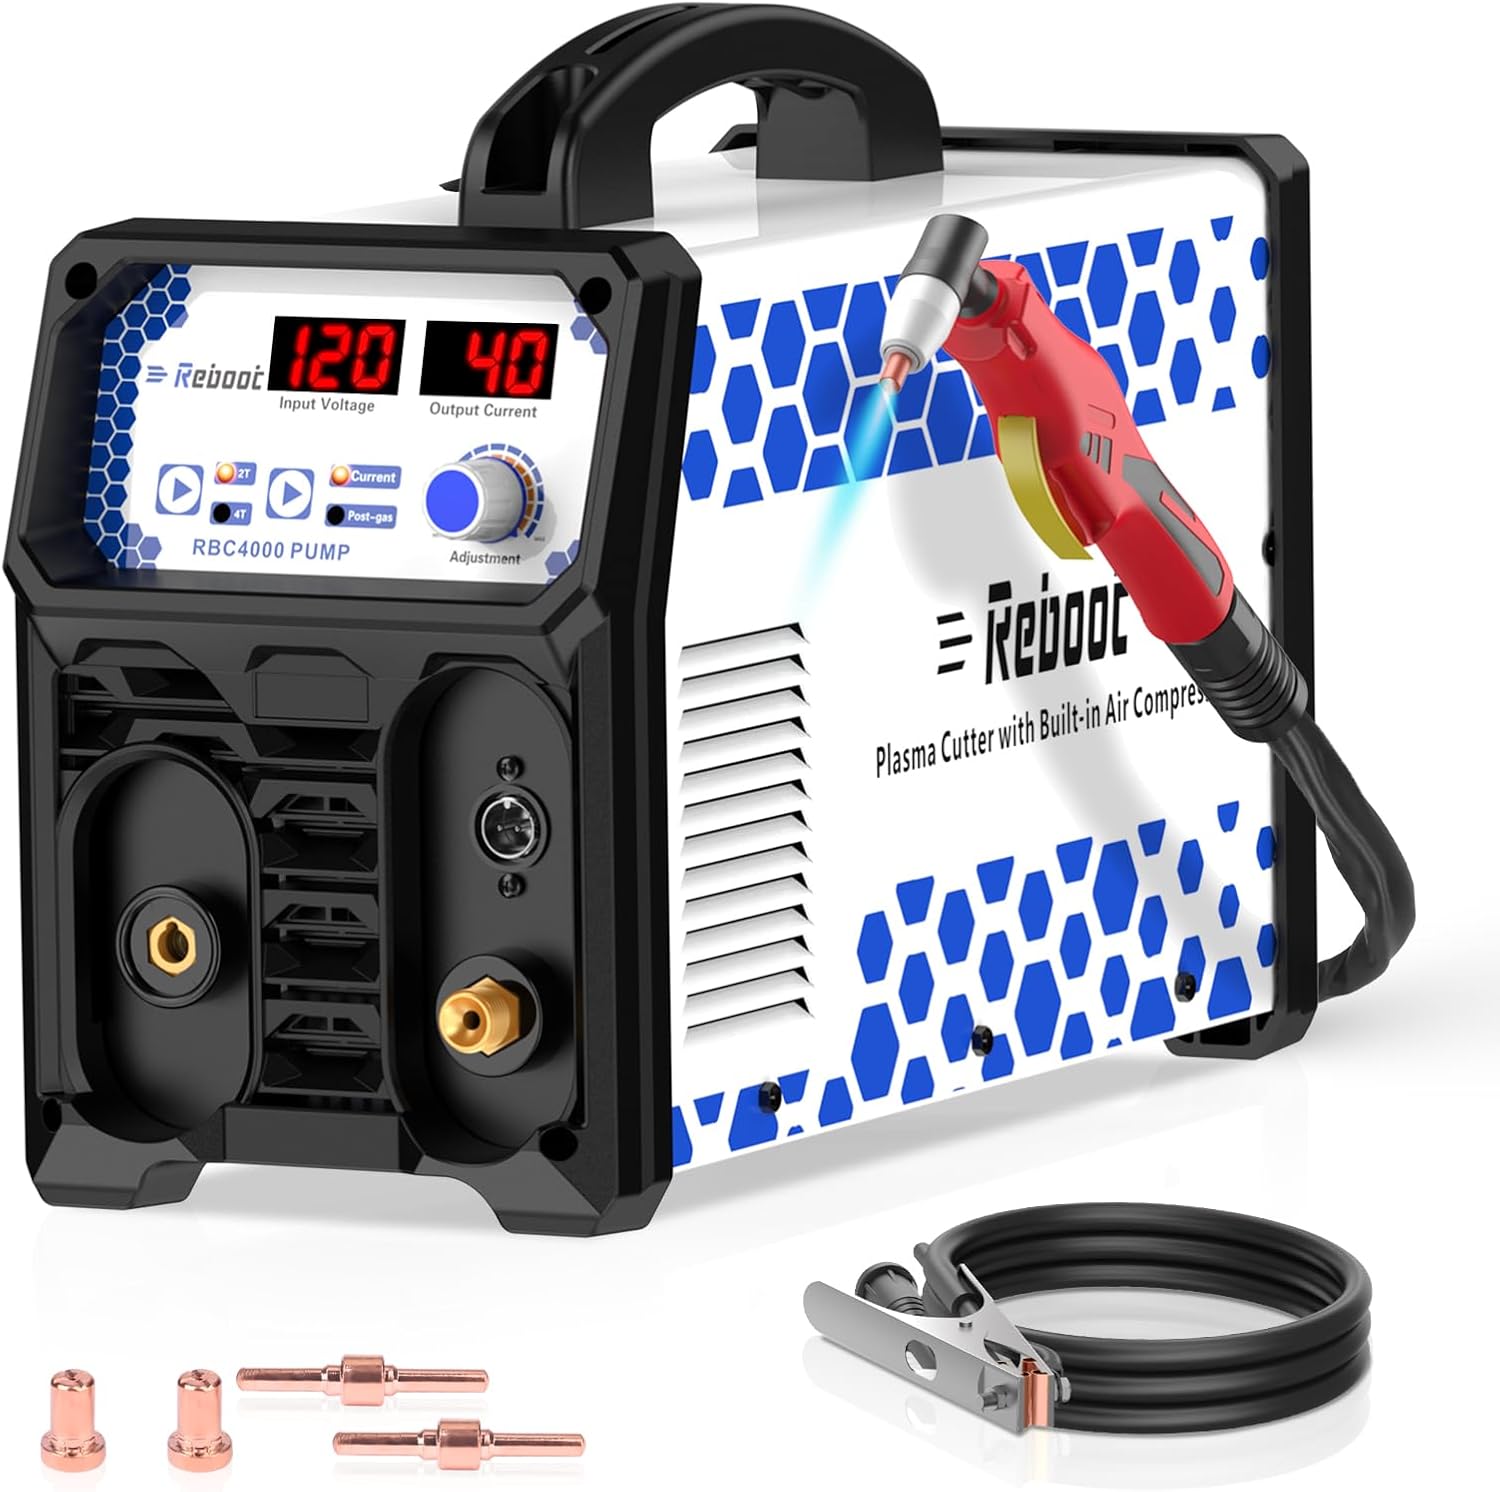
Figure 1: Reboot RBC4000PUMP Plasma Cutter main unit.
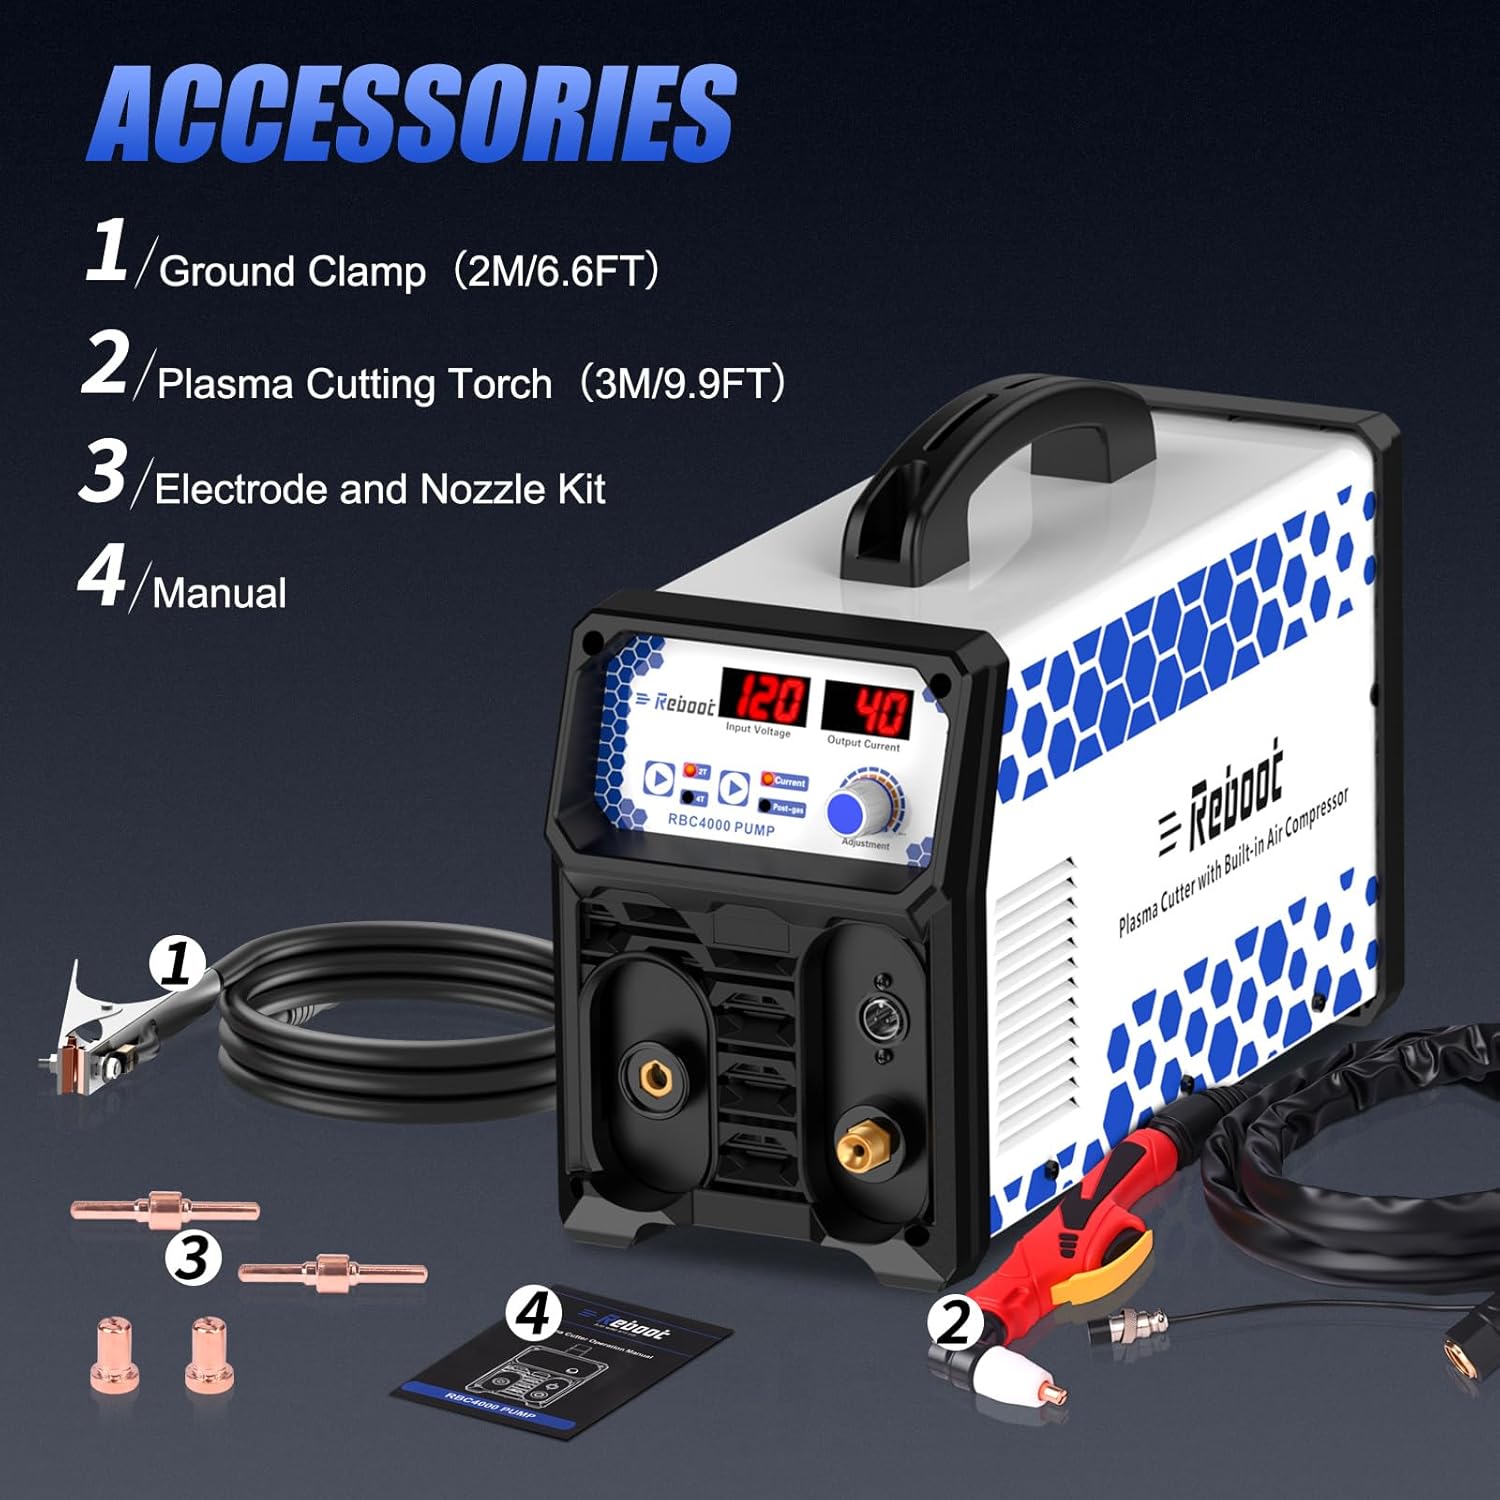
Figure 2: Included accessories for the plasma cutter.

Figure 3: Control panel with voltage display, current display, 2T/4T button, Post Gas Time, and Current Adjust Knob.
3. Setup
Follow these steps to prepare your plasma cutter for operation.
3.1 Connecting the Torch and Ground Clamp
- Connect the plasma cutting torch to the designated port on the front panel of the machine. Ensure it is securely tightened.
- Connect the ground clamp cable to the appropriate terminal on the front panel.
- Attach the ground clamp firmly to the workpiece or work table, ensuring good electrical contact.
3.2 Power Connection
- Ensure the power switch on the rear of the machine is in the 'OFF' position.
- Connect the power cord to a suitable 120V power outlet. Verify that the power supply meets the machine's requirements.
3.3 Consumables Installation (Torch)
Proper installation of torch consumables is crucial for effective cutting.
- Unscrew the torch cap.
- Insert the electrode into the torch head.
- Place the swirl ring over the electrode.
- Install the nozzle over the swirl ring and electrode.
- Screw the torch cap back on securely.
Video: Basic setup demonstration for a Reboot plasma cutter. Note: This video features model RBC6000DL, but the general setup principles apply to RBC4000PUMP.
4. Operating Instructions
Once the machine is set up, follow these steps for safe and effective cutting.
4.1 Basic Operation
- Power On: Flip the power switch on the rear of the machine to the 'ON' position. The digital display will illuminate.
- Adjust Current: Use the 'Adjustment' knob on the control panel to set the desired cutting current (Amps). Refer to the cutting chart in the full manual for recommended settings based on material type and thickness.
- Select 2T/4T Mode: Press the 2T/4T button to select the desired trigger mode.
- 2T (Two Touch): Hold the trigger to activate cutting; release to stop. Used for short, intermittent cuts.
- 4T (Four Touch): Press once to start cutting; press again to stop. Better for longer cuts, eliminating the need to hold the trigger continuously.
- Set Post-Gas Time: Adjust the 'Post-gas' knob to set the duration the air flows after cutting stops. This cools the torch and extends consumable life.
- Initiate Cut: Position the torch nozzle close to the workpiece. Press the torch trigger to initiate the pilot arc and begin cutting. Maintain a consistent travel speed for a clean cut.
- Monitor Cut: Observe the cutting process. Adjust travel speed or current if the arc is unstable or the cut quality is poor.

Figure 4: Plasma cutting in progress, demonstrating the arc and sparks.

Figure 5: Visual representation of clean cut (3/8" at 40A) and maximum cut (3/5" at 40A) capabilities.

Figure 6: The plasma cutter being used for diverse cutting applications on various metal types.
5. Maintenance
Regular maintenance ensures optimal performance and extends the lifespan of your plasma cutter.
5.1 Daily Maintenance
- Clean the torch nozzle and electrode regularly to remove slag and debris.
- Inspect all cables and connections for damage or loose fittings.
- Check the air filter for moisture or contaminants.
5.2 Consumables Replacement
Electrodes and nozzles are wear parts and need to be replaced periodically. Signs of wear include poor cut quality, difficulty starting the arc, or excessive slag.
- Ensure the machine is powered off and disconnected from the power supply.
- Unscrew the torch cap and remove the old nozzle, swirl ring, and electrode.
- Clean the torch head thoroughly.
- Install new consumables in the correct order: electrode, swirl ring, nozzle, and then screw the torch cap back on.
Video: Demonstration of replacing consumables on a plasma cutting torch to maintain cutting efficiency.
6. Troubleshooting
This section provides solutions to common issues you might encounter.
| Problem | Possible Cause | Solution |
|---|---|---|
| Machine does not power on | No power supply; loose power cord; faulty power switch. | Check power outlet and connections; ensure power switch is ON; contact support if issue persists. |
| No pilot arc or arc unstable | Worn consumables (electrode/nozzle); poor ground connection; incorrect air pressure; insufficient current. | Replace consumables; ensure ground clamp is secure; adjust air pressure; increase cutting current. |
| Poor cut quality (excessive slag, rough edges) | Worn consumables; incorrect cutting speed; insufficient current; improper torch height. | Replace consumables; adjust cutting speed; increase current; maintain correct torch-to-workpiece distance. |
| Overheat indicator active | Exceeded duty cycle; blocked ventilation. | Allow machine to cool down; ensure proper ventilation around the unit. |
7. Specifications
| Feature | Detail |
|---|---|
| Model Number | RBC4000PUMP |
| Brand | Reboot |
| Power Source | AC |
| Voltage | 120 Volts |
| Output Current | 40A (Maximum) |
| Clean Cut Thickness | 3/8 Inch @ 40A |
| Max Cut Thickness | 3/5 Inch @ 40A |
| Technology | IGBT Inverter, High Frequency |
| Air Compressor | Built-in |
| Item Weight | 13.5 kg |
| Parcel Dimensions | 53.97 x 38.73 x 27.94 cm |
8. Warranty and Support
For warranty information, technical support, or service inquiries, please refer to the contact details provided in your product packaging or visit the official Reboot website. Keep your purchase receipt as proof of purchase for warranty claims.


