
1. Introduction
This manual provides detailed instructions for the installation, operation, and maintenance of your Arvitek 8x8 HDMI Matrix Switch. This device is designed to distribute 8 HDMI input signals to 8 HDMI output displays, supporting resolutions up to 4K@60Hz (4:4:4). It offers multiple control methods for flexible management in various professional and home AV setups.
2. Package Contents
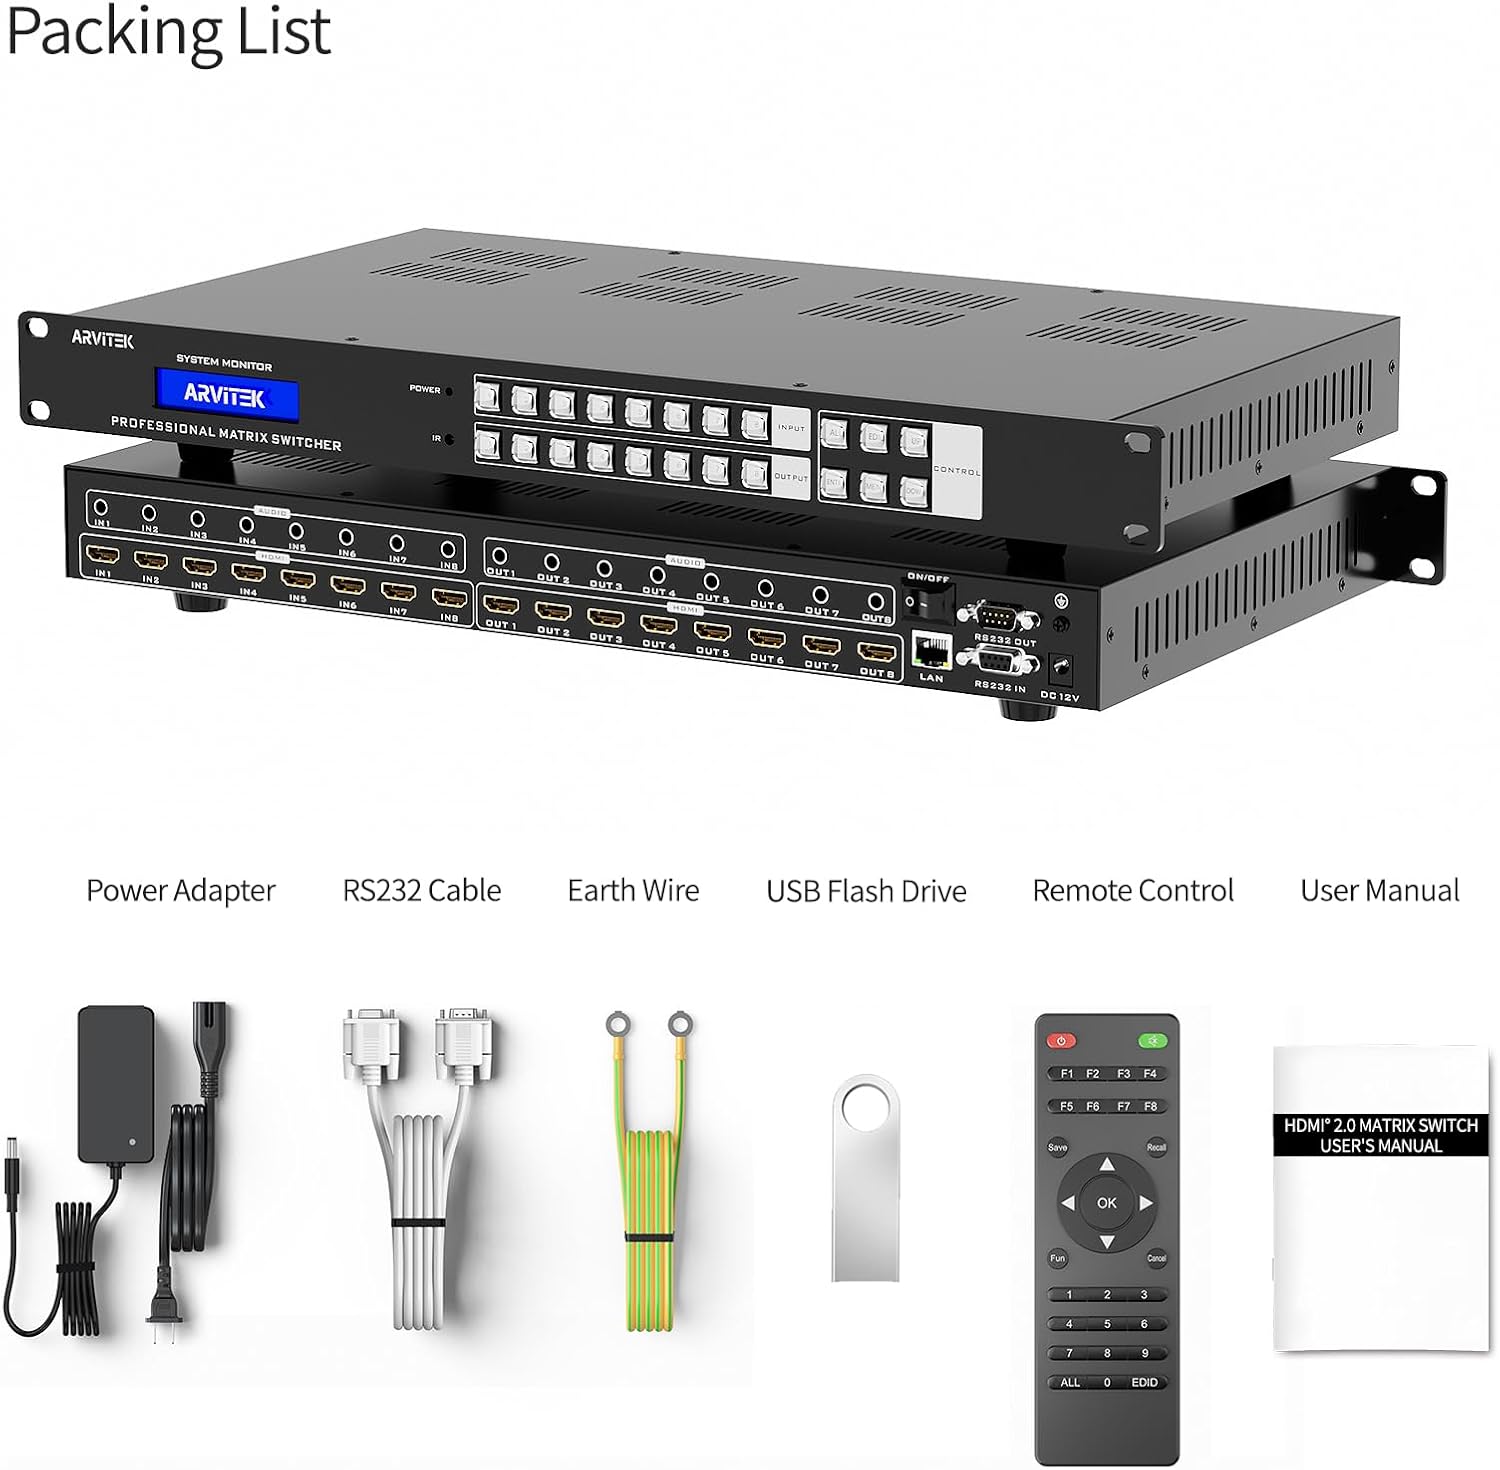
Please verify that all items listed below are included in your package:
- HDMI Matrix Switch (19x10x1.75 inch, 1U 19" rack mountable) x 1
- IR Remote x 1
- RS232 Cable x 1
- User Manual x 1
- USB Drive for software x 1
- Power Adapter x 1
- Ground Wire x 1
3. Key Features
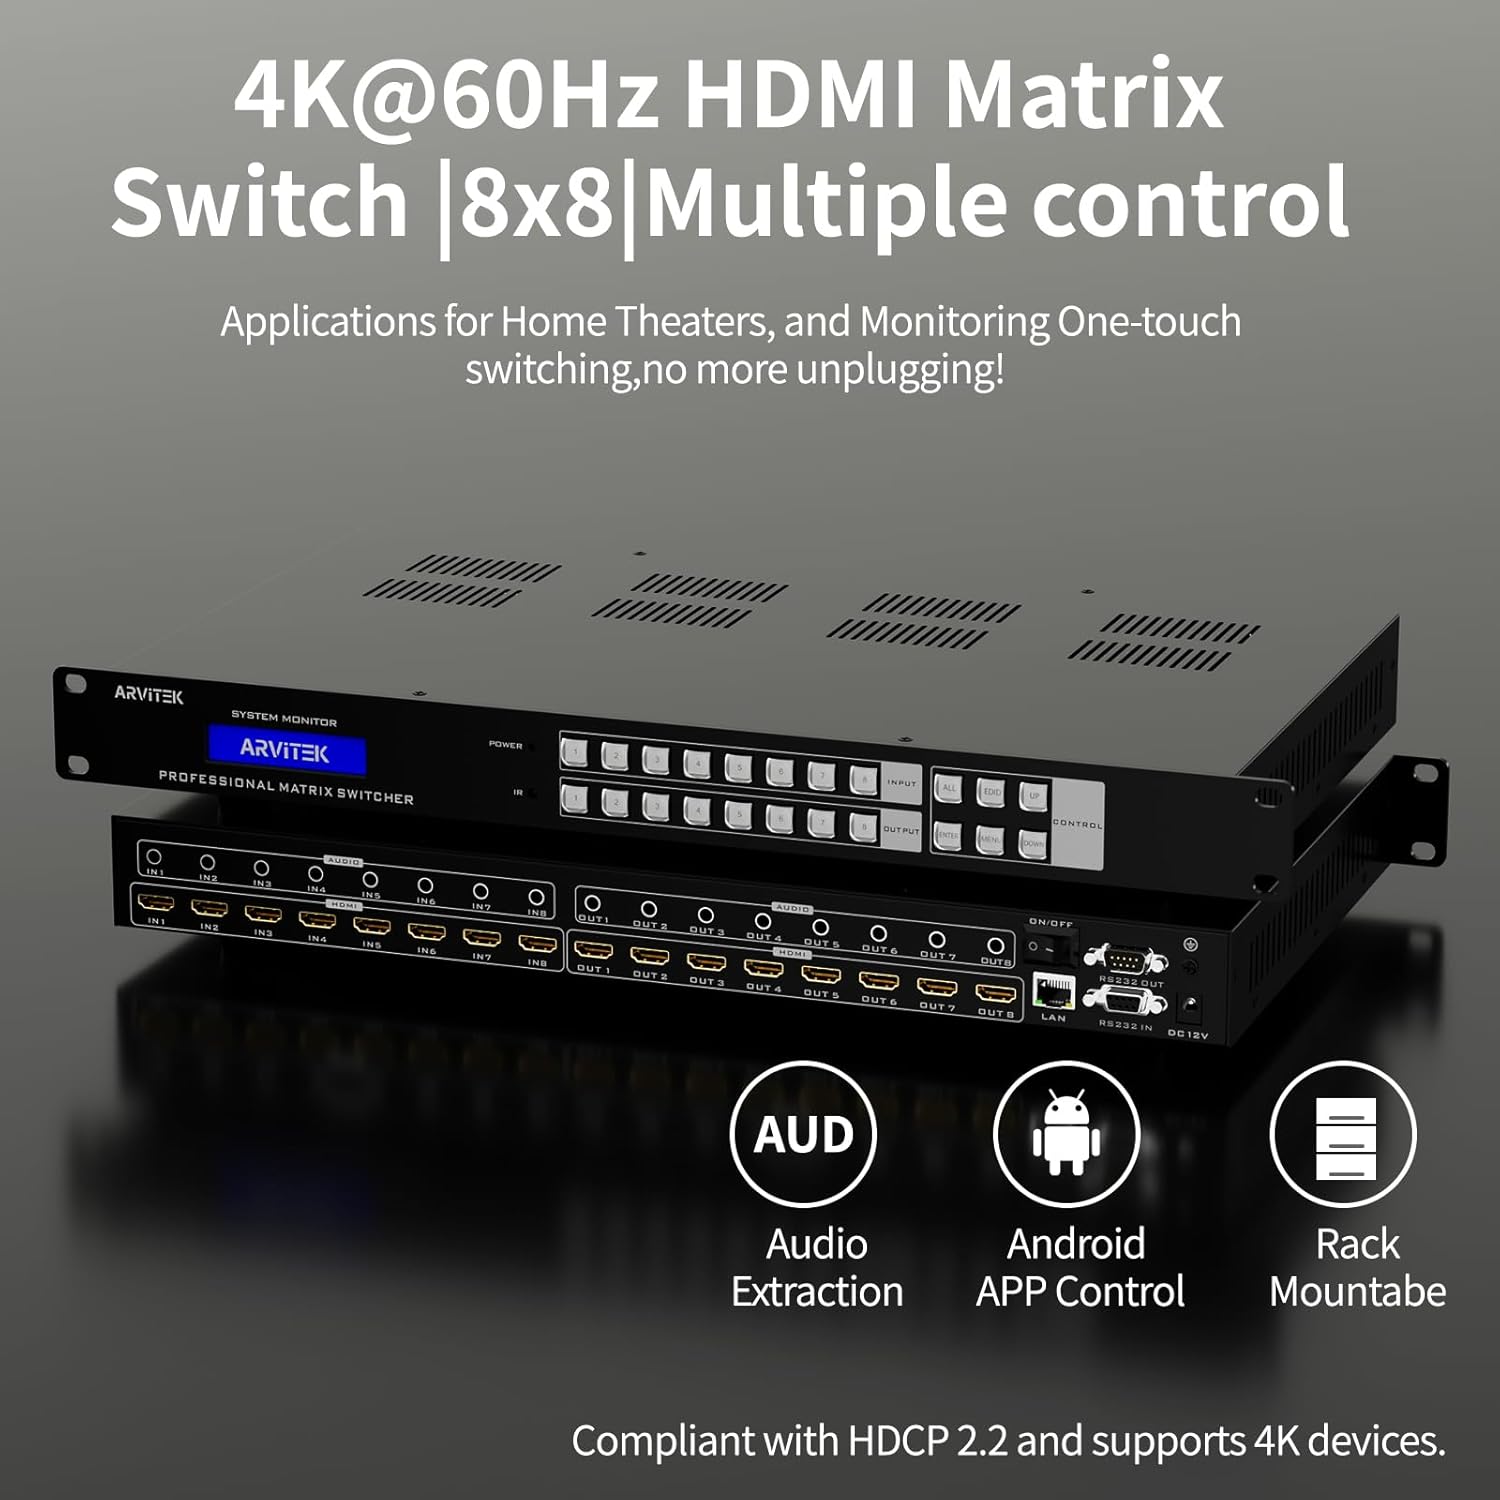
- 4K@60Hz High Resolution: Supports 4K*2K@60Hz (4:4:4), 1080P@60Hz, and various color spaces (RGB, YCbCr 4:4:4/4:2:2/4:2:0). Compatible with HDMI 2.0 and HDCP 2.2.
- Multiple Control Methods: Switch inputs/outputs via Panel Buttons, WEB GUI, RS-232, LAN, IR Remote, Software, or Android App.
- EDID Management: Features EDID auto-adaptive technology for optimized resolution across connected displays and rewritable EDID for enhanced compatibility.
- 3.5mm Audio Extraction: Includes 8x 3.5mm AUX audio extraction ports for separating audio from HDMI signals to external sound systems.
- Scene Management: Supports customized scene preset management (up to 16 scenes) with recall and scene rotation functions.
- Rack Mountable: Designed to fit a 1U 19" rack for professional installations.
4. Product Overview
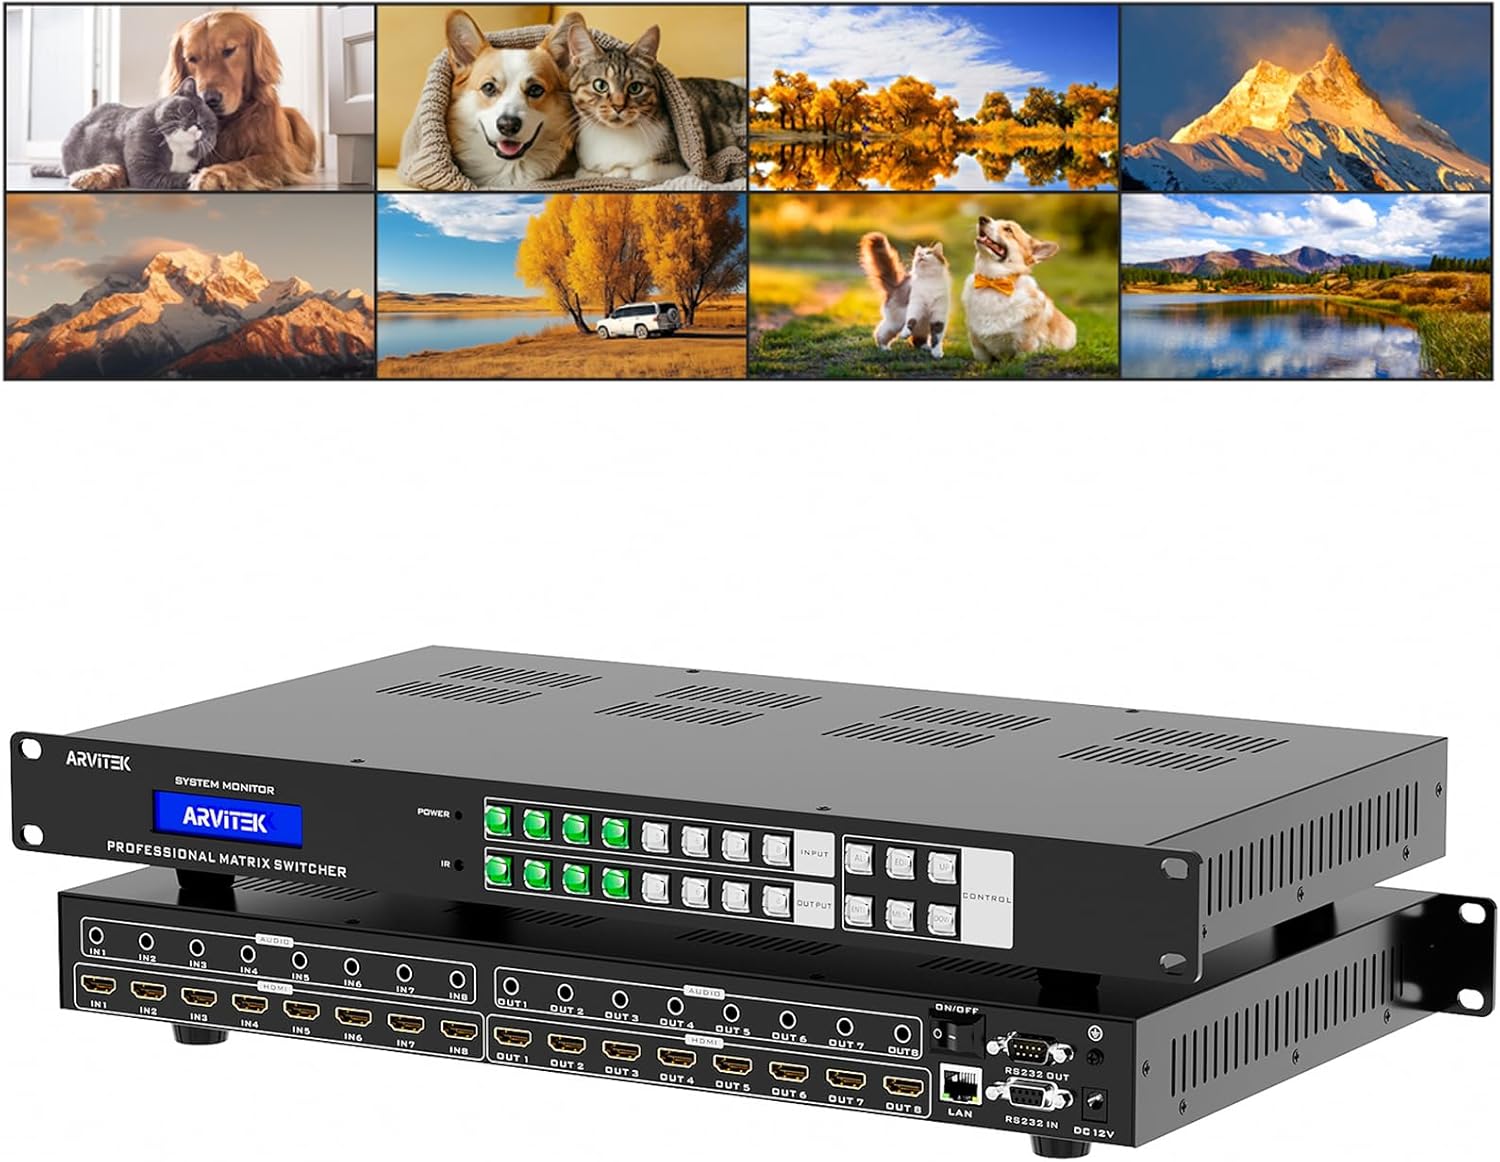
The Arvitek 8x8 HDMI Matrix Switch allows for flexible routing of HDMI signals. It can operate in various modes to suit different display requirements.
4.1 Operation Modes
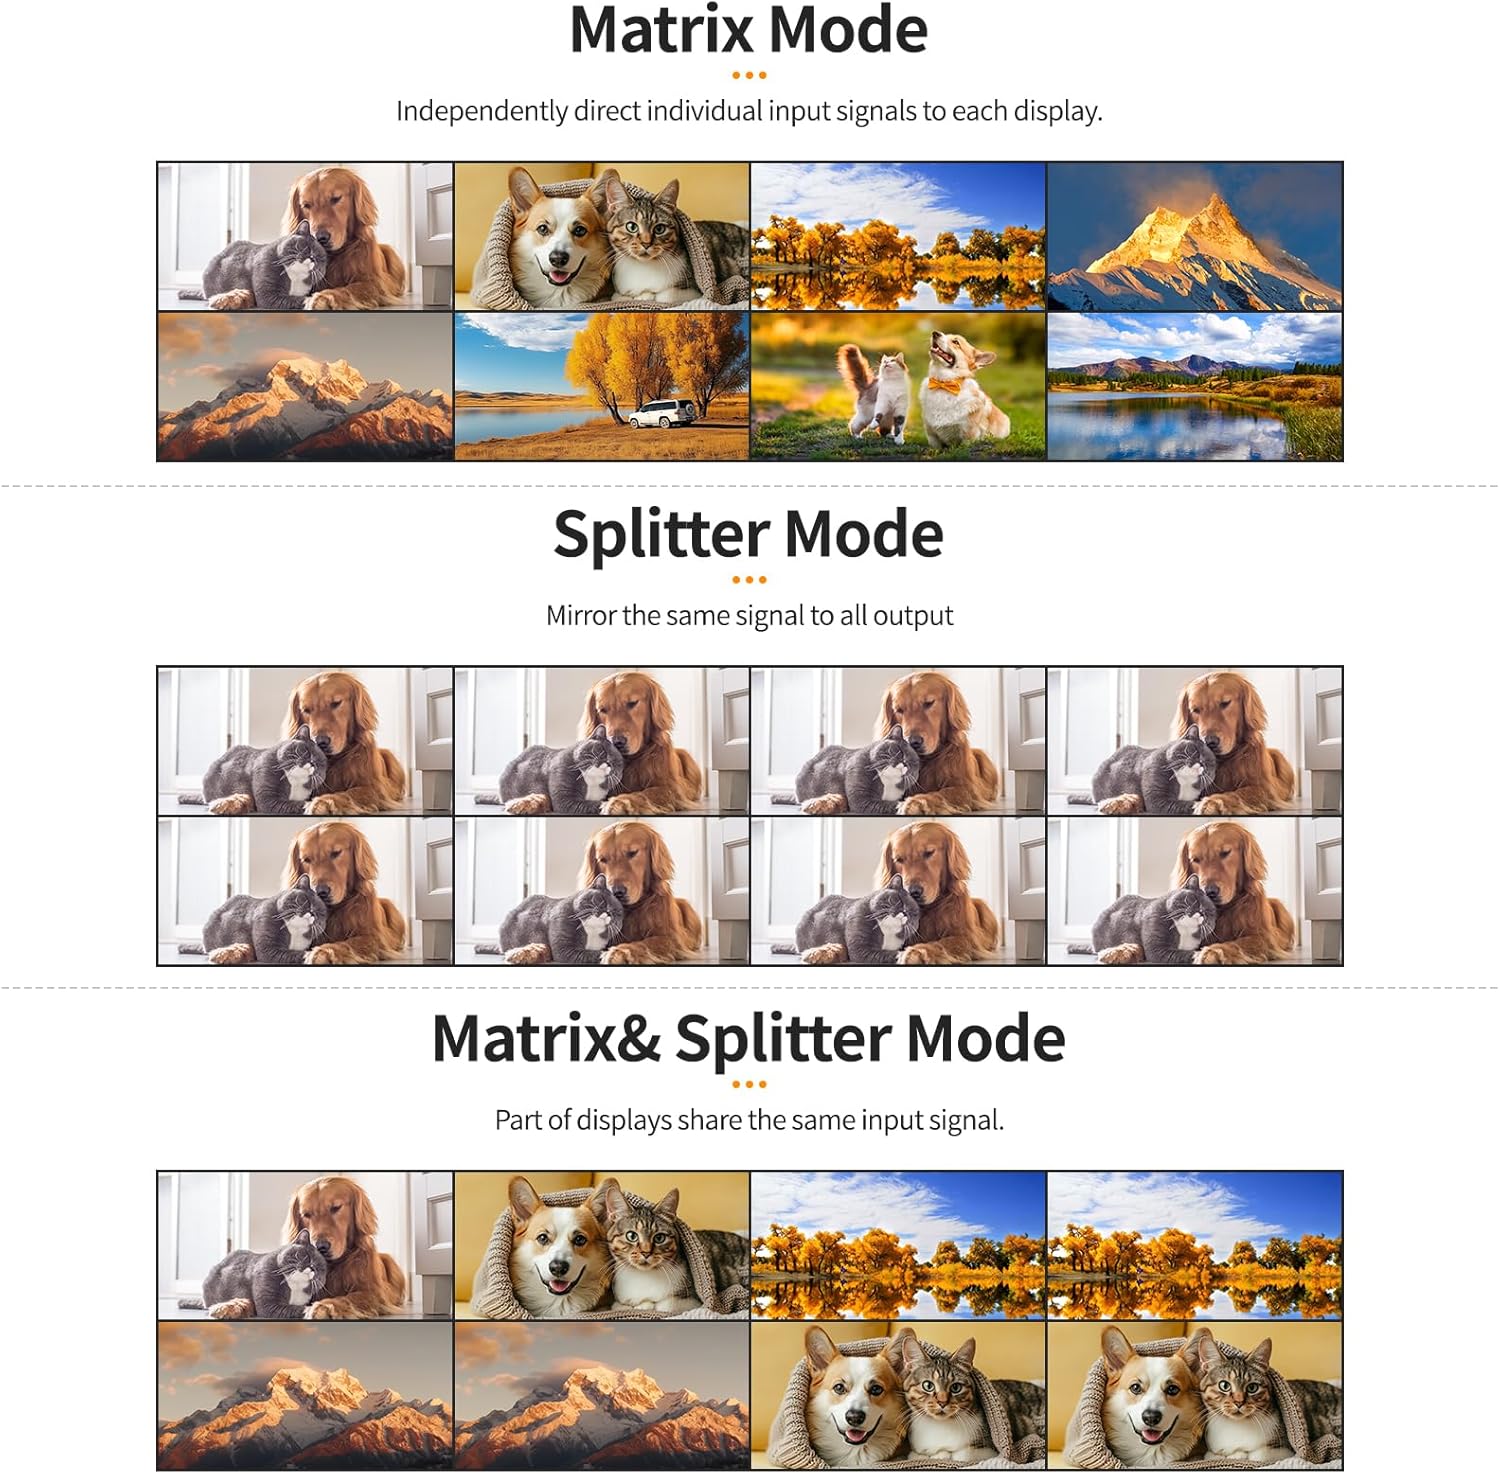
- Matrix Mode: Independently directs individual input signals to specific displays.
- Splitter Mode: Mirrors a single input signal to all output displays.
- Matrix & Splitter Mode: Allows a portion of displays to share the same input signal while others receive independent inputs.
5. Setup
Follow these steps to set up your Arvitek 8x8 HDMI Matrix Switch:
- Power Off Devices: Ensure all source devices (e.g., Blu-ray players, gaming consoles) and display devices (e.g., TVs, monitors) are powered off before making any connections.
- Connect HDMI Sources: Connect your HDMI source devices to the HDMI IN ports (IN 1 to IN 8) on the rear panel of the matrix switch using high-quality HDMI cables.
- Connect HDMI Displays: Connect your HDMI display devices to the HDMI OUT ports (OUT 1 to OUT 8) on the rear panel of the matrix switch using high-quality HDMI cables.
- Connect Audio (Optional): If using audio extraction, connect external amplifiers or sound systems to the 3.5mm AUX audio output ports corresponding to the desired HDMI outputs.
- Connect Control Cables (Optional): For advanced control, connect the RS232 cable to a control system or the LAN cable to your network.
- Connect Power: Connect the provided power adapter to the DC 12V IN port on the matrix switch and then plug it into a power outlet.
- Power On: Power on the matrix switch, followed by your display devices, and then your source devices.
6. Operating Instructions
The Arvitek 8x8 HDMI Matrix Switch offers multiple ways to control input-to-output routing.
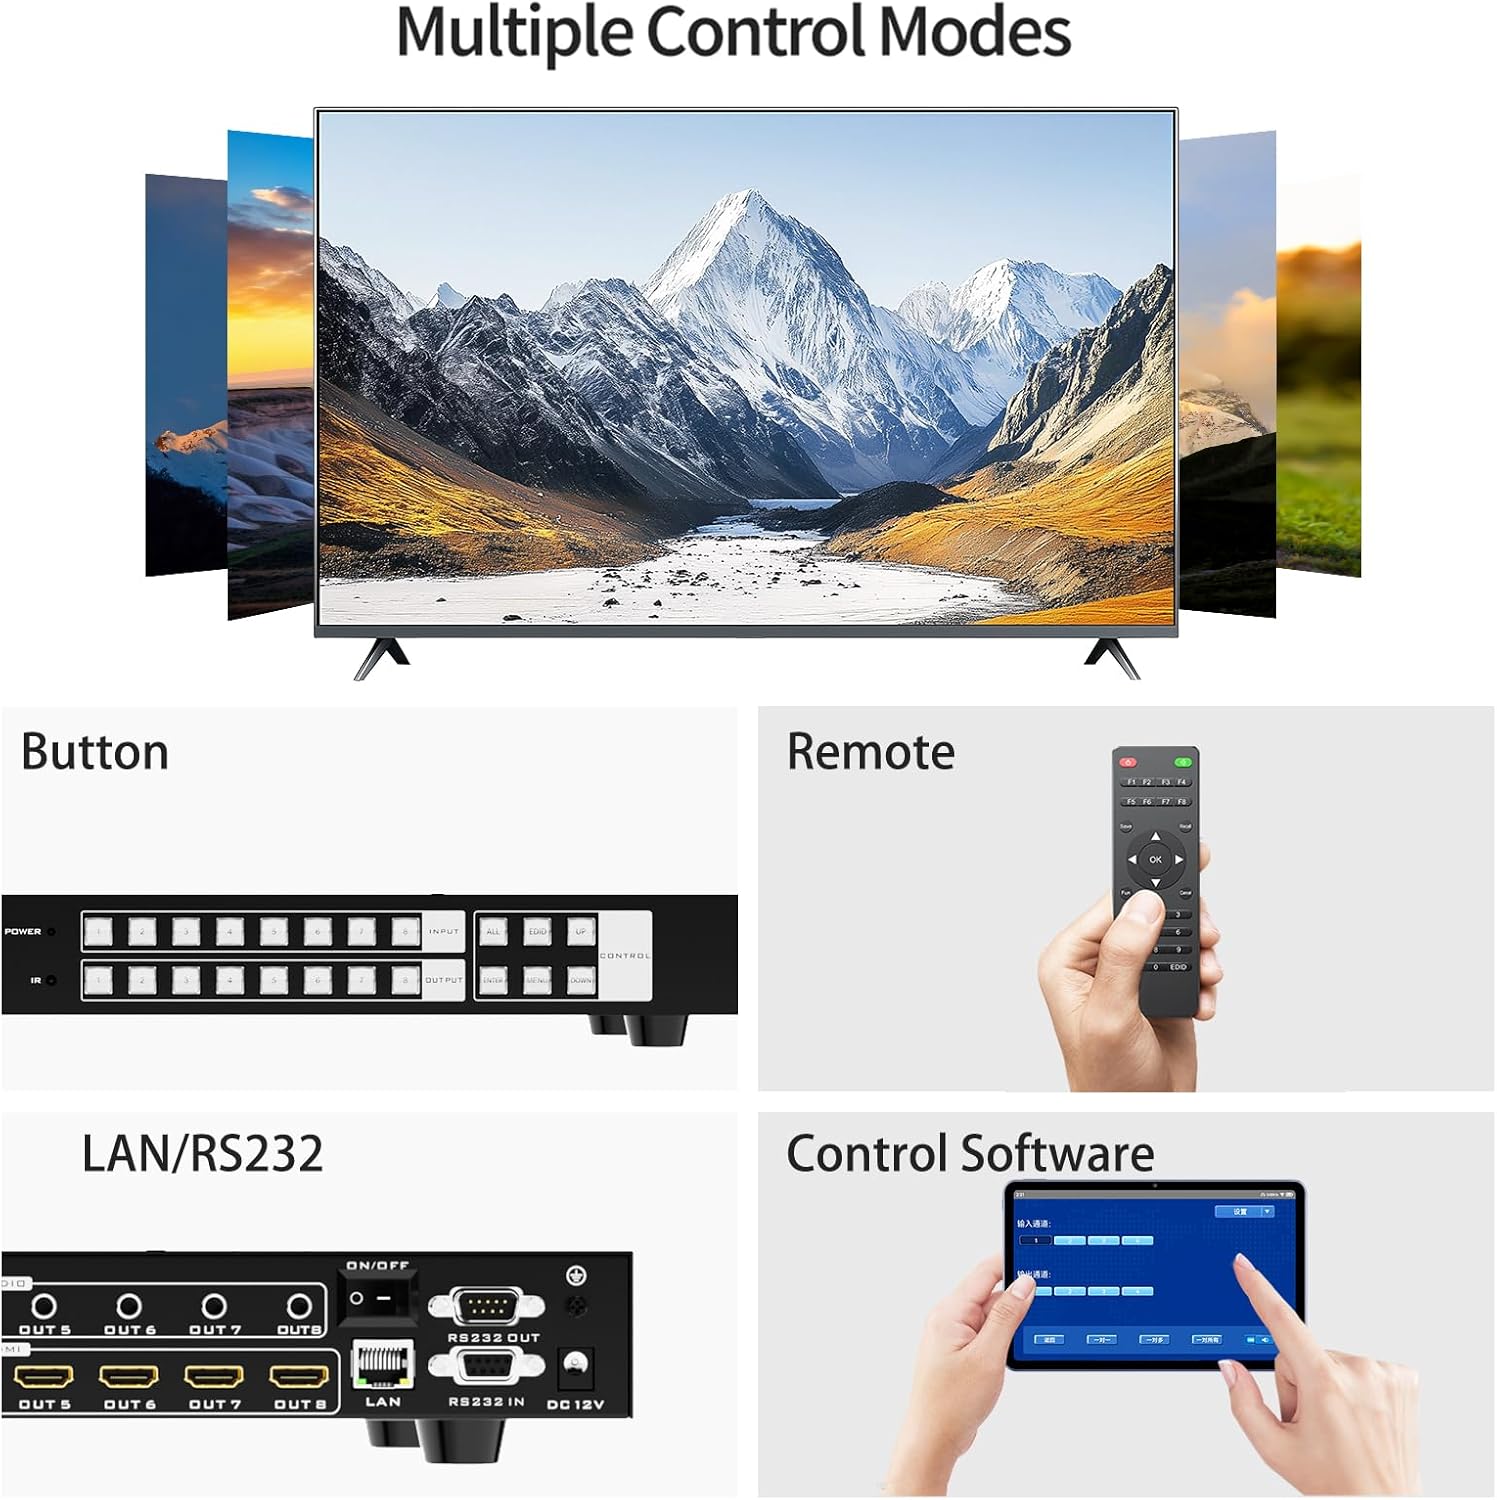
6.1 Front Panel Button Control
Use the buttons on the front panel to switch inputs to outputs.
- Press an IN button (1-8) to select the desired input source.
- Press an OUT button (1-8) to select the desired output display.
- Press ENTER to confirm the switch.
- To switch one input to all outputs, select the input and then press the ALL button.
6.2 Web GUI Control
The matrix switch can be controlled via a web-based graphical user interface (GUI) accessible through a network connection.
- Connect to Network: Connect the matrix switch to your network via the LAN port.
- Access Web GUI: Open a web browser and enter the IP address of the matrix switch (refer to the user manual or device display for the default IP).
- Switching: Navigate to the 'Switch' tab. Select the desired input and output ports, then click 'OK' to apply the changes. Options for 'One to All' and 'One to One' switching are also available.
6.3 EDID Management (Web GUI)
The EDID settings can be configured via the Web GUI to ensure optimal display compatibility.
- Navigate to the 'Setting' tab in the Web GUI.
- Under 'EDID Setting', select the input port to read the EDID from.
- Choose the desired EDID from the dropdown list and click 'Save'.
- For output settings, select the output channel and desired PE Mode/Swing, then click 'Save'.
6.4 Custom Settings (Web GUI)
You can customize input, output, and scene names for easier identification.
- Go to the 'Channel Name' tab in the Web GUI.
- Modify the names for 'Input Channel', 'Output Channel', or 'Scene' as desired.
- Click 'Save' next to each modified section to apply the changes.
6.5 Scene Management and Loop (Web GUI)
The matrix switch allows saving and recalling specific input/output configurations as scenes, and can loop through them.
- Save Scene: Configure your desired input-to-output routing on the 'Switch' tab. Then, go to the 'Scene' tab, select a scene slot (1-16), and click 'Save'.
- Recall Scene: On the 'Scene' tab, select a saved scene and click 'Recall'.
- Scene Loop: To enable scene looping, select the desired scenes in the 'Scene Loop' section, set the 'Loop Interval' in seconds, and click 'Loop Enable'. The displays will cycle through the selected scenes.
7. EDID Management
The Arvitek 8x8 HDMI Matrix Switch incorporates EDID auto-adaptive technology. This feature automatically optimizes the resolution for connected displays, ensuring compatibility even when connecting displays with different native resolutions (e.g., 4K and 1080P simultaneously). The rewritable EDID functionality further enhances compatibility with various projectors, TVs, and monitors, helping to eliminate common signal issues.
8. Audio Extraction
This HDMI matrix switcher is equipped with 8x 3.5mm AUX audio extraction ports. This allows you to separate the audio signal from the HDMI stream and output it to external amplifiers or sound systems. This feature is useful for integrating the video signal with a dedicated audio setup, providing greater flexibility in audio management.
9. Specifications
| Feature | Specification |
|---|---|
| Model Number | 8x8 |
| Resolution Support | Up to 4K@60Hz (4:4:4), 4K*2K@60Hz, 1080P@60Hz |
| Color Space Support | RGB, YCbCr 4:4:4/4:2:2/4:2:0 |
| HDMI Version | HDMI 2.0 |
| HDCP Compliance | HDCP 2.2 |
| Audio Output | 8x 3.5mm AUX Audio Extraction |
| Control Methods | Panel Buttons, WEB GUI, RS-232, LAN, IR Remote, Software, APP for Android |
| Scene Management | Up to 16 customized scenes, recall and rotation |
| Dimensions | 19 x 10 x 1.75 inches (Fits 1U 19" rack) |
| Item Weight | 9.23 pounds |
| Power Supply | DC 12V (Power Adapter included) |
| Compatible Devices | Blu-Ray Player, Gaming Console, Monitor, Projector, Television |
10. Troubleshooting
- No Signal on Display:
- Ensure all HDMI cables are securely connected to both source and display devices, and to the matrix switch.
- Verify that the correct input is selected for the corresponding output on the matrix switch.
- Check the power status of all connected devices and the matrix switch.
- Try a different HDMI cable or port to rule out cable/port issues.
- Adjust EDID settings via the Web GUI to ensure compatibility with your display.
- Poor Picture Quality:
- Ensure you are using high-quality HDMI 2.0 cables, especially for 4K@60Hz resolutions.
- Check the resolution settings of your source device and display to ensure they are compatible with the matrix switch's capabilities.
- Verify EDID settings are correctly configured.
- Control Issues (Remote/Web GUI):
- For IR remote, ensure there are no obstructions between the remote and the IR receiver on the matrix switch. Check remote battery.
- For Web GUI, ensure the matrix switch is properly connected to the network and you are using the correct IP address. Try restarting the matrix switch and your network router.
- No Audio:
- Check all audio connections to external sound systems.
- Ensure the audio output settings in the Web GUI are correctly configured for HDMI or analog extraction.
- Verify that the source device is outputting audio.
11. Maintenance
- Keep the device in a cool, dry, and well-ventilated area.
- Avoid exposing the device to direct sunlight, high temperatures, or humidity.
- Clean the device with a soft, dry cloth. Do not use liquid or aerosol cleaners.
- Ensure proper airflow around the unit, especially if rack-mounted, to prevent overheating.
12. Warranty and Support
Arvitek products are designed for reliability and performance. For warranty information and technical support, please refer to the official Arvitek website or contact our customer service team. Keep your purchase receipt for warranty claims.