
1. Introduction
This manual provides essential information for the proper installation, adjustment, and maintenance of your maXpeedingrods Coilovers for the Honda CR-V (2007-2011), model DQ28VD. Adhering to these instructions will ensure optimal performance and longevity of the product. Please read this manual thoroughly before beginning any work.
2. Safety Information
Warning: Installation of suspension components should only be performed by qualified professionals. Improper installation can lead to serious injury or vehicle damage. Always use appropriate safety equipment, including jack stands, wheel chocks, and eye protection. Ensure the vehicle is securely supported before working underneath it. Do not modify these coilovers. Refer to your vehicle's service manual for specific torque specifications and procedures.
- Always wear safety glasses and gloves.
- Ensure the vehicle is on a level surface and properly secured.
- Never work under a vehicle supported only by a jack.
- Do not reuse old hardware unless explicitly instructed.
- Dispose of old parts responsibly.
3. Product Overview and Components
The maXpeedingrods Coilover Suspension Kit includes four full coilovers (two front, two rear) and two C-spanners for adjustment. These coilovers feature height adjustability and a factory-preset damping value for consistent handling.
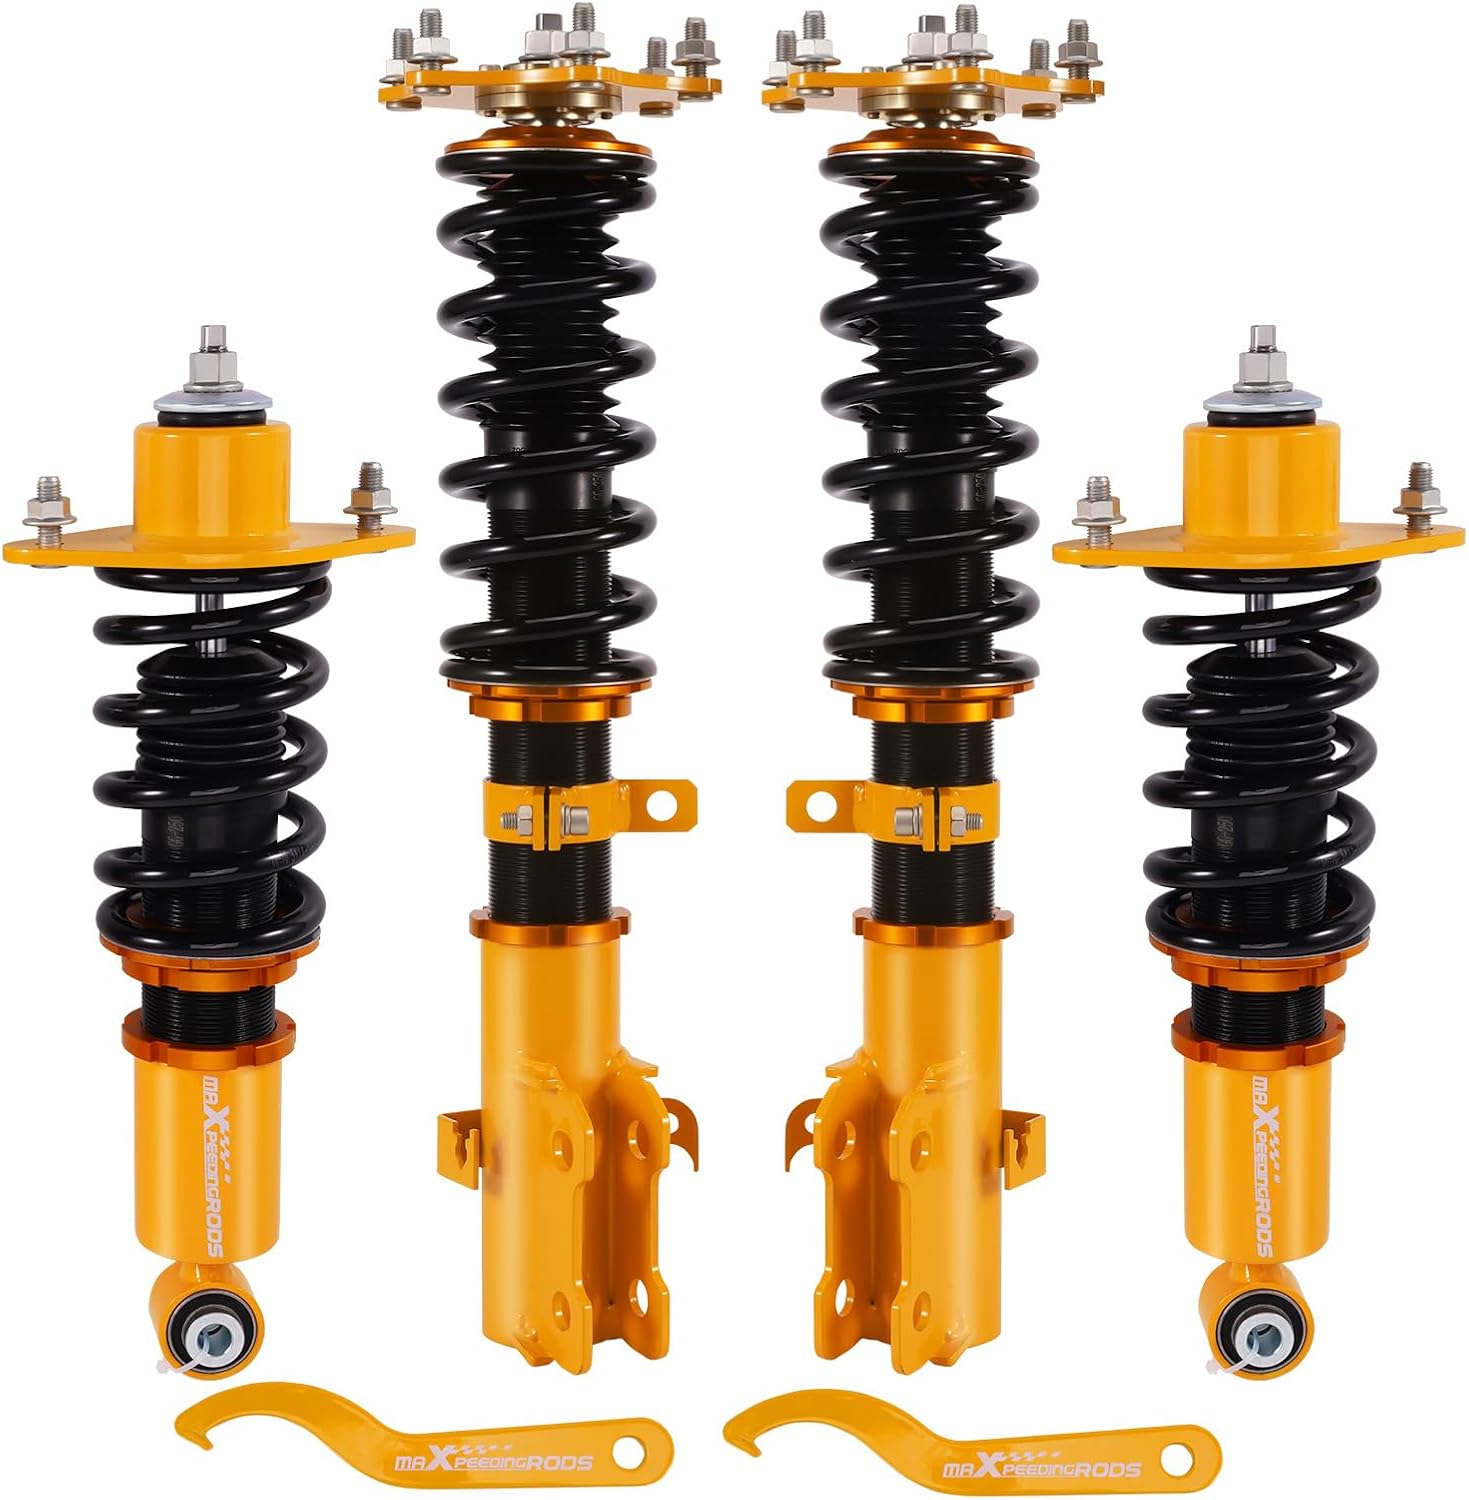
Figure 3.1: Complete maXpeedingrods Coilover Kit, showing two front and two rear coilover units along with two C-spanners.
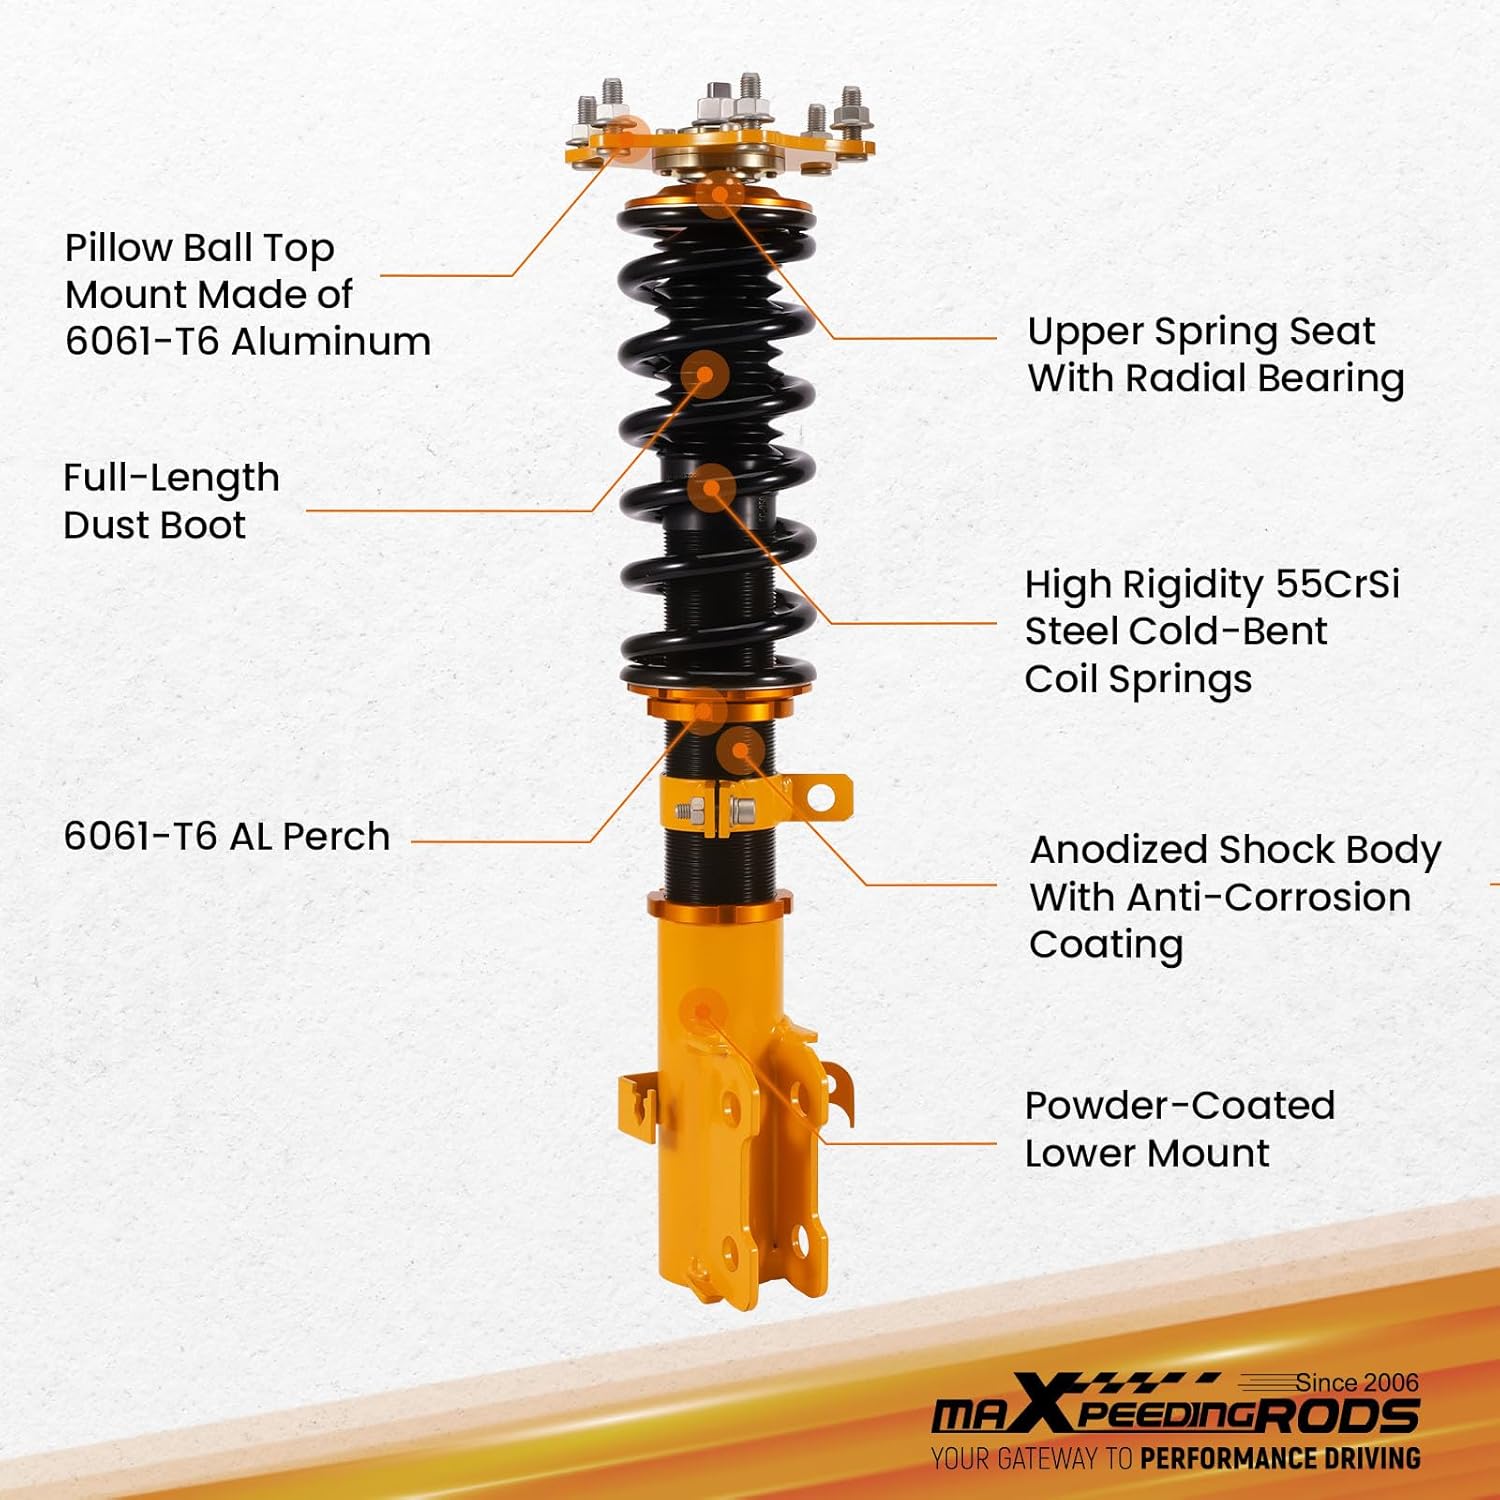
Figure 3.2: Detailed view of a single coilover, highlighting key components such as the Pillow Ball Top Mount (6061-T6 Aluminum), Upper Spring Seat with Radial Bearing, Full-Length Dust Boot, High Rigidity 55CrSi Steel Cold-Bent Coil Springs, 6061-T6 AL Perch, Anodized Shock Body with Anti-Corrosion Coating, and Powder-Coated Lower Mount.
Key Features:
- Pillow Ball Top Mount: Made of 6061-T6 Aluminum for sharp and precise handling.
- High Tensile Springs: Front and Rear: 6 kg/mm (336 in/lbs) 55CrSi steel cold-bent coil springs.
- Adjustable Ride Height: Allows for 1-3 inches of adjustment from original ride height.
- Factory Preset Damping: Maintains consistent handling characteristics.
- Durable Construction: 6061 aluminum alloy with T6 for increased hardness, anodized shock body with anti-corrosion coating, and powder-coated lower mount.
- Full-Length Dust Boot: Protects the piston shaft from dirt and debris.
- High Rigid Piston Rod: 22mm front rod diameter, heat-treated steel for rigidity and toughness.
4. Setup and Installation
This section outlines the general steps for installing the coilovers. It is highly recommended that installation be performed by a certified mechanic or an individual with extensive experience in automotive suspension systems. Always refer to your vehicle's specific service manual for detailed removal and installation procedures of the original suspension components.
4.1 Pre-Installation Checks
- Verify that all components listed in the packaging are present and undamaged (refer to Figure 3.1).
- Ensure the coilovers are the correct model for your Honda CR-V (2007-2011).
- Gather all necessary tools, including a floor jack, jack stands, wheel chocks, socket set, wrenches, torque wrench, and spring compressors (if needed for original strut removal).
4.2 General Installation Steps (Front and Rear)
- Prepare the Vehicle: Park the vehicle on a level, hard surface. Engage the parking brake. Loosen the lug nuts on the wheels.
- Lift and Secure: Safely lift the vehicle using a floor jack and place it securely on jack stands. Remove the wheels.
- Remove Original Suspension:
- For front struts: Disconnect brake lines, ABS sensor wires, and sway bar end links from the strut assembly. Unbolt the lower strut mount from the knuckle. Access the upper strut mounts from the engine bay and unbolt them. Carefully remove the entire strut assembly.
- For rear shocks/springs: Disconnect any attached lines. Unbolt the lower shock mount from the control arm and the upper shock mount from the chassis. Remove the spring from its perch.
- Install New Coilovers:
- Front Coilovers: Install the new front coilover assembly by aligning the upper mount studs with the holes in the chassis. Secure with nuts, but do not fully tighten yet. Attach the lower mount to the knuckle. Reconnect brake lines, ABS sensor wires, and sway bar end links.
- Rear Coilovers: Install the new rear coilover assembly, securing the upper and lower mounts.
- Initial Tightening: Hand-tighten all bolts and nuts.
- Lower Vehicle and Torque: Carefully lower the vehicle until it is resting on its own weight (or close to it, if possible, for final torque). Torque all suspension bolts and nuts to the manufacturer's specifications (refer to your Honda CR-V service manual). This is crucial for safety and proper function.
- Reinstall Wheels: Reinstall the wheels and torque the lug nuts to specification.
- Final Inspection: Double-check all connections and ensure nothing is loose or interfering with other components.
5. Operating and Adjustments
The maXpeedingrods coilovers allow for ride height adjustment. Damping is factory preset and not user-adjustable on this model.
5.1 Ride Height Adjustment
Ride height is adjusted by rotating the lower mount on the threaded shock body. This adjustment should be performed with the vehicle safely lifted and the wheels removed to allow access to the locking rings.

Figure 5.1: Diagram showing the height adjustment mechanism. The lower mount (A) and locking ring (B) are used to change the ride height by adjusting the thread distance (D). A separate lock ring (C) is for preload adjustment, which is typically factory set.
- Lift Vehicle: Safely lift the vehicle and remove the wheels to gain access to the coilovers.
- Loosen Locking Rings: Using the provided C-spanners, loosen the lower mount (A) and the locking ring (B) for height adjustment.
- Adjust Height: Rotate the lower mount (A) to increase or decrease the thread distance (D) on the shock body.
- Rotating the lower mount upwards will lower the vehicle.
- Rotating the lower mount downwards will raise the vehicle.
Note: Ensure equal adjustments are made on both sides (front or rear) to maintain vehicle balance. Adjustments should be made in small increments.
- Tighten Locking Rings: Once the desired height is achieved, firmly tighten the lower mount (A) and locking ring (B) using the C-spanners to secure the adjustment.
- Reinstall Wheels and Lower Vehicle: Reinstall the wheels and carefully lower the vehicle.
- Alignment: After any significant ride height adjustment, a professional wheel alignment is mandatory to prevent premature tire wear and ensure safe handling.
Important: The spring preload (adjusted by lock ring C) is factory set. Do not adjust spring preload unless you have advanced knowledge of suspension tuning, as incorrect preload can severely affect handling and safety.
6. Maintenance
Regular inspection and maintenance will help prolong the life and performance of your coilovers.
- Visual Inspection (Monthly): Check for any signs of leaks from the shock body, damage to the dust boots, or corrosion on the components. Inspect springs for cracks or deformation.
- Fastener Check (Every 6 Months or 5,000 miles): Periodically check all mounting bolts and nuts for proper torque. Vibrations can cause fasteners to loosen over time.
- Cleaning: Keep the coilovers clean, especially the threaded sections and dust boots, to prevent dirt and debris from causing wear. Use mild soap and water, then rinse thoroughly.
- Dust Boot Integrity: Ensure the full-length dust boots are intact and properly seated to protect the piston rods from contaminants. Replace if torn or damaged.
7. Troubleshooting
This section addresses common issues that may arise with coilover suspension systems.
| Symptom | Possible Cause | Solution |
|---|---|---|
| Unusual noises (clunking, squeaking) | Loose mounting bolts, worn bushings, improper installation, damaged pillow ball mount. | Inspect all fasteners and torque to specification. Check bushings for wear. Re-evaluate installation. Inspect pillow ball mount for play. |
| Uneven ride height | Incorrect height adjustment, uneven spring preload. | Re-measure and adjust ride height on both sides. Ensure spring preload is consistent (if adjusted). |
| Poor handling or instability | Incorrect ride height, improper alignment, damaged component, incorrect tire pressure. | Verify ride height settings. Get a professional wheel alignment. Inspect coilovers for damage. Check tire pressure. |
| Fluid leaks from shock body | Damaged seal, internal component failure. | This indicates a failed shock absorber. The coilover unit will need to be replaced. Contact customer support. |
If you encounter issues not listed here or are unable to resolve a problem, please contact maXpeedingrods customer support.
8. Specifications
| Feature | Detail |
|---|---|
| Brand | maXpeedingrods |
| Model Number | DQ28VD |
| Compatibility | Honda CR-V 2007-2011 |
| Auto Part Position | Front, Rear |
| Spring Rate (Front) | 6 kg/mm (336 in/lbs) |
| Spring Rate (Rear) | 6 kg/mm (336 lbs/in) |
| Ride Height Adjustment | 1-3 inches lower than original ride height |
| Damping | Factory Preset |
| Material | 6061 Aluminum Alloy (T6), 55CrSi Steel |
| Exterior Finish | Gold, Black (Anodized, Powder-Coated) |
| Item Weight | 61.5 pounds (total package) |
| Product Dimensions | 27.95 x 20.08 x 7.87 inches (package) |

Figure 8.1: Dimension details for front and rear coilovers, showing approximate lengths and spring rates. Front coilover length is approximately 230mm, rear coilover length is approximately 160mm. Both have a spring rate of 6 kg/mm (336 lbs/in).
9. Warranty and Support
maXpeedingrods offers customer support for their products. For any questions regarding installation, operation, or warranty claims, please contact the seller directly or visit the official maXpeedingrods website.
- Returns: This product typically includes a 30-day easy return policy. Please refer to your purchase details for specific return conditions.
- Customer Support: For technical assistance or product inquiries, contact maXpeedingrods customer service.
- Online Resources: Additional information and support may be available on the maXpeedingrods Store on Amazon.