1. Introduction
Thank you for choosing the HUANUO HNDMA61B Dual Monitor Stand. This freestanding vertical monitor mount is designed to optimize your workspace by allowing you to stack two monitors, ranging from 13 to 34 inches, one above the other. It supports VESA mounting patterns of 50x50mm, 75x75mm, or 100x100mm, and can hold monitors up to 44 lbs. The stand offers extensive adjustability, including swivel, tilt, and rotation, along with 13 height settings to ensure an ergonomic viewing experience and reduce neck and back strain.
2. Safety Information
- Read this entire instruction manual before installation and assembly. If you do not understand any part of the instructions or have doubts, please contact our U.S.-based support team.
- Do not exceed the maximum load capacity of 44 lbs (20 kg). This product is intended for vertical dual monitor use only.
- Ensure your monitors are compatible with VESA mounting patterns 50x50mm, 75x75mm, or 100x100mm.
- Verify that the mounting surface (desk) is structurally sound to support the combined weight of the stand and monitors.
- Use safety gear and proper tools for installation.
- Keep children away from the assembly area. Small parts could be swallowed if ingested.
3. Package Contents
Please check that all components are present and undamaged. If any parts are missing or damaged, contact our support team for assistance.
- Base (Tempered Glass)
- Vertical Pole (2 sections)
- VESA Monitor Plates (2)
- Monitor Head Brackets (2)
- C-Clamp Mounting Hardware
- Grommet Mounting Hardware
- Cable Clips
- Assembly Tools (Allen wrenches)
- Various Screws and Spacers for VESA mounting
4. Setup
4.1. Assemble the Vertical Pole
- Connect the two sections of the vertical pole by screwing them together. Ensure they are tightly secured.
- Attach the assembled pole to the tempered glass base using the provided screws and Allen wrench.
4.2. Choose and Install Mounting Method
The stand offers two primary mounting options: C-Clamp or Grommet. Select the method suitable for your desk.

C-Clamp Mounting:
- Attach the C-clamp bracket to the desk edge and tighten the knob until secure.
Grommet Mounting:
- If your desk has a grommet hole, use the grommet base hardware to secure the stand through the hole.
4.3. Attach VESA Plates to Monitors
- Carefully place your monitor face down on a soft, clean surface.
- Align the VESA plate with the mounting holes on the back of your monitor.
- Secure the VESA plate using the appropriate screws and spacers provided. Ensure all four screws are tightened.
4.4. Mount Monitors to the Stand
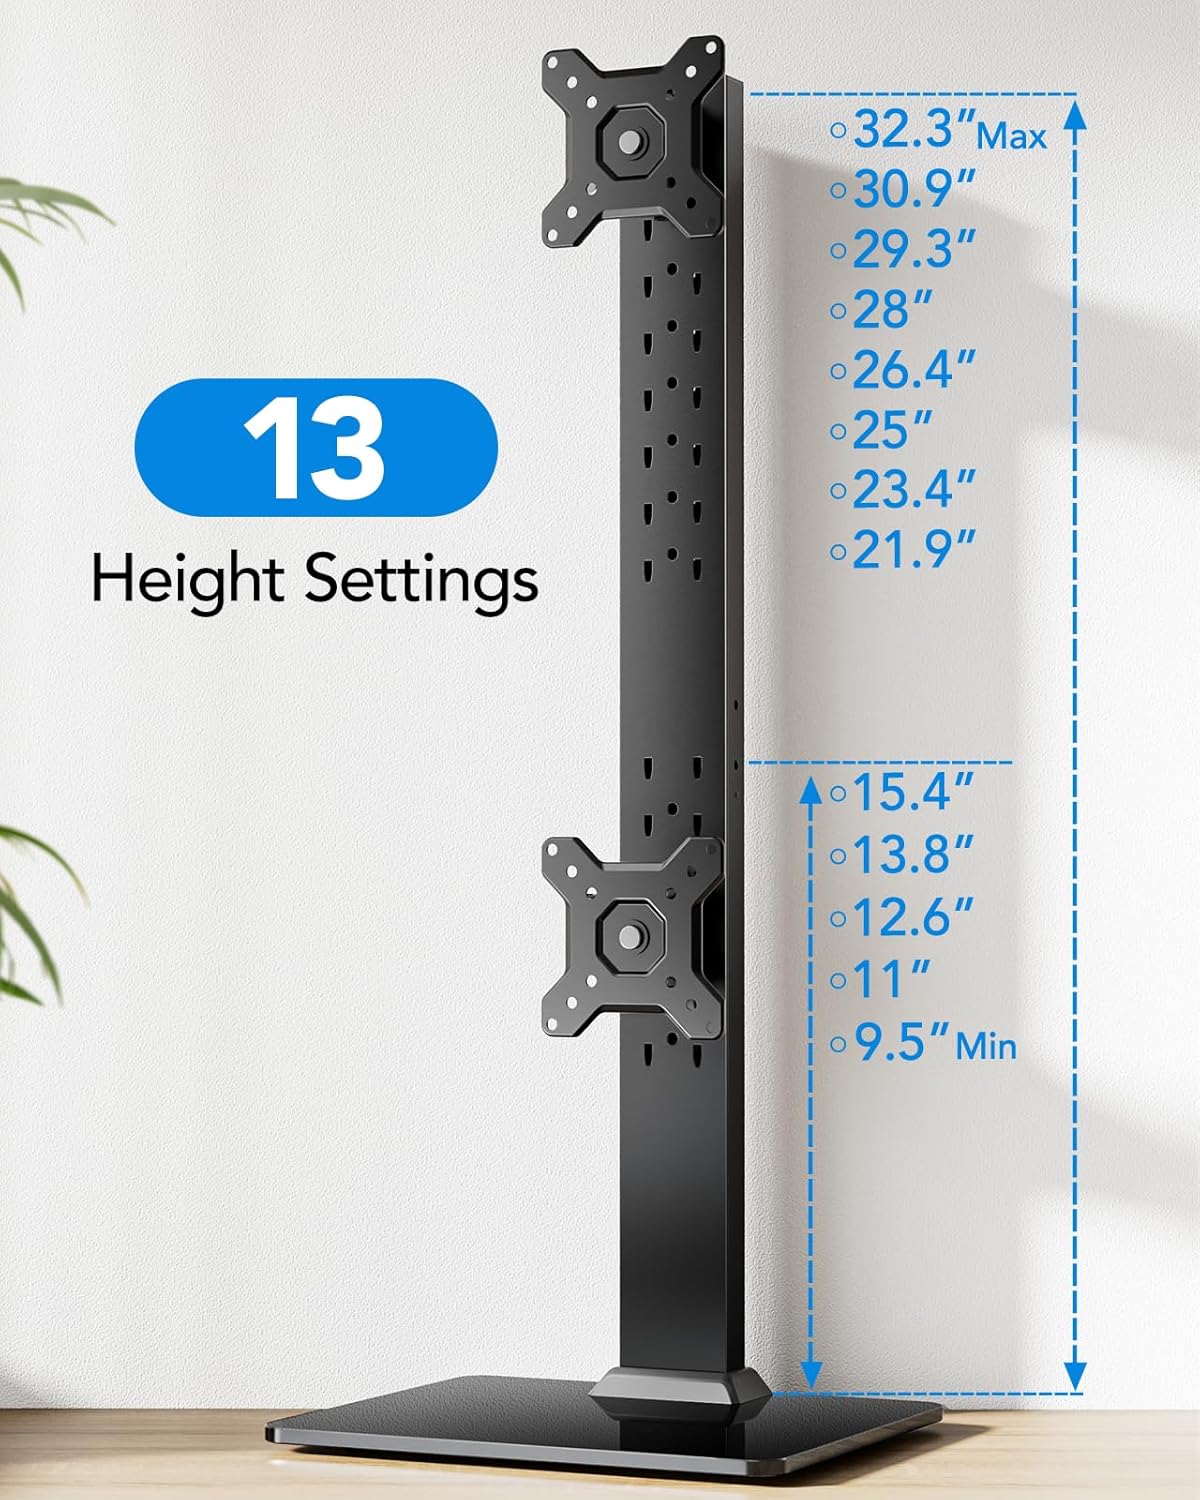
- Slide the monitor heads (with attached VESA plates) onto the vertical pole at your desired height. The stand offers 13 height settings.
- Secure each monitor head in place using the locking knobs or screws.

4.5. Cable Management
Use the included cable clips to route your monitor cables neatly along the back of the vertical pole. This helps maintain a clean and organized workspace.
5. Operating Instructions
5.1. Height Adjustment
The monitor stand features 13 distinct height settings, allowing you to position your monitors at an ergonomic level. To adjust the height, loosen the locking mechanism on the monitor head, slide the monitor to the desired position, and then re-tighten the lock.
5.2. Tilt Adjustment
Adjust the monitor's vertical angle with a tool-free tilt range of -15° to +10°. This allows you to reduce glare and find the most comfortable viewing angle.

5.3. Swivel and Rotation
The monitor mount allows for a +/-50° swivel, enabling you to share your screen easily. Additionally, smaller monitors can be rotated 360° for instant portrait or landscape orientation.

6. Maintenance
- Regularly check all screws and connections to ensure they remain tight and secure.
- Clean the stand and base with a soft, damp cloth. Avoid using abrasive cleaners or solvents that could damage the finish.
- Ensure cables are properly managed to prevent strain or damage.
7. Troubleshooting
7.1. Monitor Wobbles or Sags
- Solution: Ensure all screws, especially those connecting the monitor heads to the pole and the VESA plates to the monitors, are securely tightened. Verify that the total weight of your monitors does not exceed the 44 lbs (20 kg) maximum load capacity.
7.2. VESA Plate Does Not Fit Monitor
- Solution: Double-check your monitor's VESA mounting pattern. This stand supports 50x50mm, 75x75mm, and 100x100mm. If your monitor has a different pattern, it may not be compatible. Ensure you are using the correct screws and spacers for your monitor's depth.
7.3. Difficulty Adjusting Monitor Position
- Solution: Loosen the relevant adjustment screws or knobs slightly before attempting to move the monitor. Once in the desired position, re-tighten them firmly.
8. Specifications
| Feature | Specification |
|---|---|
| Model Number | HNDMA61B |
| Screen Size Compatibility | 13 to 34 inches |
| Max Load Capacity | 44 lbs (20 kg) |
| VESA Compatibility | 50x50mm, 75x75mm, 100x100mm |
| Height Settings | 13 settings (9.5 to 32.3 inches) |
| Tilt Range | -15° to +10° |
| Swivel Range | +/-50° |
| Rotation | 360° |
| Material | Alloy Steel, Tempered Glass |
| Mounting Type | Tabletop Mount (Freestanding, C-Clamp, Grommet) |
| Product Dimensions | 17.44 x 12.52 x 3.11 inches |
| Item Weight | 9.11 pounds |
9. Warranty & Support
HUANUO is committed to providing high-quality products and customer satisfaction. This product comes with a standard manufacturer's warranty. For any questions, concerns, or warranty claims, please contact our U.S.-based support team. Our team is ready to assist you with installation, troubleshooting, or any other product-related inquiries.
Contact information can typically be found on the product packaging or the official HUANUO website.


