1. Introduction
This manual provides essential information for the safe operation, setup, maintenance, and troubleshooting of your RC ERA C184 MD500 RC Helicopter. Please read this manual thoroughly before operating the helicopter to ensure proper function and to prevent damage or injury.
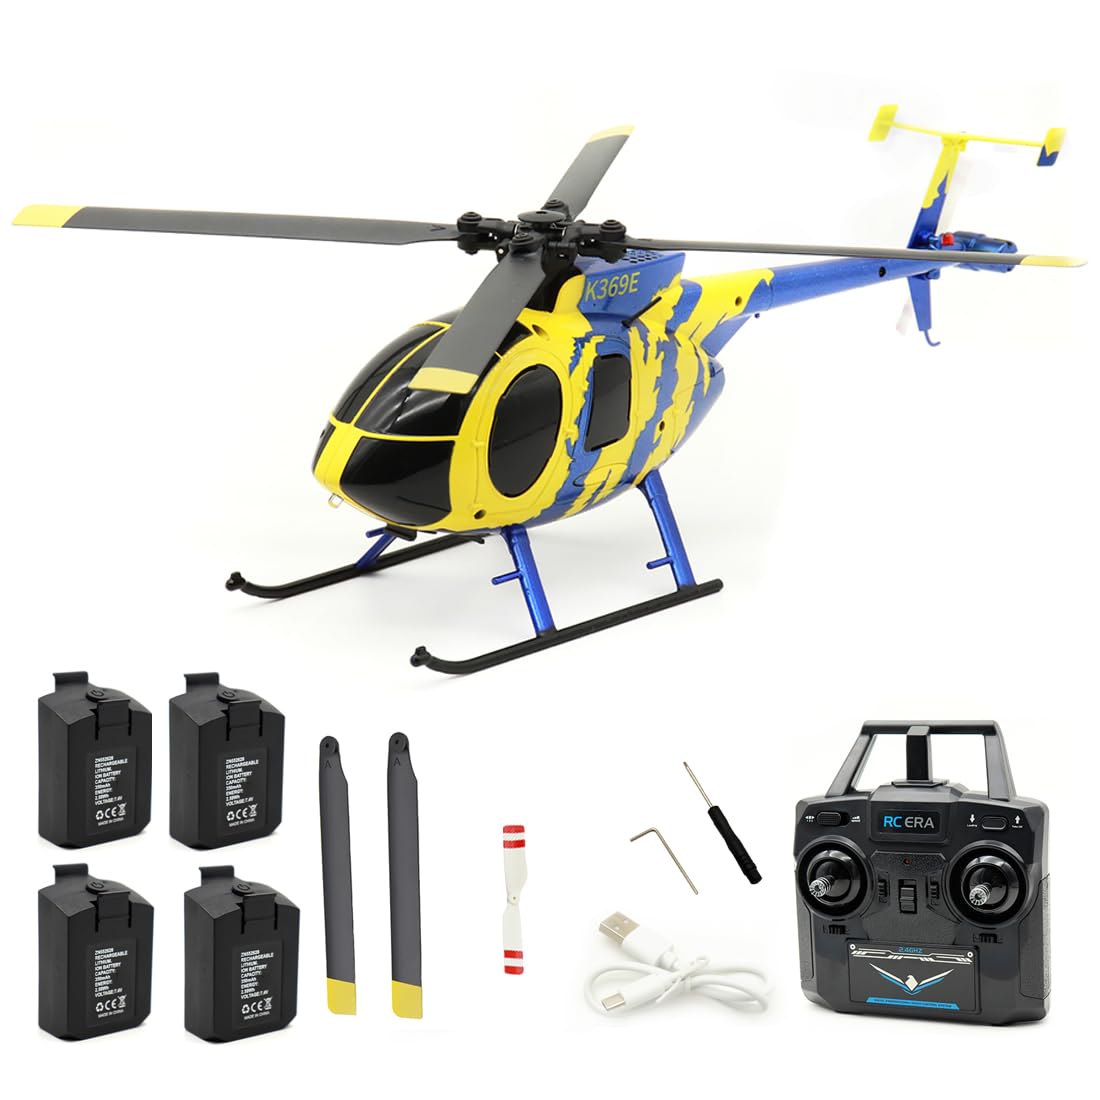
Image 1.1: The RC ERA C184 MD500 RC Helicopter in flight, showcasing its yellow and blue design.
2. Safety Precautions
Failure to follow these safety guidelines may result in injury, damage to the product, or property damage.
- Adult Supervision: This product is recommended for users aged 16 and above. Adult supervision is advised for younger users.
- Flight Environment: Operate the helicopter in open, clear areas, away from people, animals, buildings, and power lines. Avoid flying in strong winds or adverse weather conditions.
- Battery Safety: Use only the specified charger and batteries. Do not overcharge or short-circuit batteries. Discontinue use if batteries show signs of damage or swelling.
- Propeller Safety: Keep hands, face, and loose clothing away from rotating propellers. Always power off the helicopter and remote control before handling the propellers.
- Water Exposure: Avoid exposing the helicopter to water or moisture, as this can damage electronic components.
3. Package Contents
Verify that all items listed below are included in your package:
- RC ERA C184 MD500 Helicopter (1)
- 2.4G Remote Control (1)
- USB Charger (1)
- Main Propellers (2 spare)
- Tail Propeller (1 spare)
- 7.4V 350mAh LiPo Batteries (Quantity varies by package, e.g., 1, 2, 3, or 4)
- Screwdriver (1)
- Hexagonal Wrench (1)
- Instruction Manual (1)
4. Product Features
The RC ERA C184 MD500 RC Helicopter incorporates several advanced features for an enhanced flight experience:
- Innovative Aileronless Design: Utilizes an advanced aerodynamic structure with precision propeller blades for powerful lift and self-stabilizing performance.
- 6-Axis Gyroscope & 6G Mode: Built-in 6-axis gyroscope combined with 6G mode provides excellent stability and ease of operation, suitable for various skill levels.
- Barometer & Optical Flow Positioning: Equipped with a barometer for precise altitude maintenance and optical flow technology for stable hovering both indoors and outdoors.
- Intelligent Modular Battery System: Features a 7.4V 350mAh Li-Polymer battery with an intelligent power management system, clear battery level display, and convenient installation. Provides approximately 12 minutes of flight time per charge.
- Comprehensive Flight Functions: Supports a range of maneuvers including ascending, descending, forward, backward, sideways flight, 360° rotation, and preset route flight.
- Safety Features: Includes low voltage alarm, motor overload protection, runaway protection, dual rudder mode switching, and one-key take-off and landing.
5. Setup
5.1. Charging the Helicopter Battery
- Connect the USB charger to a suitable USB power source (e.g., computer USB port, USB wall adapter).
- Connect the helicopter's modular 7.4V 350mAh LiPo battery to the USB charger.
- The charging indicator on the USB charger will illuminate (e.g., red) during charging and turn off (or change color, e.g., green) when fully charged.
- Charging time is approximately 60 minutes. Do not leave batteries unattended while charging.
5.2. Installing Helicopter Battery
- Ensure the helicopter's power switch is in the OFF position.
- Carefully insert the charged modular battery into the battery compartment of the helicopter. Ensure it is securely seated.
- Close the battery compartment cover.
5.3. Installing Remote Control Batteries
- Open the battery compartment on the back of the remote control.
- Insert four (4) 1.5V AA batteries (not included), ensuring correct polarity (+/-).
- Close the battery compartment cover.
5.4. Binding the Helicopter and Remote Control
- Place the helicopter on a flat, level surface.
- Turn on the helicopter's power switch. The indicator lights on the helicopter will flash.
- Turn on the remote control. The remote control's indicator light will flash.
- Push the throttle stick (left stick) fully up, then pull it fully down.
- The indicator lights on both the helicopter and remote control will become solid, indicating a successful binding.
- If binding fails, repeat the steps. Ensure no other 2.4G devices are interfering.

Image 5.1: Front view of the RC ERA C184 MD500 RC Helicopter, showing its compact design.
6. Operating Instructions
6.1. Basic Controls
The 2.4G remote control typically features two main sticks:
- Left Stick (Throttle/Rudder):
- Push up/down: Controls throttle (ascend/descend).
- Push left/right: Controls rudder (yaw/rotate left/right).
- Right Stick (Elevator/Aileron):
- Push up/down: Controls elevator (pitch forward/backward).
- Push left/right: Controls aileron (roll left/right for sideways flight).
6.2. One-Key Take-off and Landing
After binding, press the dedicated one-key take-off button on the remote control. The helicopter will automatically ascend to a stable hovering altitude. Press the one-key landing button to initiate an automatic descent and landing.
6.3. Flight Modes and Stability
- 6G Mode: Provides enhanced stability, making the helicopter easier to control for beginners. The 6-axis gyroscope actively stabilizes the aircraft.
- Altitude Hold: The barometer maintains a consistent altitude, allowing you to focus on directional control without constantly adjusting the throttle.
- Optical Flow Positioning: For precise hovering, especially in indoor environments, the optical flow sensor helps the helicopter maintain its position.
6.4. Advanced Flight Functions
- 360° Rotation: Consult your remote control's specific button layout for initiating 360-degree rotations or flips.
- Preset Route Flight: Some models allow programming a flight path. Refer to the remote control's specific instructions for this feature.

Image 6.1: The RC ERA C184 MD500 RC Helicopter held in a hand, illustrating its compact size.
7. Maintenance
7.1. Cleaning
Gently wipe the helicopter with a clean, dry cloth after each use to remove dust and debris. Avoid using water or chemical cleaners.
7.2. Propeller Replacement
If propellers are damaged or bent, they should be replaced immediately to ensure stable flight. Use the provided screwdriver and hexagonal wrench to carefully remove the damaged propeller and install a new one, ensuring it is securely fastened.
7.3. Battery Care and Storage
- Always disconnect the battery from the helicopter when not in use.
- Store batteries in a cool, dry place, away from direct sunlight and extreme temperatures.
- Do not store fully charged or fully discharged batteries for extended periods. For long-term storage, charge batteries to approximately 50% capacity.
8. Troubleshooting
If you encounter issues with your RC ERA C184 MD500, refer to the following common problems and solutions:
| Problem | Possible Cause | Solution |
|---|---|---|
| Helicopter does not power on | Battery not charged or incorrectly installed. | Ensure helicopter battery is fully charged and correctly inserted. Check remote control batteries. |
| Helicopter does not bind with remote | Binding procedure not followed correctly; interference. | Repeat binding steps (Section 5.4). Ensure remote and helicopter are close and no other 2.4G devices are active. |
| Unstable flight or drifting | Damaged propellers; gyroscope calibration needed; strong wind. | Inspect and replace damaged propellers. Place helicopter on a flat surface, power on, and perform gyroscope calibration (refer to remote control manual for specific button combination, usually holding both sticks down and inward). Avoid flying in windy conditions. |
| Short flight time | Battery not fully charged; battery degradation. | Ensure battery is fully charged (approx. 60 minutes). If battery is old, consider replacing it. |
| Motor not spinning | Motor overload protection activated; motor damage. | Power off and restart the helicopter. If the issue persists, contact support. |
9. Specifications
Detailed specifications for the RC ERA C184 MD500 RC Helicopter:
- Model: C184 MD500
- Rotor Diameter: 256mm
- Fuselage Length: 239mm
- Height: 93mm
- Flight Time: Approximately 12 minutes
- Charging Time: Approximately 60 minutes
- Remote Control Mode: 2.4G
- Remote Control Distance: 80-100 meters
- Drive Motors: Two
- Helicopter Battery: 7.4V 350mAh Li-Polymer
- Remote Control Battery: 4 x 1.5V AA (not included)
- Product Dimensions: 1.12 x 28.23 x 10.98 inches
- Item Weight: 2.09 pounds
- Item Model Number: X50T7291F15FU
- Manufacturer Recommended Age: 16 years and up
- Manufacturer: Generic

Image 9.1: Side view render of the RC ERA C184 MD500 RC Helicopter, highlighting its fuselage design.
10. Warranty and Support
For warranty information, technical support, or replacement parts, please contact the seller or manufacturer directly. Keep your purchase receipt as proof of purchase.


