Introduction
This manual provides essential information for the setup, operation, and maintenance of your ENDGAME GEAR OP1w 4K v2 Wireless Gaming Mouse. Please read these instructions carefully to ensure optimal performance and longevity of your device.

Image: The ENDGAME GEAR OP1w 4K v2 Wireless Gaming Mouse in white, showcasing its ergonomic design.
Setup
1. Package Contents
Verify that all components are present:
- ENDGAME GEAR OP1w 4K v2 Wireless Gaming Mouse
- USB-C to USB-A Flex Cord 7.0 (6 ft)
- Wireless Receiver (Dongle)
- Quick Start Guide (this document)

Image: The ENDGAME GEAR OP1w 4K v2 mouse, its USB-C charging/data cable, and the wireless receiver.
2. Connecting the Mouse
The OP1w 4K v2 mouse supports both wireless and wired connectivity.
Wireless Connection:
- Insert the wireless receiver into an available USB-A port on your computer.
- Turn on the mouse using the switch located on the underside.
- The mouse should automatically connect to the receiver. If not, refer to the troubleshooting section.

Image: The ENDGAME GEAR OP1w 4K v2 mouse positioned next to its wireless receiver, illustrating wireless operation.
Wired Connection:
Connect the USB-C end of the Flex Cord 7.0 to the mouse and the USB-A end to your computer. The mouse will function as a wired device and charge simultaneously.
3. Software Installation
For advanced customization and firmware updates, download the official ENDGAME GEAR software from the manufacturer's website. This software allows adjustment of polling rate, CPI, button assignments, and other settings.
Operating the Mouse
1. Polling Rate Adjustment
The OP1w 4K v2 supports multiple polling rates:
- Wireless: 4000Hz, 2000Hz, 1000Hz
- Wired: 1000Hz
Adjust the polling rate using the ENDGAME GEAR software to suit your preferences and system capabilities. A higher polling rate provides faster response times.

Image: A close-up view of the mouse highlighting its capability for an ultra-fast 4000 Hz wireless polling rate.
2. CPI/DPI Settings
The PixArt PAW3950 optical sensor offers up to 30,000 CPI (Counts Per Inch). CPI settings can be adjusted via the software to fine-tune cursor sensitivity for precision and speed.

Image: The underside of the mouse, revealing the custom optical sensor and other regulatory markings.
3. Kailh GX Switches
The mouse features pre-sorted Kailh GX switches for the main buttons, providing crisp feedback and low latency. These switches are designed for durability with an 80-million click lifespan.

Image: The mouse connected to its receiver, emphasizing the Kailh GX switches for instant clicks.
4. Claw-Grip Design
The OP1w 4K v2 is engineered with a right-handed, claw-grip optimized shape, featuring flatter sides, extended ledges, and a dry grip coating for enhanced control. Its lightweight design (~58.5g) contributes to agile and precise movements.

Image: An overhead view of the mouse, illustrating its lightweight and ergonomic form factor.
Maintenance
1. Cleaning
To maintain performance and hygiene, regularly clean your mouse. Use a soft, dry cloth to wipe the surface. For sensor cleaning, use a cotton swab lightly dampened with isopropyl alcohol. Avoid harsh chemicals or abrasive materials.
2. Hot-Swappable Switches
The OP1w 4K v2 features a modding-friendly design with hot-swappable main button switches. This allows users to replace switches without soldering. Refer to the manufacturer's website or support resources for detailed instructions on switch replacement.
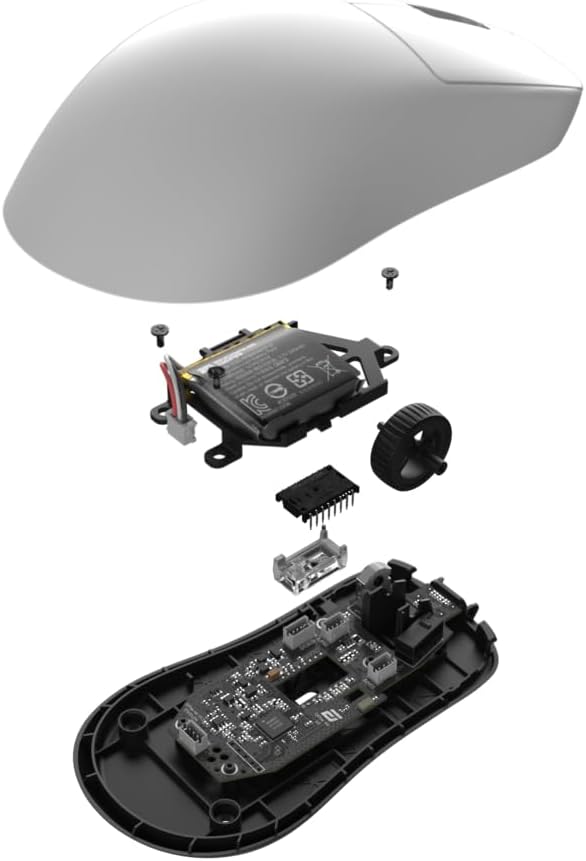
Image: An exploded diagram showing the internal components of the mouse, including the PCB, battery, and switches, illustrating its modular design.
3. Skate Replacement
The mouse feet (skates) are designed to be replaceable. Worn skates can affect glide performance. Replacement skates can be purchased separately. Follow manufacturer guidelines for proper removal and installation.

Image: A close-up of the mouse's main buttons, suggesting its adaptability to different play styles through customization options like switch and skate replacement.
Troubleshooting
- Mouse not responding: Ensure the mouse is charged and powered on. For wireless connection, verify the receiver is properly inserted and the mouse is within range. For wired connection, check the USB cable connection.
- Intermittent connection: Move the wireless receiver closer to the mouse. Avoid placing the receiver near sources of interference (e.g., other wireless devices, large metal objects).
- Cursor erratic or not tracking: Clean the optical sensor on the underside of the mouse. Ensure the mouse is used on a suitable surface (e.g., a mouse pad). Update mouse firmware via the ENDGAME GEAR software.
- Buttons not registering: Check button assignments in the ENDGAME GEAR software. If using custom switches, ensure they are correctly installed.
- Software issues: Reinstall the ENDGAME GEAR software. Ensure your operating system is up to date.
For further assistance, consult the ENDGAME GEAR support website or contact customer service.
Specifications
| Model Number | EGG-OP1W-4K-V2-WHT |
| Connectivity | Wireless (Radio Frequency), USB (Wired) |
| Sensor | PixArt PAW3950 Optical Sensor |
| Max CPI | 30,000 CPI |
| Max Polling Rate | 4000Hz (Wireless), 1000Hz (Wired) |
| Switches | Kailh GX (Hot-Swappable) |
| Weight | ~58.5g (2.1 ounces) |
| Dimensions | 3.94 x 3.94 x 3.94 inches |
| Cable | 6 ft Flex Cord 7.0 (USB-C to USB-A) |
| Battery | 1 Nonstandard Battery |
Warranty and Support
Warranty Information
ENDGAME GEAR products are covered by a limited manufacturer's warranty. Please refer to the warranty card included with your product or visit the official ENDGAME GEAR website for detailed terms and conditions regarding warranty coverage, duration, and claims procedures.
Customer Support
For technical support, product inquiries, or warranty claims, please visit the ENDGAME GEAR support portal on their official website. You can typically find FAQs, driver downloads, and contact information for their customer service team there.
Website: www.endgamegear.com/support (Example link, please verify actual support URL)


