
1. Introduction
The VEVOR Magnetic Helping Hands Soldering Station is a versatile 2-in-1 tool designed to assist with intricate electronic repair, craft, and hobby projects. It features a 3X LED magnifying lamp, five flexible gooseneck arms, and six magnetic PCB holders, providing a stable and illuminated workspace for precision tasks. This manual provides essential information for the safe and effective operation and maintenance of your soldering station.
2. Safety Instructions
- Eye Protection: Always wear appropriate eye protection when soldering to shield against solder splashes and fumes.
- Ventilation: Ensure adequate ventilation in your workspace to disperse soldering fumes. Use a fume extractor if available.
- Hot Surfaces: The soldering iron and components will become extremely hot. Avoid direct contact with hot parts to prevent burns.
- Stable Surface: Place the soldering station on a stable, heat-resistant, and non-combustible surface.
- Power Off: Disconnect the power supply to the LED lamp when not in use or during maintenance.
- Children and Pets: Keep the soldering station and all tools out of reach of children and pets.
- Proper Use: Use the tool only for its intended purpose. Do not modify the device.
3. Package Contents
Verify that all items are present upon unpacking:
- Magnetic Helping Hands Soldering Station Base
- 3X LED Magnifying Lamp with flexible arm
- 5 Flexible Gooseneck Arms with Alligator Clamps
- 6 Magnetic PCB Holders
- 1 Desktop Clamp (for magnifying lamp)
- 12 Rubber Sleeves (for alligator clamps)
- 6 Anti-Slip Pads (pre-installed on base)
- User Manual
4. Product Features
- 3X LED Magnifying Lamp: Provides clear, magnified vision for detailed work, reducing eye strain.
- Adjustable Lighting: Offers 5 color temperatures and 10 brightness levels for optimal illumination in various work environments. The light is soft, glare-free, and flicker-free.
- Flexible Gooseneck Arms: Five arms with alligator clamps allow for 360° adjustment of angle and height, securely holding components in place.
- Magnetic PCB Holders: Six magnetic pillar holders provide flexible positioning and secure grip for various workpiece shapes, ensuring damage-free installation.
- Heavy-Duty Steel Base: Industrial-grade steel base prevents tipping and includes non-slip rubber pads for stability and surface protection.

Image: Overview of the VEVOR Magnetic Helping Hands Soldering Station highlighting its key features.
5. Setup
- Unpack Components: Carefully remove all items from the packaging and verify against the package contents list.
- Position the Base: Place the heavy-duty steel base on a clean, stable, and level work surface. The pre-installed non-slip rubber pads will secure it.
- Attach Flexible Arms: Insert the magnetic bases of the flexible gooseneck arms into the desired positions on the steel base. The strong magnets will hold them securely.
- Attach PCB Holders: Place the magnetic PCB pillar holders onto the steel base as needed for your workpiece.
- Install Magnifying Lamp: The magnifying lamp comes with a desktop clamp. Secure the clamp to the edge of your workbench or directly to the soldering station base if it has a compatible slot. Adjust the flexible arm of the lamp to your preferred height and angle.
- Connect Power: Plug the USB power cable of the LED magnifying lamp into a compatible USB power source (e.g., a USB wall adapter, computer USB port, or power bank).

Image: Fully assembled VEVOR Magnetic Helping Hands Soldering Station.
6. Operating Instructions
6.1 Using the Flexible Arms and PCB Holders
- Positioning Components: Place your circuit board or workpiece on the main base. Use the magnetic PCB holders to support and stabilize the board.
- Securing with Arms: Adjust the flexible gooseneck arms to hold wires, small components, or other parts. The alligator clamps can be rotated and angled to achieve the desired position.
- Protective Sleeves: If clamping delicate components, slide the rubber sleeves over the alligator clamp jaws to prevent damage.

Image: Demonstrating the 360° full adjustment of flexible arms for precise workpiece positioning.
6.2 Adjusting the LED Magnifying Lamp
- Power On/Off: Use the inline control switch on the USB cable to turn the LED lamp on or off.
- Brightness Adjustment: Press the '+' or '-' buttons on the control switch to cycle through 10 levels of brightness.
- Color Temperature: Press the 'M' button on the control switch to switch between 5 different color temperature modes (e.g., cool white, warm white, natural light).
- Positioning: Adjust the flexible arm of the magnifying lamp to bring the lens and light directly over your work area for optimal viewing and illumination.

Image: Smart eye-caring lighting with multiple color modes and brightness levels.
7. Maintenance
- Cleaning: Wipe the base and arms with a soft, dry cloth. For the magnifying lens, use a lens cleaning cloth and appropriate cleaning solution to avoid scratches.
- Storage: Store the soldering station in a clean, dry environment away from direct sunlight and extreme temperatures.
- Inspect Components: Periodically check the flexible arms, alligator clamps, and magnetic holders for any signs of wear or damage. Replace components if necessary.
- Power Cable: Ensure the USB power cable is not kinked or damaged.
8. Troubleshooting
- LED Lamp Not Turning On:
– Check if the USB cable is securely connected to both the lamp and the power source.
– Ensure the USB power source is functional.
– Verify the inline control switch is in the 'on' position. - Flexible Arms Not Holding Position:
– Ensure the magnetic bases of the arms are fully seated on the steel base.
– The arms are designed to hold small to medium-sized components. Avoid overloading them with excessively heavy items. - Magnifying Lens is Unclear:
– Clean the lens with a soft, lint-free cloth and lens cleaner to remove dust or smudges. - Base Sliding on Workbench:
– Ensure the non-slip rubber pads on the bottom of the base are clean and intact.
– Place the station on a clean, dry surface.
9. Specifications
| Item Model Number | LFS0207 |
| Brand | VEVOR |
| Power | 8W |
| Power Plug | USB |
| Magnification | 3X |
| Short Arms Length | 5.9 in / 150 mm |
| Long Arms Length | 12.2 in / 310 mm |
| Arms Diameter | 0.28 in / 7 mm |
| Main Materials | Steel Coating |
| Net Weight (Including All Accessories) | 5.73 lb / 2.6 kg |
| Product Dimensions (L x W x H) | 11.02 x 7.01 x 0.12 in / 279 x 178 x 3 mm |
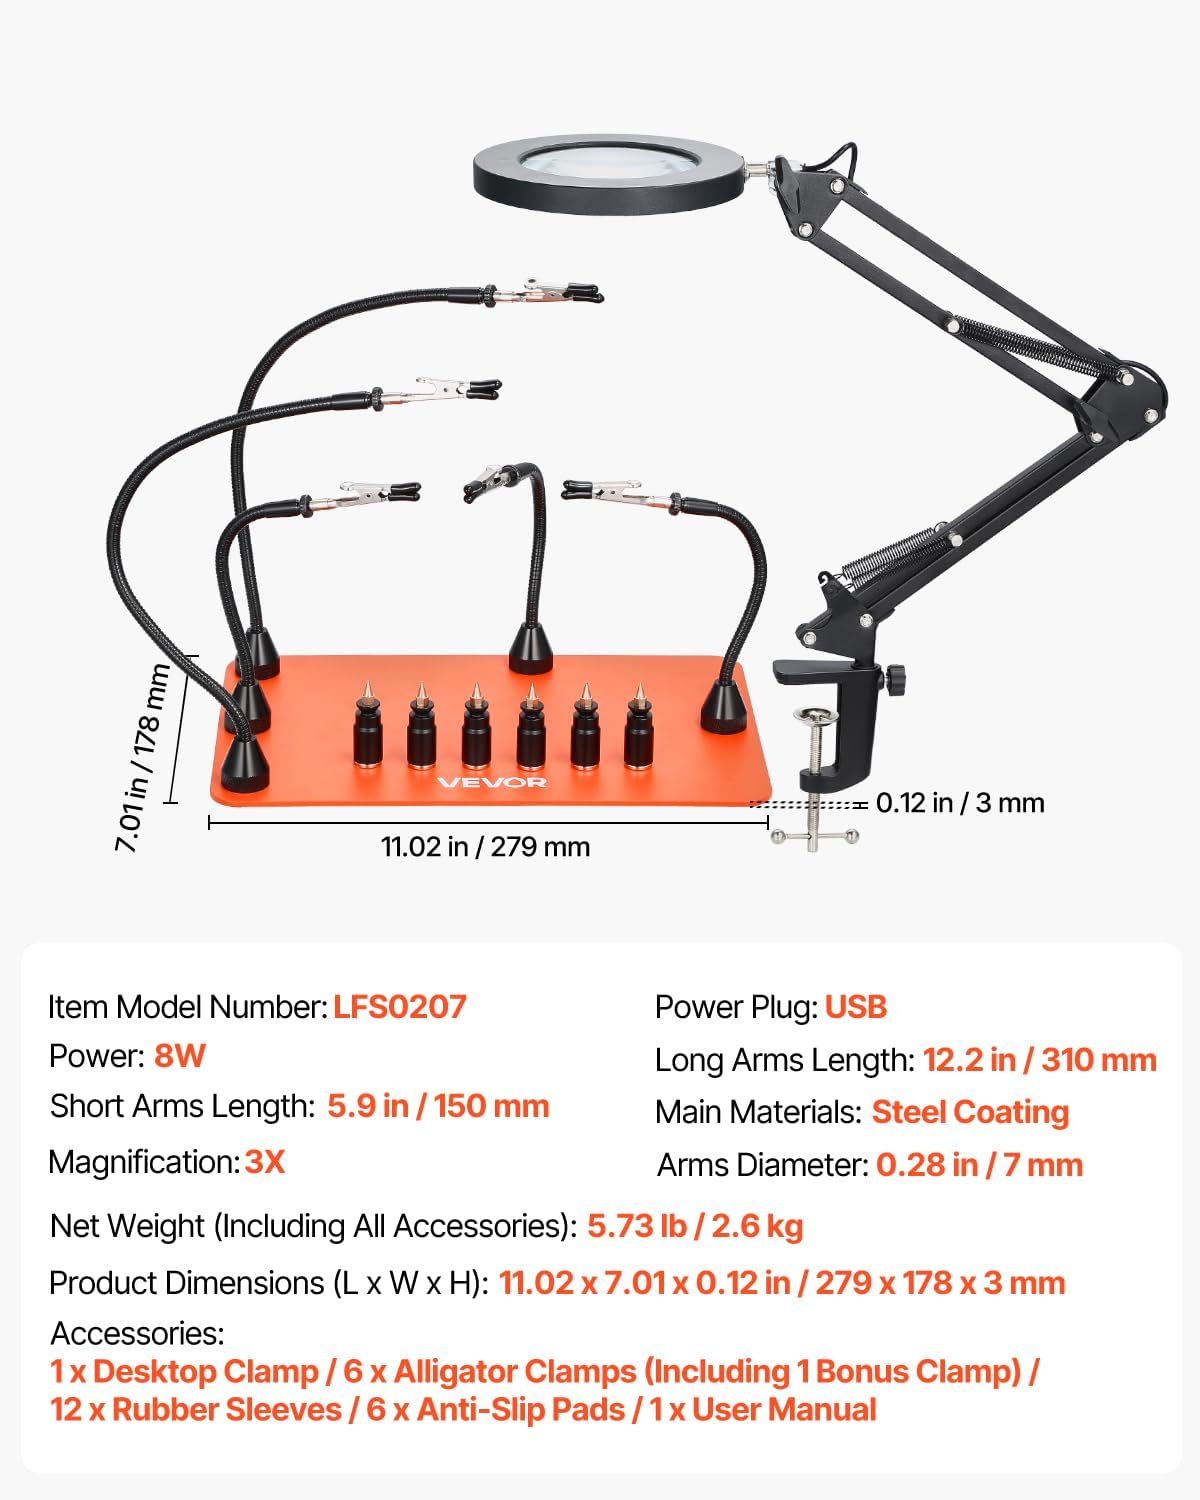
Image: Product dimensions and component specifications.
10. Warranty and Support
VEVOR products are designed for durability and performance. For warranty information, technical support, or service inquiries, please refer to the contact details provided with your purchase documentation or visit the official VEVOR website. Please have your model number (LFS0207) and purchase date ready when contacting support.

