1. Introduction
Thank you for choosing the LFF Automatic Chicken Coop Door. This manual provides detailed instructions for the installation, operation, and maintenance of your new automatic chicken door. Designed for convenience and the safety of your poultry, this door features multiple operational modes, solar charging capabilities, and robust construction. Please read this manual thoroughly before use to ensure proper function and longevity of the product.
2. Product Overview and Components
The LFF Automatic Chicken Coop Door is an advanced system designed to automate the opening and closing of your chicken coop. It integrates solar power, a light sensor, a timer, and remote control for flexible operation.

Figure 2.1: Overview of the Automatic Chicken Coop Door system, including the main door unit, solar panel, remote control, and mounting screws.
Included Components:
- 1 x Automatic Chicken Coop Door Unit
- 1 x Solar Panel
- 1 x USB-C Charge Cable
- 1 x Remote Control
- 8 x Mounting Screws

Figure 2.2: Close-up of the LCD display and control interface, showing current time, sunlight value, alarm light, charging indicator, light sensor, buzzer hole, ON/OFF button, and Type-C charging port.
3. Setup and Installation
Installation is straightforward and typically takes about 10 minutes. Ensure you have the necessary tools (e.g., drill, screwdriver) before beginning.
Installation Steps:
- Confirm Door Size and Mark Location: The door requires an opening of approximately 10.82" L x 1.5" W x 14.25" H. Measure and mark the desired location on your chicken coop.
- Prepare Opening: Carefully saw or cut the opening for the door installation according to your measurements.
- Secure the Door: Position the automatic chicken coop door unit within the prepared opening. Use the provided 8 screws to securely fasten the door to the coop structure.
- Install Solar Panel: Connect the solar panel to the main door unit. Mount the solar panel in a location that receives optimal direct sunlight throughout the day to ensure efficient charging.

Figure 3.1: Visual guide for the installation process, from confirming dimensions to securing the door and installing the solar panel.
4. Operating Modes
The LFF Automatic Chicken Coop Door offers four distinct operational modes to suit various needs and preferences.

Figure 4.1: Illustration of the four available operating modes for the chicken coop door.
- Automatic Timer Mode: Set specific times for the door to open and close (e.g., 06:00 AM open, 18:00 PM close). This mode provides consistent scheduling.
- Auto-Light Sensor Mode: The door opens at sunrise and closes at sunset, adapting to natural light conditions. You can adjust the light sensitivity (Light 31-99 for open, Light 0-30 for close).
- Manual Button Control: Use the physical buttons on the door unit to manually open or close the door as needed.
- Remote Control: Operate the door wirelessly from a distance of up to 15 meters using the provided remote control.

Figure 4.2: Detailed table illustrating various mode combinations (Light Sensor for Open/Close, Timer for Open/Close) for flexible operation.
5. Anti-Pinch Protection
The safety of your poultry is paramount. This automatic chicken door is equipped with an intelligent anti-pinch feature.
If the door detects an obstruction (such as a chicken) during its closing cycle, the built-in smart IC sensor will immediately activate a rebound function. The door will lift upwards by 3 cm to release the obstruction. After a 10-second pause, the door will attempt to close again. If the obstruction persists after three attempts, the door will stop closing, a red light will flash, and an alarm sound will activate to alert you.
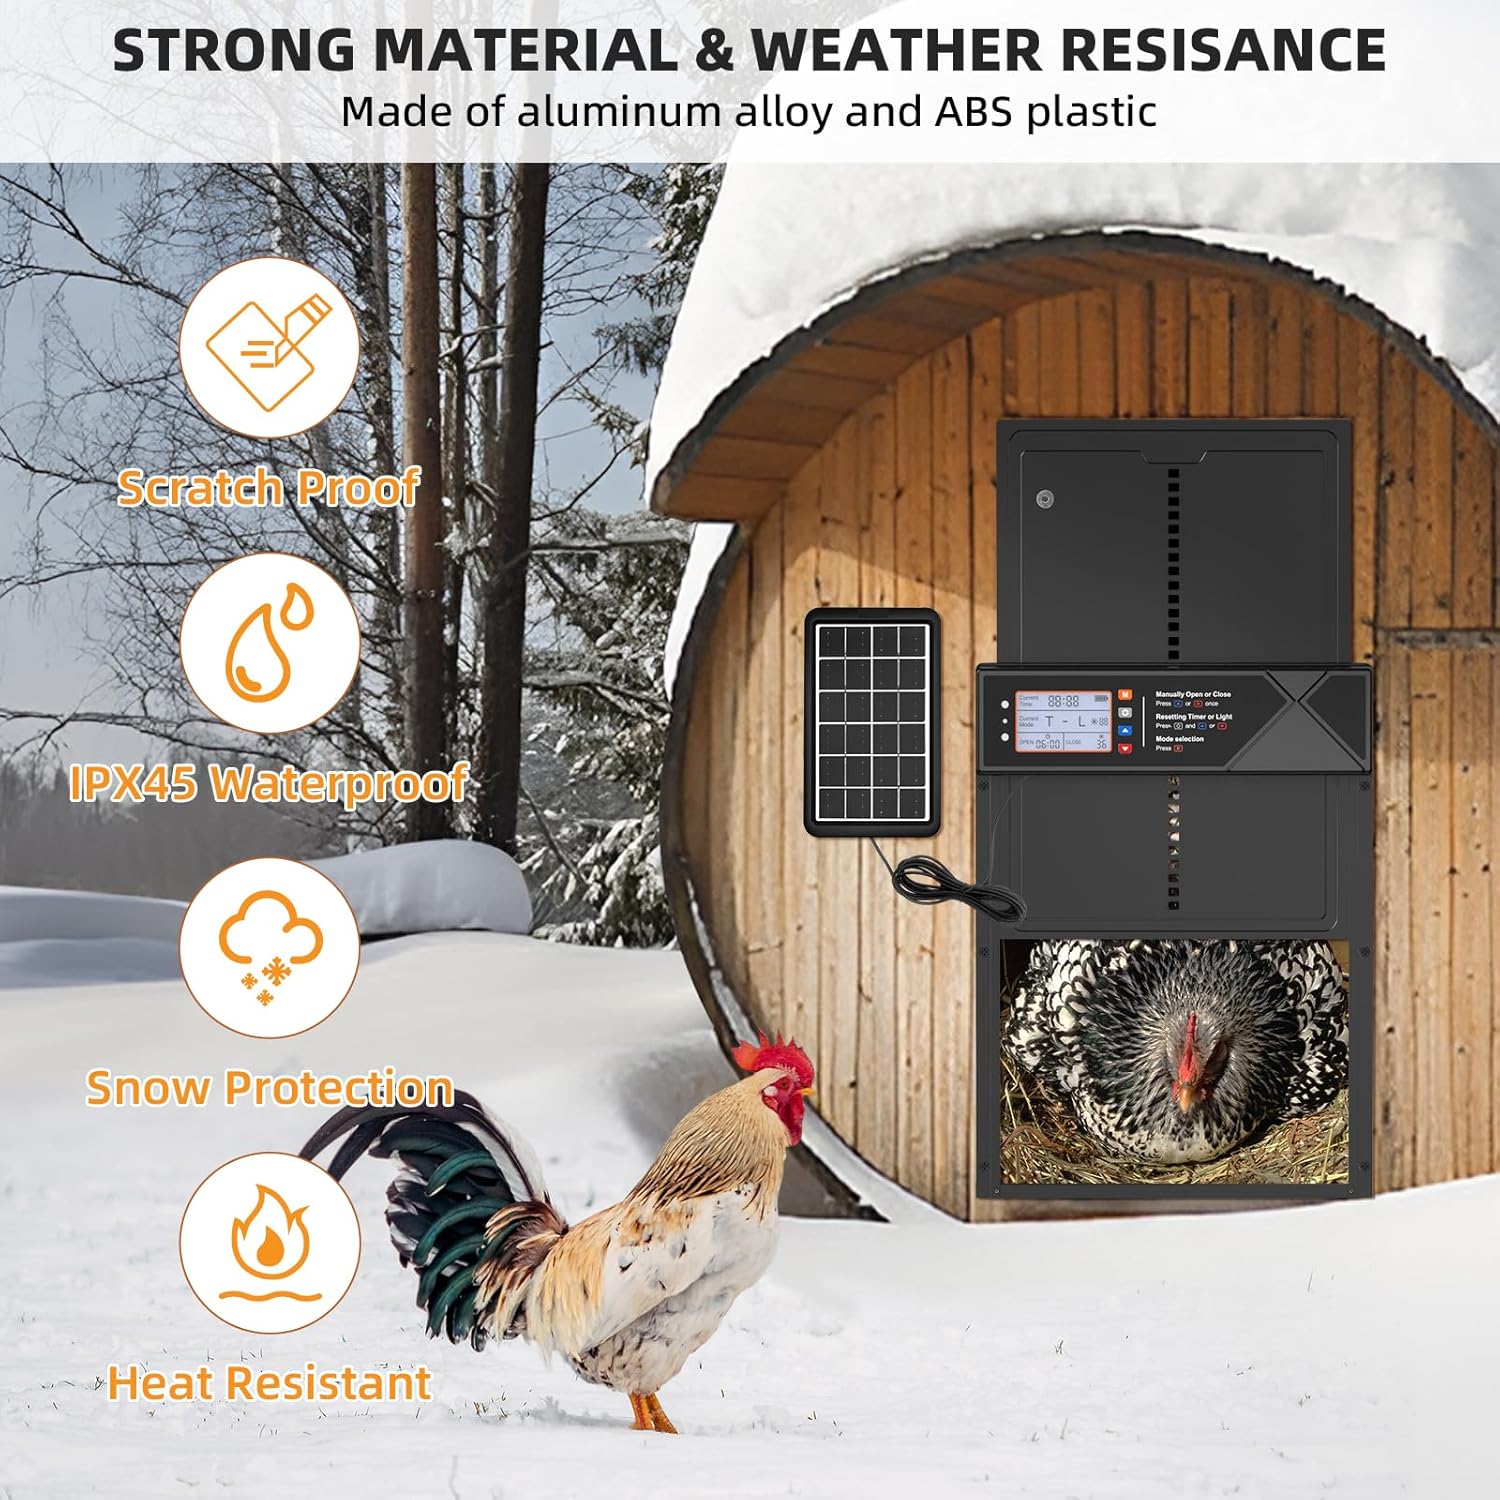
Figure 5.1: Visual representation of the anti-pinch safety feature in action, demonstrating the door's rebound mechanism.

Figure 5.2: Illustration of the anti-pinch system, highlighting the alarm and flashing light after three failed closing attempts.
6. Charging and Power
The chicken coop door is powered by a 2,000 mAh rechargeable battery, offering flexible charging options.
- Solar Charging: The primary charging method is via the included solar panel. Ensure the panel is positioned to receive maximum direct sunlight for optimal charging efficiency.
- USB-C Charging: For situations with insufficient sunlight or for initial charging, the door can be charged using the provided USB-C cable.

Figure 6.1: Visual representation of the dual charging capabilities: solar power and USB-C battery charging.

Figure 6.2: Illustration comparing the solar charging method with the Type-C cable charging method.
7. Material and Weather Resistance
Constructed from durable aluminum alloy, the LFF Automatic Chicken Coop Door is built to withstand various environmental conditions.
- Robust Construction: Made of aluminum alloy and ABS plastic, ensuring longevity and resistance to wear, including scratches from poultry claws.
- IPX45 Waterproof Rating: Provides protection against water splashes from any direction, making it suitable for outdoor use.
- Weather Resilience: Designed to operate effectively in temperatures ranging from 5°F to 140°F (-15°C to 60°C), and resistant to snow, rain, and dust.

Figure 7.1: The door's durability and weather resistance features, including scratch-proof, IPX45 waterproof, snow protection, and heat resistance.

Figure 7.2: Emphasizing the premium aluminum alloy material and its protective features against weather elements and predators.
8. Predator Defense
The robust construction and secure closing mechanism of the LFF Automatic Chicken Coop Door provide an effective barrier against common predators.
In addition to its physical strength, if an animal attempts to force the door open, the system is designed to flash a red light and sound an alarm, deterring potential threats like foxes, raccoons, snakes, and wolves.

Figure 8.1: The door's ability to defend against various potential dangers, including common predators.
9. Versatility and Compatibility
This automatic coop door is designed to be compatible with a wide range of poultry and small animals, offering a versatile solution for various enclosures.
- Broad Compatibility: Suitable for chickens, ducks, geese, rabbits, and other similar-sized poultry or small animals.
- Generous Size: The door's dimensions (10.82" L x 14.25" H) are larger than many standard market offerings, allowing for easy passage of various animal sizes.
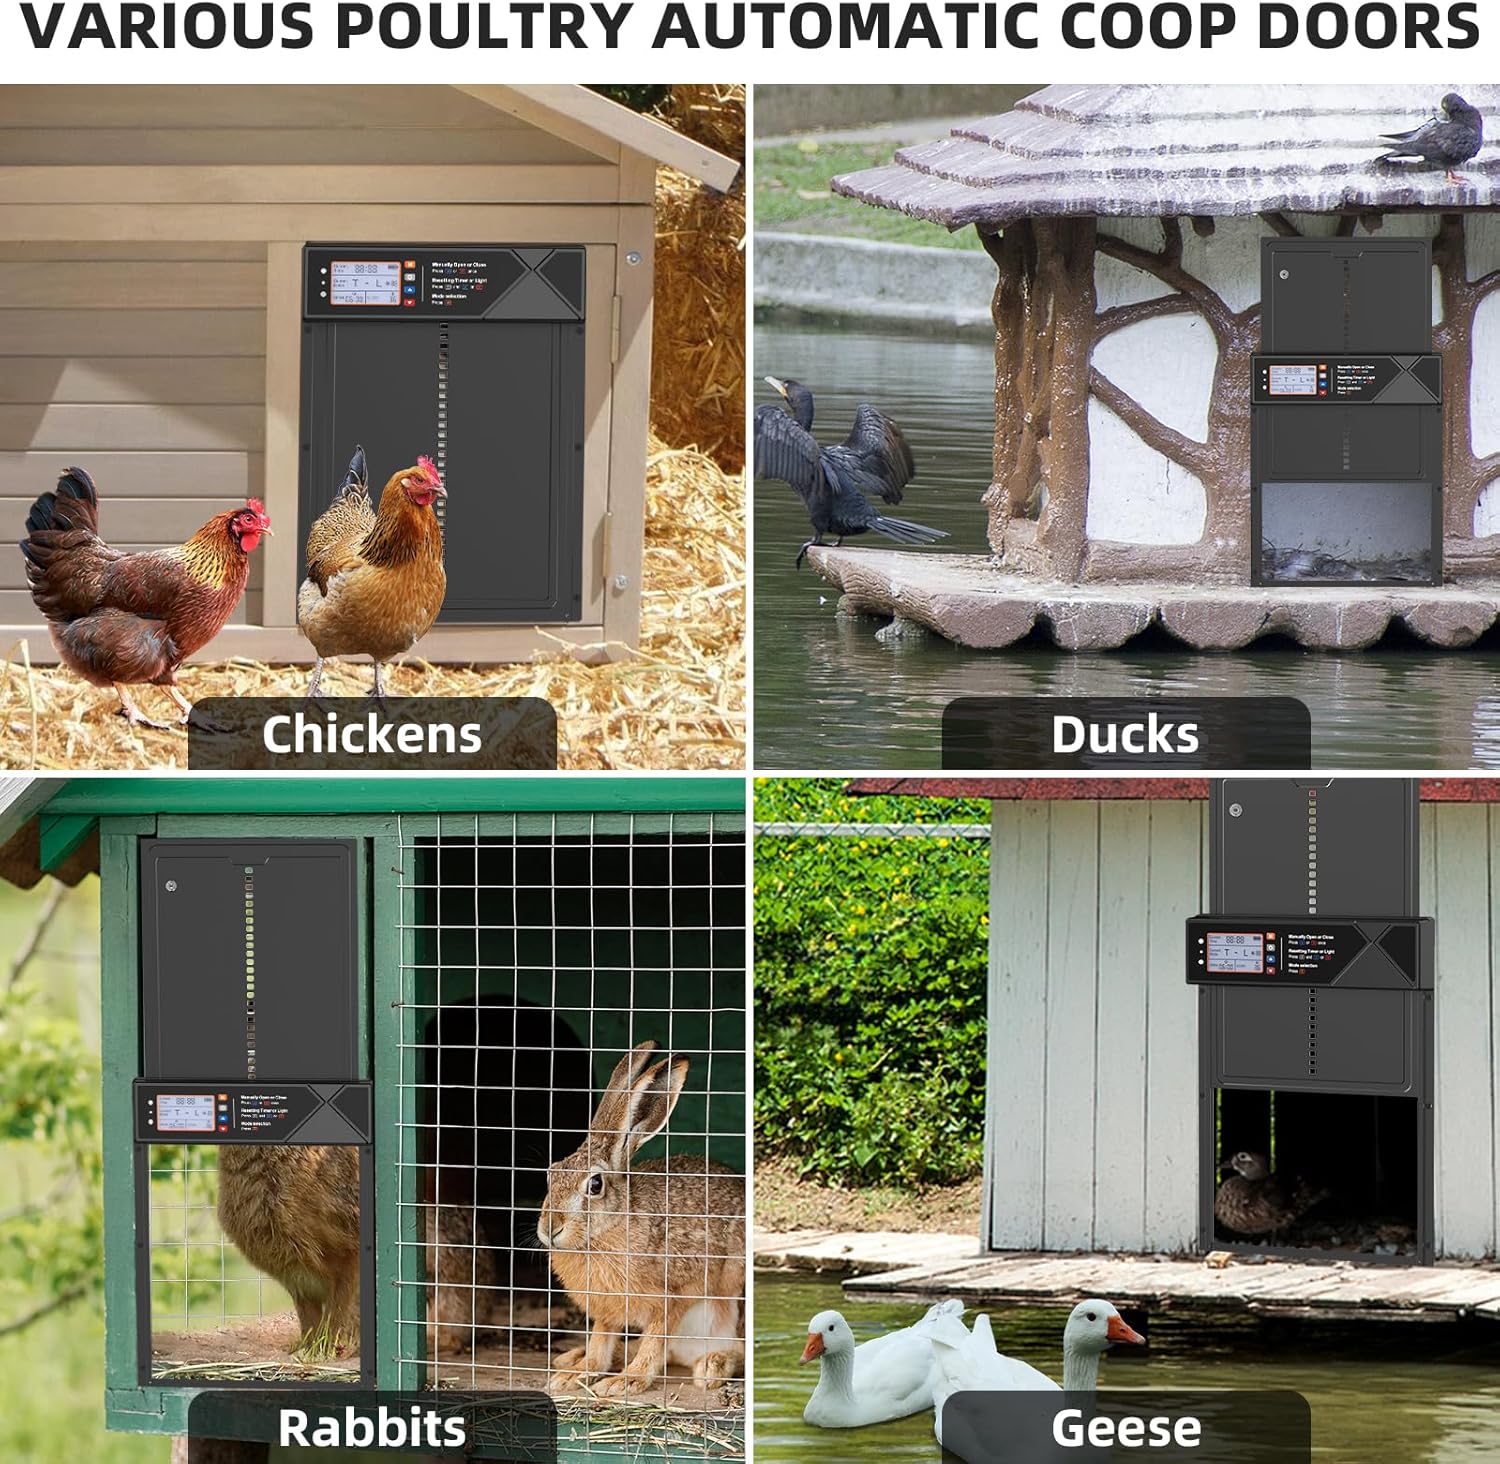
Figure 9.1: Examples of the automatic coop door being used with various types of poultry and small animals.

Figure 9.2: The door installed on a rabbit hutch, demonstrating its suitability for rabbits.

Figure 9.3: The door installed on a duck coop, illustrating its use for ducks.
10. Maintenance
Regular maintenance ensures the optimal performance and longevity of your automatic chicken coop door.
- Cleaning: Periodically wipe down the door unit and solar panel with a damp cloth to remove dirt, dust, and debris. Avoid abrasive cleaners.
- Track Inspection: Ensure the door tracks are clear of any obstructions (e.g., straw, feathers, mud) that could impede smooth operation.
- Battery Check: Monitor the battery indicator on the LCD display. Recharge via solar panel or USB-C cable as needed, especially during prolonged periods of low sunlight.
- Screw Tightness: Occasionally check that all mounting screws are tight to ensure the door remains securely fastened to the coop.
11. Troubleshooting
If you encounter issues with your automatic chicken coop door, refer to the following common problems and solutions:
| Problem | Possible Cause | Solution |
|---|---|---|
| Door not opening/closing automatically. | Incorrect timer settings; insufficient light for sensor; low battery. | Verify timer settings. Check light sensor sensitivity. Recharge battery. Ensure solar panel is clean and exposed to sunlight. |
| Door stops and reverses during closing. | Obstruction in the door path (anti-pinch activated). | Clear any obstructions from the door's path. Check for debris in the tracks. |
| Remote control not working. | Remote battery low; out of range; interference. | Replace remote battery. Ensure you are within 15m range. Reduce potential signal interference. |
| Door movement is sluggish or noisy. | Dirt/debris in tracks; mechanical issue. | Clean door tracks thoroughly. If problem persists, contact customer support. |
| Battery not charging. | Solar panel dirty/obstructed; faulty USB-C cable/port. | Clean solar panel. Ensure solar panel is in direct sunlight. Try charging with USB-C cable. If still not charging, contact support. |
12. Specifications
| Feature | Detail |
|---|---|
| Model Name | LCD177 |
| Item Model Number | PFS-177 |
| Brand | LFF |
| Product Dimensions | 10.82" L x 1.5" W x 14.25" H |
| Item Weight | 3.08 pounds |
| Material | Aluminum Alloy, ABS Plastic |
| Power Source | Solar Powered / USB-C Rechargeable Battery (2000mAh) |
| Operational Modes | Timer, Light Sensor, Remote Control, Manual |
| Waterproof Rating | IPX45 |
| Operating Temperature | 5°F to 140°F (-15°C to 60°C) |
| Remote Control Range | Up to 15 meters |
| Breed Recommendation | Chicken, duck, goose, and other poultry |
13. Warranty and Support
For warranty information or technical support, please refer to the contact details provided with your purchase or visit the official LFF store on Amazon:
Please have your model number (PFS-177 / LCD177) and purchase date ready when contacting support.


