
AODSK UAED-403TS
AODSK Electric Drum Set UAED-403TS Instruction Manual
Model: UAED-403TS | Brand: AODSK
1. Safety Information
Please read and understand all safety instructions before using your AODSK Electric Drum Set. Keep this manual for future reference. Always ensure proper electrical connections and use only the provided power adapter. Avoid exposing the drum set to extreme temperatures, humidity, or direct sunlight. Do not attempt to disassemble or modify the drum module or any components, as this may void your warranty and pose a safety risk. Keep small parts away from children to prevent choking hazards.
2. What's in the Box
Your AODSK Electric Drum Set package includes the following components:

Image: Overview of all included components for the AODSK Electric Drum Set.
- Electronic drum set frame with 4x8'' drum pads and 3x10" cymbals
- Drum module
- Drum throne
- Drumsticks (2 pairs)
- Headphones
- 2 Switch pedals (Hi-Hat and Kick)
- All necessary cables (power adapter, audio cables)
3. Setup
3.1 Assembly
The AODSK Electric Drum Set features a sturdy metal frame designed for easy assembly and portability. Follow these steps to set up your drum kit:
- Unpack all components and identify each part using the 'What's in the Box' section.
- Assemble the main drum frame by connecting the vertical and horizontal bars. Ensure all clamps are securely tightened. The frame is foldable for convenient storage and transport.
- Attach the 4x8'' drum pads (snare, tom1, tom2, floor tom) and 3x10" cymbals (hi-hat, crash, ride) to the designated mounts on the frame. Adjust their positions and angles for comfortable playing.
- Mount the drum module to the central bar of the frame.
- Connect the drum pads and cymbals to the drum module using the provided audio cables. Ensure each cable is connected to its corresponding input on the module.
- Connect the hi-hat pedal and kick pedal to the module. The upgraded weighted pedal simulates the feel of an acoustic drum pedal.
- Assemble the drum throne and adjust its height for comfortable seating.

Image: The AODSK Electric Drum Set fully assembled, showcasing its compact and foldable design.
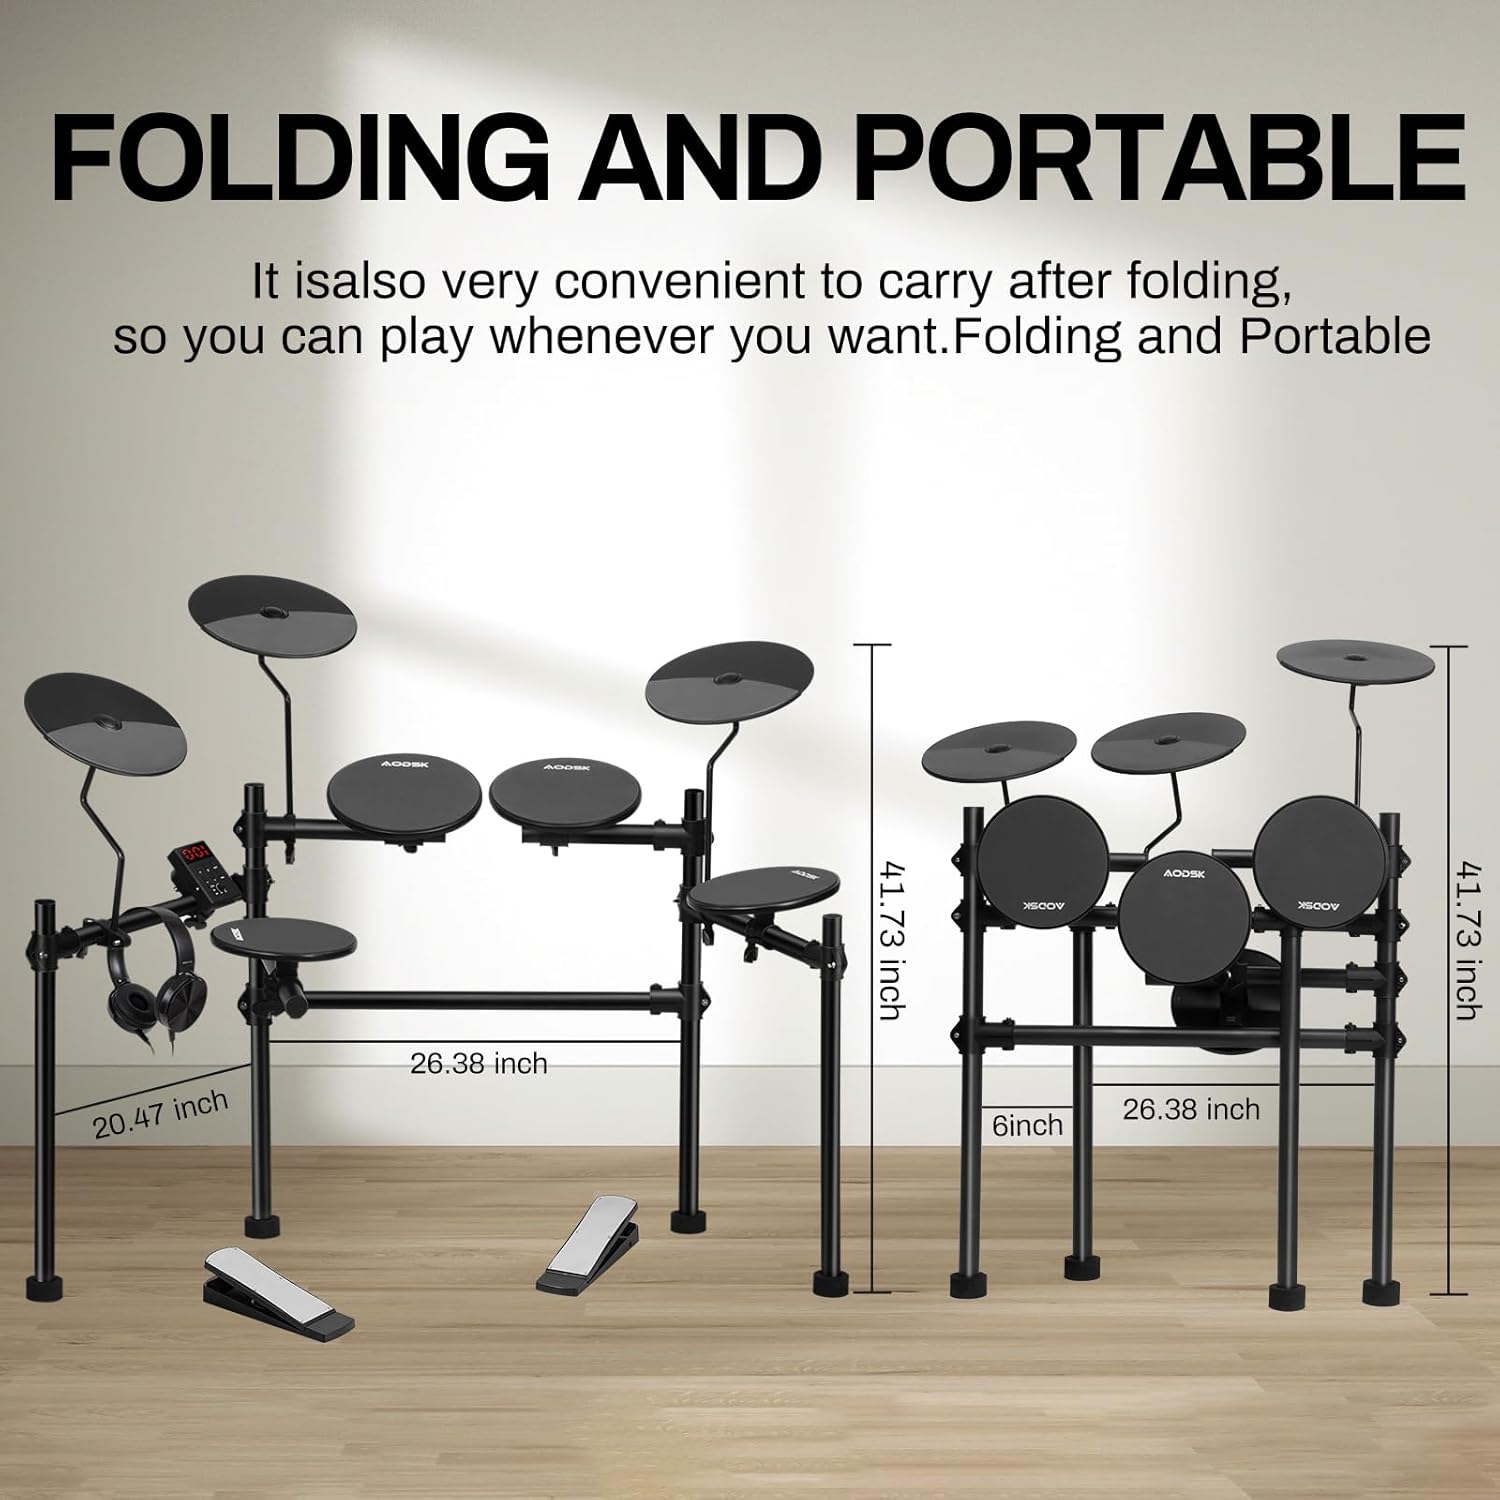
Image: The AODSK Electric Drum Set in its folded, portable configuration, highlighting its space-saving design.
3.2 Connections
After assembling the physical components, connect the necessary cables:
- Power: Connect the DC 9V power adapter to the module and plug it into a power outlet.
- Headphones: Plug the included headphones into the 'PHONES' jack on the module for private practice.
- External Speaker (Optional): Use the 'LINE OUT' jack to connect to an external amplifier or speaker system.
- AUX In: Connect an external audio device (e.g., smartphone, MP3 player) to the 'Aux in' jack to play along with your favorite music.
- USB MIDI: Use the 'USB' port to connect the module to a computer for MIDI recording or software control.
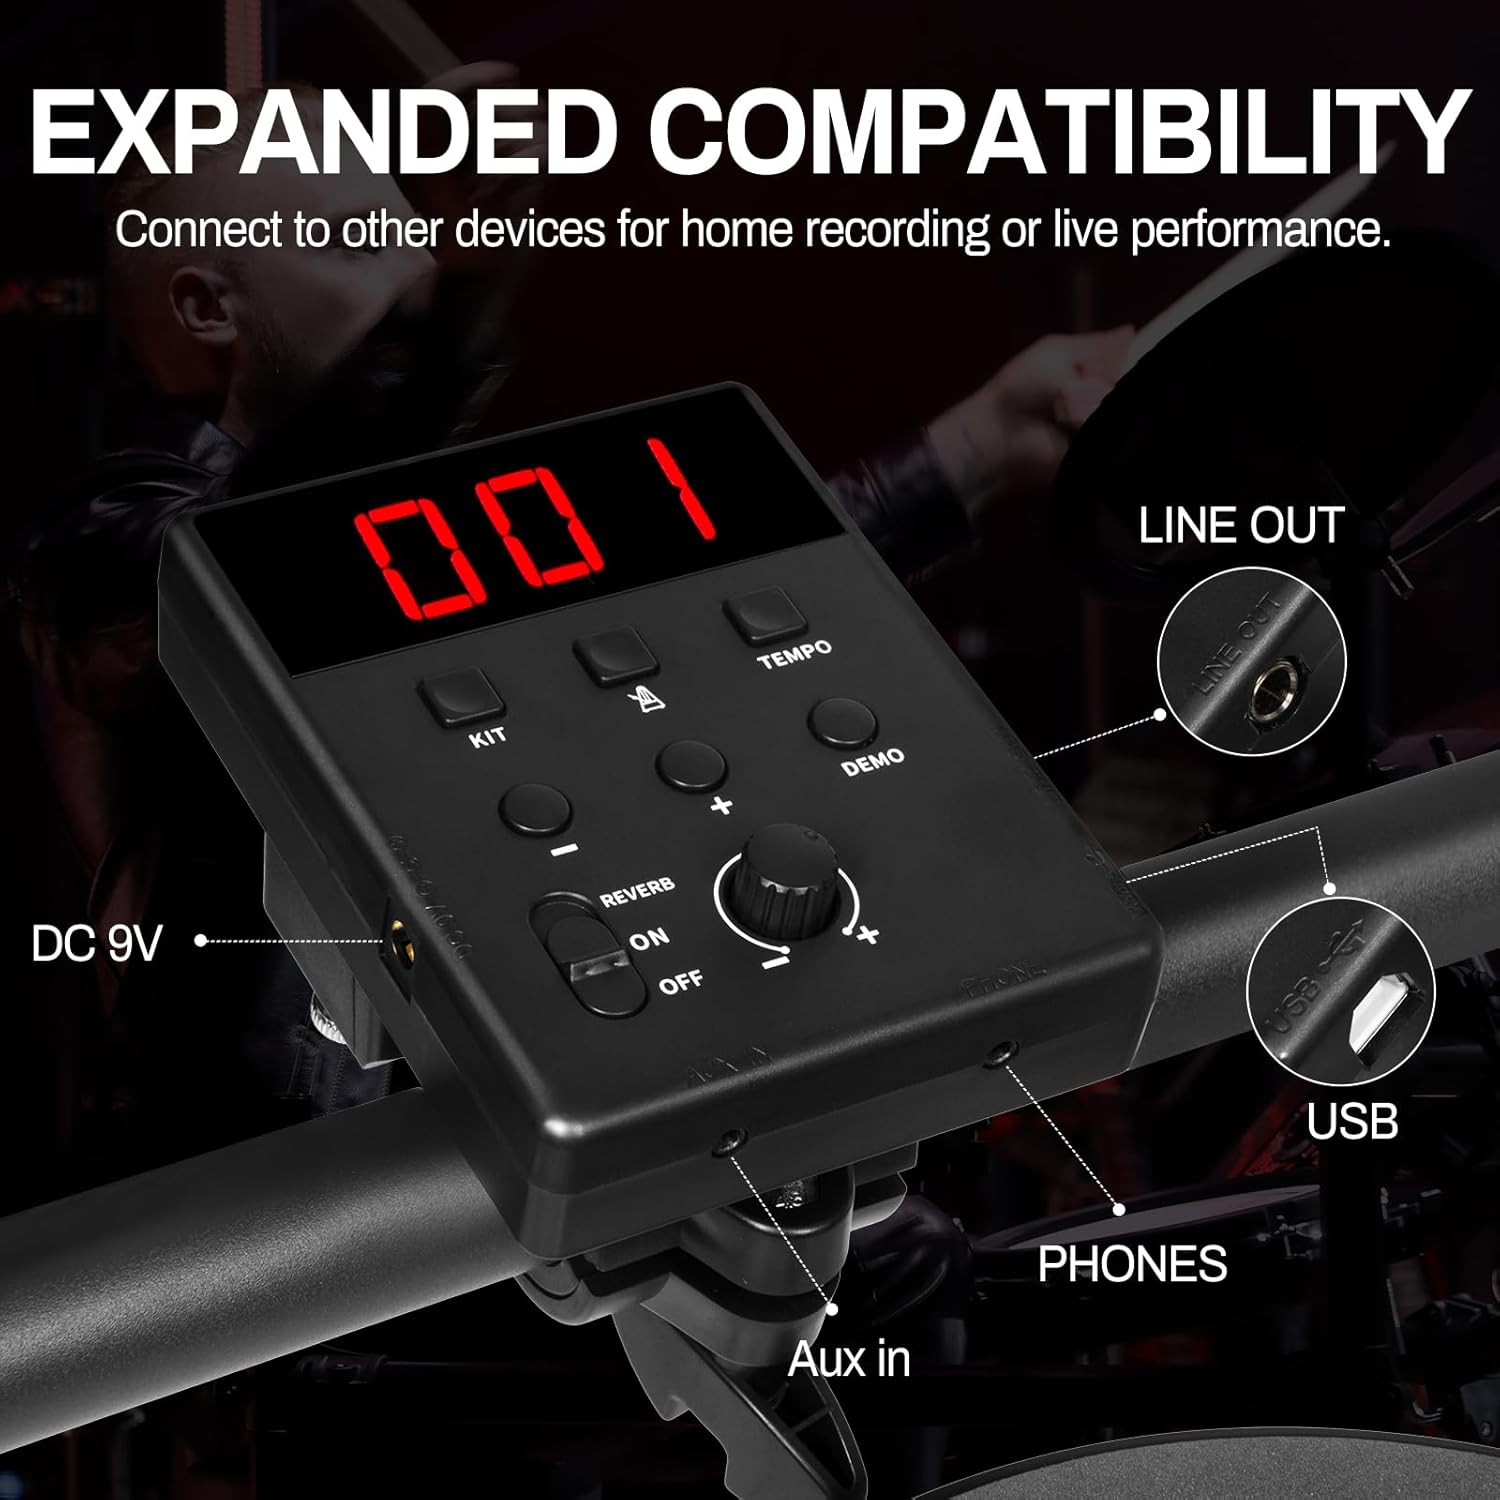
Image: Detailed view of the drum module's connectivity options, including power, audio input/output, and USB.
Video: AODSK Electric Drum Set 403T - This video provides a visual overview of the drum set's components and basic setup, demonstrating its compact design and connectivity.
Video: Aodsk Electric Drum Set Unboxing and Assembly Tutorial - This tutorial guides users through the unboxing process and step-by-step assembly of the AODSK electric drum set.
4. Operating Instructions
4.1 Drum Module Overview
The drum module is the central control unit for your AODSK Electric Drum Set. It features an easy-to-read LED display and various buttons for sound selection, tempo control, and other functions.
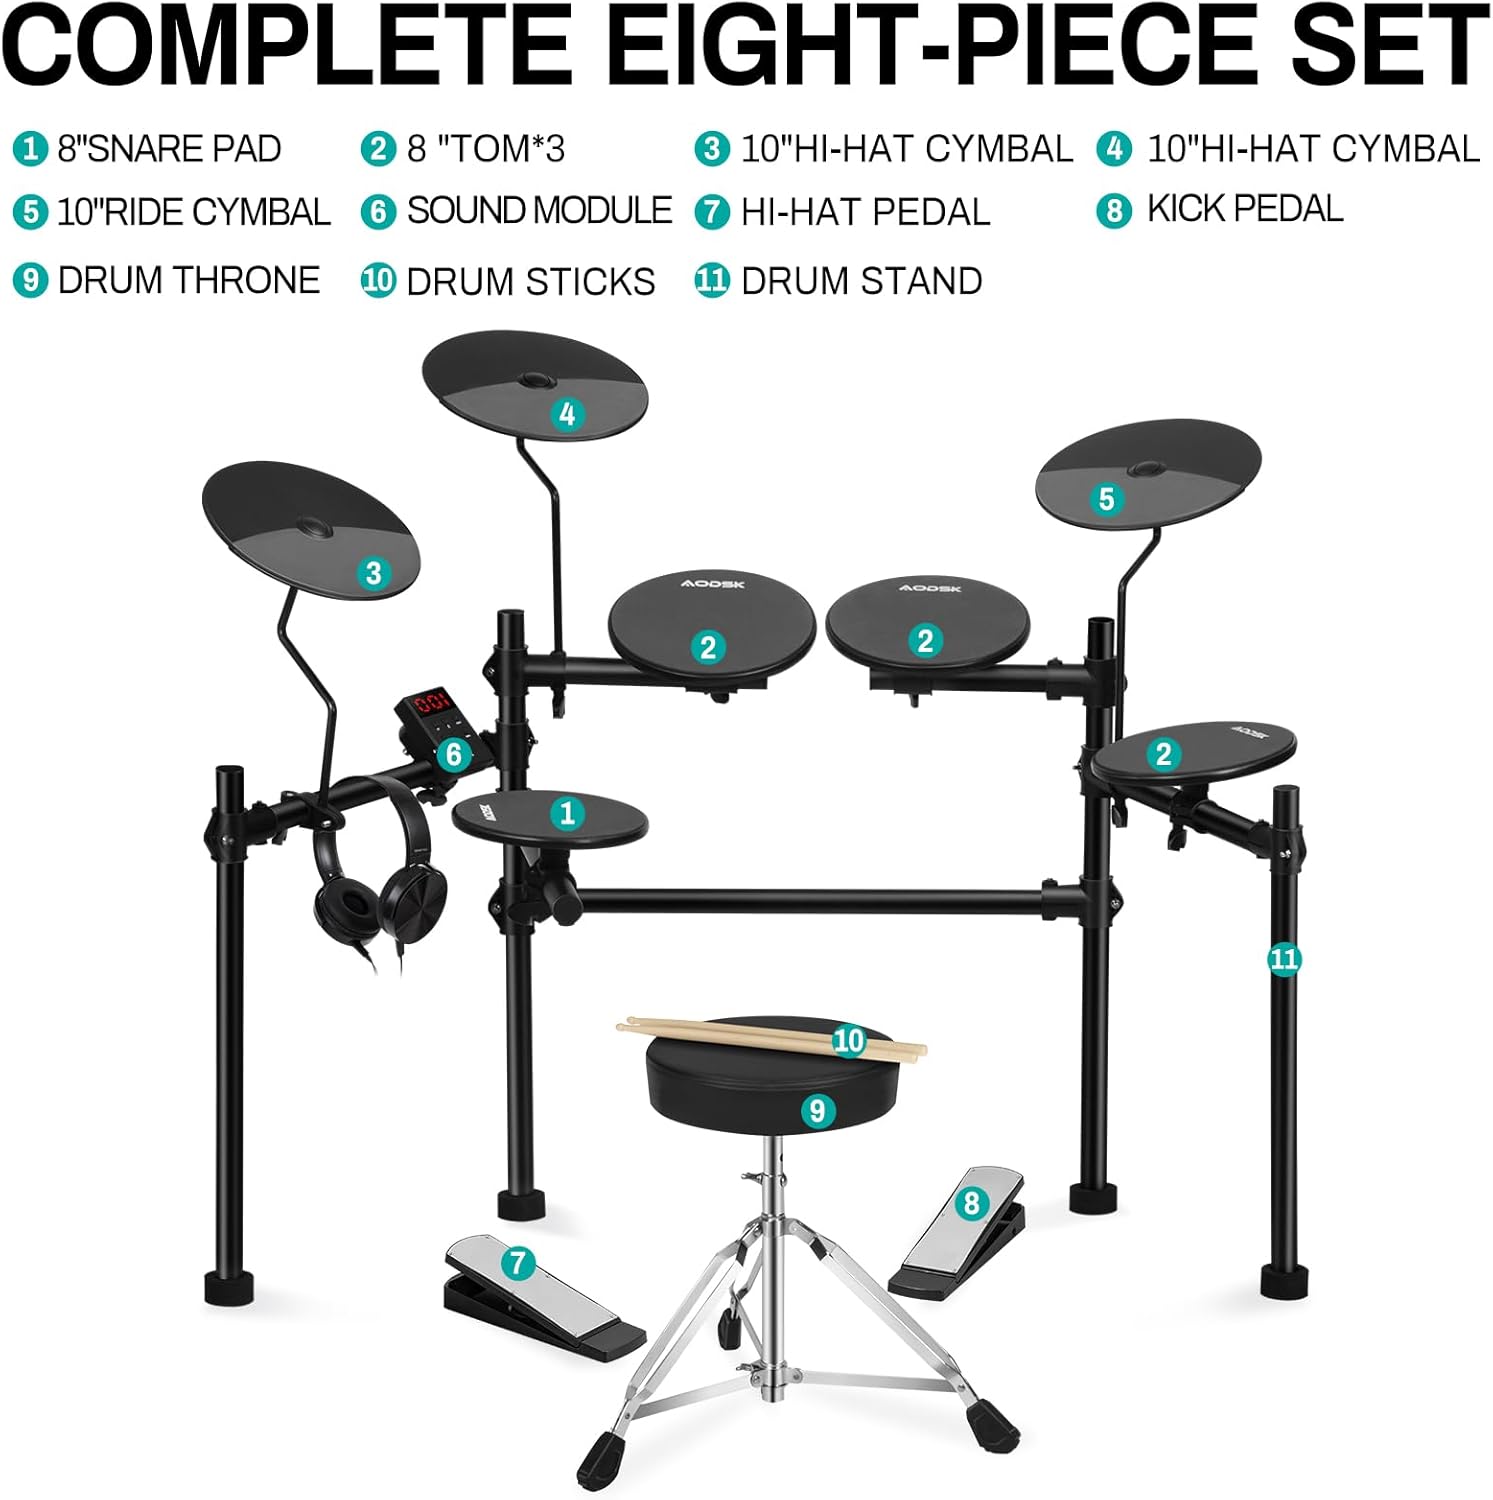
Image: Detailed view of the drum module's interface, highlighting the LED display and control buttons.
- Volume Knob: Adjusts the overall output volume.
- KIT Button: Cycles through 20 preset drum kits.
- VOICE Button: Allows selection of individual drum sounds (200 available).
- SONG Button: Selects from 20 built-in demo songs.
- TEMPO Button: Adjusts the metronome tempo.
- CLICK Button: Activates/deactivates the metronome.
- REC/SAVE Button: Initiates recording and saves custom settings.
- REVERB ON/OFF: Toggles reverb effect.
- MENU Button: Accesses additional settings and parameters.
4.2 Sound Selection and Customization
Your drum module comes with an extensive sound system:
- Drum Kits: Choose from 20 pre-configured drum kits by pressing the 'KIT' button and using the +/- buttons. These kits offer a variety of styles, from acoustic to electronic.
- Individual Sounds: Customize your kit by selecting individual sounds for each pad. Press the 'VOICE' button, strike the desired pad, and then use the +/- buttons to browse through 200 available sounds.
- Demo Songs: Practice along with 20 diverse demo songs. Press the 'SONG' button and use +/- to select a track.
4.3 Metronome and Coaching
Improve your timing and rhythm with the built-in metronome:
- Activate Metronome: Press the 'CLICK' button to start the metronome.
- Adjust Tempo: Use the 'TEMPO' button and +/- to set your desired beats per minute (BPM).
- Coaching Mode: The module may include coaching functions to help beginners learn rhythms and improve consistency. Refer to the full manual for detailed instructions on using coaching features.
4.4 Recording and Playback
Capture your performances directly on the module:
- Record: Press the 'REC/SAVE' button once to enter record standby mode. Press it again to start recording.
- Playback: After recording, press the Play/Pause button to listen to your performance.
- Save: Press and hold 'REC/SAVE' to save your recorded track or custom kit settings.
5. Maintenance
Proper maintenance ensures the longevity and optimal performance of your AODSK Electric Drum Set:
- Cleaning: Use a soft, dry cloth to wipe down the drum pads, cymbals, module, and frame. Avoid abrasive cleaners or solvents.
- Cable Management: Keep all cables neatly organized and secured to prevent tangling or damage. Avoid sharp bends or excessive pulling.
- Storage: When not in use, fold the drum set to save space and store it in a dry, dust-free environment.
- Pad Care: The high-density rebound sponge drumheads are durable, but avoid excessive force or sharp objects that could damage the mesh.
6. Troubleshooting
If you encounter any issues with your drum set, refer to the following common problems and solutions:
- No Sound:
- Check if the power adapter is securely connected and the module is turned on.
- Ensure headphones or external speakers are properly connected and their volume is turned up.
- Verify that the module's master volume is not set to zero.
- Pad Not Responding:
- Check the cable connection for the specific pad to the module.
- Ensure the pad is not damaged.
- Pedal Issues:
- Verify that the pedal cables are correctly plugged into the module.
- Ensure the pedals are placed on a stable surface to prevent sliding during use.
- Distorted Sound:
- Lower the volume on the module or connected external devices.
- Check for loose cable connections.
7. Specifications
Here are the technical specifications for your AODSK Electric Drum Set UAED-403TS:
| Model Name | UAED-403TS |
| Item Weight | 24 Pounds |
| Product Dimensions | 26 x 20 x 41 inches |
| Body Material | Iron, Plastic, Sponge |
| Finish Type | Powder Coated |
| Color | Black |
| Hand Orientation | Ambidextrous |
| Connector Type | Auxiliary |
8. Warranty and Support
Your AODSK Electric Drum Set comes with a manufacturer's warranty. Please refer to the warranty card included in your package for specific terms and conditions. For technical support, troubleshooting assistance, or warranty claims, please contact AODSK customer service through the retailer where you purchased the product.
Related documentsUAED-403TS


Ask a question about this manual
Ask about setup, troubleshooting, compatibility, parts, safety, or missing instructions. Manuals+ will review the question and use this page’s manual context to help answer it.