Important Safety Information
Please read this manual carefully before installing, operating, or performing maintenance on your MPM 60-IMG-22 hob. Keep this manual for future reference.
- Installation must be performed by a qualified technician in accordance with local regulations.
- Ensure the appliance is properly earthed.
- Do not store flammable materials near the hob.
- Always supervise cooking. Never leave the hob unattended during operation.
- Use only cookware suitable for induction and gas cooking.
- Keep children away from the appliance during operation and cooling.
- Disconnect the appliance from the power supply before cleaning or maintenance.
Setup and Installation
This section provides guidelines for the proper installation of your MPM 60-IMG-22 hob. Installation should only be carried out by a qualified professional.
1. Unpacking
Carefully remove the hob from its packaging. Inspect for any damage during transit. Report any damage to your supplier immediately.
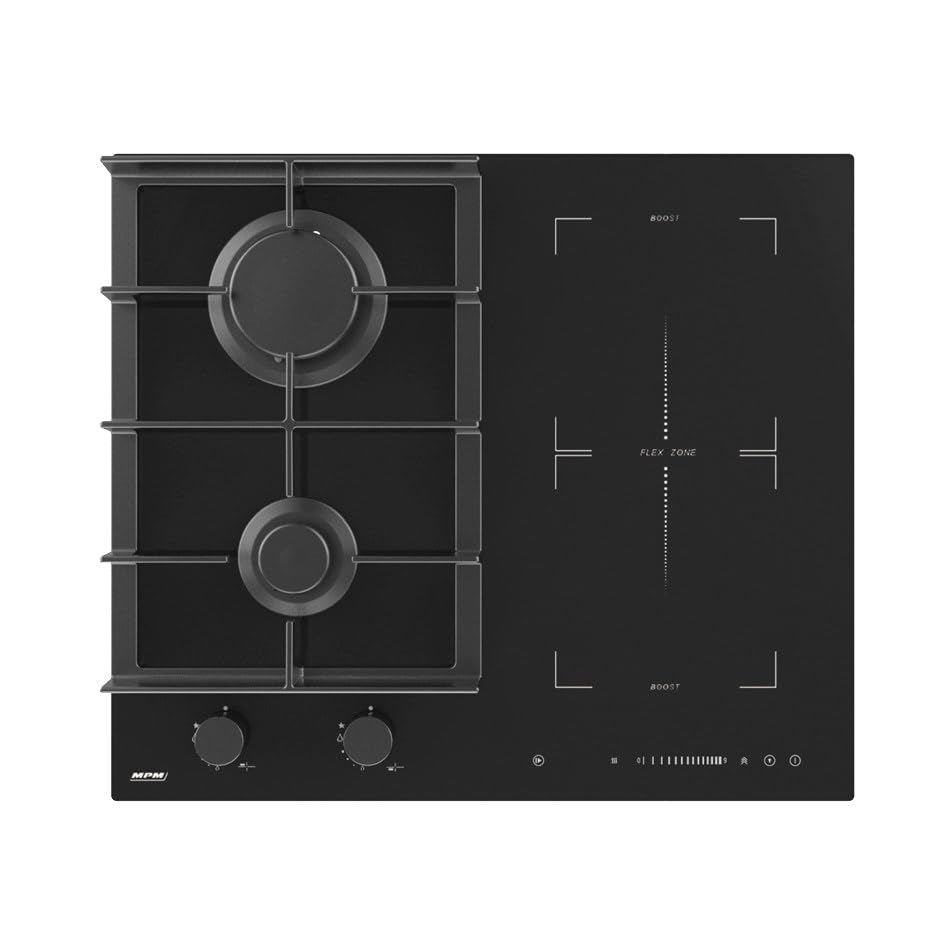
Image: Top view of the MPM 60-IMG-22 Gas and Induction Hob, showing the layout of two gas burners and two induction zones.
2. Electrical Connection
- Ensure the mains voltage matches the rating plate on the appliance.
- The hob must be connected to a dedicated circuit with appropriate overcurrent protection.
- The electrical connection must comply with all local and national wiring regulations.
3. Gas Connection
- The gas connection must be performed by a certified gas fitter.
- Ensure the gas type (natural gas or LPG) matches the appliance's specifications. Conversion kits may be required.
- Check for gas leaks using a soapy water solution after connection.
4. Ventilation Requirements
Adequate ventilation is crucial. Ensure proper air circulation around the appliance and consider installing an extractor hood above the hob.
5. Mounting the Hob
- Prepare the countertop cutout according to the dimensions provided in the installation template (not included in this manual, refer to packaging).
- Apply the sealing strip around the edge of the hob cutout to prevent liquid ingress.
- Lower the hob into the cutout, ensuring it sits flush with the countertop.
- Secure the hob from underneath using the provided mounting clips.
Operating Instructions
1. Control Panel Overview
The MPM 60-IMG-22 features a touch-sensitive slider control for induction zones and rotary knobs for gas burners.

Image: Detailed view of the control panel, highlighting the slider controls for induction and the gas burner knobs.
2. Using the Gas Burners
- Ignition: Push and turn the desired gas knob counter-clockwise to the maximum flame position. Hold for a few seconds until the flame ignites.
- Flame Adjustment: Once ignited, adjust the flame size by turning the knob between the maximum and minimum flame settings.
- Pan Placement: Use pots and pans with a diameter appropriate for the burner size to ensure efficient heating and prevent heat loss.
- Shutting Off: Turn the knob clockwise to the "OFF" position.
3. Using the Induction Zones
- Power On: Place suitable induction cookware on the desired cooking zone. Touch the power button for the zone.
- Power Level Adjustment: Use the slider control to select the desired power level (1-9).
- Booster Function: For rapid heating, select the booster function (P) on applicable zones. This provides maximum power for a limited time.
- Flex Zone: The Flex Zone allows combining two induction zones to accommodate larger cookware. Activate by touching the Flex Zone button and then setting the power level.
- Timer Function: Set a cooking timer for individual zones. The zone will switch off automatically when the time expires.
- Pause Function: Temporarily pause cooking on all active induction zones. Touch the pause button to resume.
- Shutting Off: Touch the power button for the zone again, or slide the control to '0'. The residual heat indicator (H) will remain until the surface is cool.
Care and Maintenance
Regular cleaning and maintenance will ensure the longevity and optimal performance of your hob.
1. General Cleaning
- Always ensure the hob is cool and disconnected from the power supply before cleaning.
- Use a soft cloth and mild detergent. Avoid abrasive cleaners, scouring pads, or harsh chemicals.
- Wipe spills immediately, especially sugary liquids, to prevent permanent staining.
2. Cleaning the Glass Surface
For the glass-ceramic surface, use a specialized hob cleaner. For stubborn marks, a hob scraper can be used carefully at an angle.

Image: Demonstrating the cleaning process for the hob's glass surface.
3. Cleaning Gas Burner Components
- Remove the cast iron pan supports and burner caps/crowns when cool.
- Wash these components in warm soapy water. Dry thoroughly before reassembling.
- Ensure burner ports are clear of food debris. Use a small brush if necessary.
Troubleshooting
Before contacting customer service, please refer to the following table for common issues and their solutions.
| Problem | Possible Cause | Solution |
|---|---|---|
| Gas burner does not ignite. | No gas supply; burner components wet or blocked; ignition electrode dirty. | Check gas supply; ensure components are dry and clean; clean ignition electrode. |
| Induction zone not heating. | Incorrect cookware; no cookware detected; power level not set. | Use induction-compatible cookware; ensure cookware is centered; set a power level. |
| Hob makes unusual noises. | Normal operating sounds (e.g., fan noise for induction); cookware resonance. | This is usually normal. If sounds are excessive or unusual, contact service. |
| Error code displayed. | Specific fault detected by the system. | Refer to the full error code list in the comprehensive manual (if available) or contact customer support with the specific code. |
Technical Specifications
- Brand: MPM
- Model Number: MPM-60-IMG-22
- Type of Burner: Induction and Gas (Hybrid)
- Material: Glass-ceramic surface, Cast Iron grates
- Special Features: Two induction cooking zones, Flex Zone, Two gas burners (different diameters), Sensor sliders for induction control.
- Color: Black
- ASIN: B0FCQKTRWL
Warranty and Support
MPM offers a 10-year repairability commitment for most of its products, including the MPM 60-IMG-22 hob.
For warranty claims, technical assistance, or to purchase spare parts, please contact MPM customer support. Keep your proof of purchase handy.
For more information, visit the official MPM store on Amazon: MPM Store


